PyTorch基础(18)-- torch.stack()方法
一、方法详解
首先,看一下stack的直观解释,动词可以简单理解为:把……放成一堆、把……放成一摞。
有了对stack方法的直观感受,接下来,我们正式解析torch.stack方法。
PyTorch torch.stack() method joins (concatenates) a sequence of tensors (two or more tensors) along a new dimension. It inserts new dimension and concatenates the tensors along that dimension. This method joins the tensors with the same dimensions and shape. We could also use torch.cat() to join tensors But here we discuss the torch.stack() method.
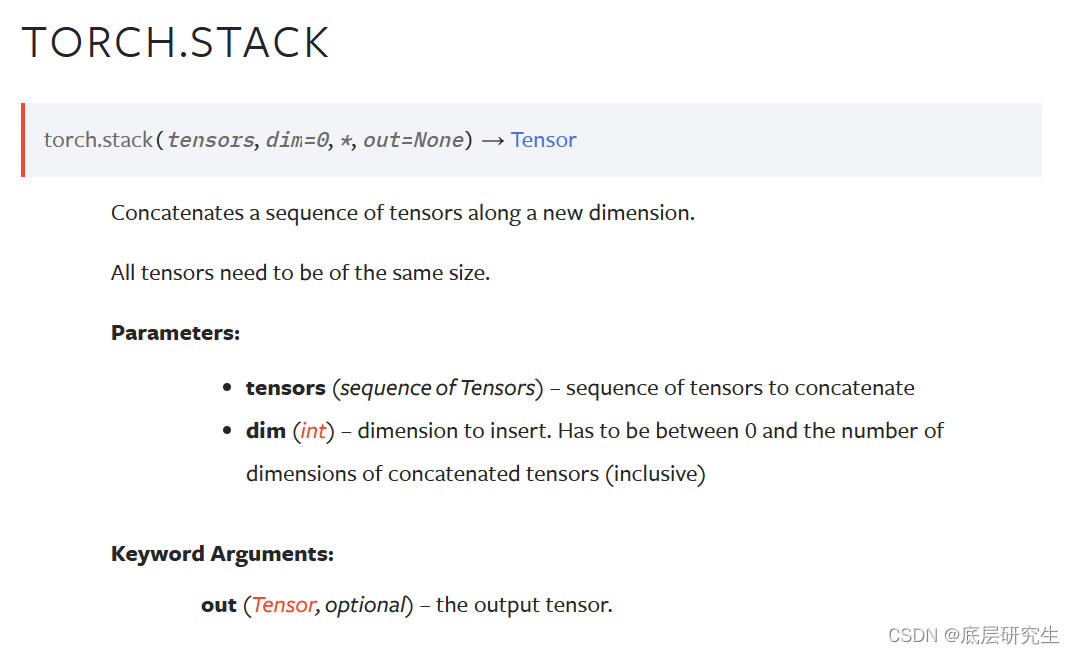
torch.stack方法用于沿着一个新的维度 join(也可称为cat)一系列的张量(可以是2个张量或者是更多),它会插入一个新的维度,并让张量按照这个新的维度进行张量的cat操作。值得注意的是:张量序列中的张量必须要有相同的shape和dimension。
Parameters
tensors:张量序列,也就是要进行stack操作的对象们,可以有很多个张量。
dim:按照dim的方式对这些张量进行stack操作,也就是你要按照哪种堆叠方式对张量进行堆叠。dim的取值范围为闭区间[0,输入Tensor的维数]
return
堆叠后的张量
只通过理论对方法进行解释说明是不够直观的,下面会通过大量的示例对torch.stack方法进行解析!
二、案例解析
2.1 案例1:2个一维tensor进行stack操作
- 程序
 x = t.tensor([1,2,3,4])
 y = t.tensor([5,6,7,8])

 print(x.shape)
 print(y.shape)

 z1 = t.stack((x,y), dim=0)
 print(z1)
 print(z1.shape)

 z2 = t.stack((x,y), dim=1)
 print(z2)
 print(z2.shape)
- 运行结果
torch.Size([4])
torch.Size([4])

tensor([[1, 2, 3, 4],
        [5, 6, 7, 8]])
torch.Size([2, 4])

tensor([[1, 5],
        [2, 6],
        [3, 7],
        [4, 8]])
torch.Size([4, 2])
- 图解

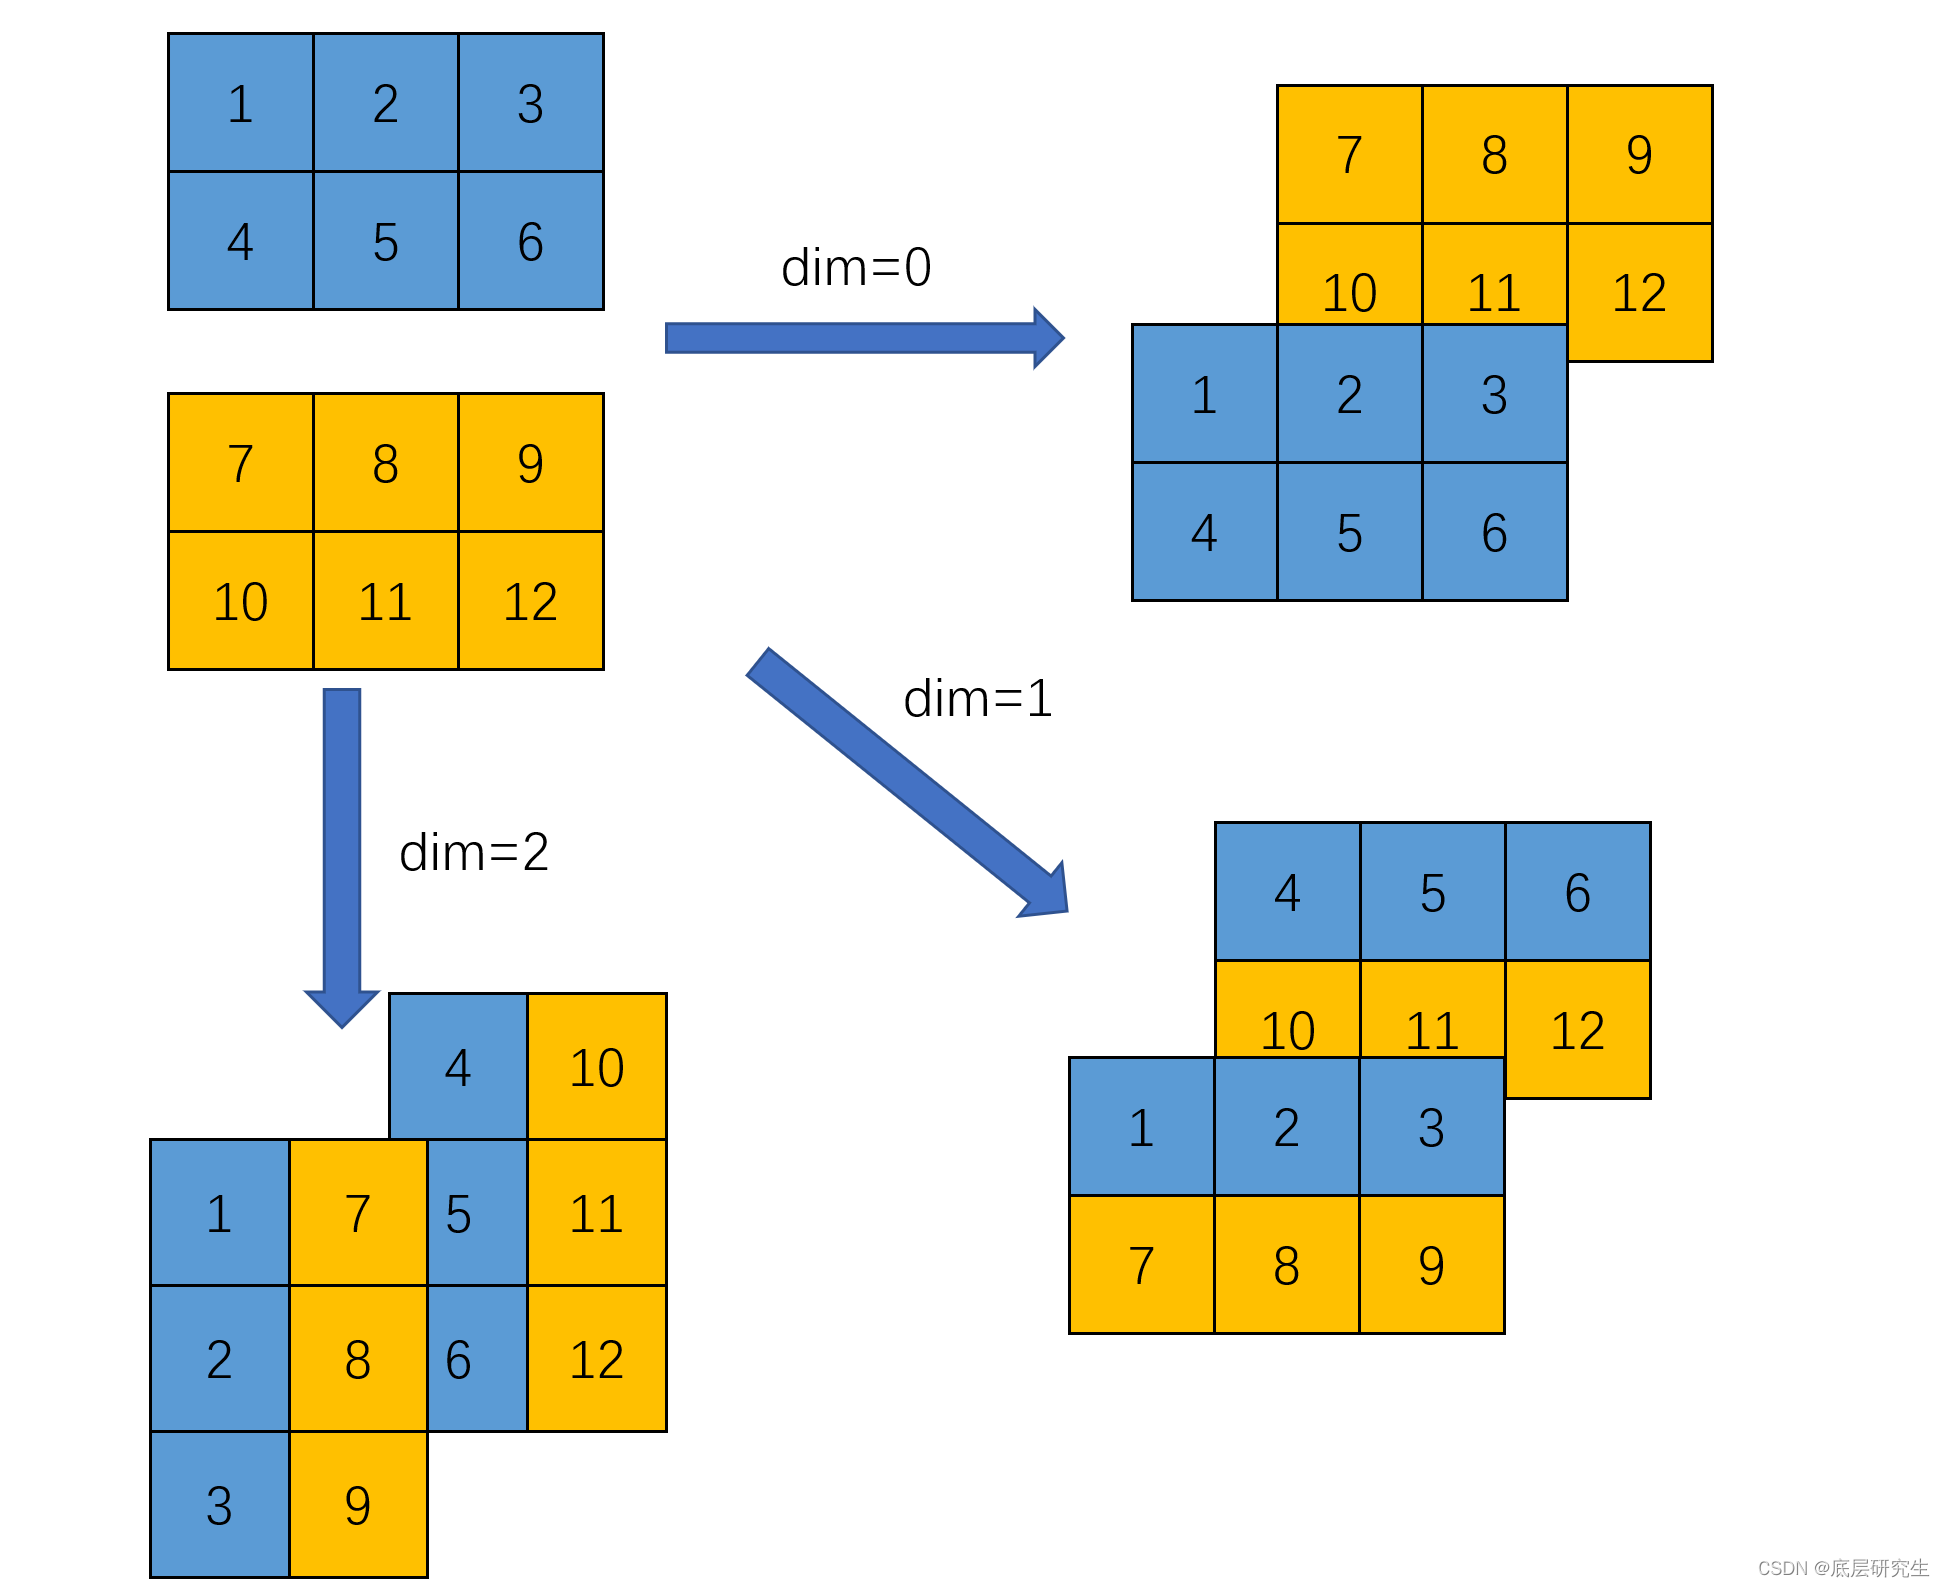
2.2 案例2:2个二维tensor进行stack操作
- 程序
 x = t.tensor([[1,2,3],[4,5,6]])
 y = t.tensor([[7,8,9],[10,11,12]])
 print(x.shape)
 print(y.shape)

 z1 = t.stack((x,y), dim=0)
 print(z1)
 print(z1.shape)

 z2 = t.stack((x,y), dim=1)
 print(z2)
 print(z2.shape)

 z3 = t.stack((x,y), dim=2)
 print(z3)
 print(z3.shape)
- 运行结果
torch.Size([2, 3])
torch.Size([2, 3])

tensor([[[ 1,  2,  3],
         [ 4,  5,  6]],

        [[ 7,  8,  9],
         [10, 11, 12]]])
torch.Size([2, 2, 3])

tensor([[[ 1,  2,  3],
         [ 7,  8,  9]],

        [[ 4,  5,  6],
         [10, 11, 12]]])
torch.Size([2, 2, 3])

tensor([[[ 1,  7],
         [ 2,  8],
         [ 3,  9]],

        [[ 4, 10],
         [ 5, 11],
         [ 6, 12]]])
torch.Size([2, 3, 2])
- 图解
2.3 案例3:多个二维tensor进行stack操作
- 程序
x = torch.tensor([[1,2,3],[4,5,6]])
y = torch.tensor([[7,8,9],[10,11,12]])
z = torch.tensor([[13,14,15],[16,17,18]])
print(x.shape)
print(y.shape)
print(z.shape)

r1 = torch.stack((x,y,z),dim=0)
print(r1)
print(r1.shape)

r2 = torch.stack((x,y,z),dim=1)
print(r2)
print(r2.shape)

r3 = torch.stack((x,y,z),dim=2)
print(r3)
print(r3.shape)
- 运行结果
torch.Size([2, 3])
torch.Size([2, 3])
torch.Size([2, 3])

tensor([[[ 1,  2,  3],
         [ 4,  5,  6]],

        [[ 7,  8,  9],
         [10, 11, 12]],

        [[13, 14, 15],
         [16, 17, 18]]])
torch.Size([3, 2, 3])

tensor([[[ 1,  2,  3],
         [ 7,  8,  9],
         [13, 14, 15]],

        [[ 4,  5,  6],
         [10, 11, 12],
         [16, 17, 18]]])
torch.Size([2, 3, 3])

tensor([[[ 1,  7, 13],
         [ 2,  8, 14],
         [ 3,  9, 15]],

        [[ 4, 10, 16],
         [ 5, 11, 17],
         [ 6, 12, 18]]])
torch.Size([2, 3, 3])
- 图解
2.4 案例4:2个三维tensor进行stack操作
- 程序
x = torch.tensor([[[1,2,3],[4,5,6]],
                  [[2,3,4],[5,6,7]]])
y = torch.tensor([[[7,8,9],[10,11,12]],
                  [[8,9,10],[11,12,13]]])
print(x.shape)
print(y.shape)
z1 = torch.stack((x,y),dim=0)
print(z1)
print(z1.shape)
z2 = torch.stack((x,y),dim=1)
print(z2)
print(z2.shape)
z3 = torch.stack((x,y),dim=2)
print(z3)
print(z3.shape)
z4 = torch.stack((x,y),dim=3)
print(z4)
print(z4.shape)
- 运行结果
torch.Size([2, 2, 3])
torch.Size([2, 2, 3])

tensor([[[[ 1,  2,  3],
          [ 4,  5,  6]],

         [[ 2,  3,  4],
          [ 5,  6,  7]]],


        [[[ 7,  8,  9],
          [10, 11, 12]],

         [[ 8,  9, 10],
          [11, 12, 13]]]])
torch.Size([2, 2, 2, 3])

tensor([[[[ 1,  2,  3],
          [ 4,  5,  6]],

         [[ 7,  8,  9],
          [10, 11, 12]]],


        [[[ 2,  3,  4],
          [ 5,  6,  7]],

         [[ 8,  9, 10],
          [11, 12, 13]]]])
torch.Size([2, 2, 2, 3])

tensor([[[[ 1,  2,  3],
          [ 7,  8,  9]],

         [[ 4,  5,  6],
          [10, 11, 12]]],


        [[[ 2,  3,  4],
          [ 8,  9, 10]],

         [[ 5,  6,  7],
          [11, 12, 13]]]])
torch.Size([2, 2, 2, 3])

tensor([[[[ 1,  7],
          [ 2,  8],
          [ 3,  9]],

         [[ 4, 10],
          [ 5, 11],
          [ 6, 12]]],


        [[[ 2,  8],
          [ 3,  9],
          [ 4, 10]],

         [[ 5, 11],
          [ 6, 12],
          [ 7, 13]]]])
torch.Size([2, 2, 3, 2])
- 图解
参考文献
[1]https://blog.csdn.net/flyingluohaipeng/article/details/125034358
[2]https://www.geeksforgeeks.org/python-pytorch-stack-method/
[3]https://www.bing.com/search?q=torch.stack&form=ANNTH1&refig=653766bda2d540398dfb83d482cd33cd