redis学习(三)——java整合redis
Jedis
Jedis可以用于java连接redis数据库
新建一个maven项目,导入Jedis依赖
<dependency>
    <groupId>org.junit.jupiter</groupId>
    <artifactId>junit-jupiter</artifactId>
    <version>RELEASE</version>
    <scope>test</scope>
</dependency>
public class RedisTest {

    private Jedis jedis;
    @BeforeEach
    void setUp() {
        // 建立连接
        jedis = new Jedis("192.168.211.132", 6379);
        // 设置密码
        //jedis.auth("123456");
        // 选择库
        jedis.select(0);
    }

    @Test
    void testString() {
        // 插入数据,方法名称就是redis命令名称,非常简单
        String result = jedis.set("name", "李四");
        System.out.println("result = " + result);
        // 获取数据
        String name = jedis.get("name");
        System.out.println("name = " + name);
    }

    @AfterEach
    void tearDown() {
        // 释放资源
        if (jedis != null) {
            jedis.close();
        }
    }
}
运行结果:

如果运行报Failed to resolve org.junit.platform:junit-platform-launcher:1.8.2可能是由于IDEA版本的问题,可以试一下添加以下依赖
<!--        Failed to resolve org.junit.platform:junit-platform-launcher:1.8.2-->
<dependency>
    <groupId>org.junit.platform</groupId>
    <artifactId>junit-platform-launcher</artifactId>
    <scope>test</scope>
</dependency>
Jedis连接池
Jedis本身是线程不安全的,并且频繁的创建和销毁连接会有性能损耗,推荐使用Jedis连接池
public class JedisConnectionFactory {
    private static final JedisPool jedisPool;

    static {
        JedisPoolConfig jedisPoolConfig = new JedisPoolConfig();
        // 最大连接
        jedisPoolConfig.setMaxTotal(8);
        // 最大空闲连接
        jedisPoolConfig.setMaxIdle(8);
        // 最小空闲连接
        jedisPoolConfig.setMinIdle(0);
        // 设置最长等待时间, ms
        jedisPoolConfig.setMaxWaitMillis(200);
        jedisPool = new JedisPool(jedisPoolConfig, "192.168.211.132", 6379, 1000);
    }

    // 获取Jedis对象
    public static Jedis getJedis() {
        return jedisPool.getResource();
    }
}
springboot整合redis
首先新建一个springboot项目
导入依赖,这里我后面会用到lombok和test测试,一并导入
       <dependency>
            <groupId>org.springframework.boot</groupId>
            <artifactId>spring-boot-starter</artifactId>
        </dependency>

        <dependency>
            <groupId>org.springframework.boot</groupId>
            <artifactId>spring-boot-starter-test</artifactId>
            <version>2.7.5</version>
        </dependency>
<!--        redis依赖-->
        <dependency>
            <groupId>org.springframework.boot</groupId>
            <artifactId>spring-boot-starter-data-redis</artifactId>
            <version>2.7.5</version>
        </dependency>
<!--        连接池依赖-->
        <dependency>
            <groupId>org.apache.commons</groupId>
            <artifactId>commons-pool2</artifactId>
        </dependency>
        <dependency>
            <groupId>org.projectlombok</groupId>
            <artifactId>lombok</artifactId>
        </dependency>
application.yml配置文件,配置文件加中文可能会出现问题,如果报错可以去掉中文再试试。
spring:
  redis:
    host:
    00

    # redis数据库地址
    port: 6379  # 端口
    lettuce:
      pool:
        max-active: 8 # 最大连接
        max-idle: 8 # 最大空闲连接
        min-idle: 0 # 最小空闲连接
        max-wait: 100 # 连接等待时间
    database: 1  # 使用的数据库
redisTemplate使用
新建一个springbootTest类,然后注入redisTemplate,之后就可以使用redisTemplate对redis数据库进行操作了。其中opsForValue()表示对String类型的数据进行操作,如果想对Hash进行操作,使用opsForHash()即可,其余同理。
@SpringBootTest
class DemoApplicationTests {

    @Autowired
    private RedisTemplate redisTemplate;
     /**
     * 在未添加redisConfig类之前,redisTemplate插入redis数据库会有其他序列化前缀,
     */
    @Test
    void testString() {
        Object name = redisTemplate.opsForValue().get("zhangsan");
        redisTemplate.opsForValue().set("aaa", "测试");

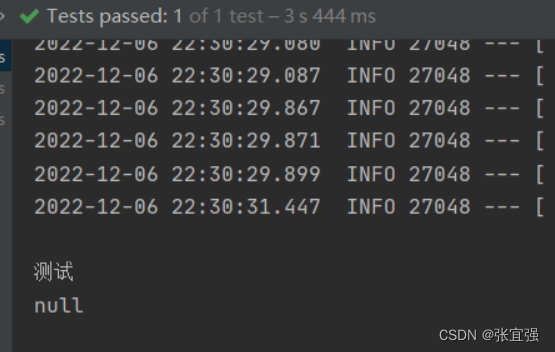
        System.out.println(redisTemplate.opsForValue().get("aaa"));
        System.out.println(name);
    }
}
可以看到输出结果,如果使用redisTemplate插入redis1的数据就可以查找到,但是原来就有的数据查不到

再进redis数据库里面查看可以发现插入数据库中的键和值并不和想象中的一样。这是因为redisTemplate会将Object进行序列化

自定义RedisTemplate序列化
我们可以自定义redisTemplate的序列化方式
新建一个redisConfig类,key和value都采用String序列化方式
@Configuration
public class RedisConfig {

    @Bean
    public RedisTemplate<String, Object> redisTemplate(RedisConnectionFactory redisConnectionFactory)
            throws UnknownHostException {
        // 创建Template
        RedisTemplate<String, Object> redisTemplate = new RedisTemplate<>();
        // 设置连接工厂
        redisTemplate.setConnectionFactory(redisConnectionFactory);
        // 设置序列化工具
        GenericJackson2JsonRedisSerializer jsonRedisSerializer = new GenericJackson2JsonRedisSerializer();
        // key和 hashKey采用 string序列化
        redisTemplate.setKeySerializer(RedisSerializer.string());
        redisTemplate.setHashKeySerializer(RedisSerializer.string());
        // value和 hashValue采用 JSON序列化
        redisTemplate.setValueSerializer(jsonRedisSerializer);
        redisTemplate.setHashValueSerializer(jsonRedisSerializer);
        return redisTemplate;
    }
}
这里使用了jackson,需要导入一下依赖
<!--        jackson依赖-->
        <dependency>
            <groupId>com.fasterxml.jackson.core</groupId>
            <artifactId>jackson-databind</artifactId>
        </dependency>
新建一个测试类试一下效果
/**
 * redisTemplate 序列化之后,可以自动将json字符串转化为实体类
 */
@Test
void testStringBean() {
    redisTemplate.opsForValue().set("user:zhangsan", new User("zhangsan", "20", "男"));
    User user = (User)redisTemplate.opsForValue().get("user:zhangsan");
    System.out.println(user);
}
这里由于在序列化的时候还存储了实体类的类型,所以可以使用强转实现类型转换


使用StringRedisTemplate
StringRedisTemplate的key和value为String类型,可以在获取到json之后使用其他工具类或者手动实现序列化
    @Autowired
    private StringRedisTemplate stringRedisTemplate;

    private static final ObjectMapper mapper = new ObjectMapper();
/**
 * 使用stringredisTemplate 获取对象为字符串,可以通过json工具转化为实体类,无法自动转化
 */
@Test
void testStringRedisTemplate() throws Exception{
    System.out.println(stringRedisTemplate.opsForValue().get("lisi"));

    User u = new User("lisi","15", "男");
    stringRedisTemplate.opsForValue().set("user:lisi", mapper.writeValueAsString(u));
    String s = stringRedisTemplate.opsForValue().get("user:lisi");
    System.out.println(s);
    User user = mapper.readValue(s,User.class);
    System.out.println(user);
}

