RHCSA --- Linux存储管理
存储管理
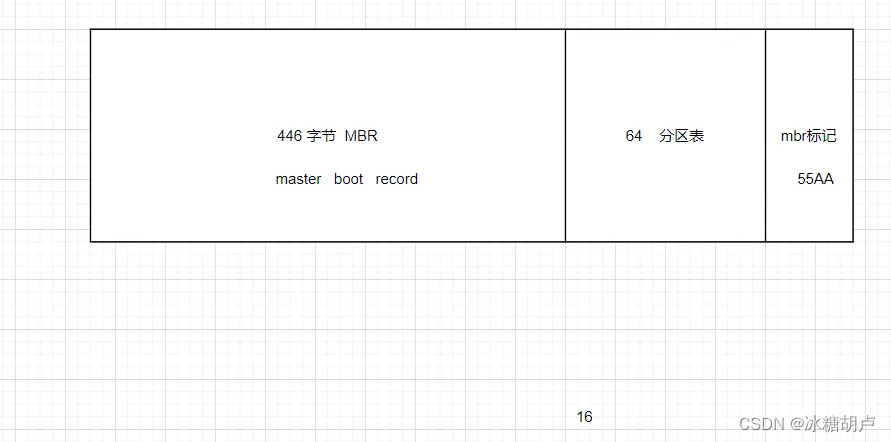
Boot:可引导操作系统的分区(必须是主分区)
分区

ll /dev/nvme0n* 表示的是 nvme接口的磁盘 0n1 1 0n2 2 0n3 3
brw-rw----. 1 root disk 259, 0 Nov 15 19:31 /dev/nvme0n1 磁盘1
brw-rw----. 1 root disk 259, 3 Nov 15 19:31 /dev/nvme0n2 磁盘2
lspci 查看设备上硬件的信息
ll /dev/sd* 表示的是 sata接口的磁盘 sda 1 sdb 2 sdc 3
fdisk -l 列出磁盘设备 scsi(服务器使用) ide sata nvme
fdisk -l | grep dev 显示各磁盘及磁盘分区信息
fdisk -l | grep Disk 显示各磁盘及磁盘分区信息
fdisk -l | grep Disk | grep dev | grep -v mapper 显示磁盘信息
fdisk /dev/磁盘设备名称 管理磁盘 交互式 parted
一级菜单
d 删除一个分区(delete a partition)
l 列出已知分区的类型(list known partition types)
n 添加一个新分区(add a new partition)
p 打印分区表(print the partition table)
t 修改分区类型(change a partition type)
m 打印帮助菜单(print this menu)
w 保存并退出(write table to disk and exit)
q 退出不保存(quit without saving changes)
创建主分区:
Command (m for help): n
Partition type
p(组分区) primary (0 primary, 0 extended, 4 free) 4个组分区
e(扩展分区) extended (container for logical partitions) 从4个组分区中选一个作为扩展分区(分为逻辑分区),分后扩展分区不可用,只可用主分区和逻辑分区
Select (default p): p
Partition number (1-4, default 1):
First sector (2048-41943039, default 2048): 2048之前为元数据空间,之后为数据空间
Last sector, +sectors or +size{K,M,G,T,P} (2048-41943039, default 41943039): +5G 以数字大小做分区
创建扩展分区:
Command (m for help): n
Partition type
p primary (1 primary, 0 extended, 3 free)
e extended (container for logical partitions)
Select (default p): e
Partition number (2-4, default 2):
First sector (10487808-41943039, default 10487808):
Last sector, +sectors or +size{K,M,G,T,P} (10487808-41943039, default 41943039):
Created a new partition 2 of type 'Extended' and of size 15 GiB.
创建逻辑分区:
Command (m for help): n
All space for primary partitions is in use.
Adding logical partition 5
First sector (10489856-41943039, default 10489856):
Last sector, +sectors or +size{K,M,G,T,P} (10489856-41943039, default 41943039):
Created a new partition 5 of type 'Linux' and of size 15 GiB.
格式化
在磁盘分区上创建文件系统的过程,叫格式化
mkfs
mkfs -t xfs /dev/磁盘设备分区的名称
mkfs.xfs /dev/磁盘设备分区的名称 xfs最新的默认的文件系统
ext 系列 ext2/3/4 .....
mkfs.xfs /dev/nvme0n2p1
mkfs.ext4 /dev/nvme0n2p5
挂载
将文件系统中的某个目录和分区建立映射关系的过程
反之为 取消挂载
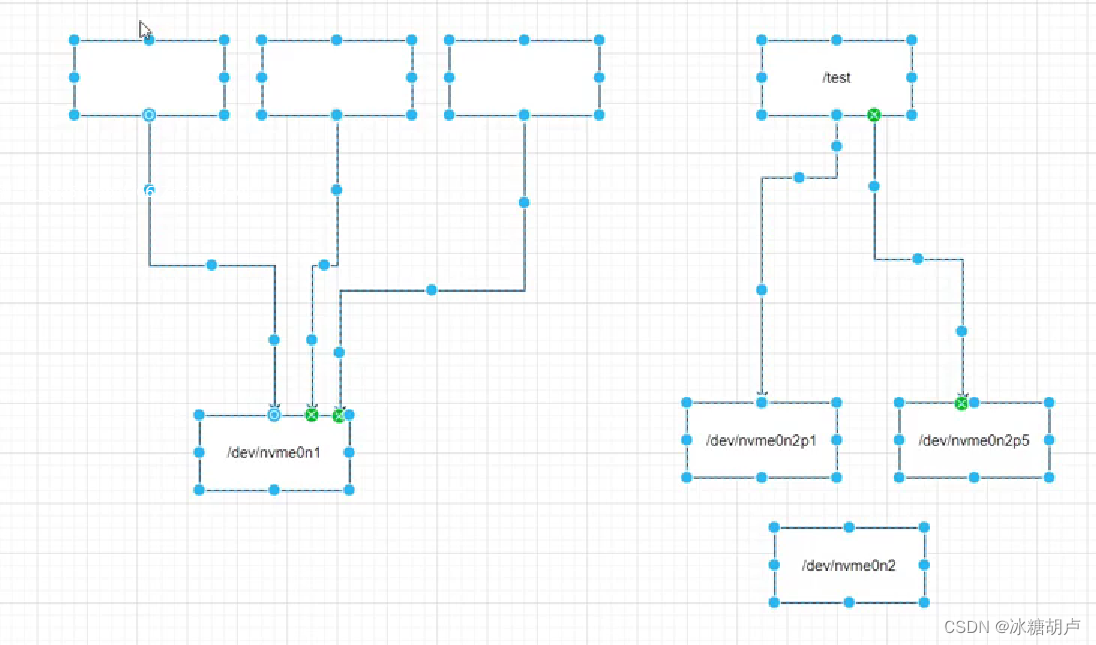
mount /dev/nvme0n2p1 /test /dev/nvme0n2p1 挂载源 /test 挂载点 挂载目标
挂载的分区 挂载的目录
df -h 查看已经挂载的文件系统及设备;
再次挂载后,目录所创文件保留在原挂载分区中
挂载点有内容的文件夹,在挂载后内容消失,卸载后内容重现,也就是说挂载后会将原文件内容掩盖,但并不对其进行其他操作。
umount 挂载源/挂载点 取消挂载
自动挂载
vim /etc/fstab
[root@localhost ~]# ll /etc/fstab
-rw-r--r--. 1 root root 687 Jan 19 11:47 /etc/fstab
6个字段
1 2 3 4 5 6
挂载源 挂载点 文件系统 挂载选项 0 0
mount -a 挂载所有的 /test02
UUID:唯一标识符
blkid 查看UUID
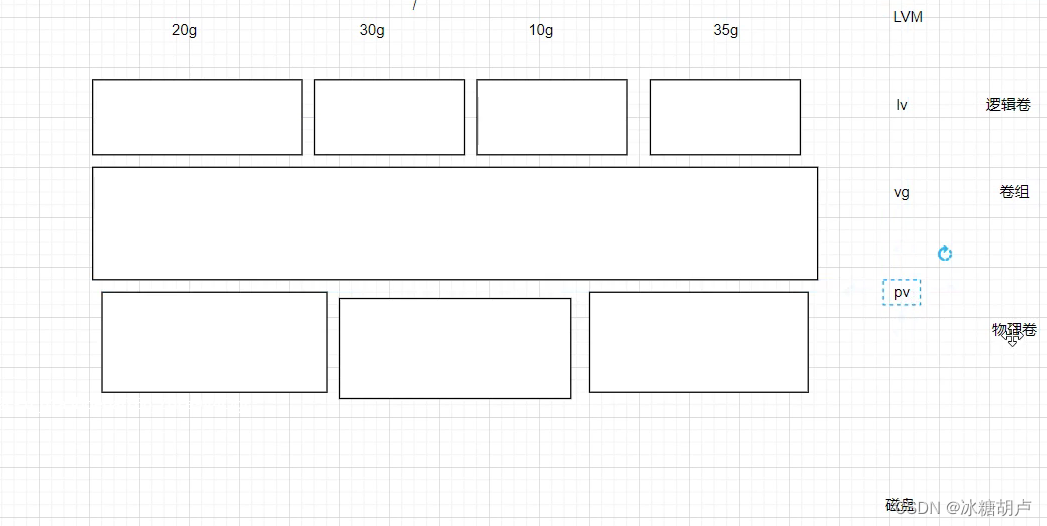
LVM(Logical volume manager) 逻辑卷管理
通过软件将物理磁盘逻辑化,运用逻辑思想(自由)解决物理问题
物理磁盘:磁盘
逻辑化后:PV 物理卷
再组合: VG 卷组(不能直接使用)
再分区: LV 逻辑卷(可添加、可取消、可扩展)
创建PV
pvcreate /dev/nvme0n2
需要逻辑化的物理磁盘
查看
pvs
pvdisplay
创建PV
pvcreate /dev/sda
pvs
创建VG
vgcreate vgname /dev/nvme0n2
查看
vgs
创建LV
lvcreate -n lvname -L 8G vgname
查看
lvs
lvdisplay
vgdisplay
lvs
lvdisplay
格式化:在分区上创建文件系统
注意路径:/dev/卷组名称/逻辑卷的名称
mkfs.xfs /dev/vgname/lvname
ll /test
mount /dev/vgname/lvname /test
df -h
vim /etc/fstab
reboot
vi /etc/fstab
reboot
df -h
ll /dev/vgname/lvname
ll /dev/mapper/vgname-lvname
vim /etc/fstab
blkid
vim /etc/fstab
删除:
lvs
vgs
pvs
lvremove /dev/vgname/lvname
umount /test
df -h
lvremove /dev/vgname/lvname
lvs
vgremove vgname
pvremove /dev/nvme0n2
pvs
vgs
lvs
自动挂载
vim /etc/fstab
虚拟机异常:紧急模式 ---》 修改
挂在之后会出现路径的变化:
链接到
dev/vgname/lvname ---> ../dm-2(dev)
链接到
dev/mapper/vgname-lvname ---> ../dm-2(dev) 推荐(常用)
UUID 最推荐
创建的LV与dm-2设备是同一个,系统提供两个软链接方便使用
dm-2:device mapper(设备映射)
利用了Mapper Device机制( Linux 2.6 内核中提供的一种从逻辑设备到物理设备的映射框架机制)每次将卷组的一部分切为逻辑卷时,它都会显示为dm-xx设备
swap 交换空间(不可以当内存使用,暂存)
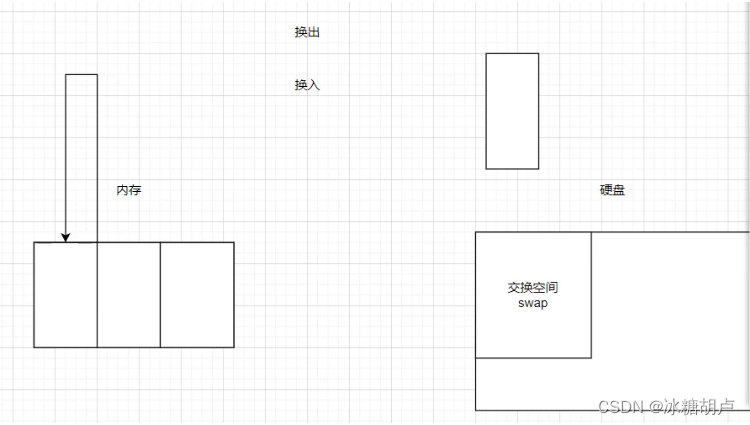
硬盘中专门开辟的空间,供内存作为数据(没用的)转移使用,转移的数据不会影响当前操作
fdisk dev/sda 在磁盘上以交互式建立分区
mkswap /dev/sda1 使用指定分区创建交换空间(必须是单独分区空间)
free -m 查看内存总数(MB)及交换空间大小的使用情况
swapon /dev/sda1 启用创建好的交换空间
swapon -s 查看启用的交换空间由哪些设备组成
swapoff /dev/sda1 停用已经启用的交换空间(分区还在)
mkfs.xfs /dev/sda1 -f 在停用该交换空间以后,强制格式化指定分区,以作他用(可做文件系统)。
/etc/fstab文件 交换空间开机启用
写法:
/dev/sda1 none swap defaults 0 0
无挂载点 格式 挂载选项
设备:
/dev/null 黑洞
/dev/random 随即设备:产生数据
/dev/urandom 产生随机数
/dev/zero 生成0数据,填满设备
/dev/sr0 光驱(包含光盘镜像文件)
dd 转换并拷贝文件
数据到什么地方去
dd if=/dev/zero of=hehe bs=1M count=5000
数据从什么地方来 每次1MB,生成5000次
dd if=/dev/zero of=/dev/nvme0n1 覆盖性擦除磁盘数据
mnt目录 挂载光驱、USB设备、Windows分区的文件系统
AppStream 除操作系统以外的所有软件包
BaseOS
mount /dev/sr0 /mnt
df -h
软件包管理
rpm 软件包管理器
/mnt/BaseOS/Packages/
rpm -i zsh-5.5.1-6.el8_1.2.x86_64.rpm 指定安装包文件名来安装程序
软件包的文件名(与程序名无关)
rpm -qa | grep zsh 通过过滤关键字来确认是否已经安装某个程序
rpm -e zsh 删除指定软件包(卸载程序)
部分软件包之间具有依赖关系:一起安装
yp-tools-4.2.3-1.el8.x86_64.rpm
ypbind-2.5-2.el8.x86_64.rpm
nss_nis-3.0-8.el8.x86_64.rpm
方案一:
rpm -i ypbind-2.5-2.el8.x86_64.rpm yp-tools-4.2.3-1.el8.x86_64.rpm
方案二:仓库配置文件
rpm -qf /etc/yum.conf 指定文件查找该文件的创建者。。。
rpm -ql yum 查询软件包安装过程中生成了多少文件。。。。
仓库管理

仓库配置文件
1、软件都在哪里 baseurl
2、仓库名称 name
3、仓库标识符 []
4、要不要启用 enable
5、要不要检查软件包 gpgcheck
yum
解决软件管理的问题 依赖的问题、软件包路径的问题 。。。
配置文件:
cd /etc/yum.repos.d/
vim cangkuwenjian.repo 创建仓库文件(.repo)
[root@localhost yum.repos.d]# cat cangkuwenjian.repo
[biaozhifu]
name=cangku1 仓库名称
baseurl=/mnt/BaseOS 软件位置
enable=1 启用
gpgcheck=0 检查软件包
RPM-GPG-KEY 验证软件包是否是红帽厂商打包
[biaozhifu2]
name=cangku2
baseurl=/mnt/AppStream
enable=1
gpgcheck=0
yum install ypbind 安装指定软件
yum remove ypbind 卸载指定软件
dnf 用法和yum完全一致 -y 表示直接确认。
系统管理(服务管理)
systemctl start 启动服务
stop 停止服务
reload 重新加载服务
enable 开机自启动服务
disable 禁止开机自启动服务
is-active 是否已经启动服务
is-enabled 是否已经开机自启动服务
mask 是否已经标记(禁止服务以任何形式启动)
unmask 取消标记服务
status 查看服务状态
服务名称
vim /etc/httpd/conf/httpd.conf
#ServerName www.example.com:80
ServerName 0.0.0.0:80
systemctl start httpd
systemctl status httpd
systemctl stop firewalld
systemctl stop firewalld 关闭防火墙
综合实验:
#停止防火墙
systemctl stop firewalld
#关闭SELINUX selinu(安全框架)
getenforce
setenforce 0 关闭
#挂载光盘镜像
mount /dev/sr0 /mnt
#安装httpd服务
yum/dnf install httpd -y
#编辑文档/etc/httpd/conf/httpd.conf
95 ServerName 0.0.0.0:80
#安装数据库
yum install mariadb mariadb-server -y
#启动数据库
systemctl start mariadb
# 初始化数据库
[root@localhost ~]# mysql_secure_installation
NOTE: RUNNING ALL PARTS OF THIS SCRIPT IS RECOMMENDED FOR ALL MariaDB
SERVERS IN PRODUCTION USE! PLEASE READ EACH STEP CAREFULLY!
In order to log into MariaDB to secure it, we'll need the current
password for the root user. If you've just installed MariaDB, and
you haven't set the root password yet, the password will be blank,
so you should just press enter here.
#数据库root账户密码(默认无密码)
Enter current password for root (enter for none):
OK, successfully used password, moving on...
Setting the root password ensures that nobody can log into the MariaDB
root user without the proper authorisation.
#设置数据库root账户密码
Set root password? [Y/n] y
New password:
Re-enter new password:
Password updated successfully!
Reloading privilege tables..
... Success!
By default, a MariaDB installation has an anonymous user, allowing anyone
to log into MariaDB without having to have a user account created for
them. This is intended only for testing, and to make the installation
go a bit smoother. You should remove them before moving into a
production environment.
#是否移除匿名账号
Remove anonymous users? [Y/n] y
... Success!
Normally, root should only be allowed to connect from 'localhost'. This
ensures that someone cannot guess at the root password from the network.
#是否禁止root用户远程登录
Disallow root login remotely? [Y/n] y
... Success!
By default, MariaDB comes with a database named 'test' that anyone can
access. This is also intended only for testing, and should be removed
before moving into a production environment.
#是否访问并删除测试的数据库
Remove test database and access to it? [Y/n] y
- Dropping test database...
... Success!
- Removing privileges on test database...
... Success!
Reloading the privilege tables will ensure that all changes made so far
will take effect immediately.
#是否重新加载权限表
Reload privilege tables now? [Y/n] y
... Success!
Cleaning up...
All done! If you've completed all of the above steps, your MariaDB
installation should now be secure.
Thanks for using MariaDB!
# 安装php组件
yum install php -y
yum install php-* libjpeg* -y
#重启服务
systemctl restart mariadb
systemctl restart httpd
systemctl enable httpd
systemctl start httpd
systemctl status httpd
# 创建数据库
[root@localhost ~]# mysql -uroot -p
Enter password:
Welcome to the MariaDB monitor. Commands end with ; or \g.
Your MariaDB connection id is 8
Server version: 10.3.28-MariaDB MariaDB Server
Copyright (c) 2000, 2018, Oracle, MariaDB Corporation Ab and others.
Type 'help;' or '\h' for help. Type '\c' to clear the current input statement.
MariaDB [(none)]> create database luntan;
Query OK, 1 row affected (0.000 sec)
#退出
MariaDB [(none)]> exit
Bye
传输压缩包文件
#移动压缩包到指定目录下
[root@localhost ~]# mv Discuz_X3.4_SC_UTF8_20191201.zip /var/www/html/
[root@localhost ~]# cd /var/www/html/
[root@localhost html]# ll
total 11524
-rw-r--r--. 1 root root 11800498 Jan 19 16:15 Discuz_X3.4_SC_UTF8_20191201.zip
#解压文件
[root@localhost html]# unzip Discuz_X3.4_SC_UTF8_20191201.zip
#删除源文件
[root@localhost html]# rm -rf Discuz_X3.4_SC_UTF8_20191201.zip
[root@localhost html]# ll
total 96
-rw-r--r--. 1 root root 18451 Jul 3 2019 qqqun.png
drwxr-xr-x. 2 root root 102 Dec 1 2019 readme
-rw-r--r--. 1 root root 70883 Dec 1 2019 readme.html
drwxr-xr-x. 13 root root 4096 Dec 1 2019 upload
drwxr-xr-x. 4 root root 94 Dec 1 2019 utility
#切换目录
[root@localhost html]# cd upload/
[root@localhost upload]# ll
#修改指定目录及指定目录下的所有文件的文件权限
[root@localhost upload]# chmod 777 uc_server/ uc_client/ data/ config/ -R
#浏览器访问路径
http://192.168.242.128/upload/install/
#页面安装数据库
填写数据库信息
数据库服务器:localhost(本地)
数据库名:luntan
数据库用户名:root
数据库密码:redhat
数据库前缀:pre_
系统邮箱 Email:admin@admin.com
填写管理员信息
管理员账号:admin
管理员密码:redhat
重复密码:redhat
管理员 Email:admin@admin.com