Mybatis学习基础篇(一)——使用Maven快速搭建一个mybatis项目,并实现简单的增删改查
题外话:
在了解mybatis框架之前,我先说明一句,目前主流的框架技术层出不穷,每个人都有自己喜欢的技术框架,自己喜欢用就行。技术并没有高低之分,喜欢用就用,虽然目前大部分人都喜欢向新技术看齐,但是我个人觉得任何技术,都有他自己存在的意义,新的技术可以学,但旧技术我们也不能说他不行。
本文将带你使用java快速搭建一个MyBatis项目,并且实现简单的增删改查操作,动态增删改查将在本文第二篇
MyBatis框架介绍
Mybatis是一款优秀的持久层框架,它是一个基于Java语言的、开源的、轻量级的ORM框架,可以用于处理关系型数据库的操作。
Mybatis作为ORM框架,其内部封装JDBC,故而使得开发者只需要关注SQL本身,并不需要花费精力去加载驱动,创建链接,创建statement等繁琐的过程。
Mybatis的主要特点是灵活、简单、易于学习和使用。Mybatis的主要工作原理是将Java对象映射成数据库的记录,实现Java对象和数据库表之间的转换。Mybatis的核心组件包括SqlSessionFactory、SqlSession、Mapper和MappedStatement。
-
SqlSessionFactory
SqlSessionFactory是用于创建SqlSession对象的工厂类。SqlSession对象是Mybatis中最重要的核心类之一,它是一个线程安全的、非常轻量级的对象,用于执行数据库操作和管理事务。SqlSessionFactory通常通过Mybatis的配置文件进行配置,可以指定数据源、事务管理器和Mapper映射文件等信息。 -
SqlSession
SqlSession是一个线程安全的、非常轻量级的对象,用于执行数据库操作和管理事务。SqlSession提供了多种操作数据库的方法,包括查询、插入、更新和删除等,还可以设置事务的隔离级别和自动提交等。 -
Mapper
Mapper是一个Java接口,用于定义SQL语句的执行方法。Mapper接口中的方法与SQL语句是一一对应的,可以通过SqlSession的getMapper方法获取Mapper接口的实例,并调用其中的方法执行SQL语句。 -
MappedStatement
MappedStatement是一个Java对象,用于描述Mapper接口中的SQL语句和参数信息。MappedStatement包括SQL语句的ID、SQL语句的类型、输入参数和输出参数等信息。
Mybatis的主要优点是:
-
灵活性高:Mybatis的配置文件非常灵活,可以使用XML或注解进行配置,支持自定义标签和属性,可以灵活地进行SQL语句的编写和调优。
-
易于学习和使用:Mybatis的API非常简单,容易学习和使用,开发人员可以快速上手,快速实现对数据库的操作。
-
易于维护和调试:Mybatis的映射文件和Java代码是分离的,容易维护和调试,开发人员可以很方便地对SQL语句进行调优和修改,提高SQL语句的执行效率。
-
易于扩展和定制化:Mybatis的插件机制非常强大,可以对SQL语句进行拦截和修改,也可以自定义类型处理器和结果集处理器,实现对特定数据类型的处理和转换。
-
良好的性能和扩展性:Mybatis采用了基于XML的配置方式和基于Java的Mapper接口,可以实现动态SQL语句的生成和优化,同时也支持多数据源和分布式数据库的操作,具有良好的性能和扩展性。
总之,Mybatis是一款优秀的持久层框架,它具有灵活性高、易于学习和使用、易于维护和调试、易于扩展和定制化、良好的性能和扩展性等优点,被广泛应用于Java企业级应用中的数据持久化层。
我的文件目录结构:
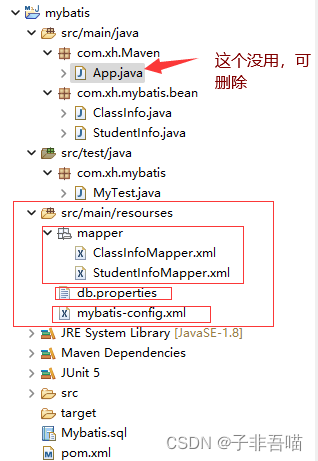
文件目录结构摆上了,如果跟着我的步骤下来的出现问题,我觉得是你的目录结构出问题了。
简单介绍完了,开始重头戏
第一步,先拿到数据库,这里提供一个实例数据库:
create database if not exists MyBatis_stu default character set utf8 collate utf8_bin;

use MyBatis_stu ;

create table if not exists classinfo(
  cid int primary key auto_increment,
  cname varchar(100) not null unique comment '班级编号'
)ENGINE=InnoDB auto_increment=101 default charset=utf8 collate=utf8_bin;

create table if not exists stuinfo (
   sid int primary key auto_increment,
   sname varchar(100) not null comment '学生姓名',
   cid int comment '所在班级编号',
   tel varchar(15) unique comment '联系方式',
   addr varchar(100) comment '家庭住址',
   constraint FK_stuinfo_cid foreign key(cid) references classinfo(cid)
)ENGINE=InnoDB auto_increment=101 default charset=utf8 collate=utf8_bin;
这一步,我觉得不要多说了,毕竟你学java到现在,这一步还是没看懂的话,我觉得你可以准备考虑考虑其他路了。
第二步前台条件,你要创建好一个maven项目,并导入相关依赖,别告诉我你忘记了maven工程如何创建了?
<project xmlns="http://maven.apache.org/POM/4.0.0" xmlns:xsi="http://www.w3.org/2001/XMLSchema-instance"
  xsi:schemaLocation="http://maven.apache.org/POM/4.0.0 http://maven.apache.org/xsd/maven-4.0.0.xsd">
  <modelVersion>4.0.0</modelVersion>

  <groupId>com.xh</groupId>
  <artifactId>Maven</artifactId>
  <version>0.0.1-SNAPSHOT</version>
  <packaging>jar</packaging>

  <name>Maven</name>
  <url>http://maven.apache.org</url>

  <properties>
    <project.build.sourceEncoding>UTF-8</project.build.sourceEncoding>
  </properties>

  <dependencies>

  <!--导入maven链接,让maven去下载
   https://mvnrepository.com/artifact/mysql/mysql-connector-java -->
	<dependency>
	    <groupId>mysql</groupId>
	    <artifactId>mysql-connector-java</artifactId>
	    <version>8.0.28</version>
	</dependency>

	<dependency>
	  <groupId>org.mybatis</groupId>
	  <artifactId>mybatis</artifactId>
	  <version>3.5.8</version>
	</dependency>

		<!-- https://mvnrepository.com/artifact/org.apache.logging.log4j/log4j-slf4j-impl -->
	<dependency>
	    <groupId>org.apache.logging.log4j</groupId>
	    <artifactId>log4j-slf4j-impl</artifactId>
	    <version>2.17.2</version>
	    <scope>test</scope>
	</dependency>

    <dependency>
      <groupId>junit</groupId>
      <artifactId>junit</artifactId>
      <version>3.8.1</version>
      <scope>test</scope>
    </dependency>
  </dependencies>
</project>
第二步,根据我们的数据库创建Bean类,什么?你告诉我你不知道什么事Bean类?额,你该恶补一下java了。
public class ClassInfo {
	private Integer cid;
	private String cname;

	public Integer getCid() {
		return cid;
	}
	public void setCid(Integer cid) {
		this.cid = cid;
	}
	public String getCname() {
		return cname;
	}
	public void setCname(String cname) {
		this.cname = cname;
	}
	@Override
	public int hashCode() {
		final int prime = 31;
		int result = 1;
		result = prime * result + ((cid == null) ? 0 : cid.hashCode());
		result = prime * result + ((cname == null) ? 0 : cname.hashCode());
		return result;
	}
	@Override
	public boolean equals(Object obj) {
		if (this == obj)
			return true;
		if (obj == null)
			return false;
		if (getClass() != obj.getClass())
			return false;
		ClassInfo other = (ClassInfo) obj;
		if (cid == null) {
			if (other.cid != null)
				return false;
		} else if (!cid.equals(other.cid))
			return false;
		if (cname == null) {
			if (other.cname != null)
				return false;
		} else if (!cname.equals(other.cname))
			return false;
		return true;
	}
	@Override
	public String toString() {
		return "ClassInfo [cid=" + cid + ", cname=" + cname + "]";
	}
	//记得这里我的需要创建的构造方法,你可以选择跟我也可以选择不跟
	public ClassInfo( String cname) {
		this.cname = cname;
	}

	public ClassInfo(Integer cid, String cname) {
		super();
		this.cid = cid;
		this.cname = cname;
	}

	public ClassInfo() {
		super();
	}
}
注意,这个类,我实际上在本篇没用上,我会在下篇才用到,你可以自行选择创建或者不创建
public class StudentInfo {

	private Integer sid;//学生id
	private String sname;//学生姓名
	private Integer cid; //外键管理,类id
	private String tel; //电话号码
	private String addr;//地址

	public Integer getSid() {
		return sid;
	}
	public void setSid(Integer sid) {
		this.sid = sid;
	}
	public String getSname() {
		return sname;
	}
	public void setSname(String sname) {
		this.sname = sname;
	}
	public Integer getCid() {
		return cid;
	}
	public void setCid(Integer cid) {
		this.cid = cid;
	}
	public String getTel() {
		return tel;
	}
	public void setTel(String tel) {
		this.tel = tel;
	}
	public String getAddr() {
		return addr;
	}
	public void setAddr(String addr) {
		this.addr = addr;
	}
	@Override
	public int hashCode() {
		final int prime = 31;
		int result = 1;
		result = prime * result + ((addr == null) ? 0 : addr.hashCode());
		result = prime * result + ((cid == null) ? 0 : cid.hashCode());
		result = prime * result + ((sid == null) ? 0 : sid.hashCode());
		result = prime * result + ((sname == null) ? 0 : sname.hashCode());
		result = prime * result + ((tel == null) ? 0 : tel.hashCode());
		return result;
	}
	@Override
	public boolean equals(Object obj) {
		if (this == obj)
			return true;
		if (obj == null)
			return false;
		if (getClass() != obj.getClass())
			return false;
		StudentInfo other = (StudentInfo) obj;
		if (addr == null) {
			if (other.addr != null)
				return false;
		} else if (!addr.equals(other.addr))
			return false;
		if (cid == null) {
			if (other.cid != null)
				return false;
		} else if (!cid.equals(other.cid))
			return false;
		if (sid == null) {
			if (other.sid != null)
				return false;
		} else if (!sid.equals(other.sid))
			return false;
		if (sname == null) {
			if (other.sname != null)
				return false;
		} else if (!sname.equals(other.sname))
			return false;
		if (tel == null) {
			if (other.tel != null)
				return false;
		} else if (!tel.equals(other.tel))
			return false;
		return true;
	}
	@Override
	public String toString() {
		return "StudentInfo [sid=" + sid + ", sname=" + sname + ", cid=" + cid + ", tel=" + tel + ", addr=" + addr
				+ "]";
	}
	public StudentInfo(Integer sid, String sname, Integer cid, String tel, String addr) {
		super();
		this.sid = sid;
		this.sname = sname;
		this.cid = cid;
		this.tel = tel;
		this.addr = addr;
	}
	public StudentInfo() {
		super();
	}
}
第三步,我们要准备数据库配置文件
这个自行确定,账号密码请你更改为自己安装数据库的账号密码,我给出我的实例db.properties
driver=com.mysql.cj.jdbc.Driver
url=jdbc:mysql://127.0.0.1:3306/mybatis_stu?useSSL=false&useUnicode=true&characterEncoding=utf8&serverTimezone=GMT%2B8&useOldAliasMetadataBehavior=true
username=root
password=123456
第四步,创建mybatis配置文件
有了上边三步的基础之后,我们需要配置mybatis-config.xml
<?xml version="1.0" encoding="UTF-8"?>
 <!DOCTYPE configuration
 PUBLIC "-//mybatis.org//DTD Config 3.0//EN"
  "http://mybatis.org/dtd/mybatis-3-config.dtd">
<configuration>
	<!-- 引入配置文件 请好好的看我  我是db.properties -->
	<properties resource="db.properties"></properties>
	<!-- 配置环境变量 development :开发环境 work :工作环境 -->

	<environments default="development">
		<environment id="development">
			<!-- 事务管理 -->
			<transactionManager type="JDBC" />
			<!-- 配置数据库连接信息 POOLED UNPOOLED -->
			<dataSource type="POOLED">
				<property name="driver" value="${driver}" />
				<property name="url" value="${url}" />
				<property name="username" value="${username}" />
				<property name="password" value="${password}" />
			</dataSource>
		</environment>
	</environments>

	<mappers>
	<!-- 加载mapper指向位置 -->
		<mapper resource="mapper/ClassInfoMapper.xml" />
		<mapper resource="mapper/StudentInfoMapper.xml"></mapper>

	</mappers>


</configuration>
至此,第四步就完成。
第五步,配置映射
我想说的这上面的每一步都很重要,但是这一步也很重要,我们将相关SQL语句全部写在这里,这一步,我们其实可以说是直接对数据库进行操作,我的理解是这样的,但是不同的人有不同的理解,我也不能去把我的思想强加给别人,对吧?
对了,如果你是初学者,我推荐你了解一下我在本项目的注释
ClassInfoMapper.xml
<?xml version="1.0" encoding="UTF-8"?>
 <!DOCTYPE mapper
  PUBLIC "-//mybatis.org//DTD Mapper 3.0//EN"
  "http://mybatis.org/dtd/mybatis-3-mapper.dtd">
<!-- namespace :命名空间 ,就是用来避免命名冲突的,同一个命名空间下面都不能出现相同的id
	时间上这个就是指向 "ClassInfo.findAll" 测试类的这个属性的ClassInfo代表命名空间,findAll代表id
 -->
<mapper namespace="ClassInfo">


	<!-- 写insert delete update select 语句 每一个语句都有一个id,到时候通过命名空间.id 来获取对应的sql语句执行
		通过paramenterType 属性来指定这个sql执行语句的参数 通过resultType属性指定这个sql语句后返回值的类型,是每条结果对应的类型 -->
	<select id="findAll" resultType="com.xh.mybatis.bean.ClassInfo">
		select cid,cname from classinfo;
	</select>

	<!-- 假设我们要查询某单一的字段,我们需要的操作是如下 -->
	<select id="find" resultType="com.xh.mybatis.bean.ClassInfo">
		select cid,cname from classinfo
		where cname=#{cname};
	</select>

	<insert id="add" parameterType="com.xh.mybatis.bean.ClassInfo">
		<!--#{} 采用预编译的方式 ${} 采用字符串拼接的方法 -->
		insert into classinfo values(0,#{cname});
	</insert>

	<!-- 模糊查询 vague '%${parameters}%' %#{parameters}%此时这个语句是有问题的,不能这么写 应该是 '%#{parameters}%'
		_${parameters}这种模糊查询也是可以的,但是没有%那么灵活,不过你觉得你使用哪个舒服就使用哪个 -->
	<select id="findByVague"
		resultType="com.xh.mybatis.bean.ClassInfo">
		select cid,cname from classinfo where cname like
		'_${parameters}';
	</select>

	<!--更新表中的数据 -->
	<update id="update"
		parameterType="com.xh.mybatis.bean.ClassInfo">
		update classinfo set cname = #{cname} where cid =
		#{cid};
	</update>

	<!-- 删除表中的数据 -->
	<delete id="delete"
		parameterType="com.xh.mybatis.bean.ClassInfo">
		delete from classinfo where cid = #{cid};
	</delete>
</mapper>
另一个文件StudentInfoMapper.xml我不会在本篇使用,故而我不在本篇展示,如果你感兴趣的话,请查看下篇。
第六步,测试类的编写
package com.xh.mybatis;

import java.io.IOException;
import java.io.InputStream;

import java.util.List;

import org.apache.ibatis.io.Resources;
import org.apache.ibatis.session.SqlSession;
import org.apache.ibatis.session.SqlSessionFactory;
import org.apache.ibatis.session.SqlSessionFactoryBuilder;
import org.junit.jupiter.api.Test;


import com.xh.mybatis.bean.ClassInfo;

public class MyTest {

	/**
	 * classinfo中的所有的值
	 * @throws IOException
	 */
	@Test
	public void test1() throws IOException {

		try (InputStream reader = Resources.getResourceAsStream("mybatis-config.xml")
				){
			//创建sqlSession工厂

			SqlSessionFactory sqlSessionFactory = new SqlSessionFactoryBuilder().build(reader);
			System.out.println("-----------");
			//从sqlsession工厂中获取一个sql会话
			SqlSession sqlSession = sqlSessionFactory.openSession();

			//通过这个回话执行与sql语句
			//将从表中查询的多条数据以作为对象的方式添加到list中
			List<ClassInfo> cls = sqlSession.selectList("ClassInfo.findAll");
			//遍历list中的所有的值
			cls.forEach(System.out::println);
			sqlSession.close();
		}
	}

	/**
	 * 在classinfo表中添加值 ,非动态添加
	 * @throws IOException
	 */
	@Test
	public void test2() throws IOException {
		try (InputStream reader = Resources.getResourceAsStream("mybatis-config.xml")){
			//创建sqlSession工厂
			SqlSessionFactory sqlSessionFactory = new SqlSessionFactoryBuilder().build(reader);

			SqlSession sqlSession = sqlSessionFactory.openSession();

			//通过这个回话执行与sql语句,
			/**
			 * 这里的new ClassInfo对象是由于我们创建的表是主键存在主键自增,故而在构造方法中不需要添加cid
			 * 我们可以选择几种方式,这边我们对构造方法可以进行多种构造,让构造方法去选择添加,也可以直接用全部构造
			 * 不够就是我们需要对构造方法进行置空处理
			 */
			int result = sqlSession.insert("ClassInfo.add",new ClassInfo("相关"));
			System.out.println(result);
			sqlSession.commit();
			sqlSession.close();
		}
	}

	/**
	 * ClassInfo表中
	 * mybatis查询某数据库中某个值
	 * @throws IOException
	 */
	@Test
	public void test3() throws IOException {
		InputStream reader = Resources.getResourceAsStream("mybatis-config.xml");
		//创建SqlSession工厂
		SqlSessionFactory sqlSessionFactory = new SqlSessionFactoryBuilder().build(reader);

		SqlSession sqlSession = sqlSessionFactory.openSession();

		//我们可以查看到当前查到的对象可以被查出来
		//ClassInfo obj = sqlSession.selectOne("ClassInfo.find",new ClassInfo("四班"));
		//ClassInfo.find表示调用Mybatis中的com.xh.bean.ClassInfo下的id=find的sql语句
		//如果我们使用的是MVC架构进行开发,这个语句应该是属于serviceImpl层调用dao接口的时候
		ClassInfo obj = sqlSession.selectOne("ClassInfo.find","四班");
		//查找单个
		//int result = sqlSession.selectOne("Classinfo.find","四班");
		System.out.println(obj);
		sqlSession.commit();
		sqlSession.close();
	}

	/**
	 * 使用模糊查询classInfo中的数据
	 * 没做动态查询
	 * @throws IOException
	 */
	@Test
	public void test4() throws IOException {
		InputStream reader = Resources.getResourceAsStream("mybatis-config.xml");
		//创建sqlSession工厂
		SqlSessionFactory sqlSessionFactory = new SqlSessionFactoryBuilder().build(reader);
		System.out.println("-----------");
		//从sqlsession工厂中获取一个sql会话
		SqlSession sqlSession = sqlSessionFactory.openSession();

		//通过这个回话执行与sql语句
		//将从表中查询的多条数据以作为对象的方式添加到list中
		List<ClassInfo> cls = sqlSession.selectList("ClassInfo.findByVague","班");
		//遍历list中的所有的值
		cls.forEach(System.out::println);
		sqlSession.commit();
		sqlSession.close();
	}

	/**
	 * 更新表中数据,先从简单的开始,ClassInfo表中的数据
	 * @throws IOException
	 */
	@Test
	public void test5() throws IOException {
		InputStream reader = Resources.getResourceAsStream("mybatis-config.xml");
		//创建sqlSession工厂
		SqlSessionFactory sqlSessionFactory = new SqlSessionFactoryBuilder().build(reader);
		System.out.println("-----------");
		//从sqlsession工厂中获取一个sql会话
		SqlSession sqlSession = sqlSessionFactory.openSession();

		//通过这个回话执行与sql语句
		//将从表中查询的多条数据以作为对象的方式添加到list中
		ClassInfo obj = new ClassInfo();

		obj.setCid(1);
		obj.setCname("一班");

		int result = sqlSession.update("ClassInfo.update",obj);
		if(result > 0) {
			System.out.println("更新成功");
		}else {
			System.out.println("更新失败");
		}

		List<ClassInfo> cls = sqlSession.selectList("ClassInfo.findAll");
		//遍历list中的所有的值
		cls.forEach(System.out::println);

		//注意在开启事务的情况下,你不提交数据库是查不到值的
		sqlSession.commit();

		sqlSession.close();
	}

	/**
	 * 删除
	 * @throws IOException
	 */

	@Test
	public void test6() throws IOException {

		InputStream reader = Resources.getResourceAsStream("mybatis-config.xml");
		//创建sqlSession工厂
		SqlSessionFactory sqlSessionFactory = new SqlSessionFactoryBuilder().build(reader);

		//从sqlsession工厂中获取一个sql会话
		SqlSession sqlSession = sqlSessionFactory.openSession();

		List<ClassInfo> cls = sqlSession.selectList("ClassInfo.findAll");

		System.out.println("删除之前的数据");
		cls.forEach(System.out::println);
		/*
		 * ClassInfo obj = new ClassInfo(); obj.setCid(7);
		 */
		int result = sqlSession.delete("ClassInfo.delete",8);
		if(result > 0) {
			System.out.println("删除成功");
		}else {
			System.out.println("删除失败");
		}
		//注意在开启事务的情况下,你不提交数据库是查不到值的
		sqlSession.commit();

		System.out.println("删除之后的数据");
		List<ClassInfo> cls1 = sqlSession.selectList("ClassInfo.findAll");
		//遍历list中的所有的值
		cls1.forEach(System.out::println);

		sqlSession.close();

	}

	//至此,上边对mybatis的简单操作到此结束
}
至此,我们搭建简单的Mybatis项目就完成了,如果您觉得本文不错的话,请你对本文点一下点赞或者收藏,或者一键三连。您的鼓励将是我最大的动力
mybatis 注意事项:
#{} 和 ${} 的区别
注意:#{}是预编译处理,${}是字符替换
注意:#{}会在mybatis运行的过程中替换为?,调用PreparedStatement的set方法来赋值。
mybatis 在处理$()会将他替换为变量的值。
多使用#{}可以防止sql注入,提高系统安全性。