机器视觉 AI 数据集制作
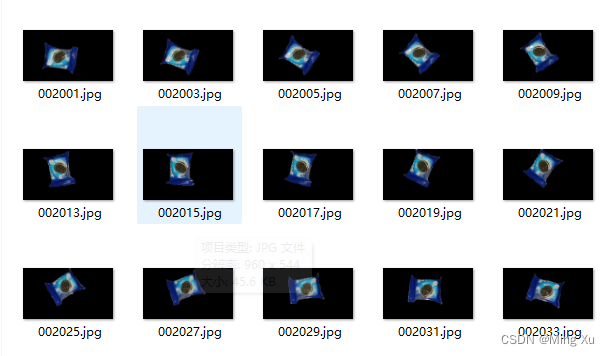
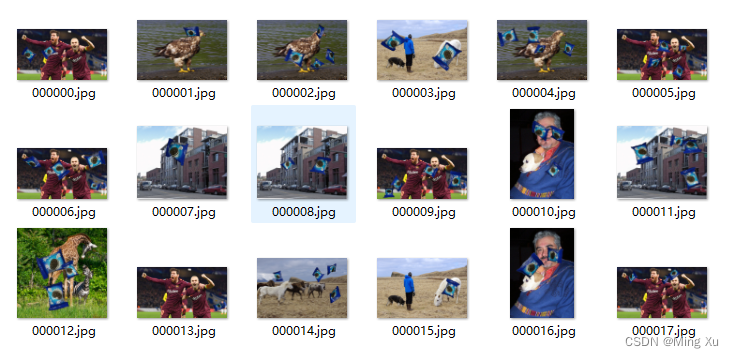
工业中,机器视觉物体分拣时,需要制作,数据集,那么,一般情况下,可以选择几个物体的几张图片,或者视频,将待识别的物体的掩模扣取出来,随机的贴在 传送带背景中,并批量自动的写成 VOC 数据集

使用图像处理的技术手段,将上述的目标的掩模扣取出来,或者使用 ps 的技术扣取掩模均可。
# -*- coding :  utf-8 -*-
# @Data      :  2019-08-16
# @Author    :  xm
# @Email     :
# @File      :  image_process.py
# Desctiption:  求取图像中物体的边界矩形

import numpy as np
import cv2
import os


def calculatBoundImage(src_Image):
    """
    求取图像中物体的边界矩形框
    :param src_Image: 输出的源图像
    :return: 返回图像中的物体边界矩形
    """

    tmp_image = src_Image.copy()
    #print(tmp_image)
    if (len(tmp_image.shape) == 3):
        tmp_image = cv2.cvtColor(tmp_image, cv2.COLOR_BGR2GRAY)
    # 自适应阈值进行二值化
    thresh_image = cv2.adaptiveThreshold(tmp_image, 255, cv2.ADAPTIVE_THRESH_GAUSSIAN_C, cv2.THRESH_BINARY_INV, 71, 10)
    thresh_image = cv2.morphologyEx(thresh_image, cv2.MORPH_CLOSE, cv2.getStructuringElement(cv2.MORPH_RECT, (25, 25)))
    # 寻找最外层轮廓
    contours_ls, hierarchy = cv2.findContours(thresh_image, cv2.RETR_EXTERNAL, cv2.CHAIN_APPROX_TC89_KCOS)
    pnt_cnt_ls = np.array([tmp_contour.shape[0] for tmp_contour in contours_ls])

    contour_image = src_Image.copy()
    contours_idx = np.argmax(pnt_cnt_ls)
    contour_image = cv2.drawContours(contour_image, contours_ls, contours_idx, (0, 0, 255))
    longest_contour = contours_ls[contours_idx]

    countour_image_gray = np.zeros(src_Image.shape, dtype=np.uint8)
    countour_image_gray = cv2.drawContours(countour_image_gray, contours_ls, contours_idx, (1, 1, 1), cv2.FILLED)
    obj_image = src_Image * countour_image_gray
    bound_box = cv2.boundingRect(longest_contour)
    return bound_box, contour_image, obj_image


def rotateImage(src_Image, angle_deg, rotate_center=None):
    """
    对目标图像进行旋转
    :param src_Image: 输入的源图像
    :param angle_deg: 旋转的角度
    :param rotate_center: 旋转的中心
    :return: 旋转后的图片
    """
    (h, w) = src_Image.shape[:2]
    if rotate_center is None:
        rotate_center = ((w -1) / 2, (h - 1) / 2)
    rot_mat = cv2.getRotationMatrix2D(rotate_center, angle_deg, 1.0)
    rot_iamge = cv2.warpAffine(src_Image, rot_mat, (w, h))
    return rot_iamge


def VideotoImage(video_file, folder_path):
    """
    数据的视频保存为提取之后的物体图
    :param video_file: 视频文件
    :param folder_path: 保存图片的路径
    :return: 保存的图片
    """
    video_cap = cv2.VideoCapture(video_file)
    image_idx = 2000
    while True:
        ret, frame = video_cap.read()
        if (frame is None):
            continue
        bound_box, contour_image, obj_image = calculatBoundImage(frame)
        bound_thres = 4500

        if (bound_box[2] > bound_thres or bound_box[3] > bound_thres):
            continue
        contour_image = cv2.rectangle(contour_image, (bound_box[0], bound_box[1]),(bound_box[0] + bound_box[2],bound_box[1] + bound_box[3]), (225, 0, 0), thickness=2)
        #cv2.imshow('frame', contour_image)

        image_name = str(image_idx).zfill(6) + '.jpg'
        image_idx += 1
        if image_idx % 2 == 0:
            cv2.imwrite(folder_path + image_name, obj_image)
        cv2.waitKey(25)
        if 0xFF & cv2.waitKey(5) == 27:
            break
    video_cap.release()


def BatchImageProcess(image_path, folder_path):
    """
    批量图片物体提取,背景为黑色
    :param Image_path: 图片的路径
    :param folder_path: 图像处理之后的保存路径
    :return: 保存的图片
    """
    image_file_list = os.listdir(image_path)
    # 获取物体图像的文件名
    image_idx = 0
    for image_name in range(len(image_file_list)):
        obj_image_path = image_path + image_file_list[image_idx]
        src_Image = cv2.imread(obj_image_path)

        bound_box, contour_image, obj_image = calculatBoundImage(src_Image)
        bound_thres = 4500

        if (bound_box[2] > bound_thres or bound_box[3] > bound_thres):
            continue
        contour_image = cv2.rectangle(contour_image, (bound_box[0], bound_box[1]), (bound_box[0] + bound_box[2], bound_box[1] + bound_box[3]), (225, 0, 0), thickness=2)
        #cv2.imshow('frame', contour_image)
        image_name = str(image_idx).zfill(6) + '.jpg'
        cv2.imwrite(folder_path + image_name, obj_image)
        image_idx += 1


def main():
    image_path = "/home/xm/workspace/ImageProcess/tmp/circle/"
    folder_path = "/home/xm/workspace/ImageProcess/tmp/"
    BatchImageProcess(image_path, folder_path)


# def main():
#     src_Image = cv2.imread("./Images/00001.png")
#     bound_box, contour_image, obj_image = calculatBoundImage(src_Image)
#     print("bound_box", bound_box)
#
#     cv2.namedWindow("input image", cv2.WINDOW_AUTOSIZE)
#     cv2.imshow("input image", contour_image)
#
#
#     # 一般源图像进行旋转再提取轮廓
#     rot_image = rotateImage(src_Image, 20, rotate_center=None)
#     cv2.imshow("obj image", obj_image)
#     cv2.imshow("rot image", rot_image)
#     cv2.waitKey(0)
#
#     # vide_file = "./Images/blue_1_82.mp4"
#     # folder_path = "./results/"
#     #
#     # VideotoImage(vide_file, folder_path)


if __name__ == "__main__":
    main()

# -*- coding :  utf-8 -*-
# @Data      :  2019-08-17
# @Author    :  xm
# @Email     :
# @File      :  ImageDataSetGeneration.py
# Desctiption:  生成物体分类的图像数据集

import numpy as np
import cv2
import os
from lxml import etree, objectify


def rotateImage(src_image, rotate_deg):
    """
    对图像进行旋转
    :param src_image: 输入源图像
    :param rotate_dog: 旋转角度
    :return: 旋转后的图像
    """
    img_h, img_w = src_image.shape[0:2]
    rotate_mat = cv2.getRotationMatrix2D((img_w / 2.0, img_h / 2.0), rotate_deg, 1.0)
    dst_image = cv2.warpAffine(src_image, rotate_mat, (img_w, img_h))
    return dst_image


def calculateBoundImage(src_image):
    """
    求图像中物体的边界矩形
    :param src_image: 源图像
    :return: 图像中物体的边界矩形、轮廓图、目标图像
    """

    tmp_image = src_image.copy()
    if len(tmp_image.shape) == 3:
        tmp_image = cv2.cvtColor(tmp_image, cv2.COLOR_BGR2GRAY)
    ret, thresh_images = cv2.threshold(tmp_image, 0, 255,cv2.THRESH_BINARY)
    contours_ls, _ = cv2.findContours(thresh_images, cv2.RETR_EXTERNAL,cv2.CHAIN_APPROX_SIMPLE)
    all_points = np.concatenate(contours_ls, axis=0)
    bound_box = cv2.boundingRect(all_points)
    return bound_box


def randomMoveObjectInImage(src_image, src_bound_box):
    """
    将物体在图像中随机摆放
    :param src_image: 背景图 COCO/VOC
    :param src_bound_box: 原始边界框
    :return: 相机旋转后的边界框
    """
    x, y, w, h = src_bound_box
    img_h, img_w = src_image.shape[0:2]
    img_h -= h
    img_w -= w
    random_array = np.random.uniform(0.0, 1.0, 2)
    bbox_x = np.floor(img_w * random_array[0])
    bbox_y = np.floor(img_h * random_array[1])
    return np.array([bbox_x, bbox_y, w, h])


def calculateIOU(bound_box_1, bound_box_2):
    """
    计算两个 bound_box 之间的 IOU
    :param bound_box_1: 边界框 1, shape [x, y, w, h]
    :param bound_box_2: 边界框 2,shape [x, y, w, h]
    :return: 两个 bound box 之间的 IOU 值
    """

    min_xy = np.maximum(bound_box_1[0:2], bound_box_2[0:2])
    max_xy = np.minimum(bound_box_1[0:2] + bound_box_2[2:4],
                        bound_box_2[0:2] + bound_box_2[2:4])

    delta_xy = max_xy - min_xy
    intersection_area = delta_xy[0] * delta_xy[1]
    if (intersection_area < 0):
        return
    box_area_1 = bound_box_1[2] * bound_box_1[3]
    box_area_2 = bound_box_2[2] * bound_box_2[3]

    union_area = box_area_1 + box_area_2 - intersection_area
    return intersection_area / union_area


def resizeObjectImage(src_image, max_min_box_size):
    """
    对物体图像进行随机缩放
    :param src_image: 原始图像
    :param max_min_box_size: 缩放后图像中的物体的 bound box 的最大边的范围
    :return: 缩放后的图像
    """
    src_bbox = calculateBoundImage(src_image)
    src_bbox_max = np.max(src_bbox[2:4])
    cur_bbox_max = np.random.uniform(max_min_box_size[1], max_min_box_size[0], 1)[-1]
    cur_ratio = cur_bbox_max / src_bbox_max

    src_h, src_w = src_image.shape[0:2]
    dst_h, dst_w = np.floor(src_h * cur_ratio), np.floor(src_w * cur_ratio)
    dst_image = cv2.resize(src_image, (np.int(dst_w), np.int(dst_h)))
    return dst_image


def addObjectToImage(backgroup_image, obj_image, bound_box):
    """
    将目标物体添加到背景图中
    :param backgroup_image: 背景图
    :param obj_image: 目标物体图
    :param bound_box: 边界矩形框
    :return: 添加了目标物体的背景图
    """

    tmp_image = obj_image.copy()
    if len(tmp_image.shape) == 3:
        tmp_image = cv2.cvtColor(tmp_image, cv2.COLOR_BGR2GRAY)
    mask = tmp_image > 5

    min_x, min_y, max_x, max_y = bound_box[0], bound_box[1], bound_box[0] + bound_box[2], bound_box[1] + bound_box[3]
    backgroup_image[np.int(min_y):np.int(max_y), np.int(min_x):np.int(max_x)][mask] = obj_image[mask]
    return backgroup_image


def formImageAndlabel(background_image, obj_ls, max_min_size_ration, iou_thres):
    """
    形成训练图像,并生成对应的 label 列表
    :param background_image: 输入背景图
    :param obj_ls: 目标 list
    :param max_min_size_ration: 最大最小旋转角度
    :param iou_thres: IOU 阈值
    :return: 返训练的图像,对应的 label
    """

    max_ratio, min_ratio = max_min_size_ration
    image_size = np.min(background_image.shape[0:2])
    dst_image = background_image.copy()
    max_min_box_size = [np.floor(max_ratio * image_size), np.floor(min_ratio * image_size)]
    label_ls = []
    for obj_image, obj_name in obj_ls:
        # 对图像进行随机缩放
        resize_obj_image = resizeObjectImage(obj_image, max_min_box_size)
        # 对图像进行随机旋转
        rotate_image = rotateImage(resize_obj_image, np.random.uniform(0, 360, 1)[-1])
        # 多次迭代, 直到将图像平移到适当位置为止
        src_bbox = calculateBoundImage(rotate_image)
        sub_obj_image = rotate_image[src_bbox[1]:src_bbox[1] + src_bbox[3], src_bbox[0]:src_bbox[0] + src_bbox[2]]
        iter_cnt = 100
        if len(label_ls) == 0:
            iter_cnt = 1
        for iter_idx in range(iter_cnt):
            dst_bbox = randomMoveObjectInImage(dst_image, src_bbox)
            if len(label_ls) != 0:
                is_fit = True
                for tmp_box, tmp_obj_name in label_ls:
                    #print("....", tmp_box)
                    #print("+++++", dst_bbox)
                    IOU = calculateIOU(tmp_box, dst_bbox)
                    if (IOU is not None) and (IOU > iou_thres):
                        is_fit = False
                        break
                if is_fit == False:
                    continue
                else:
                    break
        dst_image = addObjectToImage(dst_image, sub_obj_image, dst_bbox)
        label_ls.append([dst_bbox, obj_name])
    return dst_image, label_ls


def formImageLableXML(src_image, image_file_name, label_info, label_path):
    """
    生成图片的 label XML
    :param src_image: 原始图像
    :param image_file_name: 图像的文件名
    :param label_infor: 标签信息
    :param label_path: 标签的路径
    :return: XML
    """

    ele = objectify.ElementMaker(annotate=False)
    anno_tree = ele.annotation(
        ele.folder('VOC2019_xm'),
        ele.filename(image_file_name),
        ele.source(
            ele.database('The VOC2019 Database'),
            ele.annotation('PASCAL VOC2019'),
            ele.image('flickr'),
            ele.flickrid('264265361')
            ),
        ele.owner(
            ele.flickrid('xm'),
            ele.name('xm')
        ),
        ele.size(
            ele.width(str(src_image.shape[0])),
            ele.height(str(src_image.shape[1])),
            ele.depth(str(src_image.shape[2]))
        ),
        ele.segmented('0')
    )
    for cur_box, cur_obj_name in label_info:
        cur_ele = objectify.ElementMaker(annotate=False)
        cur_tree = cur_ele.object(
            ele.name(cur_obj_name),
            ele.pose('Frontal'),
            ele.truncated('0'),
            ele.difficult('0'),
            ele.bndbox(
                ele.xmin(str(cur_box[0])),
                ele.ymin(str(cur_box[1])),
                ele.xmax(str(cur_box[0] + cur_box[2])),
                ele.ymax(str(cur_box[1] + cur_box[3]))
            )
        )
        anno_tree.append(cur_tree)
    etree.ElementTree(anno_tree).write(label_path, pretty_print=True)


def main():
    obj_name_ls = ['circle', 'square']
    # 各种物体对应的图像的路径
    base_obj_file_name = '/home/xm/workspace/ImageProcess/DataSet/'
    obj_file_name = [base_obj_file_name + cur_obj for cur_obj in obj_name_ls]
    print(obj_file_name)
    # 每个种类的样本数量
    obj_count = 600

    # 图像中物体最大的数量
    image_max_obj_cnt = 2

    # 图像中物体的 bound box 的最大尺寸点,整个图像最小尺寸比例,
    max_size_radio = 0.45
    min_size_radio = 0.20

    # 图像的总数
    image_count = len(obj_name_ls) * 600

    # 数据集的保存路径
    dataset_basic_path = '/home/xm/workspace/ImageProcess/COCO/VOCdevkit/VOC2019/'
    image_folder = dataset_basic_path + 'JPEGImages/'
    #print(image_folder)
    label_folder = dataset_basic_path + 'Annotations/'
    #print(label_folder)
    image_set_folder = dataset_basic_path + 'ImageSets/Main/'
    #print(image_set_folder)

    for data_idx in range(image_count):
        # 获取 VOC 数据集中图像文件夹中所有文件的名称
        voc_folder_dir = '/home/xm/workspace/ImageProcess/VOC'
        voc_image_file_list = os.listdir(voc_folder_dir)
        #获取物体图像的文件名列表
        obj_image_ls_ls = []
        for obj_image_dir in obj_name_ls:
            cur_image_dir = base_obj_file_name + obj_image_dir
            obj_image_ls_ls.append(os.listdir(cur_image_dir))

        # 随机取一张 VOC 图做背景
        background_image_file = voc_image_file_list[np.random.randint(0, len(voc_image_file_list), 1)[-1]]
        background_image_file = voc_folder_dir + '/' + background_image_file
        background_image = cv2.imread(background_image_file)

        # 随机取若干物体
        obj_image_name_ls = []
        obj_cnt = np.random.randint(1, image_max_obj_cnt, 1)[-1]
        for obj_idx in range(obj_cnt):
            cur_obj_idx = np.random.randint(0, len(obj_image_ls_ls), 1)[-1]
            cur_obj_image_ls = obj_image_ls_ls[cur_obj_idx]
            cur_obj_file = cur_obj_image_ls[np.random.randint(0, len(cur_obj_image_ls), 1)[-1]]
            cur_obj_image = cv2.imread(base_obj_file_name + obj_name_ls[cur_obj_idx] + '/' + cur_obj_file)
            obj_image_name_ls.append([cur_obj_image, obj_name_ls[cur_obj_idx]])


        # 随机生成图像
        get_image, label_ls = formImageAndlabel(background_image, obj_image_name_ls, [max_size_radio, min_size_radio], iou_thres=0.05)
        #
        # # 保存图像与标签
        cur_image_name = str(data_idx).zfill(6) + '.jpg'
        #print(cur_image_name)
        cur_label_name = str(data_idx).zfill(6) + '.xml'
        #print(cur_label_name)

        cv2.imwrite(image_folder + cur_image_name, get_image)
        formImageLableXML(get_image, cur_image_name, label_ls, label_folder + cur_label_name)

        for obj_bbox, obj_name in label_ls:
            pnt_1 = tuple(map(int, obj_bbox[0:2]))
            pnt_2 = tuple(map(int, obj_bbox[0:2]))
            cv2.rectangle(get_image, pnt_1, pnt_2, (0, 0, 255))
        print(cur_image_name)

        cv2.imshow("get image", get_image)
        cv2.waitKey(10)
    train_set_name = 'train.txt'
    train_val_name = 'val.txt'
    test_set_name = 'test.txt'
    idx_thre = np.floor(0.6 * image_count)
    idx_thre_ = np.floor(0.8 * image_count)

    train_file = open(image_set_folder + train_set_name, 'w')
    for line_idx in range(int(idx_thre)):
        line_str = str(line_idx).zfill(6) + '\n'
        train_file.write(line_str)
    train_file.close()

    train_val_file = open(image_set_folder + train_val_name, 'w')
    for line_idx in range(int(idx_thre), int(idx_thre_)):
        line_str = str(line_idx).zfill(6) + '\n'
        train_val_file.write(line_str)
    train_val_file.close()

    test_file = open(image_set_folder + test_set_name, 'w')
    for line_idx in range(int(idx_thre_), image_count):
        line_str = str(line_idx).zfill(6) + '\n'
        test_file.write(line_str)
    test_file.close()


if __name__ == '__main__':
    main()

