LoadBalancer将服务暴露到外部实现负载均衡Openelb-layer2模式配置介绍
目录
一.openelb简介
二.主要介绍layer2模式
1.简介
2.原理
3.部署
(1)先在集群master上开启kube-proxy的strictARP
(2)应用下载openelb.yaml(需要修改镜像地址)
(3)编写yaml文件来添加eip地址池
(4)创建service
(5)验证暴露到外部并且负载均衡实现
(6)卸载openelb
一.openelb简介
OpenELB是一个开源的企业级负载均衡器,它为 Kubernetes 集群提供了强大的负载均衡功能。OpenELB 通过与 Kubernetes API 交互来获取服务和端点信息,并与 Kubernetes的内部组件(如 etcd)进行通信,以获取集群状态信息。这使得 OpenELB 能够动态地感知到整个集群的状态和服务变化。他可以根据 Kubernetes 中服务和端点的变化动态地更新负载均衡策略,确保流量(VIP流量)能够按照需求正确地路由到后端 Pod。之后的文章会讲述几类负载均衡器如何使用。
二.主要介绍layer2模式
1.简介
网络通信中使用以太网的二层(数据链路层)交换机进行数据转发的一种工作方式。在Layer2模式下,交换机根据设备的物理地址(MAC地址)来决定数据包应该转发到哪个端口。如果node1出现故障,OpenELB 会重新向路由器发送 APR/NDP 数据包,将 Service IP 地址映射到 node2的 MAC 地址,Service 流量切换到node2,这个过程可能会出现服务中断。
2.原理
单manager情况下,在设置strictARP后,openelb-manager持续的监听局域网中的ARP请求,请求IP符合IP池里面已经使用的IP时主动响应。
3.部署
(1)先在集群master上开启kube-proxy的strictARP
目的地使所有网卡停止响应其他网卡请求,以openelb来替代。
[root@k8s-master service]# kubectl edit configmap kube-proxy -n kube-system
#将strictARP改为true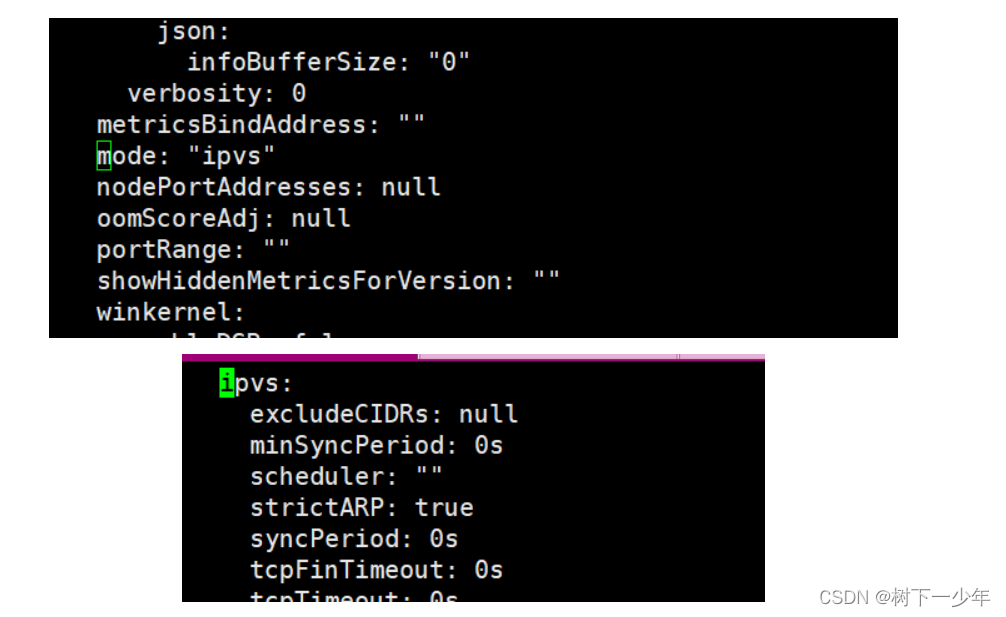
(2)应用下载openelb.yaml(需要修改镜像地址)
这里的文件已经修改好了的,一般是需要将1267和1300行两处的image地址更改(kubespheredev/kube-webhook-certgen:v1.1.1)
链接:百度网盘 请输入提取码 取码:df6b

[root@k8s-master service]# kubectl apply -f openelb.yaml
[root@k8s-master service]# kubectl get ns #查看到已经新建了ns
NAME STATUS AGE
default Active 116m
kube-node-lease Active 116m
kube-public Active 116m
kube-system Active 116m
myns Active 88m
openelb-system Active 17s
[root@k8s-master service]# kubectl get pods -n openelb-system #ns中已经运行需要的pod
NAME READY STATUS RESTARTS AGE
openelb-admission-create-g4q5f 0/1 Completed 0 17s
openelb-admission-patch-j679s 0/1 Completed 0 17s
openelb-keepalive-vip-jk5lh 1/1 Running 0 8s #我这里有两个node,应用出两个vip
openelb-keepalive-vip-xcjpw 1/1 Running 0 8s
openelb-manager-99b49789c-ssn4x 1/1 Running 0 17s(3)编写yaml文件来添加eip地址池
[root@k8s-master service]# vim ip-pool.yaml
apiVersion: network.kubesphere.io/v1alpha2 #版本可以在成功应用openelb之后使用kubectl explain Eip.apiVersion来查看
kind: Eip
metadata:
name: my-eip-pool
spec:
address: 192.168.2.11-192.168.2.20 #写一段没有使用的IP地址范围作为ip-pool,要与主机位于同一网段
protocol: layer2
disable: false
interface: ens33 #指定主机网卡名称
[root@k8s-master service]# kubectl apply -f ip-pool.yaml
eip.network.kubesphere.io/my-eip-pool created
[root@k8s-master service]# kubectl get eip
NAME CIDR USAGE TOTAL
my-eip-pool 192.168.2.11-192.168.2.20 10(4)创建service
[root@k8s-master service]# cat service1.yaml
apiVersion: apps/v1
kind: Deployment
metadata:
labels:
name: my-nginx
name: my-nginx
namespace: myns
spec:
replicas: 3
selector:
matchLabels:
name: my-nginx-deploy
template:
metadata:
labels:
name: my-nginx-deploy
spec:
containers:
- name: my-nginx-pod
image: nginx
ports:
- containerPort: 80
---
apiVersion: v1
kind: Service
metadata:
name: my-nginx-service
namespace: myns
annotations: #这三行详情也要添加,尤为重要
lb.kubesphere.io/v1alpha1: openelb
protocol.openelb.kubesphere.io/v1alpha1: layer2
eip.openelb.kubesphere.io/v1alpha2: my-eip-pool #指定创建地址池时指定的名称
spec:
ports:
- port: 80
protocol: TCP
targetPort: 80
selector:
name: my-nginx-deploy
type: LoadBalancer #指定type为LoadBalancer
LoadBalancerIP: number
#是可以指定IP的
[root@k8s-master service]# kubectl apply -f service1.yaml
deployment.apps/my-nginx created
service/my-nginx-service created
[root@k8s-master service]# kubectl get service -n myns
NAME TYPE CLUSTER-IP EXTERNAL-IP PORT(S) AGE
my-nginx-service LoadBalancer 10.106.211.61 192.168.2.11 80:32230/TCP 7s
[root@k8s-master service]# kubectl get pod -n myns
NAME READY STATUS RESTARTS AGE
my-nginx-5d67c8f488-2m7dz 1/1 Running 0 13s
my-nginx-5d67c8f488-knfl5 1/1 Running 0 13s
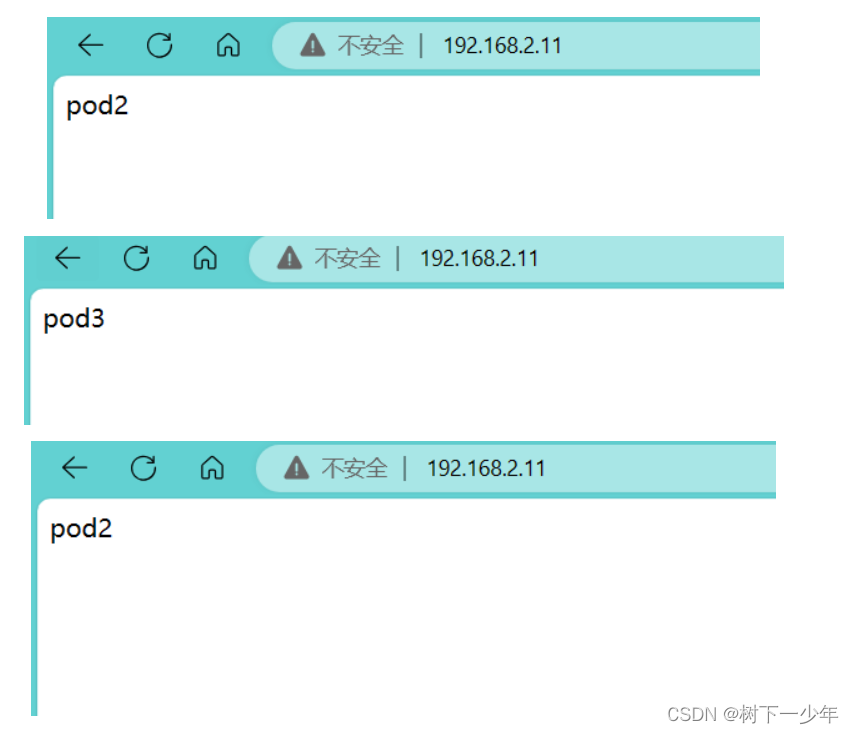
my-nginx-5d67c8f488-v49xg 1/1 Running 0 13s(5)验证暴露到外部并且负载均衡实现
主机验证
[root@k8s-master service]# kubectl exec -it my-nginx-5d67c8f488-2m7dz -n myns -- /bin/sh -c "echo pod1 > /usr/share/nginx/html/index.html"
[root@k8s-master service]# kubectl exec -it my-nginx-5d67c8f488-knfl5 -n myns -- /bin/sh -c "echo pod2 > /usr/share/nginx/html/index.html"
[root@k8s-master service]# kubectl exec -it my-nginx-5d67c8f488-v49xg -n myns -- /bin/sh -c "echo pod3 > /usr/share/nginx/html/index.html"
[root@k8s-master service]# curl 192.168.2.11
pod2
[root@k8s-master service]# curl 192.168.2.11
pod1
[root@k8s-master service]# curl 192.168.2.11
pod3
[root@k8s-master service]# curl 192.168.2.11
pod2
[root@k8s-master service]# curl 192.168.2.11
pod1
[root@k8s-master service]# curl 192.168.2.11
pod3
[root@k8s-master service]# curl 192.168.2.11
浏览器验证
(6)卸载openelb
我们采用apply -f的yaml文件来配置,就直接使用delete -f 该yaml文件即可
[root@k8s-master service]#  kubectl delete -f service1.yaml
deployment.apps "my-nginx" deleted
service "my-nginx-service" deleted
[root@k8s-master service]#  kubectl delete -f ip-pool.yaml
eip.network.kubesphere.io "my-eip-pool" deleted
[root@k8s-master service]#  kubectl delete -f openelb.yaml
namespace "openelb-system" deleted
customresourcedefinition.apiextensions.k8s.io "bgpconfs.network.kubesphere.io" deleted
customresourcedefinition.apiextensions.k8s.io "bgppeers.network.kubesphere.io" deleted
customresourcedefinition.apiextensions.k8s.io "eips.network.kubesphere.io" deleted
serviceaccount "kube-keepalived-vip" deleted
serviceaccount "openelb-admission" deleted
role.rbac.authorization.k8s.io "leader-election-role" deleted
role.rbac.authorization.k8s.io "openelb-admission" deleted
clusterrole.rbac.authorization.k8s.io "kube-keepalived-vip" deleted
clusterrole.rbac.authorization.k8s.io "openelb-admission" deleted
clusterrole.rbac.authorization.k8s.io "openelb-manager-role" deleted
rolebinding.rbac.authorization.k8s.io "leader-election-rolebinding" deleted
rolebinding.rbac.authorization.k8s.io "openelb-admission" deleted
clusterrolebinding.rbac.authorization.k8s.io "kube-keepalived-vip" deleted
clusterrolebinding.rbac.authorization.k8s.io "openelb-admission" deleted
clusterrolebinding.rbac.authorization.k8s.io "openelb-manager-rolebinding" deleted
service "openelb-admission" deleted
deployment.apps "openelb-manager" deleted
job.batch "openelb-admission-create" deleted
job.batch "openelb-admission-patch" deleted
mutatingwebhookconfiguration.admissionregistration.k8s.io "openelb-admission" deleted
validatingwebhookconfiguration.admissionregistration.k8s.io "openelb-admiss