Ubuntu18.04 本地安装CVAT标注工具
写在前面:
1、如果直接clone最新版本的cvat,python版本最好安装3.8的,因为其中部分代码的语法只有高版本的python才可以支持。
2、安装完成以后本地登陆可能出现"cannot connect to cvat server"的错误,可以从Cannot connect to the CVAT server · Issue #6202 · opencv/cvat · GitHub
这个里面查找一下答案,也可以直接执行以下语句,查看报错问题:
python manage.py health_check
3、最好不要安装最新版的CVAT。
以下
主要流程参考这个链接:https://www.cnblogs.com/duoruaimi4/p/17415137.html
系统:Ubuntu 18.04.1 LTS

docker有版本要求,如果有docker可以先卸载,再按要求安装

主流程参照:https://blog.csdn.net/sinat_29957455/article/details/116245562

安装docker:

sudo apt-get update
sudo apt-get --no-install-recommends install -y \
apt-transport-https \
ca-certificates \
curl \
gnupg-agent \
software-properties-common
curl -fsSL https://download.docker.com/linux/ubuntu/gpg | sudo apt-key add -
sudo add-apt-repository \
"deb [arch=amd64] https://download.docker.com/linux/ubuntu \
$(lsb_release -cs) \
stable"
sudo apt-get update
sudo apt-get --no-install-recommends install -y docker-ce docker-ce-cli containerd.io

安装docker-compose的时候报了很多错误,去掉sudo(后面一句命令)

 创建docker用户:

sudo groupadd docker
sudo usermod -aG docker $USER

安装docker-compose:

sudo apt-get --no-install-recommends install -y python3-pip python3-setuptools
sudo python3 -m pip install setuptools docker-compose

如果出现错误:

failed to build: the --mount option requires BuildKit
可使用如下方法:

export DOCKER_BUILDKIT=1 # or configure in daemon.json
export COMPOSE_DOCKER_CLI_BUILD=1

然后再sudo python3 -m pip install setuptools docker-compose,可去掉sudo

clone CVAT 到本地:

sudo apt-get --no-install-recommends install -y git
git clone https://github.com/opencv/cvat
cd cvat

运行docker容器:

docker-compose up -d

再次:

docker-compose -f docker-compose.yml -f docker-compose.dev.yml build
docker-compose up -d

有的库可能默认安装版本比较高,可以手动安装合适版本。

如:pip install cryptography==3.4.8

注册superuser:

docker exec -it cvat bash -ic 'python3 ~/manage.py createsuperuser'

如果cvat容器不存在,就使用:

docker exec -it cvat_server bash -ic 'python3 ~/manage.py createsuperuser'

这样完整的服务端已经部署好了,并且有了一个管理员账号。

通过web,登录管理员账号就可以访问。

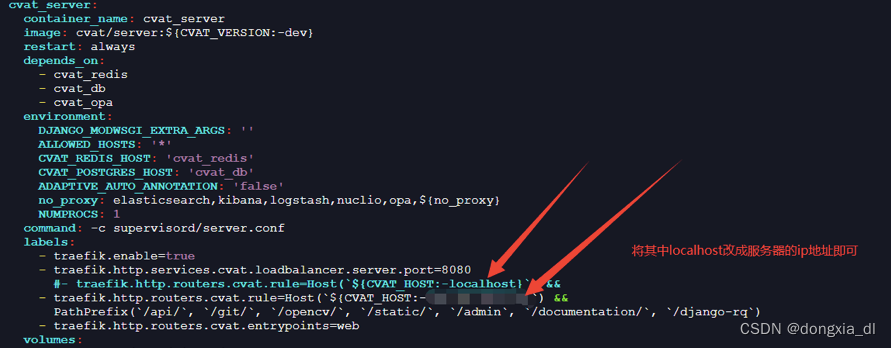
修改配置项,加入本地ip后,其它机器可通过ip和8080端口访问:

在cvat目录下执行:

sudo cp -a docker-compose.yml docker-compose.override.yml
sudo vim docker-compose.override.yml

#重启服务器
docker-compose up -d

重启后修改生效,可通过ip:8080 访问


#关闭Docker容器命令:docker-compose down

