Isaac Sim教程08 独立代码编程
Isaac Sim 独立代码编程
版权信息
Copyright 2023 Herman Ye@Auromix. All rights reserved.

This course and all of its associated content, including but not limited to text,
images, videos, and any other materials, are protected by copyright law.
The author holds all rights to this course and its contents.

Any unauthorized use, reproduction, distribution, or modification of this course
or its contents is strictly prohibited and may result in legal action.
This includes, but is not limited to:
Copying or distributing course materials without express written permission.
Reposting, sharing, or distributing course content on any platform without proper attribution and permission.
Creating derivative works based on this course without permission.
Permissions and Inquiries

If you wish to use or reproduce any part of this course for purposes other than personal learning,
please contact the author to request permission.

The course content is provided for educational purposes, and the author makes no warranties or representations
regarding the accuracy, completeness, or suitability of the course content for any specific purpose.
The author shall not be held liable for any damages, losses,
or other consequences resulting from the use or misuse of this course.

Please be aware that this course may contain materials or images obtained from third-party sources.
The author and course creator diligently endeavor to ensure that these materials
are used in full compliance with copyright and fair use regulations.
If you have concerns about any specific content in this regard,
please contact the author for clarification or resolution.

By enrolling in this course, you agree to abide by the terms and conditions outlined in this copyright notice.
学习目标
- 熟悉Omniverse中拓展的概念
- 熟悉Omniverse中拓展的包架构
- 熟悉Omniverse中拓展的创建
- 了解Omniverse中拓展在工具配置、场景导入和强化学习中的使用
难度级别
| 初级 | 中级 | 高级 |
|---|---|---|
| √ |
预计耗时
40 mins
学习前提
| 对象 | 类型 | 状态 |
|---|---|---|
| Ubuntu22.04操作系统 | 软件 | 已确认 |
| Isaac Sim | 软件 | 已配置 |
| Isaac Sim基本概念 | 知识 | 已了解 |
| Isaac Sim基本使用 | 知识 | 已了解 |
| Isaac Sim高级使用 | 知识 | 已了解 |
Isaac Sim core API
NVIDIA Omniverse™ Kit是 Omniverse Isaac Sim 用于构建其应用程序的工具包,提供用于脚本编写的 Python 解释器。这意味着每个 GUI 命令以及许多附加功能都可以作为 Python API 提供。
然而,使用 Pixar 的 USD Python API 与 Omniverse Kit 交互的学习曲线非常陡峭,而且步骤通常很乏味。
因此,Nvidia提供了一组旨在用于机器人应用程序的 API,这些 API 抽象了 USD API 的复杂性,并将多个步骤合并为一个以执行频繁执行的任务。
Example代码编程
├── __init__.py
├── my_demo_hello_world_extension.py
└── my_demo_hello_world.py
在GUi界面的上栏目,有Isaac Examples来辅助初学者学习Isaac Sim,尝试打开Hello World案例,点击LOAD来载入这个demo,点击旁边的图标在VSCode中打开源代码:
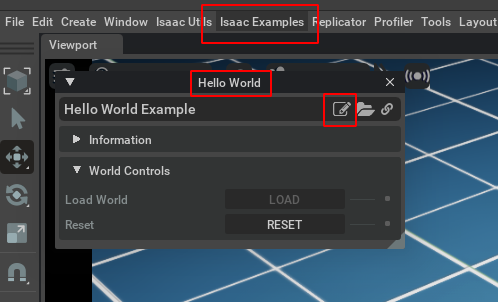
点击文件夹则进入其所在的文件夹,包含了hello_world.py、hello_world_extension.py和__init__.py.
hello_world.py
脚本hello_world.py是添加应用程序逻辑的地方,而应用程序的 UI 元素将添加到hello_world_extension.py脚本中,从而链接到逻辑。
# Copyright (c) 2020-2023, NVIDIA CORPORATION. All rights reserved.
#
# NVIDIA CORPORATION and its licensors retain all intellectual property
# and proprietary rights in and to this software, related documentation
# and any modifications thereto. Any use, reproduction, disclosure or
# distribution of this software and related documentation without an express
# license agreement from NVIDIA CORPORATION is strictly prohibited.
#

from omni.isaac.examples.base_sample import BaseSample

# Note: checkout the required tutorials at https://docs.omniverse.nvidia.com/app_isaacsim/app_isaacsim/overview.html


class HelloWorld(BaseSample):
    def __init__(self) -> None:
        super().__init__()
        return

    def setup_scene(self):

        world = self.get_world()
        world.scene.add_default_ground_plane()
        return

    async def setup_post_load(self):
        return

    async def setup_pre_reset(self):
        return

    async def setup_post_reset(self):
        return

    def world_cleanup(self):
        return
hello_world_extension.py
# Copyright (c) 2020-2023, NVIDIA CORPORATION. All rights reserved.
#
# NVIDIA CORPORATION and its licensors retain all intellectual property
# and proprietary rights in and to this software, related documentation
# and any modifications thereto. Any use, reproduction, disclosure or
# distribution of this software and related documentation without an express
# license agreement from NVIDIA CORPORATION is strictly prohibited.
#

import os

from omni.isaac.examples.base_sample import BaseSampleExtension
from omni.isaac.examples.hello_world import HelloWorld


class HelloWorldExtension(BaseSampleExtension):
    def on_startup(self, ext_id: str):
        super().on_startup(ext_id)
        super().start_extension(
            menu_name="",
            submenu_name="",
            name="Hello World",
            title="Hello World Example",
            doc_link="https://docs.omniverse.nvidia.com/app_isaacsim/app_isaacsim/tutorial_core_hello_world.html",
            overview="This Example introduces the user on how to do cool stuff with Isaac Sim through scripting in asynchronous mode.",
            file_path=os.path.abspath(__file__),
            sample=HelloWorld(),
        )
        return
_init_.py
	# Copyright (c) 2021-2023, NVIDIA CORPORATION. All rights reserved.
	#
	# NVIDIA CORPORATION and its licensors retain all intellectual property
	# and proprietary rights in and to this software, related documentation
	# and any modifications thereto. Any use, reproduction, disclosure or
	# distribution of this software and related documentation without an express
	# license agreement from NVIDIA CORPORATION is strictly prohibited.
	#

	from omni.isaac.examples.hello_world.hello_world import HelloWorld
	from omni.isaac.examples.hello_world.hello_world_extension import HelloWorldExtension
修改和自定义Example
当进行重置操作时,在运行IsaacSim的终端里打印了位姿
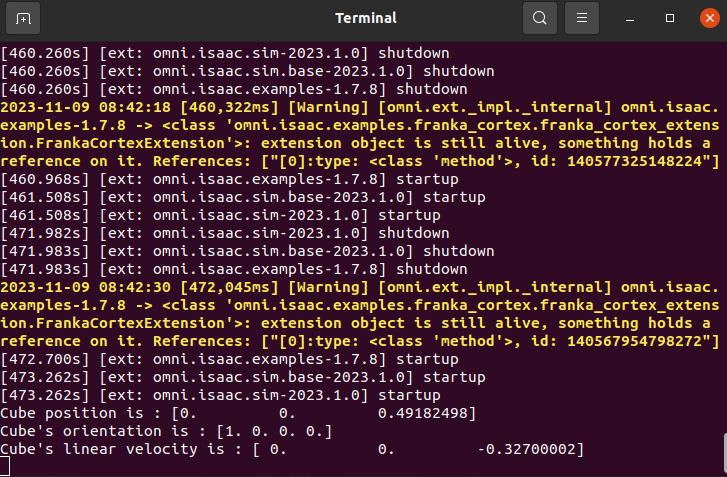
# Go to Isaac Sim directory
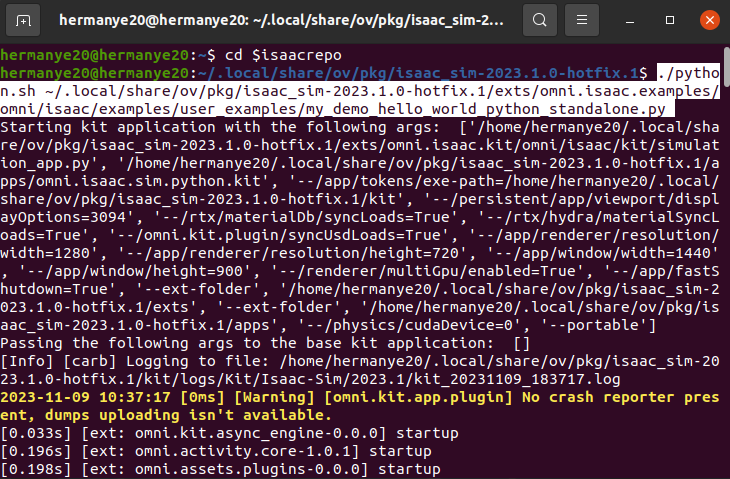
cd $isaacrepo
# Run demo
./python.sh ~/.local/share/ov/pkg/isaac_sim-2023.1.0-hotfix.1/exts/omni.isaac.examples/omni/isaac/examples/user_examples/my_demo_hello_world_python_standalone.py
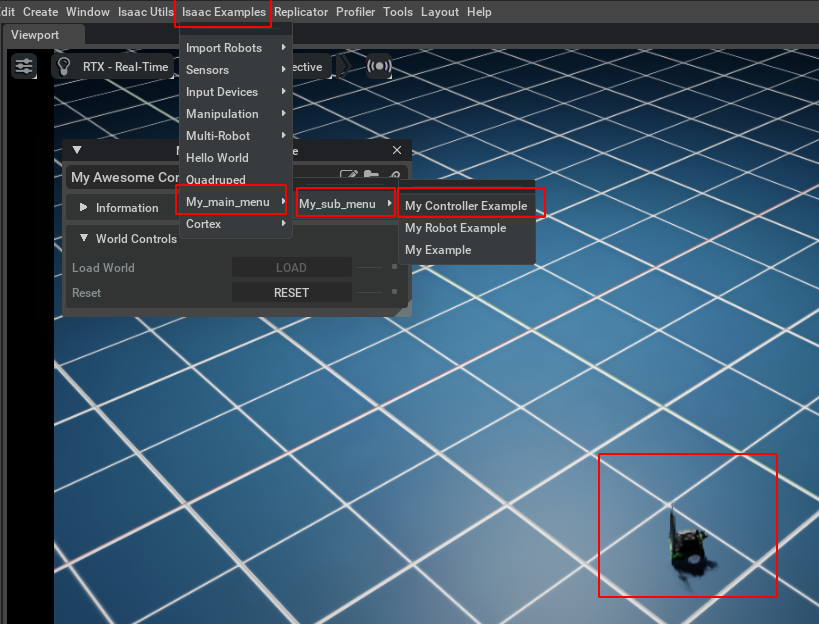
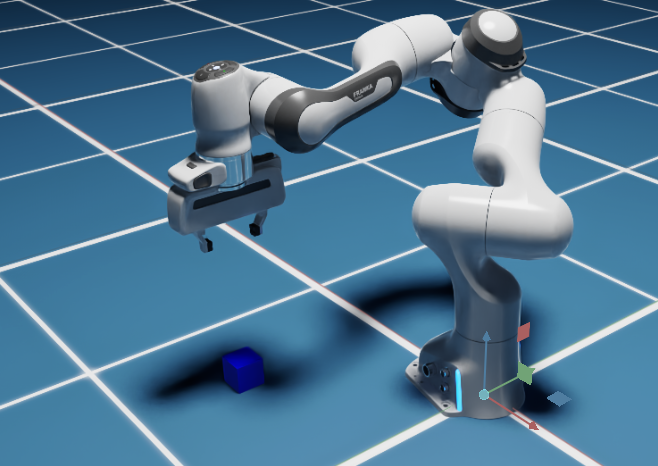
./python.sh /home/hermanye20/.local/share/ov/pkg/isaac_sim-2023.1.0-hotfix.1/exts/omni.isaac.examples/omni/isaac/examples/user_examples/my_demo_franka_arm_python_standalone.py
世界由“加载”和“重置”按钮管理,使用户可以清楚地保证调用回调函数时模拟器的状态。用户与世界的交互被最小化到他们与世界的唯一交互采用world.scene.add(user_object)的形式,其中user_object是来自omni.isaac.core的任何对象。
基准代码详解
Example基类
base_example.py
# Copyright (c) 2018-2023, NVIDIA CORPORATION. All rights reserved.
#
# NVIDIA CORPORATION and its licensors retain all intellectual property
# and proprietary rights in and to this software, related documentation
# and any modifications thereto. Any use, reproduction, disclosure or
# distribution of this software and related documentation without an express
# license agreement from NVIDIA CORPORATION is strictly prohibited.
#

# 引入垃圾回收
import gc
# 引入抽象基类装饰器,以确保子类重写了父类中的抽象方法而不是直接继承父类的抽象方法
from abc import abstractmethod
# 引入World类
from omni.isaac.core import World
# 引入Scene类
from omni.isaac.core.scenes.scene import Scene
# 引入创建和更新舞台Stage的异步方法
from omni.isaac.core.utils.stage import create_new_stage_async, update_stage_async


class BaseSample(object):
    def __init__(self) -> None:
        # 初始化变量
        self._world = None
        self._current_tasks = None
        # 初始化世界设置
        self._world_settings = {"physics_dt": 1.0 / 60.0,
                                "stage_units_in_meters": 1.0, "rendering_dt": 1.0 / 60.0}
        # self._logging_info = ""
        return

    # 获取世界实例的方法
    def get_world(self):
        return self._world

    # 设置世界参数
    # 若该方法被调用且传入了参数,则更新世界对应的参数设置
    def set_world_settings(self, physics_dt=None, stage_units_in_meters=None, rendering_dt=None):

        if physics_dt is not None:
            self._world_settings["physics_dt"] = physics_dt
        if stage_units_in_meters is not None:
            self._world_settings["stage_units_in_meters"] = stage_units_in_meters
        if rendering_dt is not None:
            self._world_settings["rendering_dt"] = rendering_dt
        return

    # 当按下Load时调用的函数
    # 这是加载世界的异步方法
    async def load_world_async(self):
        """Function called when clicking load buttton"""
        # 检查是否已经实例化了世界
        if World.instance() is None:
            # 若没有实例化,则异步等待创建一个新的舞台Stage
            await create_new_stage_async()
            # 将self._world_settings字典中的参数键值对解包为关键字参数并用于创建世界实例
            self._world = World(**self._world_settings)
            # 初始化世界的仿真上下文
            await self._world.initialize_simulation_context_async()
            # 设置场景
            self.setup_scene()
        else:
            # 若已经实例化了世界,则直接获取世界实例
            self._world = World.instance()
        # 获取当前世界中的任务
        # Warning@HermanYe: 所有任务都应该在reset之前添加
        self._current_tasks = self._world.get_current_tasks()

        # 将舞台Stage重置为其初始状态,并将场景Scene中包含的每个对象重置为其默认状态
        await self._world.reset_async()
        # 将世界暂停
        await self._world.pause_async()
        # 在load世界的首次reset后,调用setup_post_load方法
        await self.setup_post_load()
        # 若存在任务,则将物理回调函数添加到世界中
        if len(self._current_tasks) > 0:
            # 在每次物理步进前调用的回调函数(回调名称,具体的回调函数)
            # self._world.step_async将会调用物理步进前应调用的所有函数
            self._world.add_physics_callback(
                "tasks_step", self._world.step_async)
        return

    # 当按下Reset时调用的函数
    # 这是重置世界的异步方法
    async def reset_async(self):
        """Function called when clicking reset buttton"""
        # 若世界中已经存在任务且已经构建了场景
        if self._world.is_tasks_scene_built() and len(self._current_tasks) > 0:
            # 移除名为tasks_step的回调函数
            self._world.remove_physics_callback("tasks_step")
        # 开始世界的Play
        await self._world.play_async()
        # 更新舞台Stage
        await update_stage_async()
        # 调用setup_pre_reset方法来完成重置之前需要的操作
        await self.setup_pre_reset()
        # 重置世界
        await self._world.reset_async()
        # 暂停世界
        await self._world.pause_async()
        # 调用setup_post_reset方法来完成重置之后需要的操作
        await self.setup_post_reset()
        # 若世界中已经存在任务且已经构建了场景
        if self._world.is_tasks_scene_built() and len(self._current_tasks) > 0:
            # 重新添加名为tasks_step的回调函数
            self._world.add_physics_callback(
                "tasks_step", self._world.step_async)
        return

    @abstractmethod
    def setup_scene(self, scene: Scene) -> None:
        """used to setup anything in the world, adding tasks happen here for instance.

        Args:
            scene (Scene): [description]
        """
        return

    @abstractmethod
    async def setup_post_load(self):
        """called after first reset of the world when pressing load,
        intializing provate variables happen here.
        """
        return

    @abstractmethod
    async def setup_pre_reset(self):
        """called in reset button before resetting the world
        to remove a physics callback for instance or a controller reset
        """
        return

    @abstractmethod
    async def setup_post_reset(self):
        """called in reset button after resetting the world which includes one step with rendering"""
        return

    @abstractmethod
    async def setup_post_clear(self):
        """called after clicking clear button
        or after creating a new stage and clearing the instance of the world with its callbacks
        """
        return

    # def log_info(self, info):
    #     self._logging_info += str(info) + "\n"
    #     return

    # 清理世界的方法
    def _world_cleanup(self):
        # 停止世界
        self._world.stop()
        # 清除所有的回调函数
        self._world.clear_all_callbacks()
        # 清除所有的当前任务
        self._current_tasks = None
        # 其他清理操作
        self.world_cleanup()
        return

    # 其他清理操作
    def world_cleanup(self):
        """Function called when extension shutdowns and starts again, (hot reloading feature)"""
        return

    # 异步清理
    async def clear_async(self):
        """Function called when clicking clear buttton"""
        # 创建一个新的舞台Stage
        await create_new_stage_async()
        # 若世界实例不为空
        if self._world is not None:
            # 清理世界
            self._world_cleanup()
            # 清除世界实例
            self._world.clear_instance()
            # 清除代表世界的变量
            self._world = None
            # 垃圾回收
            gc.collect()
        # 调用setup_post_clear方法来完成清理之后需要的操作
        await self.setup_post_clear()
        return
Example的Extension基类
# Copyright (c) 2018-2023, NVIDIA CORPORATION. All rights reserved.
#
# NVIDIA CORPORATION and its licensors retain all intellectual property
# and proprietary rights in and to this software, related documentation
# and any modifications thereto. Any use, reproduction, disclosure or
# distribution of this software and related documentation without an express
# license agreement from NVIDIA CORPORATION is strictly prohibited.
#

import asyncio
import weakref
from abc import abstractmethod

import omni.ext
import omni.ui as ui
from omni.isaac.core import World
from omni.isaac.examples.base_sample import BaseSample
from omni.isaac.ui.menu import make_menu_item_description
from omni.isaac.ui.ui_utils import btn_builder, get_style, scrolling_frame_builder, setup_ui_headers
from omni.kit.menu.utils import MenuItemDescription, add_menu_items, remove_menu_items


class BaseSampleExtension(omni.ext.IExt):
    def on_startup(self, ext_id: str):
        self._menu_items = None
        self._buttons = None
        # 拓展ID
        self._ext_id = ext_id
        self._sample = None
        self._extra_frames = []
        return

    def start_extension(
        self,
        menu_name: str,  # 菜单名称
        submenu_name: str,  # 子菜单名称
        name: str,  # 拓展名称
        title: str,  # 标题
        doc_link: str,  # 文档链接
        overview: str,  # 概述
        file_path: str,  # 文件路径
        sample=None,
        number_of_extra_frames=1,  # 额外UI块的数量
        window_width=350,  # 窗口宽度
        keep_window_open=False,  # 是否保持窗口打开
    ):
        # 若sample为None,则创建一个BaseSample实例
        if sample is None:
            self._sample = BaseSample()
        else:
            self._sample = sample

        # 若菜单名称和子菜单名称均为空,则将菜单项添加到Isaac Examples菜单中
        # 创建了一个菜单项(拓展ID、名称和回调函数)
        # Info@HermanYe: self 是一个弱引用,用于避免循环引用问题,也就是其中两个或多个对象互相引用,导致它们无法被垃圾回收。
        menu_items = [make_menu_item_description(
            self._ext_id, name, lambda a=weakref.proxy(self): a._menu_callback())]
        # 若菜单名称不为空,则创建一个菜单项(菜单名称、子菜单名称和菜单项)
        if menu_name == "" or menu_name is None:  # 没有主菜单,创建一个单独的菜单项,归属关系为:菜单项
            self._menu_items = menu_items
        elif submenu_name == "" or submenu_name is None:  # 没有子菜单,创建一个归属于一个主菜单的菜单项,归属关系为:主菜单->菜单项
            self._menu_items = [MenuItemDescription(
                name=menu_name, sub_menu=menu_items)]
        else:  # 既设置了主菜单又设置了子菜单,创建一个菜单项,归属关系为:主菜单->子菜单->菜单项
            self._menu_items = [
                MenuItemDescription(
                    name=menu_name, sub_menu=[MenuItemDescription(
                        name=submenu_name, sub_menu=menu_items)]
                )
            ]
        # 将菜单项添加到Isaac Examples菜单中
        add_menu_items(self._menu_items, "Isaac Examples")
        # 创建按钮字典
        self._buttons = dict()
        # 创建完整的UI
        self._build_ui(
            name=name,
            title=title,
            doc_link=doc_link,
            overview=overview,
            file_path=file_path,
            number_of_extra_frames=number_of_extra_frames,
            window_width=window_width,
            keep_window_open=keep_window_open,
        )
        return

    # 返回拓展的案例
    @property
    def sample(self):
        return self._sample

    def get_frame(self, index):
        if index >= len(self._extra_frames):
            raise Exception("there were {} extra frames created only".format(
                len(self._extra_frames)))
        return self._extra_frames[index]

    # 获取世界实例的方法
    def get_world(self):
        return World.instance()

    # 获取按钮的方法
    def get_buttons(self):
        return self._buttons

    def _build_ui(
        self, name, title, doc_link, overview, file_path, number_of_extra_frames, window_width, keep_window_open
    ):
        # 创建顶层容器窗口,默认吸附在全局的左下角
        self._window = omni.ui.Window(
            name, width=window_width, height=0, visible=keep_window_open, dockPreference=ui.DockPreference.LEFT_BOTTOM
        )

        with self._window.frame:
            # 创建垂直堆叠布局容器,用于垂直排列后续的 UI 元素
            self._main_stack = ui.VStack(spacing=5, height=0)
            with self._main_stack:

                # 在Isaac 扩展的顶部创建标准 UI 元素,显示扩展的名称、链接还有指向的代码文件,通过按钮可访问
                setup_ui_headers(self._ext_id, file_path,
                                 title, doc_link, overview)
                # 创建名为World Controls可折叠的UI块,这部分为拓展的主要内容
                self._controls_frame = ui.CollapsableFrame(
                    title="World Controls",  # 左侧显示的标题
                    width=ui.Fraction(1),  # 宽度
                    height=0,  # 高度
                    collapsed=False,  # 是否默认折叠
                    style=get_style(),  # Isaac Sim样式
                    horizontal_scrollbar_policy=ui.ScrollBarPolicy.SCROLLBAR_AS_NEEDED,  # 水平滚动条
                    vertical_scrollbar_policy=ui.ScrollBarPolicy.SCROLLBAR_ALWAYS_ON,  # 垂直滚动条
                )
                # 创建一个滚动框架,用于垂直排列后续的 额外的UI块
                with ui.VStack(style=get_style(), spacing=5, height=0):
                    for i in range(number_of_extra_frames):
                        self._extra_frames.append(
                            ui.CollapsableFrame(
                                title="",
                                width=ui.Fraction(0.33),
                                height=0,
                                visible=False,
                                collapsed=False,
                                style=get_style(),
                                horizontal_scrollbar_policy=ui.ScrollBarPolicy.SCROLLBAR_AS_NEEDED,
                                vertical_scrollbar_policy=ui.ScrollBarPolicy.SCROLLBAR_ALWAYS_ON,
                            )
                        )

                with self._controls_frame:
                    with ui.VStack(style=get_style(), spacing=5, height=0):
                        dict = {
                            "label": "Load World",  # 左侧显示的标题
                            "type": "button",  # UI类型
                            "text": "Load",  # 按钮上显示的文字
                            "tooltip": "Load World and Task",  # 鼠标悬停时显示的文字
                            "on_clicked_fn": self._on_load_world,  # 点击按钮时的回调函数
                        }
                        # 解析字典用作参数,用以创建Load按钮
                        self._buttons["Load World"] = btn_builder(**dict)
                        # 启用按钮
                        self._buttons["Load World"].enabled = True
                        dict = {
                            "label": "Reset",
                            "type": "button",
                            "text": "Reset",
                            "tooltip": "Reset robot and environment",
                            "on_clicked_fn": self._on_reset,
                        }
                        # 解析字典用作参数,用以创建Reset按钮
                        self._buttons["Reset"] = btn_builder(**dict)
                        # 禁用按钮
                        self._buttons["Reset"].enabled = False
        return

    def _set_button_tooltip(self, button_name, tool_tip):
        self._buttons[button_name].set_tooltip(tool_tip)
        return

    # 加载世界的普通方法
    def _on_load_world(self):
        async def _on_load_world_async():
            # 调用用户在sample中自定义的加载世界的方法
            await self._sample.load_world_async()
            # 等待Omniverse Kit的下一次更新,可能用于对齐
            # Ref: https://docs.omniverse.nvidia.com/kit/docs/kit-manual/104.0/omni.kit.app/omni.kit.app.IApp.html
            await omni.kit.app.get_app().next_update_async()
            # 添加舞台事件回调到世界
            self._sample._world.add_stage_callback(
                "stage_event_1", self.on_stage_event)
            # 启用所有按钮,禁用Load World按钮
            self._enable_all_buttons(True)
            self._buttons["Load World"].enabled = False
            # 调用用户在sample中自定义的加载世界按钮被按下后的方法
            self.post_load_button_event()
            # 添加时间轴事件回调到世界
            self._sample._world.add_timeline_callback(
                "stop_reset_event", self._reset_on_stop_event)
        # 在普通方法中,异步执行加载世界的方法以避免阻塞主线程
        asyncio.ensure_future(_on_load_world_async())
        return

    def _on_reset(self):
        # 调用用户在sample中自定义的重置世界的方法
        async def _on_reset_async():
            await self._sample.reset_async()
            await omni.kit.app.get_app().next_update_async()
            self.post_reset_button_event()

        asyncio.ensure_future(_on_reset_async())
        return

    @abstractmethod
    def post_reset_button_event(self):
        return

    @abstractmethod
    def post_load_button_event(self):
        return

    @abstractmethod
    def post_clear_button_event(self):
        return

    def _enable_all_buttons(self, flag):
        # 遍历按钮字典,启用或禁用所有按钮
        for btn_name, btn in self._buttons.items():
            if isinstance(btn, omni.ui._ui.Button):
                btn.enabled = flag
        return

    def _menu_callback(self):
        # 反转窗口的可见性
        self._window.visible = not self._window.visible
        return

    def _on_window(self, status):
        # if status:
        return

    def on_shutdown(self):
        self._extra_frames = []
        if self._sample._world is not None:
            self._sample._world_cleanup()
        if self._menu_items is not None:
            self._sample_window_cleanup()
        if self._buttons is not None:
            self._buttons["Load World"].enabled = True
            self._enable_all_buttons(False)
        self.shutdown_cleanup()
        return

    def shutdown_cleanup(self):
        return

    def _sample_window_cleanup(self):
        remove_menu_items(self._menu_items, "Isaac Examples")
        self._window = None
        self._menu_items = None
        self._buttons = None
        return

    def on_stage_event(self, event):
        # 若舞台事件为关闭,则清理世界
        if event.type == int(omni.usd.StageEventType.CLOSED):
            # 清理世界及其实例
            if World.instance() is not None:
                self.sample._world_cleanup()
                self.sample._world.clear_instance()
                # 检查BaseSampleExtension的实例是否有_buttons属性
                if hasattr(self, "_buttons"):
                    # 若有,则禁用所有按钮,启用Load World按钮
                    if self._buttons is not None:
                        self._enable_all_buttons(False)
                        self._buttons["Load World"].enabled = True
        return

    def _reset_on_stop_event(self, e):
        # 若时间轴事件为停止,则禁用Load World按钮,启用Reset按钮,并调用清理世界后需要执行的内容(自定义的)
        if e.type == int(omni.timeline.TimelineEventType.STOP):
            self._buttons["Load World"].enabled = False
            self._buttons["Reset"].enabled = True
            self.post_clear_button_event()
        return
独立代码编程
Hello World
# 在其他任何引入前,必须先引入仿真器类
from omni.isaac.kit import SimulationApp
# 构建仿真器实例
# 设置Headless模式(TODO)
simulation_app = SimulationApp({"headless": False})

# 引入World类
from omni.isaac.core import World
# 引入DynamicCuboid类,用于创建立方体
from omni.isaac.core.objects import DynamicCuboid
# 引入numpy
import numpy as np

# 创建世界实例
world = World()
# 添加默认的地面
world.scene.add_default_ground_plane()
# 添加一个立方体
fancy_cube = world.scene.add(
    DynamicCuboid(
        prim_path="/World/random_cube",
        name="fancy_cube",
        position=np.array([0, 0, 1.0]),
        scale=np.array([0.5015, 0.5015, 0.5015]),
        color=np.array([0, 0, 1.0]),
    ))
# 添加资源后建议进行重置
world.reset()

# 主循环
steps_to_simulate = 2000
for i in range(steps_to_simulate):
    # 获取指定的prim在世界坐标系下的位姿
    position, orientation = fancy_cube.get_world_pose()
    # 获取指定的prim的线速度
    linear_velocity = fancy_cube.get_linear_velocity()
    # 打印信息
    print("Cube position is : " + str(position))
    print("Cube's orientation is : " + str(orientation))
    print("Cube's linear velocity is : " + str(linear_velocity))

    # 同步执行仿真物理步进和显示渲染步进
    world.step(render=True)

# 关闭仿真器
simulation_app.close()
My Robot
# 在其他任何引入前,必须先引入仿真器类
from omni.isaac.kit import SimulationApp
# 构建仿真器实例
# 设置Headless模式(TODO)
simulation_app = SimulationApp({"headless": False})


# 引入World类
from omni.isaac.core import World
# 引入nuclues中的函数来获取assets路径
from omni.isaac.core.utils.nucleus import get_assets_root_path
# 引入omni.isaac.core.utils.stage中的函数来添加机器人模型引用
from omni.isaac.core.utils.stage import add_reference_to_stage
# 引入omni.isaac.core.robots中的Robot类
from omni.isaac.core.robots import Robot
# 引入关节控制种类相关类
from omni.isaac.core.utils.types import ArticulationAction
# 引入日志相关,Carbonite含有Omniverse的日志系统
import carb
# 引入numpy
import numpy as np


class HelloRobot():
    def __init__(self):
        self.setup_scene()
        return

    def setup_scene(self):
        # 创建世界实例
        self._world = World()
        # 添加默认的地面
        self._world.scene.add_default_ground_plane()
        # 获取Nucleus服务器上的Isaac资产文件夹的路径
        assets_root_path = get_assets_root_path()
        # 打印错误信息
        if assets_root_path is None:
            carb.log_error("Could not find nucleus server with /Isaac folder")
        # 打印Isaac资产文件夹的路径
        carb.log_info("Assets root path: " + assets_root_path)
        # 拼接机器人模型的路径
        asset_path = assets_root_path + "/Isaac/Robots/Jetbot/jetbot.usd"
        # 打印机器人模型的路径
        carb.log_info("Asset path: " + asset_path)
        # 将机器人模型添加到Stage中并指定它的Stage路径
        add_reference_to_stage(usd_path=asset_path,
                               prim_path="/World/Fancy_Robot")

        # 将机器人prim root 封装成Robot类的实例并添加到世界中
        # 注意:此步不会重复添加prim到Stage,因为在第一次添加后,该prim已经存在于Stage中
        jetbot_robot = self._world.scene.add(
            Robot(prim_path="/World/Fancy_Robot", name="fancy_robot"))

        # 打印机器人的自由度,但在第一次重置之前,关节信息无法获取,它将输出none
        print("Num of degrees of freedom before first reset: " +
              str(jetbot_robot.num_dof))

        # 添加资源后建议进行重置
        self._world.reset()

        # 获取指定名称的prim,此处为机器人
        self._jetbot = self._world.scene.get_object("fancy_robot")
        # 获取机器人的关节隐式PD控制器,可用于设置PD控制器的参数,应用动作,切换控制模式等
        self._jetbot_articulation_controller = self._jetbot.get_articulation_controller()

        # 添加一个仿真物理步进回调函数,以便在每次执行物理步骤时发送控制动作
        self._world.add_physics_callback(
            "sending_actions", callback_fn=self.send_robot_actions)

        # 在第一次重置后,关节信息将可用,此时将打印关节信息,它将输出2
        print("Num of degrees of freedom after first reset: " +
              str(self._jetbot.num_dof))
        # 获取关节的位置
        print("Joint Positions after first reset: " +
              str(self._jetbot.get_joint_positions()))

    def send_robot_actions(self, step_size):
        # 控制器的apply_action 方法接受 ArticulationAction 类型的参数,其中包含关节位置,关节力矩和关节速度
        # 对于轮子通常指定速度控制,此处随机生成两个轮子的速度数组乘上系数作为速度控制输入
        # self._jetbot_articulation_controller.apply_action()的另一个相同的方法是self._jetbot.apply_action()
        wheel_velocities = 5 * np.random.rand(2)
        self._jetbot_articulation_controller.apply_action(ArticulationAction(joint_positions=None,
                                                                             joint_efforts=None,
                                                                             joint_velocities=wheel_velocities))
        # 打印日志
        print("send_robot_actions method called")
        print("step_size: " + str(step_size))
        print("joint_positions: " +
              str(self._jetbot.get_joint_positions()))
        print("joint_velocities: " + str(wheel_velocities))

    def run(self, steps_to_simulate=2000):
        for i in range(steps_to_simulate):
            # 同步执行仿真物理步进和显示渲染步进
            self._world.step(render=True)

    def close(self):
        # 关闭仿真器
        simulation_app.close()


def main():
    # 创建HelloRobot实例
    hello_robot = HelloRobot()
    # 运行仿真
    hello_robot.run()
    # 关闭仿真器
    hello_robot.close()


if __name__ == "__main__":
    main()
My controller
# 在其他任何引入前,必须先引入仿真器类
from omni.isaac.kit import SimulationApp
# 构建仿真器实例
# 设置Headless模式(TODO)
simulation_app = SimulationApp({"headless": False})


# 引入World类
from omni.isaac.core import World
# 引入nuclues中的函数来获取assets路径
from omni.isaac.core.utils.nucleus import get_assets_root_path
# 引入omni.isaac.core.utils.stage中的函数来添加机器人模型引用
from omni.isaac.core.utils.stage import add_reference_to_stage
# 引入omni.isaac.core.robots中的Robot类
from omni.isaac.core.robots import Robot
# 引入关节控制种类相关类
from omni.isaac.core.utils.types import ArticulationAction
# 引入控制器的基类
from omni.isaac.core.controllers import BaseController
# 引入日志相关,Carbonite含有Omniverse的日志系统
import carb
# 引入numpy
import numpy as np


class MyController(BaseController):
    def __init__(self):
        super().__init__(name="my_cool_controller")
        # 双轮模型的开环控制器
        self._wheel_radius = 0.03
        self._wheel_base = 0.1125
        return

    def forward(self, command):
        # 具体的控制器实现
        joint_velocities = [0.0, 0.0]
        joint_velocities[0] = (
            (2 * command[0]) - (command[1] * self._wheel_base)) / (2 * self._wheel_radius)
        joint_velocities[1] = (
            (2 * command[0]) + (command[1] * self._wheel_base)) / (2 * self._wheel_radius)
        # 返还ArticulationAction对象
        return ArticulationAction(joint_velocities=joint_velocities)


class HelloRobot():
    def __init__(self):
        self.setup_scene()
        return

    def setup_scene(self):
        # 创建世界实例
        self._world = World()
        # 添加默认的地面
        self._world.scene.add_default_ground_plane()
        # 获取Nucleus服务器上的Isaac资产文件夹的路径
        assets_root_path = get_assets_root_path()
        # 打印错误信息
        if assets_root_path is None:
            carb.log_error("Could not find nucleus server with /Isaac folder")
        # 打印Isaac资产文件夹的路径
        carb.log_info("Assets root path: " + assets_root_path)
        # 拼接机器人模型的路径
        asset_path = assets_root_path + "/Isaac/Robots/Jetbot/jetbot.usd"
        # 打印机器人模型的路径
        carb.log_info("Asset path: " + asset_path)
        # 将机器人模型添加到Stage中并指定它的Stage路径
        add_reference_to_stage(usd_path=asset_path,
                               prim_path="/World/Fancy_Robot")

        # 将机器人prim root 封装成Robot类的实例并添加到世界中
        # 注意:此步不会重复添加prim到Stage,因为在第一次添加后,该prim已经存在于Stage中
        jetbot_robot = self._world.scene.add(
            Robot(prim_path="/World/Fancy_Robot", name="fancy_robot"))

        # 打印机器人的自由度,但在第一次重置之前,关节信息无法获取,它将输出none
        print("Num of degrees of freedom before first reset: " +
              str(jetbot_robot.num_dof))

        # 添加资源后建议进行重置
        self._world.reset()

        # 获取指定名称的prim,此处为机器人
        self._jetbot = self._world.scene.get_object("fancy_robot")
        # 自定义机器人控制器
        self._my_controller = MyController()

        # 添加一个仿真物理步进回调函数,以便在每次执行物理步骤时发送控制动作
        self._world.add_physics_callback(
            "sending_actions", callback_fn=self.send_robot_actions)

        # 在第一次重置后,关节信息将可用,此时将打印关节信息,它将输出2
        print("Num of degrees of freedom after first reset: " +
              str(self._jetbot.num_dof))
        # 获取关节的位置
        print("Joint Positions after first reset: " +
              str(self._jetbot.get_joint_positions()))

    def send_robot_actions(self, step_size):
        # 自定义速度指令的格式为[前进速度,角速度]
        my_velocity_control_command = [0.5, np.pi / 4]
        # 应用自定义控制器计算出的动作
        self._jetbot.apply_action(self._my_controller.forward(
            command=my_velocity_control_command))

    def run(self, steps_to_simulate=2000):
        for i in range(steps_to_simulate):
            # 同步执行仿真物理步进和显示渲染步进
            self._world.step(render=True)

    def close(self):
        # 关闭仿真器
        simulation_app.close()


def main():
    # 创建HelloRobot实例
    hello_robot = HelloRobot()
    # 运行仿真
    hello_robot.run()
    # 关闭仿真器
    hello_robot.close()


if __name__ == "__main__":
    main()
