C# WPF上位机开发(抽奖软件)
【 声明:版权所有,欢迎转载,请勿用于商业用途。 联系信箱:feixiaoxing @163.com】
每到年末或者是尾牙的时候,很多公司都会办一些年终的清楚活动,感谢员工过去一年辛苦的付出。这个时候,作为年会的重头戏,那就是抽奖环节了。抽奖一般来说,有很多的方法。比如说,可以是物理抽奖的方法,即每一个人写一个抽奖券,放在统一的盒子里面;也可以是电子的方法,这就是今天说的抽奖程序。
前面既然我们已经学习了c# wpf,那么完全可以自己做一个抽奖程序出来。在做之前,我们可以假定抽奖的数字有几位,有几个按钮,显示效果怎么样。这部分不要怕麻烦,可以自己设计一个效果图出来。
1、设计界面
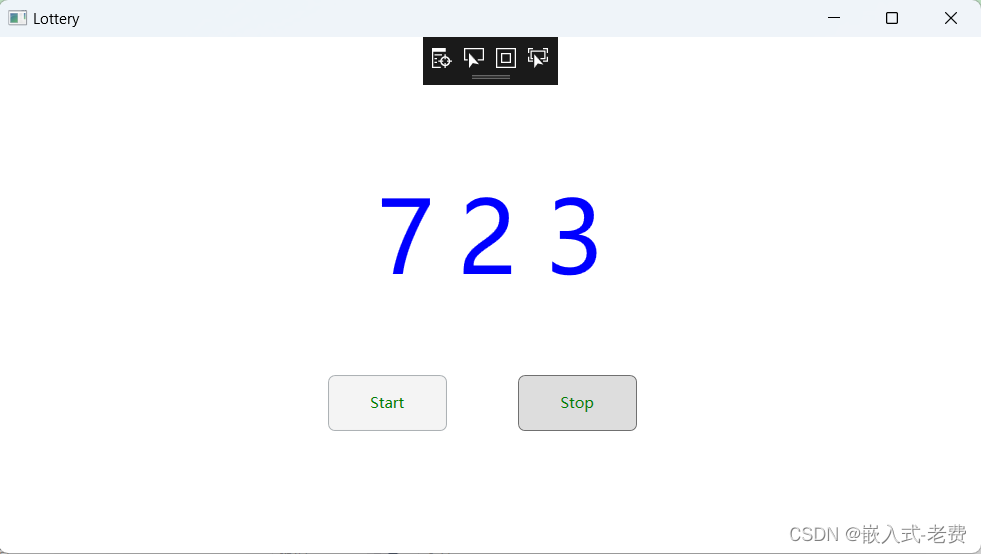
界面部分的设计可以简单一点,比如说只需要显示三个label和两个按钮。三个label,也就是快速跳动的数字。而两个按钮则分别是开始按钮、结束按钮。开始按钮按下去的时候,数字开始跳动;等到结束按钮被按下去的时候,那么屏幕上留下来的数字就是我们需要的抽奖数字。当然,目前为止,这里显示的数字只有三个,如果公司规模比较大,现实的数字可以根据需求添加几位也是可以的。设计完毕之后,它的代码是这样的,
<Window x:Class="WpfApp.MainWindow"
        xmlns="http://schemas.microsoft.com/winfx/2006/xaml/presentation"
        xmlns:x="http://schemas.microsoft.com/winfx/2006/xaml"
        xmlns:d="http://schemas.microsoft.com/expression/blend/2008"
        xmlns:mc="http://schemas.openxmlformats.org/markup-compatibility/2006"
        xmlns:local="clr-namespace:WpfApp"
        mc:Ignorable="d"
        Title="Lottery" Height="450" Width="800">
    <Grid>

        <Label x:Name="num1" Content="0" Foreground="Blue"  FontSize="80" HorizontalAlignment="Left" Margin="297,103,0,0" VerticalAlignment="Top"/>
        <Label x:Name="num2" Content="0" Foreground="Blue" FontSize="80" HorizontalAlignment="Left" Margin="362,103,0,0" VerticalAlignment="Top"/>
        <Label x:Name="num3" Content="0" Foreground="Blue" FontSize="80" HorizontalAlignment="Left" Margin="432,103,0,0" VerticalAlignment="Top"/>
        <Button x:Name="start"  Content="Start" Foreground="Green" Click="Start_Click" HorizontalAlignment="Left" Margin="263,270,0,0" VerticalAlignment="Top" Width="95" Height="45">
            <Button.Resources>
                <Style TargetType="{x:Type Border}">
                    <Setter Property="CornerRadius" Value="5"></Setter>
                </Style>
            </Button.Resources>
        </Button>
        <Button x:Name="stop" Content="Stop" Foreground="Green" Click="Stop_Click" HorizontalAlignment="Left" Margin="415,270,0,0" VerticalAlignment="Top" Width="95" Height="45">
            <Button.Resources>
                <Style TargetType="{x:Type Border}">
                    <Setter Property="CornerRadius" Value="5"></Setter>
                </Style>
            </Button.Resources>
        </Button>
    </Grid>
</Window>
2、实际的设计效果
一般写完xaml之后,对于效果还需要进行微调处理。比如字体大小,字体位置,按钮的大小,按钮的位置,按钮的颜色,看一下效果,

3、代码编写
实现了界面之后,下面要做的就是界面代码编写。之前我们编写了倒计时软件,它的做法就是每周期减去1。抽奖程序的代码其实很类似。首先我们需要定时生成一个随机数。当然为了体现公平性,这个生成的周期要快一点,不再是1s更新一次,而是几十ms更新一次。随机数的生成,不需要自己考虑随机算法,而是直接使用c#自带的sdk即可。接着,有了这个随机数之后,下面就是把相关的数据显示到界面之上,这和之前的倒计时软件是一样的。最后就是丰富start和stop按钮的编写,start按钮代表开始随机数的生成,而stop按钮则表示结束随机数的生成。因为抽奖是需要不停迭代进行的,所以两个按钮基本上是一个互斥的关系。
using System;
using System.Collections.Generic;
using System.Linq;
using System.Text;
using System.Threading.Tasks;
using System.Windows;
using System.Windows.Controls;
using System.Windows.Data;
using System.Windows.Documents;
using System.Windows.Input;
using System.Windows.Media;
using System.Windows.Media.Imaging;
using System.Windows.Navigation;
using System.Windows.Shapes;

namespace WpfApp
{
    /// <summary>
    /// MainWindow.xaml 的交互逻辑
    /// </summary>
    public partial class MainWindow : Window
    {
        private int flag = 0;
        private System.Windows.Threading.DispatcherTimer dispatcherTimer = null;
        private int num = 0;

        // construct function
        public MainWindow()
        {
            InitializeComponent();

            stop.IsEnabled = false;
        }

        // start button function
        private void Start_Click(object sender, RoutedEventArgs e)
        {
            dispatcherTimer = null;
            dispatcherTimer = new System.Windows.Threading.DispatcherTimer();
            dispatcherTimer.Tick += new EventHandler(dispatcherTimer_Tick);
            dispatcherTimer.Interval = new TimeSpan(0, 0, 0, 0, 20);
            dispatcherTimer.Start();

            start.IsEnabled = false;
            stop.IsEnabled = true;
            flag = 1;
        }

        // timer function
        private void dispatcherTimer_Tick(object sender, EventArgs e)//计时执行的程序
        {
            Random Ran = new Random();
            num = Ran.Next(1,999);

            if (flag == 0)
            {
                dispatcherTimer.Stop();
                return;
            }

            display_number();
        }

        private void display_number()
        {
            // display num
            num1.Content = Convert.ToString(num / 100);
            num2.Content = Convert.ToString((num % 100) /10);
            num3.Content = Convert.ToString(num % 10);
        }

        // stop button function
        private void Stop_Click(object sender, RoutedEventArgs e)
        {
            flag = 0;
            start.IsEnabled = true;
            stop.IsEnabled = false;
        }
    }
}
如上面代码所示,整个逻辑当中比较重要的内容就是两部分,分别是Start_Click和Stop_Click。前者创建一个定时器,每20ms调用一下回调函数。在dispatcherTimer_Tick函数中,利用Random生成一个随机数,再利用display_number显示出来。当然,如果发现flag==0,则代表定时器已经停止。后者Stop_Click则比较简单,主要就是flag置位。
4、测试运行
测试相对而言就比较简单,单击运行即可。观察一下Start按下去的时候,数字有没有发生跳动;Stop按下去的时候,数字跳动有没有停止。如果一切ok,那代表软件是编写成功的。
另外细心的同学发现了,整个软件编写过程中有一个bug,那就是已经中奖的同学还有可能再次中奖。所以这部分代码大家可以考虑下如何才能编写,才能保证这个错误不再发生。