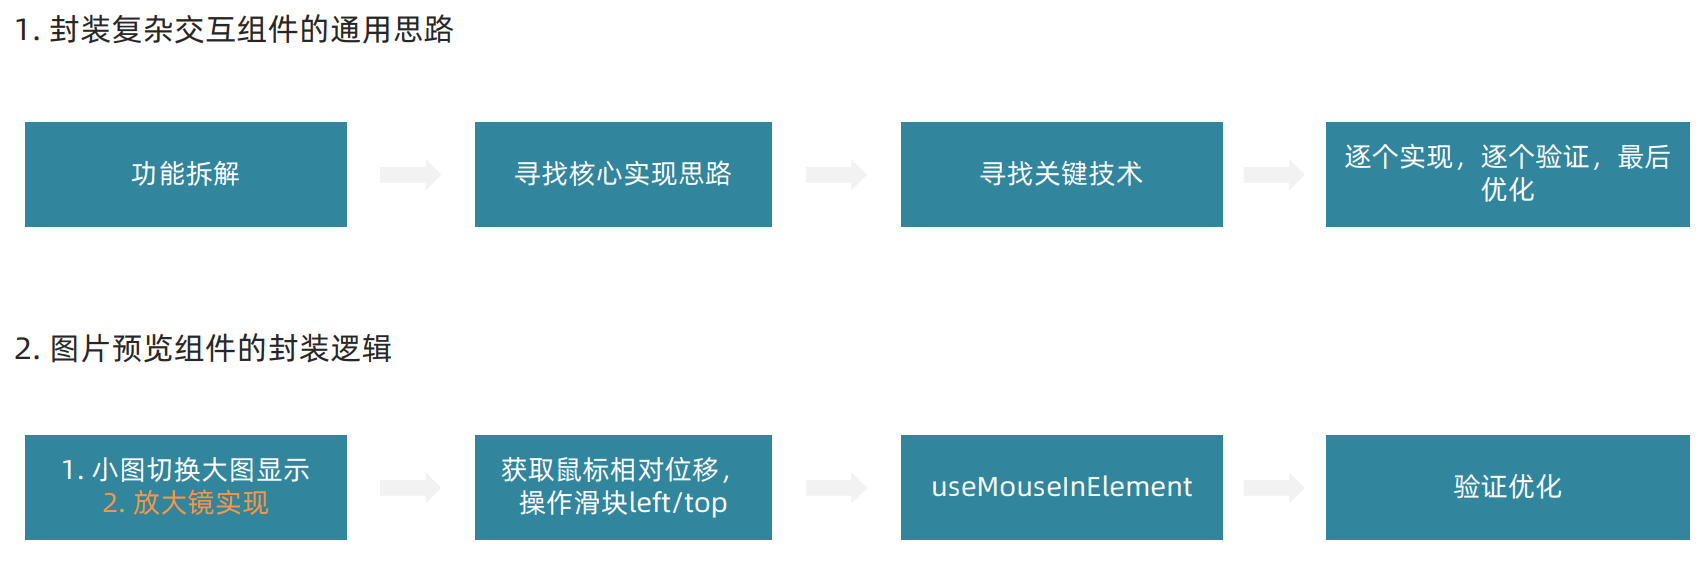
封装图片预览组件
小图切换大图
思路:维护一个数组图片列表,鼠标划入小图记录当前小图下标值,通过下标值在数组中取对应图片,显示到大图位置。
步骤:
1. 图片数据列表
2. 为小图绑定事件,记录当前激活的下标值
3. 通过下标值切换大图显示
4. 通过下标实现激活状态显示
<script setup>
import {ref} from 'vue';
// 图片列表
const imageList = [
  "https://yanxuan-item.nosdn.127.net/d917c92e663c5ed0bb577c7ded73e4ec.png",
  "https://yanxuan-item.nosdn.127.net/e801b9572f0b0c02a52952b01adab967.jpg",
  "https://yanxuan-item.nosdn.127.net/b52c447ad472d51adbdde1a83f550ac2.jpg",
  "https://yanxuan-item.nosdn.127.net/f93243224dc37674dfca5874fe089c60.jpg",
  "https://yanxuan-item.nosdn.127.net/f881cfe7de9a576aaeea6ee0d1d24823.jpg"
]
const activeIndex = ref(0)
const enterhandler = (i) => {
  activeIndex.value = i
}
</script>


<template>
  <div class="goods-image">
    <!-- 左侧大图-->
    <div class="middle" ref="target">
      <img :src="imageList[activeIndex]" alt="" />
      <!-- 蒙层小滑块 -->
      <div class="layer" :style="{ left: `0px`, top: `0px` }"></div>
    </div>
    <!-- 小图列表 -->
    <ul class="small">
      <li v-for="(img, i) in imageList" :key="i" @mouseenter="enterhandler(i)" :class="{active: activeIndex === i}">
        <img :src="img" alt="" />
      </li>
    </ul>
    <!-- 放大镜大图 -->
    <div class="large" :style="[
      {
        backgroundImage: `url(${imageList[0]})`,
        backgroundPositionX: `0px`,
        backgroundPositionY: `0px`,
      },
    ]" v-show="false"></div>
  </div>
</template>

<style scoped lang="scss">
.goods-image {
  width: 480px;
  height: 400px;
  position: relative;
  display: flex;

  .middle {
    width: 400px;
    height: 400px;
    background: #f5f5f5;
  }

  .large {
    position: absolute;
    top: 0;
    left: 412px;
    width: 400px;
    height: 400px;
    z-index: 500;
    box-shadow: 0 0 10px rgba(0, 0, 0, 0.1);
    background-repeat: no-repeat;
    // 背景图:盒子的大小 = 2:1  将来控制背景图的移动来实现放大的效果查看 background-position
    background-size: 800px 800px;
    background-color: #f8f8f8;
  }

  .layer {
    width: 200px;
    height: 200px;
    background: rgba(0, 0, 0, 0.2);
    // 绝对定位 然后跟随咱们鼠标控制left和top属性就可以让滑块移动起来
    left: 0;
    top: 0;
    position: absolute;
  }

  .small {
    width: 80px;

    li {
      width: 68px;
      height: 68px;
      margin-left: 12px;
      margin-bottom: 15px;
      cursor: pointer;

      &:hover,
      &.active {
        border: 2px solid $xtxColor;
      }
    }
  }
}
</style>
放大镜
功能拆解:
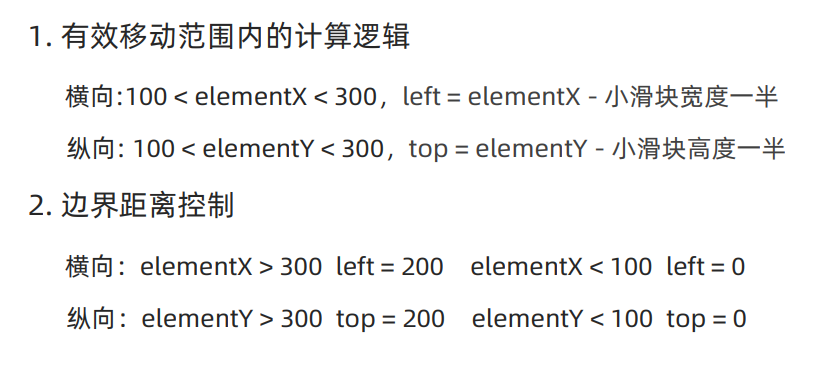
1. 左侧滑块跟随鼠标移动
利用获取到当前的鼠标在盒子内的相对位置(useMouselnElement) ,控制滑块跟随鼠标移动(left/top)。
import {useMouseInElement} from "@vueuse/core";
<script setup>
import {ref, watch} from 'vue';
import {useMouseInElement} from "@vueuse/core";
// 图片列表
const imageList = [
  "https://yanxuan-item.nosdn.127.net/d917c92e663c5ed0bb577c7ded73e4ec.png",
  "https://yanxuan-item.nosdn.127.net/e801b9572f0b0c02a52952b01adab967.jpg",
  "https://yanxuan-item.nosdn.127.net/b52c447ad472d51adbdde1a83f550ac2.jpg",
  "https://yanxuan-item.nosdn.127.net/f93243224dc37674dfca5874fe089c60.jpg",
  "https://yanxuan-item.nosdn.127.net/f881cfe7de9a576aaeea6ee0d1d24823.jpg"
]
const activeIndex = ref(0)
const target = ref(null)
const left = ref(0)
const top = ref(0)
const {elementX, elementY, isOutside} = useMouseInElement(target)
const enterhandler = (i) => {
  activeIndex.value = i
}
watch([elementX, elementY], () => {
  if (elementX.value > 100 && elementX.value < 300) {
    left.value = elementX.value - 100
  }
  if (elementY.value > 100 && elementY.value < 300) {
    top.value = elementY.value - 100
  }
  if (elementX.value > 300) {
    left.value = 200
  }
  if (elementX.value < 100) {
    left.value = 0
  }
  if (elementY.value > 300) {
    top.value = 200
  }
  if (elementY.value < 100) {
    top.value = 0
  }
})
</script>


<template>
  <div class="goods-image">
    <!-- 左侧大图-->
    <div class="middle" ref="target">
      <img :src="imageList[activeIndex]" alt=""/>
      <!-- 蒙层小滑块 -->
      <div class="layer" :style="{ left: `${left}px`, top: `${top}px` }"></div>
    </div>
    <!-- 小图列表 -->
    <ul class="small">
      <li v-for="(img, i) in imageList" :key="i" @mouseenter="enterhandler(i)" :class="{active: activeIndex === i}">
        <img :src="img" alt=""/>
      </li>
    </ul>
    <!-- 放大镜大图 -->
    <div class="large" :style="[
      {
        backgroundImage: `url(${imageList[0]})`,
        backgroundPositionX: `0px`,
        backgroundPositionY: `0px`,
      },
    ]" v-show="false"></div>
  </div>
</template>

<style scoped lang="scss">
.goods-image {
  width: 480px;
  height: 400px;
  position: relative;
  display: flex;

  .middle {
    width: 400px;
    height: 400px;
    background: #f5f5f5;
  }

  .large {
    position: absolute;
    top: 0;
    left: 412px;
    width: 400px;
    height: 400px;
    z-index: 500;
    box-shadow: 0 0 10px rgba(0, 0, 0, 0.1);
    background-repeat: no-repeat;
    // 背景图:盒子的大小 = 2:1  将来控制背景图的移动来实现放大的效果查看 background-position
    background-size: 800px 800px;
    background-color: #f8f8f8;
  }

  .layer {
    width: 200px;
    height: 200px;
    background: rgba(0, 0, 0, 0.2);
    // 绝对定位 然后跟随咱们鼠标控制left和top属性就可以让滑块移动起来
    left: 0;
    top: 0;
    position: absolute;
  }

  .small {
    width: 80px;

    li {
      width: 68px;
      height: 68px;
      margin-left: 12px;
      margin-bottom: 15px;
      cursor: pointer;

      &:hover,
      &.active {
        border: 2px solid $xtxColor;
      }
    }
  }
}
</style>
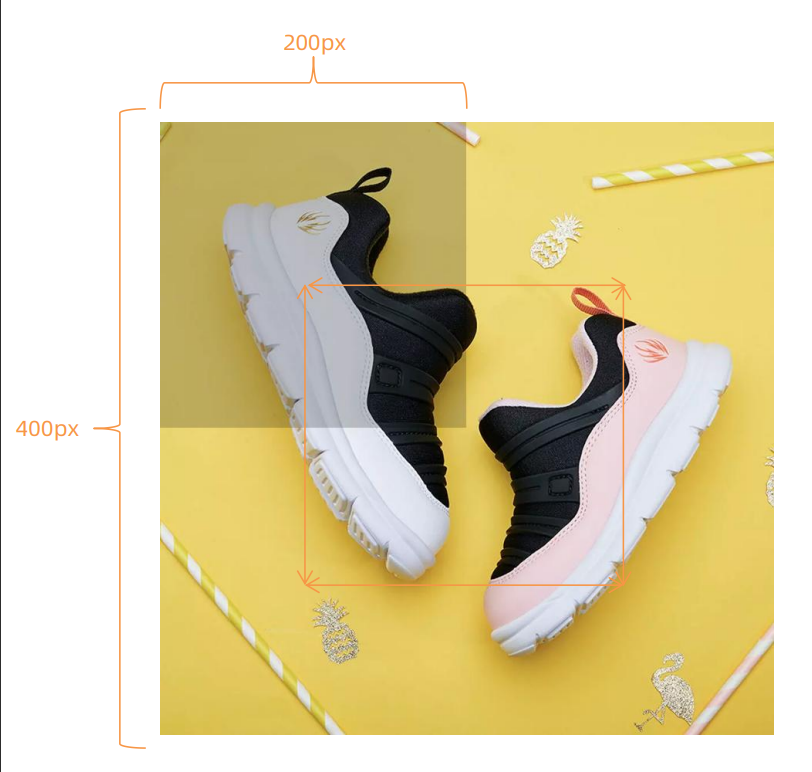
2. 右侧大图放大效果实现
效果:为实现放大效果,大图的宽高是小图的两倍
思路:大图的移动方向和滑块移动方向相反,且数值为2倍
<script setup>
import {ref, watch} from 'vue';
import {useMouseInElement} from "@vueuse/core";
// 图片列表
const imageList = [
  "https://yanxuan-item.nosdn.127.net/d917c92e663c5ed0bb577c7ded73e4ec.png",
  "https://yanxuan-item.nosdn.127.net/e801b9572f0b0c02a52952b01adab967.jpg",
  "https://yanxuan-item.nosdn.127.net/b52c447ad472d51adbdde1a83f550ac2.jpg",
  "https://yanxuan-item.nosdn.127.net/f93243224dc37674dfca5874fe089c60.jpg",
  "https://yanxuan-item.nosdn.127.net/f881cfe7de9a576aaeea6ee0d1d24823.jpg"
]
const activeIndex = ref(0)
const target = ref(null)
// 滑块坐标
const left = ref(0)
const top = ref(0)
// 大图坐标
const positionX = ref(0)
const positionY =ref(0)
const {elementX, elementY, isOutside} = useMouseInElement(target)
const enterhandler = (i) => {
  activeIndex.value = i
}
watch([elementX, elementY], () => {
  // 蒙层横纵向
  if (elementX.value > 100 && elementX.value < 300) {
    left.value = elementX.value - 100
  }
  if (elementY.value > 100 && elementY.value < 300) {
    top.value = elementY.value - 100
  }
  // 控制边界
  if (elementX.value > 300) {
    left.value = 200
  }
  if (elementX.value < 100) {
    left.value = 0
  }
  if (elementY.value > 300) {
    top.value = 200
  }
  if (elementY.value < 100) {
    top.value = 0
  }
  // 控制大图的显示
  positionX.value = -left.value * 2
  positionY.value = -top.value * 2
})
</script>


<template>
  <div class="goods-image">
    <!-- 左侧大图-->
    <div class="middle" ref="target">
      <img :src="imageList[activeIndex]" alt=""/>
      <!-- 蒙层小滑块 -->
      <div class="layer" :style="{ left: `${left}px`, top: `${top}px` }"></div>
    </div>
    <!-- 小图列表 -->
    <ul class="small">
      <li v-for="(img, i) in imageList" :key="i" @mouseenter="enterhandler(i)" :class="{active: activeIndex === i}">
        <img :src="img" alt=""/>
      </li>
    </ul>
    <!-- 放大镜大图 -->
    <div class="large" :style="[
      {
        backgroundImage: `url(${imageList[0]})`,
        backgroundPositionX: `${positionX}px`,
        backgroundPositionY: `${positionY}px`,
      },
    ]" ></div>
  </div>
</template>

<style scoped lang="scss">
.goods-image {
  width: 480px;
  height: 400px;
  position: relative;
  display: flex;

  .middle {
    width: 400px;
    height: 400px;
    background: #f5f5f5;
  }

  .large {
    position: absolute;
    top: 0;
    left: 412px;
    width: 400px;
    height: 400px;
    z-index: 500;
    box-shadow: 0 0 10px rgba(0, 0, 0, 0.1);
    background-repeat: no-repeat;
    // 背景图:盒子的大小 = 2:1  将来控制背景图的移动来实现放大的效果查看 background-position
    background-size: 800px 800px;
    background-color: #f8f8f8;
  }

  .layer {
    width: 200px;
    height: 200px;
    background: rgba(0, 0, 0, 0.2);
    // 绝对定位 然后跟随咱们鼠标控制left和top属性就可以让滑块移动起来
    left: 0;
    top: 0;
    position: absolute;
  }

  .small {
    width: 80px;

    li {
      width: 68px;
      height: 68px;
      margin-left: 12px;
      margin-bottom: 15px;
      cursor: pointer;

      &:hover,
      &.active {
        border: 2px solid $xtxColor;
      }
    }
  }
}
</style>
3. 鼠标移入控制滑块和大图显示隐藏
思路:鼠标移入盒子(isOutside) ,滑块和大图才显示(v-show)
<script setup>
import {ref, watch} from 'vue';
import {useMouseInElement} from "@vueuse/core";
// 图片列表
const imageList = [
  "https://yanxuan-item.nosdn.127.net/d917c92e663c5ed0bb577c7ded73e4ec.png",
  "https://yanxuan-item.nosdn.127.net/e801b9572f0b0c02a52952b01adab967.jpg",
  "https://yanxuan-item.nosdn.127.net/b52c447ad472d51adbdde1a83f550ac2.jpg",
  "https://yanxuan-item.nosdn.127.net/f93243224dc37674dfca5874fe089c60.jpg",
  "https://yanxuan-item.nosdn.127.net/f881cfe7de9a576aaeea6ee0d1d24823.jpg"
]
const activeIndex = ref(0)
const target = ref(null)
// 滑块坐标
const left = ref(0)
const top = ref(0)
// 大图坐标
const positionX = ref(0)
const positionY =ref(0)
const {elementX, elementY, isOutside} = useMouseInElement(target)
const enterhandler = (i) => {
  activeIndex.value = i
}
watch([elementX, elementY], () => {
  if (isOutside.value) {
    return
  }
  // 蒙层横纵向
  if (elementX.value > 100 && elementX.value < 300) {
    left.value = elementX.value - 100;
  }
  if (elementY.value > 100 && elementY.value < 300) {
    top.value = elementY.value - 100
  }
  // 控制边界
  if (elementX.value > 300) {
    left.value = 200
  }
  if (elementX.value < 100) {
    left.value = 0
  }
  if (elementY.value > 300) {
    top.value = 200
  }
  if (elementY.value < 100) {
    top.value = 0
  }
  // 控制大图的显示
  positionX.value = -left.value * 2
  positionY.value = -top.value * 2
})
</script>


<template>
  <div class="goods-image">
    <!-- 左侧大图-->
    <div class="middle" ref="target">
      <img :src="imageList[activeIndex]" alt=""/>
      <!-- 蒙层小滑块 -->
      <div class="layer" v-show="!isOutside" :style="{ left: `${left}px`, top: `${top}px` }"></div>
    </div>
    <!-- 小图列表 -->
    <ul class="small">
      <li v-for="(img, i) in imageList" :key="i" @mouseenter="enterhandler(i)" :class="{active: activeIndex === i}">
        <img :src="img" alt=""/>
      </li>
    </ul>
    <!-- 放大镜大图 -->
    <div class="large" :style="[
      {
        backgroundImage: `url(${imageList[0]})`,
        backgroundPositionX: `${positionX}px`,
        backgroundPositionY: `${positionY}px`,
      },
    ]" v-show="!isOutside" ></div>
  </div>
</template>

<style scoped lang="scss">
.goods-image {
  width: 480px;
  height: 400px;
  position: relative;
  display: flex;

  .middle {
    width: 400px;
    height: 400px;
    background: #f5f5f5;
  }

  .large {
    position: absolute;
    top: 0;
    left: 412px;
    width: 400px;
    height: 400px;
    z-index: 500;
    box-shadow: 0 0 10px rgba(0, 0, 0, 0.1);
    background-repeat: no-repeat;
    // 背景图:盒子的大小 = 2:1  将来控制背景图的移动来实现放大的效果查看 background-position
    background-size: 800px 800px;
    background-color: #f8f8f8;
  }

  .layer {
    width: 200px;
    height: 200px;
    background: rgba(0, 0, 0, 0.2);
    // 绝对定位 然后跟随咱们鼠标控制left和top属性就可以让滑块移动起来
    left: 0;
    top: 0;
    position: absolute;
  }

  .small {
    width: 80px;

    li {
      width: 68px;
      height: 68px;
      margin-left: 12px;
      margin-bottom: 15px;
      cursor: pointer;

      &:hover,
      &.active {
        border: 2px solid $xtxColor;
      }
    }
  }
}
</style>
props适配
<script setup>
import {ref, watch} from 'vue';
import {useMouseInElement} from "@vueuse/core";
// 图片列表
defineProps({
  imageList: {
    type: Array,
    default: () => []
  }
})
const activeIndex = ref(0)
const target = ref(null)
// 滑块坐标
const left = ref(0)
const top = ref(0)
// 大图坐标
const positionX = ref(0)
const positionY = ref(0)
const {elementX, elementY, isOutside} = useMouseInElement(target)
const enterhandler = (i) => {
  activeIndex.value = i
}
watch([elementX, elementY], () => {
  if (isOutside.value) {
    return
  }
  // 蒙层横纵向
  if (elementX.value > 100 && elementX.value < 300) {
    left.value = elementX.value - 100;
  }
  if (elementY.value > 100 && elementY.value < 300) {
    top.value = elementY.value - 100
  }
  // 控制边界
  if (elementX.value > 300) {
    left.value = 200
  }
  if (elementX.value < 100) {
    left.value = 0
  }
  if (elementY.value > 300) {
    top.value = 200
  }
  if (elementY.value < 100) {
    top.value = 0
  }
  // 控制大图的显示
  positionX.value = -left.value * 2
  positionY.value = -top.value * 2
})
</script>


<template>
  <div class="goods-image">
    <!-- 左侧大图-->
    <div class="middle" ref="target">
      <img :src="imageList[activeIndex]" alt=""/>
      <!-- 蒙层小滑块 -->
      <div class="layer" v-show="!isOutside" :style="{ left: `${left}px`, top: `${top}px` }"></div>
    </div>
    <!-- 小图列表 -->
    <ul class="small">
      <li v-for="(img, i) in imageList" :key="i" @mouseenter="enterhandler(i)" :class="{active: activeIndex === i}">
        <img :src="img" alt=""/>
      </li>
    </ul>
    <!-- 放大镜大图 -->
    <div class="large" :style="[
      {
        backgroundImage: `url(${imageList[activeIndex]})`,
        backgroundPositionX: `${positionX}px`,
        backgroundPositionY: `${positionY}px`,
      },
    ]" v-show="!isOutside"></div>
  </div>
</template>

<style scoped lang="scss">
.goods-image {
  width: 480px;
  height: 400px;
  position: relative;
  display: flex;

  .middle {
    width: 400px;
    height: 400px;
    background: #f5f5f5;
  }

  .large {
    position: absolute;
    top: 0;
    left: 412px;
    width: 400px;
    height: 400px;
    z-index: 500;
    box-shadow: 0 0 10px rgba(0, 0, 0, 0.1);
    background-repeat: no-repeat;
    // 背景图:盒子的大小 = 2:1  将来控制背景图的移动来实现放大的效果查看 background-position
    background-size: 800px 800px;
    background-color: #f8f8f8;
  }

  .layer {
    width: 200px;
    height: 200px;
    background: rgba(0, 0, 0, 0.2);
    // 绝对定位 然后跟随咱们鼠标控制left和top属性就可以让滑块移动起来
    left: 0;
    top: 0;
    position: absolute;
  }

  .small {
    width: 80px;

    li {
      width: 68px;
      height: 68px;
      margin-left: 12px;
      margin-bottom: 15px;
      cursor: pointer;

      &:hover,
      &.active {
        border: 2px solid $xtxColor;
      }
    }
  }
}
</style>
总结