<Linux开发> linux应用开发-之-socket通信开发例程
一、简介
对于socket通信的相关介绍,作者不过多介绍了,网上的介绍有很多。
二、环境搭建
本次测试socket通信的应用例程是运行在ubuntu pc上的;当然也是可以运行在linux开发板 或相关linux设备上的。
开发环境无特别要求,如果是Linux 板子上 要连接非局域网,则需要底层硬件网络驱动等的支持。
三、例程代码
本次代码会使用单独的一个c文件用来编写服务器进程代码,用以接收数据并在终端打印;
使用单独的一个c文件用来编写客户端进程代码,用以发送数据。
1、服务器代码如下:
/***************************************************************
Copyright © OneFu Co., Ltd. 1998-2022. All rights reserved.
文件名 : server.c
作者 : waterfxw
版本 : V1.0
描述 : socket server 示例代码
其他 : 无
日志 : 初版 V1.0 2023/03/15 waterfxw创建
***************************************************************/
#include <stdio.h>
#include <stdlib.h>
#include <unistd.h>
#include <string.h>
#include <sys/types.h>
#include <sys/socket.h>
#include <arpa/inet.h>
#include <netinet/in.h>
#include <pthread.h>
#include <pthread.h>

#define SERVER_PORT 9876 //端口号不能发生冲突,不常用的端口号通常大于 5000


void *Server_Thread(void* arg);
void  *Client_Thread( void* arg);

int Num=1;
int flasg=0;
typedef struct
{
    int sockfd;
    int connfd;
    int ID;
    int flag;
    /* data */
}Client_TYPE;


Client_TYPE ClientT[50];        //用于存放所有的连接客户端
pthread_t ClientThread[50];     //线程对象


//客户端连接后创建的线程
void  *Client_Thread( void* arg)
{
    printf("Client_Thread有客户端接入...\n");
    int ret;
    Client_TYPE  *ClientTr= (Client_TYPE *)arg;
    char recvbuf[512];

    /* 接收客户端发送过来的数据 */
    for ( ; ; ) {
        // 接收缓冲区清零
        memset(recvbuf, 0x0, sizeof(recvbuf));

        // 读数据
        ret = recv(ClientTr->connfd, recvbuf, sizeof(recvbuf), 0);
        if(0 >= ret) {
            perror("recv error");
            close(ClientTr->connfd);
            break;
        }

        // 将读取到的数据以字符串形式打印出来
        printf("from client[%d]: %s\n", ClientTr->ID ,recvbuf);

        // 如果读取到"exit"则关闭套接字退出程序
        if (0 == strncmp("exit", recvbuf, 4)) {
            printf("server client[%d] exit...\n",ClientTr->ID);
            close(ClientTr->connfd);
            break;
        }
    }
    Num--;
    pthread_exit(NULL);

}

//暂无使用
void *Server_Thread(void* arg)
{
    struct sockaddr_in client_addr = {0};
    int addrlen = sizeof(client_addr);
    int connfd;
    char ip_str[20] = {0};
    Client_TYPE  *SendC;
    int i;

    int sockfd = (int *)arg;;

    /* 阻塞等待客户端连接 */
    connfd = accept(sockfd, (struct sockaddr *)&client_addr, &addrlen);
    if (0 > connfd) {
        perror("accept error");
        close(sockfd);
        exit(EXIT_FAILURE);
    }
    printf("有客户端接入...\n");
    //转换获取IP
    inet_ntop(AF_INET, &client_addr.sin_addr.s_addr, ip_str, sizeof(ip_str));
    printf("客户端主机的 IP 地址: %s\n", ip_str);
    printf("客户端进程的端口号: %d\n", client_addr.sin_port);

    for(i=0;i<50;i++)
    {
        if(ClientT[i].flag != 1) //检查空余位置
        {
            ClientT[i].sockfd = sockfd;
            ClientT[i].connfd = connfd;
            ClientT[i].ID = i;
            ClientT[i].flag = 1;    //标记该位置已连接客户机
            SendC  = &ClientT[i];
            Num ++;
            flasg = 1;
            break;
        }

    }

    //创建客户端对应的处理线程
    pthread_create(&ClientThread[i],NULL,Client_Thread,(void *)(SendC));
    printf("connet:%d   Num:%d\n",i,Num-1);

}


int main(void) {

    struct sockaddr_in server_addr = {0};
    int sockfd;
    int ret;
    int i;

     struct sockaddr_in client_addr = {0};
    int addrlen = sizeof(client_addr);
    int connfd;
    char ip_str[20] = {0};
    Client_TYPE  *SendC;

    /* 打开套接字,得到套接字描述符 */
    sockfd = socket(AF_INET, SOCK_STREAM, 0);
    if (0 > sockfd) {
        perror("socket error");
        exit(EXIT_FAILURE);
    }


    //设置端口复用
    int opt=1;
    setsockopt(sockfd,SOL_SOCKET,SO_REUSEADDR,&opt,sizeof(int));

    /* 将套接字与指定端口号进行绑定 */
    server_addr.sin_family = AF_INET;
    server_addr.sin_addr.s_addr = htonl(INADDR_ANY);
    server_addr.sin_port = htons(SERVER_PORT);
    ret = bind(sockfd, (struct sockaddr *)&server_addr, sizeof(server_addr));
    if (0 > ret) {
        perror("bind error");
        close(sockfd);
        exit(EXIT_FAILURE);
    }


    /* 使服务器进入监听状态 */
    ret = listen(sockfd, 50);
    if (0 > ret) {
        perror("listen error");
        close(sockfd);
        exit(EXIT_FAILURE);
    }


    while(Num>1 || flasg !=1 )
    {

        /* 阻塞等待客户端连接 */
        connfd = accept(sockfd, (struct sockaddr *)&client_addr, &addrlen);
        if (0 > connfd) {
            perror("accept error");
            close(sockfd);
            exit(EXIT_FAILURE);
        }
        printf("有客户端接入...\n");
        //转换获取IP
        inet_ntop(AF_INET, &client_addr.sin_addr.s_addr, ip_str, sizeof(ip_str));
        printf("客户端主机的 IP 地址: %s\n", ip_str);
        printf("客户端进程的端口号: %d\n", client_addr.sin_port);

        for(i=0;i<50;i++)
        {
            if(ClientT[i].flag != 1) //检查空余位置
            {
                ClientT[i].sockfd = sockfd;
                ClientT[i].connfd = connfd;
                ClientT[i].ID = i;
                ClientT[i].flag = 1;    //标记该位置已连接客户机
                SendC  = &ClientT[i];
                Num ++;
                flasg = 1;
                break;
            }

        }

        //创建客户端对应的处理线程
        pthread_create(&ClientThread[i],NULL,Client_Thread,(void *)(SendC));
        printf("connet:%d   Num:%d\n",i,Num-1);

        // sleep(1); //一秒钟发送一次

    }

    printf("所有客户端都退出连接!!!\n");

    for(i=0;i<Num-1;i++)
    {
        if(ClientT[i].flag != 1)
        {
            ClientT[i].sockfd = 0;
            ClientT[i].connfd = 0;
            ClientT[i].ID = 0;
            ClientT[i].flag = 0;

            pthread_join(ClientThread[i],NULL); //等待线程退出
            printf("client[%d] exit...\n",i);
        }

    }

    /* 关闭套接字 */
    close(sockfd);
    exit(EXIT_SUCCESS);
}
2、客户端代码如下:
/***************************************************************
Copyright © OneFu Co., Ltd. 1998-2022. All rights reserved.
文件名 : client.c
作者 : waterfxw
版本 : V1.0
描述 : socket client 示例代码
其他 : 无
日志 : 初版 V1.0 2023/03/15 waterfxw创建
***************************************************************/

#include <stdio.h>
#include <stdlib.h>
#include <unistd.h>
#include <string.h>
#include <sys/types.h>
#include <sys/socket.h>
#include <arpa/inet.h>
#include <netinet/in.h>

#define SERVER_PORT 9876 //服务器的端口号
#define SERVER_IP "192.168.140.191" //服务器的 IP 地址


int main(void) {
    struct sockaddr_in server_addr = {0};
    char buf[512];
    int sockfd;
    int ret;
    /* 打开套接字,得到套接字描述符 */
    sockfd = socket(AF_INET, SOCK_STREAM, 0);
    if (0 > sockfd) {
        perror("socket error");
        exit(EXIT_FAILURE);
    }

    /* 调用 connect 连接远端服务器 */
    server_addr.sin_family = AF_INET;
    server_addr.sin_port = htons(SERVER_PORT); //端口号
    inet_pton(AF_INET, SERVER_IP, &server_addr.sin_addr);//IP 地址
    ret = connect(sockfd, (struct sockaddr *)&server_addr, sizeof(server_addr));
    if (0 > ret) {
        perror("connect error");
        close(sockfd);
        exit(EXIT_FAILURE);
    }

    printf("服务器连接成功...\n\n");

    /* 向服务器发送数据 */
    for ( ; ; ) {
        // 清理缓冲区
        memset(buf, 0x0, sizeof(buf));

        // 接收用户输入的字符串数据
        printf("Please enter a string: ");
        fgets(buf, sizeof(buf), stdin);

        // 将用户输入的数据发送给服务器
        ret = send(sockfd, buf, strlen(buf), 0);
        if(0 > ret){
            perror("send error");
            break;
        }

        //输入了"exit",退出循环
        if(0 == strncmp(buf, "exit", 4))
        break;
    }
    close(sockfd);
    exit(EXIT_SUCCESS);
}
四、编译测试
1、server编译命令:
gcc server.c -o server -lpthread
由于线程数据外部链接库 所以需要指明 -lpthread;
2、client编译
gcc client.c -o client
3、运行效果如下:
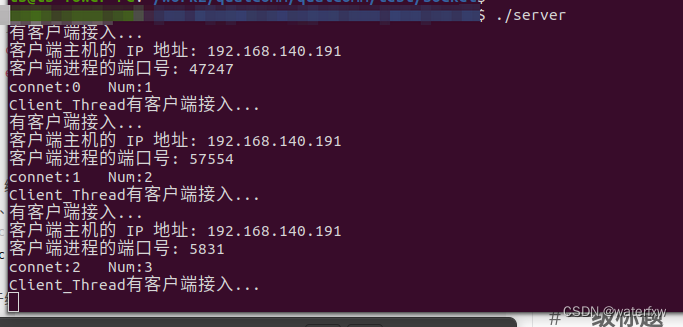
服务端接收客户端连接输出的log如下:

客户端启动连接服务端:

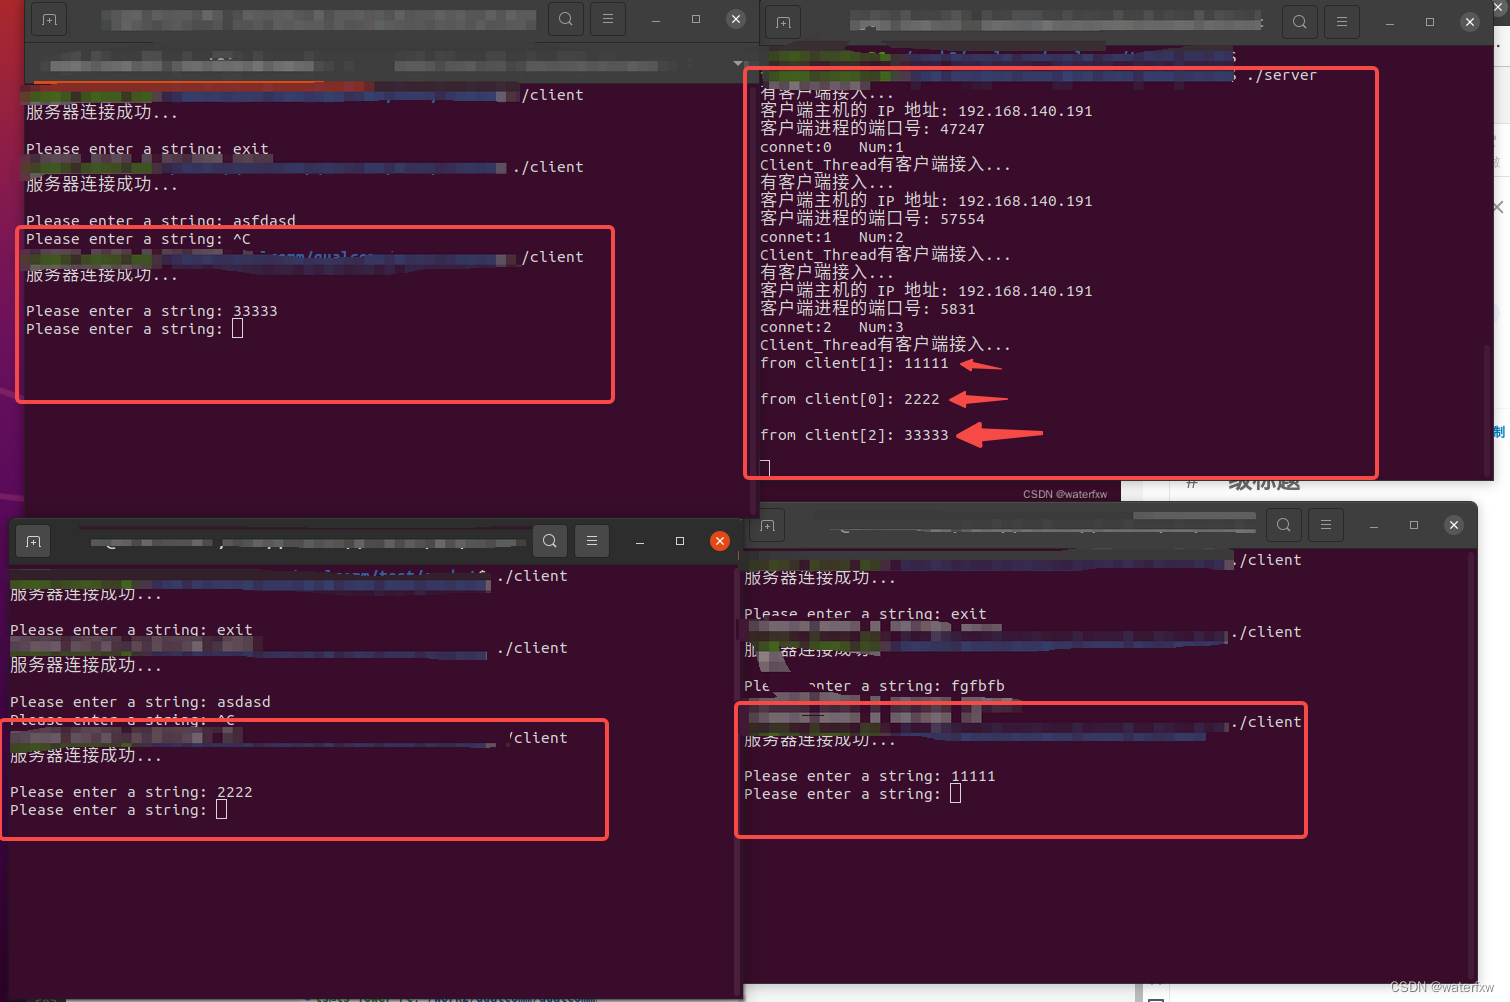
多个客户端连接服务端并发送数据效果图:

五、总结
上述测试例程只是socket一个简单测试例程,实际的项目开发 逻辑过程 更加复杂。但是我们掌握了基本的socket通信流程,相信读者能写出优秀的代码。加油…
