Thread类的基本用法
Thread类的基本用法
- 🔎1.线程创建
- 🌻继承Thread类
- 🌼继承Thread重写run()方法
- 🌼继承Thread匿名内部类
- 🌻实现Runnable接口
- 🌼实现Runnable接口重写run()方法
- 🌼实现Runnable接口匿名内部类
- 🌻使用Lambda表达式
- 🔎2.线程中断
- 🌻线程立即中断
- 🌻稍等片刻中断
- 🌻线程不中断
- 🔎3.线程等待
- 🔎4.线程休眠
- 🔎5.线程的六种状态
- 🔎结尾
🔎1.线程创建
线程创建的3种方式
- 继承Thread类
- 实现Runnable接口
- 使用Lambda表达式
🌻继承Thread类
🌼继承Thread重写run()方法
class ExThread extends Thread {
    @Override
    public void run() {
        System.out.println("通过继承Thread类创建线程");
    }
}

public class Main{
    public static void main(String[] args) {
        Thread t = new ExThread();
        //启动线程
        t.start();
    }
}
🌼继承Thread匿名内部类
public class HomeWork {
    public static void main(String[] args) {
        Thread t = new Thread() {
            @Override
            public void run() {
                System.out.println("通过继承Thread类创建线程");
            }
        };
    }
}
🌻实现Runnable接口
🌼实现Runnable接口重写run()方法
class ExRunnable implements Runnable {
    @Override
    public void run() {
        System.out.println("通过实现Runnable接口创建线程");
    }
}

public class HomeWork {
    public static void main(String[] args) {
        ExRunnable runnable = new ExRunnable();
        Thread t = new Thread(runnable);
		//启动线程
        t.start();
    }
}
🌼实现Runnable接口匿名内部类
public class HomeWork {
    public static void main(String[] args) {
        Thread t = new Thread(new Runnable() {
            @Override
            public void run() {
                System.out.println("通过实现Runnable接口创建线程");
            }
        });
    }
}
🌻使用Lambda表达式
public class HomeWork {
    public static void main(String[] args) {
        Thread t = new Thread(() -> {
            System.out.println("使用Lambda创建线程");
        });
    }
}
🔎2.线程中断
线程中断就是让线程停下来
那么如何才能让线程停下来呢?
那就是让该线程的入口方法执行完毕
下面来简单介绍下3种线程中断的情况
1.线程立即中断
2.线程稍等片刻中断
3.线程不中断
举个栗子
你正在打游戏,然后你的女朋友打电话叫你去陪她逛街
这时候你有3个选择
1.立刻把游戏停了陪她逛街(线程立即中断)
2.和她说打完这把再去(线程稍等片刻中断)
3.直接把电话挂了,继续打游戏(线程不中断)
下面来看下代码
🌻线程立即中断
public class Main {
    public static void main(String[] args) {
        Thread t = new Thread(() -> {
            //currentThread是获取到当前线程的实例
            //此处currentThread()得到的对象就是t
            //isInterrupted()是t对象自带的标志位-->默认是false
            //可以理解成while(!false) --> while(true) --> 死循环
            while(!Thread.currentThread().isInterrupted()) {
                System.out.println("hello t1");
                try {
                    //休眠0.5s
                    Thread.sleep(500);
                } catch(InterruptedException e) {
                    e.printStackTrace();
                    break;
                }
            }
            System.out.println("线程立即中断");
        });

        //启动线程
        t.start();

        try {
            //休眠3s
            Thread.sleep(3000);
        } catch(InterruptedException e) {
            e.printStackTrace();
        }

        t.interrupt();//将标志位设置为true
    }
}
🌻稍等片刻中断
public class Test1 {
    public static void main(String[] args) {
        Thread t = new Thread(() -> {
            while(!Thread.currentThread().isInterrupted()) {
                System.out.println("hello t2");
                try {
                    Thread.sleep(500);
                } catch (InterruptedException e) {
                    e.printStackTrace();
                    try {
                        Thread.sleep(1000);
                    } catch (InterruptedException ee) {
                        ee.printStackTrace();
                    }
                    break;
                }
            }
            System.out.println("线程稍等片刻中断");
        });

        //启动线程
        t.start();

        try {
            Thread.sleep(3000);
        } catch (InterruptedException e) {
            e.printStackTrace();
        }

        t.interrupt();
    }
}
🌻线程不中断
public class Test1 {
    public static void main(String[] args) {
        Thread t = new Thread(() -> {
            while(!Thread.currentThread().isInterrupted()) {
                System.out.println("hello t3");
                try {
                    Thread.sleep(500);
                } catch (InterruptedException e) {
                    e.printStackTrace();
                }
            }
            System.out.println("线程不中断");
        });

        //启动线程
        t.start();

        try {
            Thread.sleep(3000);
        } catch (InterruptedException e) {
            e.printStackTrace();
        }

        t.interrupt();
    }
}
🔎3.线程等待

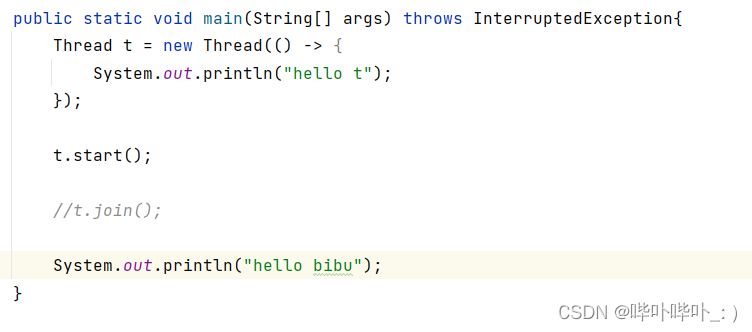
等于这上述代码
我们无法确定打印顺序
先输出hello t 还是先输出hello bibu

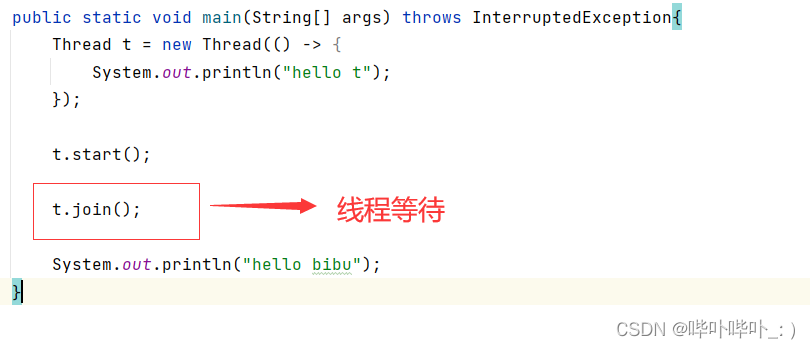
但在main线程加入了t.join()(线程等待)之后,就会先去打印hello t了
这是因为在main线程中加入t.join(),如果此时的 t线程还没有执行完,main线程就会发生堵塞
也就是说,等到 t线程执行完毕后再去执行main线程的程序
需要注意的是
- 在t1线程中调用t2.join(),就是t2先执行完毕再去执行t1
- 在t2线程种调用t3.join(),就是t3先执行完毕再去执行t2
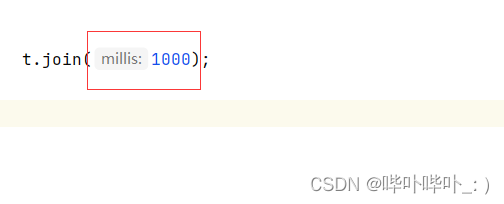
- t.join()这个方法也可以设置一个时间

解释
- 这里设置的时间就是说最多等待 t线程执行1000ms(1s),如果还没有执行完.那main线程就会继续执行
- 举个栗子
- 你的女朋友让你在她宿舍楼下等她10分钟
- 你可以选择一直等着她( t.join())
- 也可以选择就等10分钟( t.join(1000))
🔎4.线程休眠
让线程进入一定时间的停止
public class Main{
    public static void main(String[] args) {
        Thread t = new Thread(() -> {
            while(true) {
                try {
                    //让线程进入休眠
                    Thread.sleep(500);
                } catch (InterruptedException e) {
                    e.printStackTrace();
                }
            }
        });

        t.start();
    }
}
🔎5.线程的六种状态
- NEW: 安排了工作, 还未开始行动
- RUNNABLE: 就绪状态. 又可以分成正在工作中和即将开始工作
- TERMINATED:系统中的线程已经执行完了,Thread对象还在
- TIMED_WATING:指定时间等待
- BLOCKED:等待出现状态
- WAITING:使用wait方法出现的状态
具体参考: 多线程的几种状态
🔎结尾
如果大家有什么不太理解的,可以私信或者评论区留言,一起加油
