深入学习NIO三大核心:缓冲区 Buffer、通道Channel、Selector选择器
缓冲区 Buffer
一、简单介绍
Buffer,顾名思义就是缓冲区的意思,它是NIO中数据交换的载体,实质上是一种承载数据的容器。在上一篇BIO文章中我们提到BIO的工作模式是使用流来进行数据交换,并且根据操作的不同,分为输入流和输出流两种,而在NIO中则是以Buffer来进行数据交换的,例如后面将要提到的Channel中,都是通过Buffer来进行读写操作的,Buffer可以同时进行输入和输出操作。

二、Buffer类及其子类
Buffer类在jdk中是一个抽象类,它实现了Buffer的一些共性的设计。

上述缓冲区除了ByteBuffer的功能稍微多点外,因为ByteBuffer是通用的,所以功能会比较多。其他6种的使用方式几乎是一致的。都是通过如下方法获取一个 Buffer对象:
static XxxBuffer allocate(int capacity) : 创建一个容量为capacity 的 XxxBuffer 对象
三、Buffer的参数说明以及常用方法
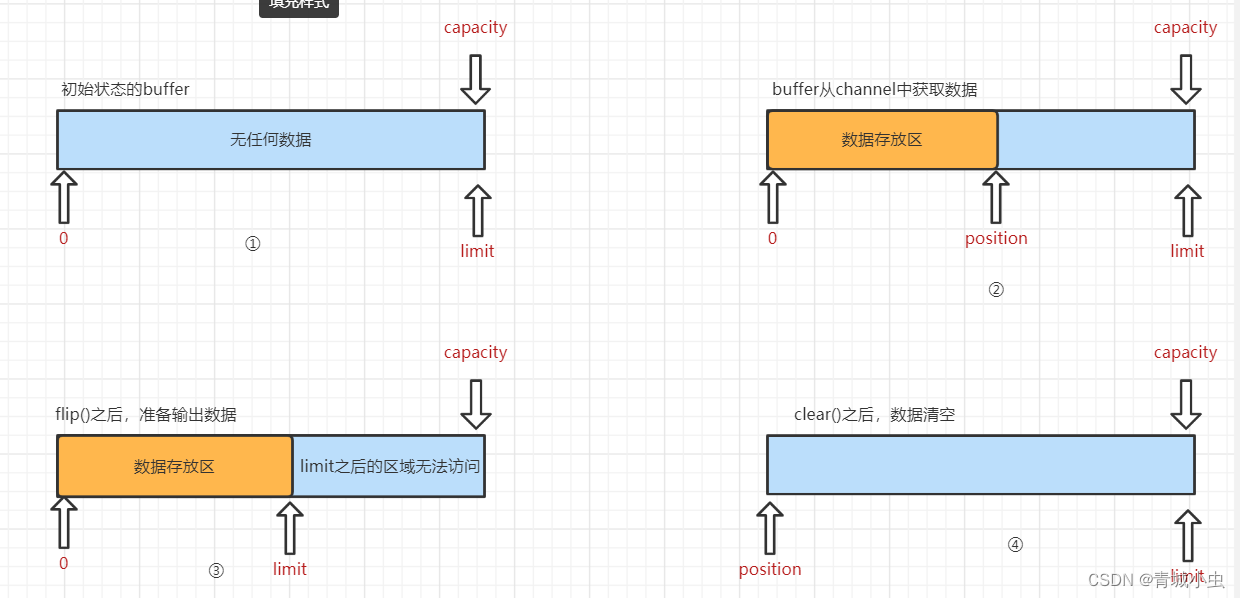
Buffer中的重要概念
- 容量(capacity): 缓冲区支持的最大容量。缓冲区不能为负,且创建后不能更改
- 界限(limit): 表示缓冲区可以操作数据的大小(limit)后边是不能写数据的。缓冲区的限制不能为负,并且不能大于缓冲区的容量。写入模式,限制buffer的容量。在读取模式下,limit等于写入的数据量。
- 位置(postion): 下一个要读取或写入数据的索引。缓冲区位置不能为负,并且不能大于其限制
- 标记(mark)与重置(reset): 标记是一个索引,通过Buffer中的mark()方法指向Buffer中的一个特定的position,之后可以通过调用reset()方法恢复到这个位置的position.
标记、位置、限制、容量遵循以下不等式:0 <= mark <= position <= limit <= capacity
图片理解Buffer读写数据的流程变化
Buffer的常用方法
Buffer clear() 清空缓冲区并返回对缓冲区的引用
Buffer flip()   将缓冲区的界限设置为当前位置,并将当前位置重置为 0
int capacity() 返回 Buffer的capacity 大小
boolean hasRemaining() 判断缓冲区中是否还有元素
int limit() 返回 Buffer 的界限(limit) 的位置
Buffer limit(int n) 将设置缓冲区界限为 n,并返回一个具有新 limit 的缓冲区对象
Buffer mark() 对缓冲区设置标记
int position() 返回缓冲区的当前位置 position
Buffer position(int n) 将设置缓冲区的当前位置为 n,并返回修改后的 Buffer 对象
int remaining() 返回 position 和 limit 之间的元素个数
Buffer reset() 将位置 position 转到以前设置的mark所在的位置
Buffer rewind() 将位置设为为 0, 取消设置的 mark
方式测试
public class NIOTest {
    public static void main(String[] args) {
        bufferTest();
    }
    public static void bufferTest(){
        //1. 分配一个指定大小的缓冲区
        ByteBuffer buf = ByteBuffer.allocate(1024);
        System.out.println("-----------------allocate()----------------");
        System.out.println(buf.position());  //返回缓冲区的当前位置 0
        System.out.println(buf.limit());     //界限(limit) 的位置 1024
        System.out.println(buf.capacity()); // Buffer的capacity 大小 1024

        // 2.put向缓冲区中添加数据,利用 put() 存入数据到缓冲区中
        String str = "qcby";
        buf.put(str.getBytes());
        System.out.println("-----------------put()----------------");
        System.out.println(buf.position()); //返回缓冲区的当前位置 4
        System.out.println(buf.limit());  // 界限(limit) 的位置 1024
        System.out.println(buf.capacity()); // Buffer的capacity 大小 1024

        //3. 切换读取数据模式
        buf.flip();
        System.out.println("-----------------flip()----------------");
        System.out.println(buf.position()); //返回缓冲区的当前位置 0
        System.out.println(buf.limit());  // 界限(limit) 的位置 4
        System.out.println(buf.capacity());  // Buffer的capacity 大小 1024

        //这种读取不可重复读
        System.out.println("-----------------get()----------------");
        //4. 利用 get() 读取缓冲区中的数据 ---- 前提是必须切换为读取模式
        byte[] dst = new byte[buf.limit()];
        buf.get(dst);
        System.out.println(new String(dst, 0, dst.length));
        System.out.println(buf.position()); //返回缓冲区的当前位置 4
        System.out.println(buf.limit()); // 界限(limit) 的位置 4
        System.out.println(buf.capacity()); // Buffer的capacity 大小 1024

        System.out.println("-----------------rewind()----------------");
        //5. rewind() : 可重复读
        buf.rewind();
        byte[] dst1 = new byte[buf.limit()];
        buf.get(dst1);
        System.out.println(new String(dst1, 0, dst.length));
        System.out.println(buf.position()); //返回缓冲区的当前位置 4
        System.out.println(buf.limit()); // 界限(limit) 的位置 4
        System.out.println(buf.capacity()); // Buffer的capacity 大小 1024

        //6. clear() : 清空缓冲区. 但是缓冲区中的数据依然存在,但是处于“被遗忘”状态
        buf.clear();
        System.out.println("-----------------clear()----------------");
        System.out.println(buf.position()); //返回缓冲区的当前位置 0
        System.out.println(buf.limit());  // 界限(limit) 的位置 1024
        System.out.println(buf.capacity());  // 界限(limit) 的位置 1024
        System.out.println((char)buf.get()); // q
    }
}
public class NIOTest {
    public static void main(String[] args) {
        bufferTest();
    }
    public static void bufferTest(){
        String str = "hello world";
        ByteBuffer buf = ByteBuffer.allocate(1024); //创建一个缓冲区为1024的buffer数组
        buf.put(str.getBytes()); // 将数据放入
        buf.flip();  //调用flip()方法,转换为读取模式
        byte[] dst = new byte[buf.limit()]; //创建一个buffer界限位置的数组
        buf.get(dst, 0, 2);//将buffer数组当中前前两个数据放入dst数组当中
        System.out.println(new String(dst, 0, 2));//输出数据
        System.out.println(buf.position()); //位置 (position):下一个要读取或写入的数据的索引。
        //mark() : 标记
        buf.mark(); //标记是一个索引,通过Buffer中的mark()方法指向Buffer中的一个特定的position
        buf.get(dst, 2, 2);
        System.out.println(new String(dst, 2, 2));
        System.out.println(buf.position());
        //reset() : 恢复到 mark 的位置
        buf.reset();
        System.out.println(buf.position());
        //判断缓冲区中是否还有剩余数据
        if(buf.hasRemaining()){
            //获取缓冲区中可以操作的数量
            System.out.println(buf.remaining());
        }
    }
}
四、Buffer的基本用法
使用Buffer读写数据,一般遵循以下四个步骤
①:写入数据到Buffer
②:调用flip()方法,将Buffer从写模式切换到读模式
③:从Buffer中读取数据
④:调用clear()方法或者compact()方法
当向buffer写入数据时,buffer会记录下写了多少数据。一旦要读取数据,需要通过flip()方法将Buffer从写模式切换到读模式。在读模式下,可以读取之前写入到buffer的所有数据。有两种方式能清空缓冲区:调用clear()或compact()方法。
clear()方法会清空整个缓冲区。
compact()方法只会清除已读过的数据。任何未读的数据都会被移动到缓冲区的起始处,新写入的数据放在缓冲区未读数据的后面。
五、选择直接内存还是非直接内存
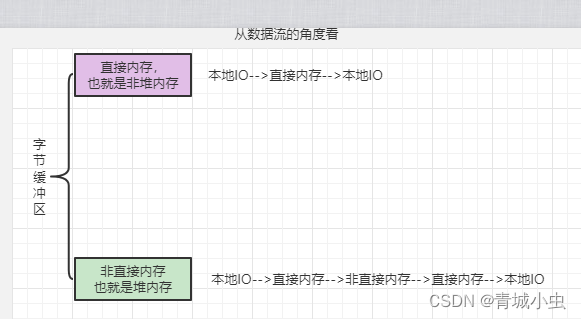
直接缓冲区与非直接缓冲区区别图形示意:
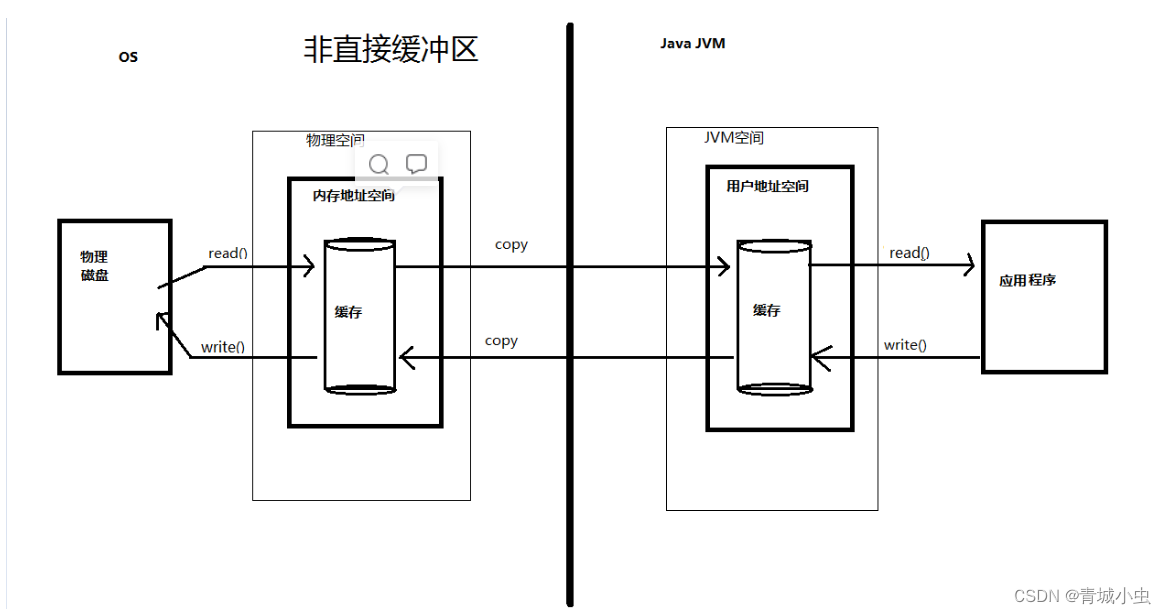
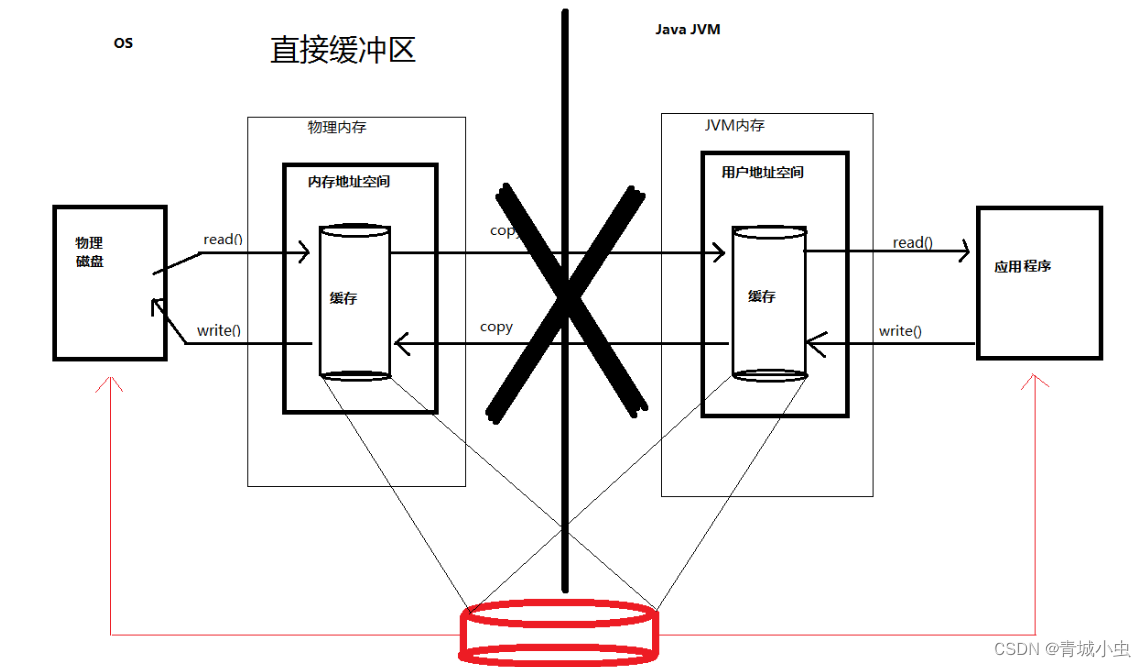
很明显,在做IO处理时,比如网络发送大量数据时,直接内存会具有更高的效率。直接内存使用allocateDirect创建,但是它比申请普通的堆内存需要耗费更高的性能。不过,这部分的数据是在JVM之外的,因此它不会占用应用的内存。所以呢,当你有很大的数据要缓存,并且它的生命周期又很长,那么就比较适合使用直接内存。只是一般来说,如果不是能带来很明显的性能提升,还是推荐直接使用堆内存。字节缓冲区是直接缓冲区还是非直接缓冲区可通过调用其 isDirect() 方法来确定。
public static void bufferTest(){
        //分配直接缓冲区
        ByteBuffer buf = ByteBuffer.allocateDirect(1024);
        System.out.println(buf.isDirect());
}
使用场景
1 有很大的数据需要存储,它的生命周期又很长
2 适合频繁的IO操作,比如网络并发场景
通道Channel
一、简单介绍
通道(Channel)是java.nio的第二个创建概念。Channel用于在缓冲区和位于通道另一侧的实体(通常是一个文件或者是一个套接字)之间有效的传输数据。只不过Channel本身不能直接访问数据,Channel只能和Buffer进行交互。

NIO的通道和流的区别
- 通道可以同时进行读写,但是流只能读或者只能写
- 通道可以实现异步读写数据
- 通道可以从缓冲读取数据,也可以写数据到缓冲区;
BIO中的stream是单向的, 例如InputStream对象只能进行对数据的读取操作,而NIO中通道Channel是双向的,可以进行读操作,也可以进行写操作。
Channel在NIO中是一个接口
public interface Channel extends Closeable
二、常用的Channel实现类
- FileChannel: 用于读取、写入、映射和操作文件通道。
- DatagramChannel: 通过UDP读写网络中的数据通道。
- SocketChannel:通过TCP读取网络中的数据
- ServerSocketChannel:可以监听新进来的 TCP 连接,对每一个新进来的连接都会创建SocketChannel。
【ServerSocketChannel 类似 ServerSocket , SocketChannel 类似 Socket】
三、FileChannel类
1.FileChannel的常用方法
int read(ByteBuffer dst) 从Channel到中读取数据到ByteBuffer
long  read(ByteBuffer[] dsts) 将Channel到中的数据“分散”到ByteBuffer[]
int  write(ByteBuffer src)将ByteBuffer 到中的数据写入到  Channel
long write(ByteBuffer[] srcs)将ByteBuffer[] 到中的数据“聚集”到  Channel
long position() 返回此通道的文件位置
FileChannel position(long p) 设置此通道的文件位置
long size() 返回此通道的文件的当前大小
FileChannel truncate(long s) 将此通道的文件截取为给定大小
void force(boolean metaData) 强制将所有对此通道的文件更新写入到存储设备中
2.FileChannel的实际案例
①:需求:使用前面学习后的 ByteBuffer(缓冲) 和 FileChannel(通道), 将 “hello world!” 写入到 data.txt 中.
public class NIOTest {
    public static void main(String[] args) {
        bufferTest();
    }
    public static void bufferTest(){
        try {
            // 1、字节输出流通向目标文件
            FileOutputStream fos = new FileOutputStream("D:\\data01.txt");
            // 2、得到字节输出流对应的通道Channel
            FileChannel channel = fos.getChannel();
            // 3、分配缓冲区
            ByteBuffer buffer = ByteBuffer.allocate(1024);
            buffer.put("hello world!".getBytes());
            // 4、把缓冲区切换成写出模式
            buffer.flip();
            channel.write(buffer);
            channel.close();
            System.out.println("写数据到文件中!");
        } catch (Exception e) {
            e.printStackTrace();
        }
    }
}
②:需求:使用前面学习后的 ByteBuffer(缓冲) 和 FileChannel(通道),将data01.txt 中的数据读入到程序,并显示在控制台屏幕
public class NIOTest {
    public static void main(String[] args) throws Exception {
        bufferTest();
    }
    public static void bufferTest() throws Exception {
        // 1、定义一个文件字节输入流与源文件接通
        FileInputStream is = new FileInputStream("D:\\data01.txt");
        // 2、需要得到文件字节输入流的文件通道
        FileChannel channel = is.getChannel();
        // 3、定义一个缓冲区
        ByteBuffer buffer = ByteBuffer.allocate(1024);
        // 4、读取数据到缓冲区
        channel.read(buffer);
        buffer.flip();
        // 5、读取出缓冲区中的数据并输出即可
        String rs = new String(buffer.array(),0,buffer.remaining());
        System.out.println(rs);
    }
}
四、FileChannel类的创建方式
获取通道的一种方式是对支持通道的对象调用getChannel() 方法。
支持通道的类如下:
FileInputStream
FileOutputStream
RandomAccessFile
DatagramSocket
Socket
ServerSocket
获取通道的其他方式是使用 Files 类的静态方法
newByteChannel() 获取字节通道。或者通过通道的静态
方法 open() 打开并返回指定通道
五、SocketChannel
SocketChannel是对传统的java socket API进行了改进 ,主要支持了非阻塞的读写, 同时改进了传统的单向流API,Channel同时支持读和写(其实就是加了个中间层Buffer)
SocketChannel的基本使用
①:打开SocketChannel
方式一:
SocketChannel socketChannel = SocketChannel.open(
        new InetSocketAddress("www.baidu.com",80));
方式二:
SocketChannel socketChannel = SocketChannel.open();
socketChannel.connect(new InetSocketAddress("www.baidu.com",80));
②:关闭SocketChannel
socketChannel.close();
③:链接校验
socketChannel.isOpen(); //检测SocketChannel是否处于Open状态
socketChannel.isConnected(); // 检测SocketChannel是否已经被链接
socketChannel.isConnectionPending();//测试SocketChannel是否正在进行链接
socketChannel.finishConnect();//校验正在进行套接字的SocketChannel是否已经完成链接
④:SocketChannel的非阻塞模式
将 SocketChannel 设置为非阻塞模式之后,就可以在异步模式下调用connect(), read() 和write()了。
socketChannel.configureBlocking(false);
connect()
如果SocketChannel在非阻塞模式下,此时调用connect(),该方法可能在连接建立之前就返回了。为了确定连接是否建立,可以调用finishConnect()的方法。像这样:
public static void main(String[] args) throws IOException {
    SocketChannel socketChannel = SocketChannel.open();
    //设置为非阻塞模式
    socketChannel.configureBlocking(false);
    socketChannel.connect(new InetSocketAddress("www.baidu.com",80));
    //校验正在进行套接字的SocketChannel是否已经完成链接
    while(! socketChannel.finishConnect() ){

    }
}
write()
非阻塞模式下,write()方法在尚未写出任何内容时可能就返回了。所以需要在循环中调用write()。
public static void main(String[] args) throws IOException {
    SocketChannel socketChannel = SocketChannel.open();
    socketChannel.connect(new InetSocketAddress("www.baidu.com", 80));
    String newData = "New String to write to file..." + System.currentTimeMillis();
    ByteBuffer buf = ByteBuffer.allocate(48);
    buf.clear();
    buf.put(newData.getBytes());
    buf.flip();
    while(buf.hasRemaining()) {
        socketChannel.write(buf);
    }
}
read()
非阻塞模式下,read()方法在尚未读取到任何数据时可能就返回了。所以需要关注它的int返回值,它会告诉你读取了多少字节。
使用 SocketChannel 读写
从 SocketChannel 读取
public static void main(String[] argv) throws Exception {
    ByteBuffer buf = ByteBuffer.allocateDirect(1024);
    SocketChannel sChannel = SocketChannel.open();
    sChannel.configureBlocking(false);
    sChannel.connect(new InetSocketAddress("hostName", 12345));

    int numBytesRead = sChannel.read(buf);

    if (numBytesRead == -1) {
        sChannel.close();
    } else {
        buf.flip();
    }
}
写入 SocketChannel
public static void main(String[] argv) throws Exception {
    SocketChannel sChannel = SocketChannel.open();
    sChannel.configureBlocking(false);
    sChannel.connect(new InetSocketAddress("hostName", 12345));

    ByteBuffer buf = ByteBuffer.allocateDirect(1024);
    buf.put((byte) 0xFF);

    buf.flip();

    int numBytesWritten = sChannel.write(buf);
}
六、ServerSocketChannel
Java NIO中的 ServerSocketChannel 是一个可以监听新进来的TCP连接的通道, 就像标准IO中的ServerSocket一样。
ServerSocketChannel的基本使用
①:打开 ServerSocketChannel
ServerSocketChannel serverSocketChannel = ServerSocketChannel.open();
②:关闭 ServerSocketChannel
通过调用ServerSocketChannel.close() 方法来关闭ServerSocketChannel.
serverSocketChannel.close();
③:监听新进来的连接
通过 ServerSocketChannel.accept() 方法监听新进来的连接。当 accept()方法返回的时候,它返回一个包含新进来的连接的 SocketChannel。因此, accept()方法会一直阻塞到有新连接到达。
while(true){
    SocketChannel socketChannel = serverSocketChannel.accept();
    //do something with socketChannel...
}
当然,也可以在while循环中使用除了true以外的其它退出准则。
④:非阻塞模式
ServerSocketChannel可以设置成非阻塞模式。在非阻塞模式下,accept() 方法会立刻返回,如果还没有新进来的连接,返回的将是null。 因此,需要检查返回的SocketChannel是否是null.
ServerSocketChannel serverSocketChannel = ServerSocketChannel.open();

  serverSocketChannel.socket().bind(new InetSocketAddress(9999));
  serverSocketChannel.configureBlocking(false);

  while(true){
      SocketChannel socketChannel = serverSocketChannel.accept();
      if(socketChannel != null){
          //do something with socketChannel...
      }
  }
七、Scatter/Gather分散和聚集
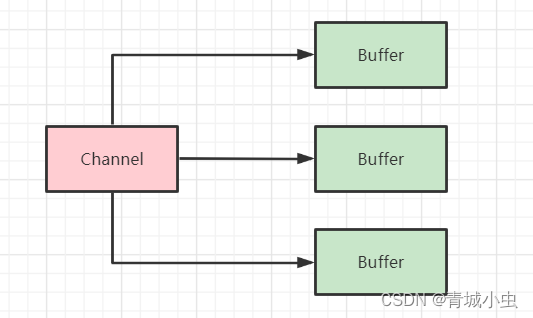
分散(Scatter) 从Channel中读取是指在读操作时将读取的数据写入多个buffer中。因此,Channel将从Channel中读取的数据 “分散(Scatter)” 到多个Buffer中。
ByteBuffer header = ByteBuffer.allocate(128);
ByteBuffer body   = ByteBuffer.allocate(1024);
ByteBuffer[] bufferArray = { header, body };
channel.read(bufferArray);
注意buffer首先被插入到数组,然后再将数组作为channel.read() 的输入参数。read()方法按照buffer在数组中的顺序将从channel中读取的数据写入到buffer,当一个buffer被写满后,channel紧接着向另一个buffer中写。
Scattering Reads在移动下一个buffer前,必须填满当前的buffer,这也意味着它不适用于动态消息(译者注:消息大小不固定)。换句话说,如果存在消息头和消息体,消息头必须完成填充(例如 128byte),Scattering Reads才能正常工作。
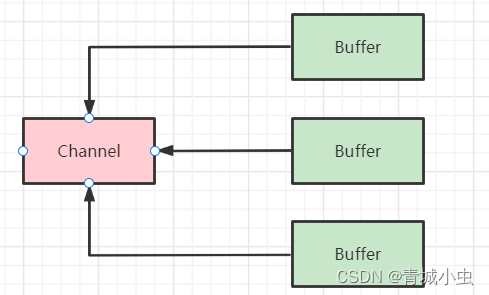
聚集(gather) 写入Channel是指在写操作时将多个buffer的数据写入到同一个channel,因此,Channel 将多个Buffer中的数据“聚集(gather)”后发送到Channel。
public static void main(String[] argv) throws Exception {
    ByteBuffer header = ByteBuffer.allocate(128);
    ByteBuffer body   = ByteBuffer.allocate(1024);
    //write data into buffers
    ByteBuffer[] bufferArray = { header, body };
    channel.write(bufferArray);
}
buffers数组是write()方法的入参,write()方法会按照buffer在数组中的顺序,将数据写入到channel,注意只有position和limit之间的数据才会被写入。因此,如果一个buffer的容量为128byte,但是仅仅包含58byte的数据,那么这58byte的数据将被写入到channel中。因此与Scattering Reads相反,Gathering Writes能较好的处理动态消息。
scatter / gather经常用于需要将传输的数据分开处理的场合,例如传输一个由消息头和消息体组成的消息,你可能会将消息体和消息头分散到不同的buffer中,这样你可以方便的处理消息头和消息体。
Selector选择器
一、基本概念
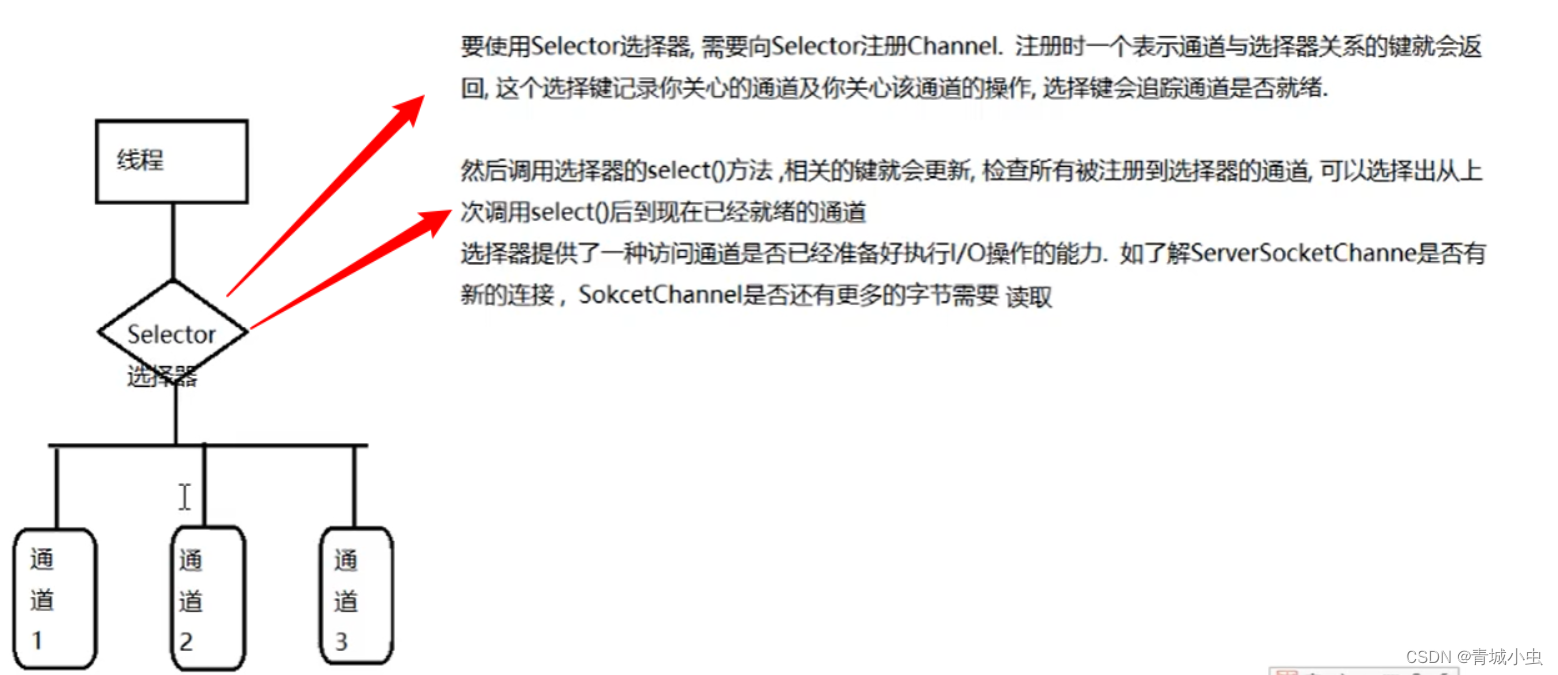
选择器提供一种选择执行已经就绪的任务的能力。selector选择器可以让单线程处理多个通道。如果程序打开了多个连接通道,每个连接的流量都比较低,可以使用Selector对通道进行管理。
二、如何创建选择器
1.创建Selector
Selector selector = Selector.open();
2.必须将通道设置为非阻塞模式才能注册到选择器上
Channel.configureBlocking(false);
3.把通道注册到选择器上,会返回一个选择键
SelectionKey selectionKey = socketChannel.register(selector, SelectionKey.OP_READ);
SelectionKey的操作有:
- SelectionKey.OP_CONNECT,指某个通道连接到服务器
- SelectionKey.OP_ACCEPT,只有ServerSocketChannel有这个事件,查看是否有新的连接
- SelectionKey.OP_READ,是否有可读的通道就绪
- SelectionKey.OP_WRITE,写数据的通道是否就绪
注册完成后,可以调用select()方法轮询是否有就绪的通道
int count = selector.select();
select()方法,返回就绪的通道数量
三、服务器端模板
//服务器端模板代码
public static void Server_Standard_Code_template() {
    try {
        ServerSocketChannel ssc=ServerSocketChannel.open();
        ssc.socket().bind(new InetSocketAddress("localhost",80));
        //只有设置为非阻塞才能注册到选择器中
        ssc.configureBlocking(false);
        //创建一个选择器
        Selector selector = Selector.open();
        //通道注册进选择器中---监听客户端连接事件
        ssc.register(selector, SelectionKey.OP_ACCEPT);

        while(true){
            //获取以及就绪的通道数量
            int select = selector.select();
            //没有通道就绪
            if(select==0)
            {
                continue;
            }
            //获取已经就绪的
            Set<SelectionKey> selectionKeys = selector.selectedKeys();
            Iterator<SelectionKey> iterator = selectionKeys.iterator();
            while (iterator.hasNext())
            {
                SelectionKey selectionKey = iterator.next();
                //客户端连接请求事件
                if(selectionKey.isAcceptable())
                {
                    //接收连接
                }else if(selectionKey.isReadable())
                {
                    //读取数据
                }
                else if(selectionKey.isWritable())
                {
                    //写数据
                }
                //移除
                iterator.remove();
            }
        }
    } catch (IOException e) {
        e.printStackTrace();
    }
}
四、NIO通讯实例
服务器端
public class NIOServer {
    //通道管理器
    private Selector selector;

    /**
     * 获取一个ServerSocket通道,并对该通道做一些初始化工作
     * @param port 端口号
     * @throws IOException
     */
    public void initServer(int port) throws IOException {
        //获取一个ServerSocket通道
        ServerSocketChannel socketChannel = ServerSocketChannel.open();
        //设置通道为非阻塞
        socketChannel.configureBlocking(false);
        //将通道对应的ServerSocket绑定到port端口
        socketChannel.socket().bind(new InetSocketAddress(port));
        //获取一个通道管理器
        this.selector = Selector.open();
        /**
         * 将通道管理器和该通道绑定,并为该通道注册SelectionKey.OP_ACCEPT事件
         * 注册该事件后,当该事件到达时,selector.select()会返回
         * 如果该事件没有到达,selector.select()会一直阻塞
         */
        socketChannel.register(selector, SelectionKey.OP_ACCEPT);
    }

    public void listen() throws IOException {
        while (true){
            //当注册的事件到达时,方法返回,否则该方法一直阻塞
            selector.select();
            //获取selector中选项的迭代器
            Iterator<SelectionKey> iterator = this.selector.selectedKeys().iterator();
            while (iterator.hasNext()){
                SelectionKey key = iterator.next();
                //删除已经选择的key,防止重复处理
                iterator.remove();
                //客户端连接请求事件
                if(key.isAcceptable()){
                    //接收连接
                    ServerSocketChannel serverSocketChannel = (ServerSocketChannel) key.channel();
                    //获取客户端连接的通道
                    SocketChannel channel = serverSocketChannel.accept();
                    //设置为非阻塞
                    channel.configureBlocking(false);
                    //向客户端发送数据源
                    ByteBuffer buf = ByteBuffer.allocate(1024);
                    String message = "你好我是服务器端,我接收到了你的消息";
                    buf.put(message.getBytes(StandardCharsets.UTF_8));
                    //把缓冲区切换成读取模式
                    buf.flip();
                    //将buffer写入channel
                    while (buf.hasRemaining()){
                        channel.write(buf);
                    }
                    //和客户端连接成功后,为了接收到客户端的信息,需要给通道设置读取权限
                    channel.register(this.selector,SelectionKey.OP_READ);
                }else if(key.isReadable()){
                    //读取数据
                    read(key);
                }
            }
        }
    }

    public void read(SelectionKey key) throws IOException {
        //得到事件发生的socket通道
        SocketChannel channel = (SocketChannel) key.channel();
        //创建读取的缓冲区
        ByteBuffer buffer = ByteBuffer.allocate(1024);
        //将数据读取到缓冲区
        channel.read(buffer);
        // 4、把缓冲区切换成写出模式
        buffer.flip();
        String rs = new String(buffer.array(),0,buffer.remaining());
        System.out.println(rs);
    }

    public static void main(String[] args) throws IOException {
        NIOServer server = new NIOServer();
        server.initServer(8100);
        server.listen();
    }
}
客户端
public class NIOClient {
    //通道管理器
    private Selector selector;

    public static void main(String[] args) throws IOException {
        NIOClient client = new NIOClient();
        client.initClick("127.0.0.1",8100);
        client.listen();
    }
    public void initClick(String ip,int port) throws IOException {
        //获取一个socket
        SocketChannel channel = SocketChannel.open();
        //设置通道为非阻塞
        channel.configureBlocking(false);
        //获取一个通道管理器
        this.selector = Selector.open();

        channel.connect(new InetSocketAddress(ip,port));

        channel.register(this.selector, SelectionKey.OP_CONNECT);
    }

    public void listen() throws IOException {
        while (true){
            selector.select();
            Iterator<SelectionKey> iterator = this.selector.selectedKeys().iterator();
            while (iterator.hasNext()){
                SelectionKey key = iterator.next();
                iterator.remove();
                if(key.isConnectable()){
                    SocketChannel channel = (SocketChannel) key.channel();
                    if(channel.isConnectionPending()){
                        channel.finishConnect();
                    }
                    //设置为阻塞
                    channel.configureBlocking(false);
                    //向客户端发送数据源
                    ByteBuffer buffer = ByteBuffer.allocate(1024);
                    String  message = "服务器端你好,我是客户端";
                    buffer.put(message.getBytes(StandardCharsets.UTF_8));
                    //把缓冲区切换成读取模式
                    buffer.flip();
                    //将buffer写入channel
                    while (buffer.hasRemaining()){
                        channel.write(buffer);
                    }
                    channel.register(this.selector,SelectionKey.OP_READ);
                }else if(key.isReadable()){
                    read(key);
                }
            }
        }
    }

    public void read(SelectionKey key) throws IOException {
        SocketChannel channel = (SocketChannel) key.channel();
        ByteBuffer buffer = ByteBuffer.allocate(1024);
        channel.read(buffer);
        byte[] data = buffer.array();
        // 4、把缓冲区切换成写出模式
        buffer.flip();
        String rs = new String(data,0,buffer.remaining());
        System.out.println(rs);
    }
}
