20.神经网络 - 搭建小实战和 Sequential 的使用
神经网络 - 搭建小实战和 Sequential 的使用
在 PyTorch 中,Sequential 是一个容器(container)类,用于构建神经网络模型。它允许你按顺序(sequential)添加不同的网络层,并将它们串联在一起,形成一个网络模型。这样做可以方便地定义简单的前向传播过程,适用于许多基本的网络结构。
Sequential 的优点之一是其简洁性和易读性,特别适用于简单的网络结构。然而,对于更复杂的模型,可能需要使用 PyTorch 的其他模型构建方式,如使用 nn.Module 基类自定义网络结构,以满足更灵活的需求。
网站地址 : Sequential — PyTorch 1.10 documentation
Example:
把卷积、非线性激活、卷积、非线性激活使用sequantial进行组合,一起放在构建的model中。
# Using Sequential to create a small model. When `model` is run,
# input will first be passed to `Conv2d(1,20,5)`. The output of
# `Conv2d(1,20,5)` will be used as the input to the first
# `ReLU`; the output of the first `ReLU` will become the input
# for `Conv2d(20,64,5)`. Finally, the output of
# `Conv2d(20,64,5)` will be used as input to the second `ReLU`
model = nn.Sequential(
          nn.Conv2d(1,20,5),
          nn.ReLU(),
          nn.Conv2d(20,64,5),
          nn.ReLU()
        )

# Using Sequential with OrderedDict. This is functionally the
# same as the above code
model = nn.Sequential(OrderedDict([
          ('conv1', nn.Conv2d(1,20,5)),
          ('relu1', nn.ReLU()),
          ('conv2', nn.Conv2d(20,64,5)),
          ('relu2', nn.ReLU())
        ]))
好处:代码简洁易懂
1.对 CIFAR10 进行分类的简单神经网络
CIFAR 10:根据图片内容,识别其究竟属于哪一类(10代表有10个类别)
CIFAR-10 and CIFAR-100 datasets
[外链图片转存中…(img-WbXJRvP5-1724861831551)]
第一次卷积:首先加了几圈 padding(图像大小不变,还是32x32),然后卷积了32次
- Conv2d — PyTorch 1.10 documentation
- 输入尺寸是32x32,经过卷积后尺寸不变,如何设置参数? —— padding=2,stride=1
- 计算公式:

其中Hout=32,Hin=32,dilation[0]=1,kernel_size[0]=5,将其带入到Hout的公式,计算过程如下:
32 =((32+2×padding[0]-1×(5-1)-1)/stride[0])+1,简化之后的式子为:
27+2×padding[0]=31×stride[0],stride[0]=2的话padding[0]要设置的很大,不合理,所以让stride[0]=1,可得padding[0]=2。
几个卷积核就是几通道的,一个卷积核作用于RGB三个通道后会把得到的三个矩阵的对应值相加,也就是说会合并,所以一个卷积核会产生一个通道
任何卷积核在设置padding的时候为保持输出尺寸不变都是卷积核大小的一半
通道变化时通过调整卷积核的个数(即输出通道)来实现的,在 nn.conv2d 的参数中有 out_channel 这个参数,就是对应输出通道
kernel 的内容是不一样的,可以理解为不同的特征抓取,因此一个核会产生一个channel
直接搭建,实现上图 CIFAR10 model 的代码
from torch import nn
from torch.nn import Conv2d, MaxPool2d, Flatten, Linear
class Tudui(nn.Module):
def __init__(self):
super(Tudui, self).__init__()
self.conv1 = Conv2d(in_channels=3, out_channels=32, kernel_size=5, padding=2) #第一个卷积,输入3,输出32,卷积核5,令stride=1,根据公式计算出padding为2
self.maxpool1 = MaxPool2d(kernel_size=2) #池化
self.conv2 = Conv2d(32,32,5,padding=2) #维持尺寸不变,所以padding仍为2
self.maxpool2 = MaxPool2d(2)
self.conv3 = Conv2d(32,64,5,padding=2)
self.maxpool3 = MaxPool2d(2)
self.flatten = Flatten() #展平为64x4x4=1024个数据
# 经过两个线性层:第一个线性层(1024为in_features,64为out_features)、第二个线性层(64为in_features,10为out_features)
self.linear1 = Linear(1024,64)
self.linear2 = Linear(64,10) #10为10个类别,若预测的是概率,则取最大概率对应的类别,为该图片网络预测到的类别
def forward(self,x): #x为input
x = self.conv1(x)
x = self.maxpool1(x)
x = self.conv2(x)
x = self.maxpool2(x)
x = self.conv3(x)
x = self.maxpool3(x)
x = self.flatten(x)
x = self.linear1(x)
x = self.linear2(x)
return x
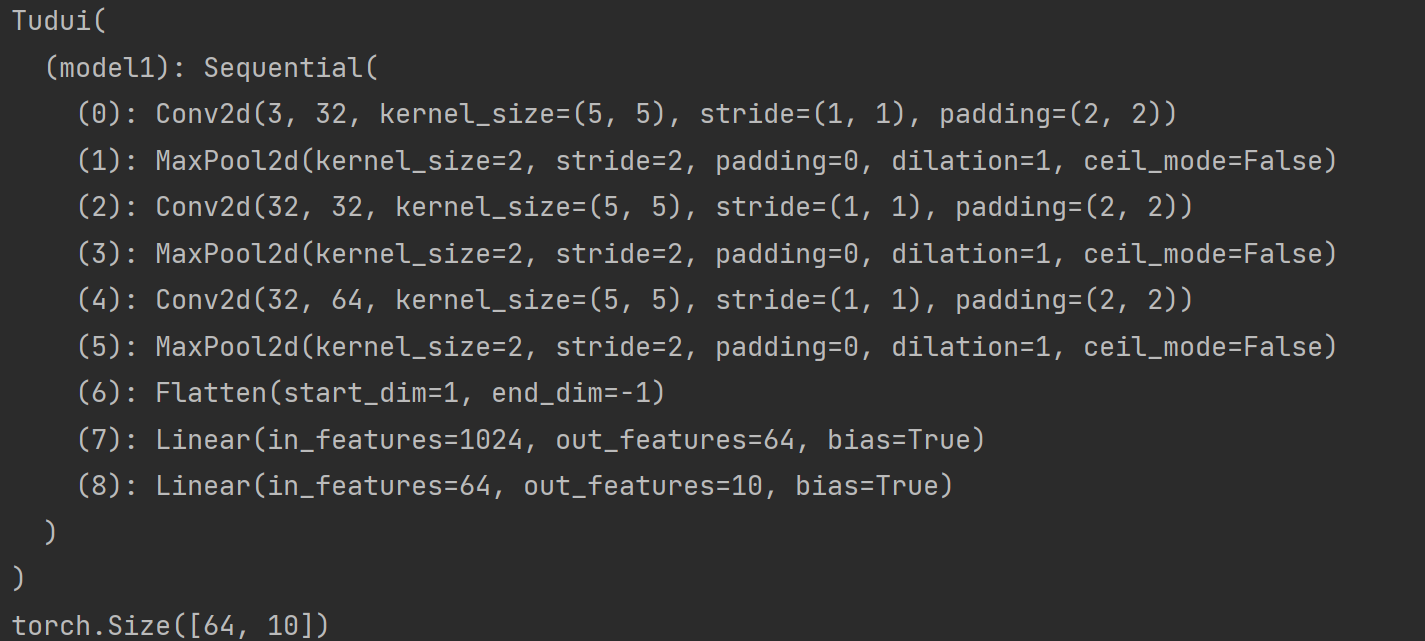
tudui = Tudui()
print(tudui)
[外链图片转存中…(img-YRNV8yil-1724861831552)]
运行后可以看到网络结构:
[外链图片转存中…(img-iRZ4X2hO-1724861831552)]
实际过程中如何检查网络的正确性?
核心:一定尺寸的数据经过网络后,能够得到我们想要的输出
对网络结构进行检验的代码:
input = torch.ones((64,3,32,32))  #全是1,batch_size=64,3通道,32x32
output = tudui(input)
print(output.shape)
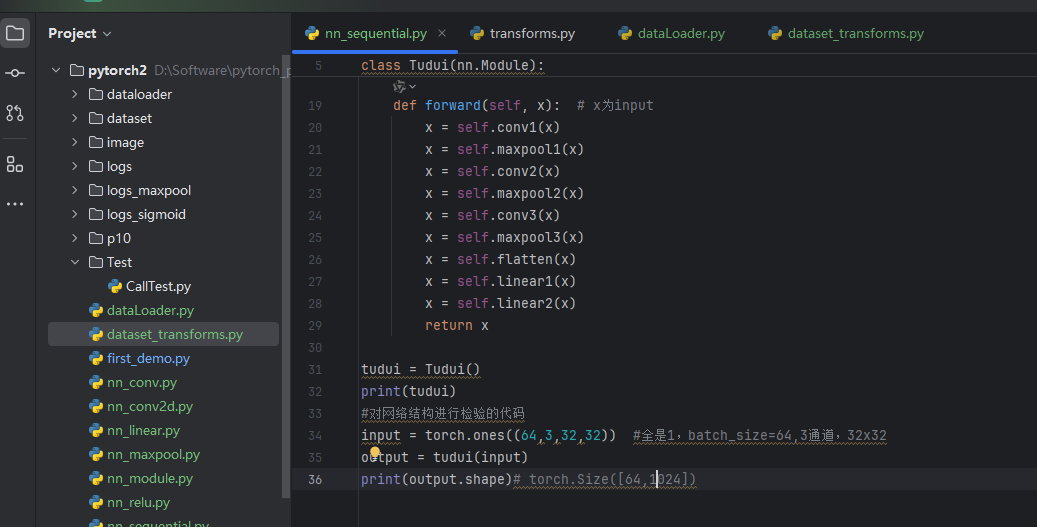
运行结果:
torch.Size([64, 10])

若不知道flatten之后的维度是多少该怎么办?
这个1024是我们算出来的,若不会算,删除forward中self.flatten(x)后两行,运行代码
import torch
from torch import nn
from torch.nn import Conv2d, MaxPool2d, Flatten, Linear

class Tudui(nn.Module):
    def __init__(self):
        super(Tudui, self).__init__()
        self.conv1 = Conv2d(in_channels=3, out_channels=32, kernel_size=5, padding=2)  #第一个卷积
        self.maxpool1 = MaxPool2d(kernel_size=2)   #池化
        self.conv2 = Conv2d(32,32,5,padding=2)  #维持尺寸不变,所以padding仍为2
        self.maxpool2 = MaxPool2d(2)
        self.conv3 = Conv2d(32,64,5,padding=2)
        self.maxpool3 = MaxPool2d(2)
        self.flatten = Flatten()  #展平为64x4x4=1024个数据
        # 经过两个线性层:第一个线性层(1024为in_features,64为out_features)、第二个线性层(64为in_features,10为out_features)
        self.linear1 = Linear(1024,64)
        self.linear2 = Linear(64,10)  #10为10个类别,若预测的是概率,则取最大概率对应的类别,为该图片网络预测到的类别
    def forward(self,x):   #x为input
        x = self.conv1(x)
        x = self.maxpool1(x)
        x = self.conv2(x)
        x = self.maxpool2(x)
        x = self.conv3(x)
        x = self.maxpool3(x)
        x = self.flatten(x)
        return x

tudui = Tudui()
print(tudui)

input = torch.ones((64,3,32,32))  #全是1,batch_size=64(64张图片),3通道,32x32
output = tudui(input)
print(output.shape)  # torch.Size([64,1024])
看到输出的维度是(64,1024),64可以理解为64张图片,1024就是flatten之后的维度了
运行结果:

用 Sequential 搭建,实现上图 CIFAR10 model 的代码
可以看到上面神经网络进行搭建时非常繁琐,在init中进行了多个操作以后,需要在forward中逐次进行调用,因此我们使用sequential方法,在init方法中直接定义一个model,然后在下面的forward方法中直接使用一次model即可。
在init方法中:
self.model1 = Sequential(
     Conv2d(...)
     MaxPool2d(...)
     Linear(...)
)
在forward方法中:
 x = self.model(x)
return x
作用:代码更加简洁
import torch
from torch import nn
from torch.nn import Conv2d, MaxPool2d, Flatten, Linear, Sequential


class Xiazhi(nn.Module):
    def __init__(self):
        super(Xiazhi, self).__init__()
        self.model1 = Sequential(
            Conv2d(3, 32, 5, padding=2),
            MaxPool2d(2),
            Conv2d(32, 32, 5, padding=2),
            MaxPool2d(2),
            Conv2d(32, 64, 5, padding=2),
            MaxPool2d(2),
            Flatten(),
            Linear(1024, 64),
            Linear(64, 10)
        )

    def forward(self, x):  # x为input
        x = self.model1(x)
        return x

input = torch.ones((64, 3, 32, 32))  # 全是1,batch_size=64,3通道,32x32
output = xiazhi(input)
print(output.shape)
运行结果:
2.引入 tensorboard 可视化模型结构
在上述代码后面加上以下代码:
from torch.utils.tensorboard import SummaryWriter
writer = SummaryWriter("logs_seq")
writer.add_graph(tudui,input)   # add_graph 计算图
writer.close()
运行后在 terminal 里输入:
tensorboard --logdir=logs_seq
打开网址,双击图片中的矩形,可以放大每个部分:
[外链图片转存中…(img-gZPZzalR-1724861831555)]
writer = SummaryWriter("logs_seq")
writer.add_graph(tudui,input)   # add_graph 计算图
writer.close()
运行后在 terminal 里输入:
tensorboard --logdir=logs_seq
打开网址,双击图片中的矩形,可以放大每个部分:
[外链图片转存中…(img-gZPZzalR-1724861831555)]