多线程并发性
基础
```java public static void main(String[] args) { Thread t1 = new Thread(() -> { for (int i = 0; i < 50; i++) { System.out.println("我是一号线程:"+i); } }); Thread t2 = new Thread(() -> { for (int i = 0; i < 50; i++) { System.out.println("我是二号线程:"+i); } }); t1.start(); t2.start(); } ```public static void main(String[] args) {
Thread t = new Thread(() -> {
try {
System.out.println("l");
//sleep方法是Thread的静态方法,它只作用于当前线程(它知道当前线程是哪个)
Thread.sleep(1000);
//调用sleep后,线程会直接进入到等待状态,直到时间结束
System.out.println("b");
} catch (InterruptedException e) {
e.printStackTrace();
}
});
t.start();
}
public static void main(String[] args) {
    Thread t = new Thread(() -> {
        System.out.println("线程开始运行!");
        while (true){
            //判断是否存在中断标志
            if(Thread.currentThread().isInterrupted()){
                //响应中断
                break;
            }
        }
        System.out.println("线程被中断了!");
    });
    t.start();
    try {
        //休眠3秒,一定比线程t先醒来
        Thread.sleep(3000);
        //调用t的interrupt方法
        t.interrupt();
    } catch (InterruptedException e) {
        e.printStackTrace();
    }
}
stop()方法是强制终止线程,简单粗暴,但是资源有可能不完全释放
通过isInterrupted()可以判断线程是否存在中断标志,如果存在,说明外部希望当前线程立即停止,也有可能是给当前线程发送一个其他的信号
public static void main(String[] args) {
    Thread t = new Thread(() -> {
        System.out.println("线程开始运行!");
        while (true){
            if(Thread.currentThread().isInterrupted()){   //判断是否存在中断标志
                System.out.println("发现中断信号,复位,继续运行...");
                //复位中断标记(返回值是当前是否有中断标记,这里不用管)
                Thread.interrupted();
            }
        }
    });
    t.start();
    try {
        Thread.sleep(3000);   //休眠3秒,一定比线程t先醒来
        t.interrupt();   //调用t的interrupt方法
    } catch (InterruptedException e) {
        e.printStackTrace();
    }
}
public static void main(String[] args) {
    Thread t = new Thread(() -> {
        System.out.println("线程开始运行!");
        Thread.currentThread().suspend();   //暂停此线程
        System.out.println("线程继续运行!");
    });
    t.start();
    try {
        Thread.sleep(3000);   //休眠3秒,一定比线程t先醒来
        t.resume();   //恢复此线程
    } catch (InterruptedException e) {
        e.printStackTrace();
    }
}
优先级
每个线程并不是平均分配CPU资源的,采用抢占式调度方式,优先级越高的线程,优先使用CPU资源- MIN_PRIORITY 最低优先级
- MAX_PRIORITY 最高优先级
- NOM_PRIORITY 常规优先级
public static void main(String[] args) {
    Thread t = new Thread(() -> {
        System.out.println("线程开始运行!");
    });
    t.start();
    t.setPriority(Thread.MIN_PRIORITY);  //通过使用setPriority方法来设定优先级
}
在当前线程的工作不重要时,将CPU资源让位给其他线程,通过使用yield()方法来将当前资源让位给其他同优先级线程:
public static void main(String[] args) {
    Thread t1 = new Thread(() -> {
        System.out.println("线程1开始运行!");
        for (int i = 0; i < 50; i++) {
            if(i % 5 == 0) {
                System.out.println("让位!");
                Thread.yield();
            }
            System.out.println("1打印:"+i);
        }
        System.out.println("线程1结束!");
    });
    Thread t2 = new Thread(() -> {
        System.out.println("线程2开始运行!");
        for (int i = 0; i < 50; i++) {
            System.out.println("2打印:"+i);
        }
    });
    t1.start();
    t2.start();
}
public static void main(String[] args) {
    Thread t1 = new Thread(() -> {
        System.out.println("线程1开始运行!");
        for (int i = 0; i < 50; i++) {
            System.out.println("1打印:"+i);
        }
        System.out.println("线程1结束!");
    });

    Thread t2 = new Thread(() -> {
        System.out.println("线程2开始运行!");
        for (int i = 0; i < 50; i++) {
            System.out.println("2打印:"+i);
            if(i == 10){
                try {
                    System.out.println("线程1加入到此线程!");
                    //在i==10时,让线程1加入,先完成线程1的内容,在继续当前内容
                    t1.join();
                } catch (InterruptedException e) {
                    e.printStackTrace();
                }
            }
        }
    });
    t1.start();
    t2.start();
}
线程1加入后,线程2等待线程1待执行的内容全部执行完成之后,再继续执行的线程2内容。
线程的加入只是等待另一个线程的完成,并不是将另一个线程和当前线程合并!
线程锁和线程同步
线程之间的共享变量存储在主内存(main memory)中,每个线程都有一个私有的工作内存(本地内存),工作内存中存储了该线程以读/写共享变量的副本
private static int value = 0;

public static void main(String[] args) throws InterruptedException {
    Thread t1 = new Thread(() -> {
        for (int i = 0; i < 10000; i++) value++;
        System.out.println("线程1完成");
    });
    Thread t2 = new Thread(() -> {
        for (int i = 0; i < 10000; i++) value++;
        System.out.println("线程2完成");
    });
    t1.start();
    t2.start();
    Thread.sleep(1000);  //主线程停止1秒,保证两个线程执行完成
    System.out.println(value);
}

/*
运行结果:
线程2完成
线程1完成
13770
*/
当两个线程同时读取value的时候,可能会同时拿到同样的值,而进行自增操作之后,也是同样的值,再写回主内存后,本来应该进行2次自增操作,实际上只执行了一次!
所以就需要用到了synchronized
synchronized代码块需要在括号中填入一个内容,必须是一个对象或是一个类,我们在value自增操作外套上同步代码块:
private static int value = 0;

public static void main(String[] args) throws InterruptedException {
    Thread t1 = new Thread(() -> {
        for (int i = 0; i < 10000; i++) {
            //使用synchronized关键字创建同步代码块
            synchronized (Main.class){
                value++;
            }
        }
        System.out.println("线程1完成");
    });
    Thread t2 = new Thread(() -> {
        for (int i = 0; i < 10000; i++) {
            synchronized (Main.class){
                value++;
            }
        }
        System.out.println("线程2完成");
    });
    t1.start();
    t2.start();
    //主线程停止1秒,保证两个线程执行完成
    Thread.sleep(1000);
    System.out.println(value);
}
/*
运行结果:
线程2完成
线程1完成
20000
*/
在同步代码块执行过程中,拿到了我们传入对象或类的锁(传入的如果是对象,就是对象锁,不同的对象代表不同的对象锁,如果是类,就是类锁,类锁只有一个,实际上类锁也是对象锁,是Class类实例,但是Class类实例同样的类无论怎么获取都是同一个),但是注意两个线程必须使用同一把锁!
当一个线程进入到同步代码块时,会获取到当前的锁,而这时如果其他使用同样的锁的同步代码块也想执行内容,就必须等待当前同步代码块的内容执行完毕,在执行完毕后会自动释放这把锁,而其他的线程才能拿到这把锁并开始执行同步代码块里面的内容(实际上synchronized是一种悲观锁,随时都认为有其他线程在对数据进行修改,乐观锁,如CAS算法)
private static int value = 0;

public static void main(String[] args) throws InterruptedException {
    Main main1 = new Main();
    Main main2 = new Main();
    Thread t1 = new Thread(() -> {
        for (int i = 0; i < 10000; i++) {
            synchronized (main1){
                value++;
            }
        }
        System.out.println("线程1完成");
    });
    Thread t2 = new Thread(() -> {
        for (int i = 0; i < 10000; i++) {
            synchronized (main2){
                value++;
            }
        }
        System.out.println("线程2完成");
    });
    t1.start();
    t2.start();
    Thread.sleep(1000);  //主线程停止1秒,保证两个线程执行完成
    System.out.println(value);
}
/*
运行结果:
线程2完成
线程1完成
19436
*/
当对象不同时,获取到的是不同的锁,因此并不能保证自增操作的原子性,最后也得不到我们想要的结果。
private static int value = 0;

private static synchronized void add(){
    value++;
}

public static void main(String[] args) throws InterruptedException {
    Thread t1 = new Thread(() -> {
        for (int i = 0; i < 10000; i++) add();
        System.out.println("线程1完成");
    });
    Thread t2 = new Thread(() -> {
        for (int i = 0; i < 10000; i++) add();
        System.out.println("线程2完成");
    });
    t1.start();
    t2.start();
    Thread.sleep(1000);  //主线程停止1秒,保证两个线程执行完成
    System.out.println(value);
}
实际上效果是相同的,只不过这个锁不用你去给,
如果是静态方法,就是使用的类锁
如果是普通成员方法,就是使用的对象锁。通过灵活的使用synchronized就能很好地解决我们之前提到的问题了。
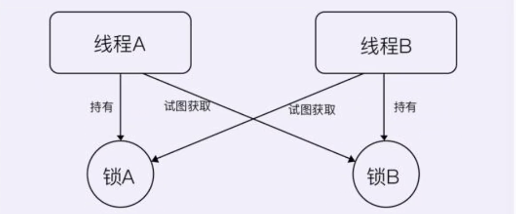
死锁

public static void main(String[] args) throws InterruptedException {
    Object o1 = new Object();
    Object o2 = new Object();
    Thread t1 = new Thread(() -> {
        synchronized (o1){
            try {
                Thread.sleep(1000);
                synchronized (o2){
                    System.out.println("线程1");
                }
            } catch (InterruptedException e) {
                e.printStackTrace();
            }
        }
    });
    Thread t2 = new Thread(() -> {
        synchronized (o2){
            try {
                Thread.sleep(1000);
                synchronized (o1){
                    System.out.println("线程2");
                }
            } catch (InterruptedException e) {
                e.printStackTrace();
            }
        }
    });
    t1.start();
    t2.start();
}
不推荐使用 suspend()去挂起线程的原因,是因为suspend()在使线程暂停的同时,并不会去释放任何锁资源。其他线程都无法访问被它占用的锁。直到对应的线程执行resume()方法后,被挂起的线程才能继续,从而其它被阻塞在这个锁的线程才可以继续执行。但是,如果resume()操作出现在suspend()之前执行,那么线程将一直处于挂起状态,同时一直占用锁,这就产生了死锁。
wait和notify
只有在同步代码块中才能使用这些方法public static void main(String[] args) throws InterruptedException {
Object o1 = new Object();
Thread t1 = new Thread(() -> {
synchronized (o1){
try {
System.out.println("开始等待");
o1.wait(); //进入等待状态并释放锁
System.out.println("等待结束!");
} catch (InterruptedException e) {
e.printStackTrace();
}
}
});
Thread t2 = new Thread(() -> {
synchronized (o1){
System.out.println("开始唤醒!");
o1.notify(); //唤醒处于等待状态的线程
for (int i = 0; i < 50; i++) {
System.out.println(i);
}
//唤醒后依然需要等待这里的锁释放之前等待的线程才能继续
}
});
t1.start();
Thread.sleep(1000);
t2.start();
}
wait()方法会暂时使得此线程进入等待状态,同时会释放当前代码块持有的锁,这时其他线程可以获取到此对象的锁,当其他线程调用对象的notify()方法后,会唤醒刚才变成等待状态的线程(这时并没有立即释放锁)。注意,必须是在持有锁(同步代码块内部)的情况下使用,否则会抛出异常!
notifyAll和notify一样,也是用于唤醒,但是前者是唤醒所有调用wait()后处于等待的线程,而后者是看运气随机选择一个。
ThreadLocal
只在自己的工作内存中创建变量仅供仅供线程自己使用变量值存储在内部(只能存储一个变量),不同的线程访问到ThreadLocal对象时,都只能获取到当前线程所属的变量
public static void main(String[] args) throws InterruptedException {
    ThreadLocal<String> local = new ThreadLocal<>();  //注意这是一个泛型类,存储类型为我们要存放的变量类型
    Thread t1 = new Thread(() -> {
        local.set("lbwnb");   //将变量的值给予ThreadLocal
        System.out.println("变量值已设定!");
        System.out.println(local.get());   //尝试获取ThreadLocal中存放的变量
    });
    Thread t2 = new Thread(() -> {
        System.out.println(local.get());   //尝试获取ThreadLocal中存放的变量
    });
    t1.start();
    Thread.sleep(3000);    //间隔三秒
    t2.start();
}
开启两个线程分别去访问ThreadLocal对象,我们发现,第一个线程存放的内容,第一个线程可以获取,但是第二个线程无法获取
public static void main(String[] args) {
    ThreadLocal<String> local = new ThreadLocal<>();
    Thread t = new Thread(() -> {
       local.set("lbwnb");
        new Thread(() -> {
            System.out.println(local.get());
        }).start();
    });
    t.start();
}
public static void main(String[] args) {
    ThreadLocal<String> local = new InheritableThreadLocal<>();
    Thread t = new Thread(() -> {
       local.set("lbwnb");
        new Thread(() -> {
            System.out.println(local.get());
        }).start();
    });
    t.start();
}
定时器
```java public static void main(String[] args) { //创建定时器对象 Timer timer = new Timer(); // 抽象类,不是接口,无法使用lambda表达式简化,只能使用匿名内部类 timer.schedule(new TimerTask() { @Override public void run() { //打印当前线程名称 System.out.println(Thread.currentThread().getName()); } //执行一个延时任务 }, 1000); } ```通过创建一个Timer类来让它进行定时任务调度,我们可以通过此对象来创建任意类型的定时任务,包延时任务、循环定时任务等,但是程序在执行完成后不会并没有停止,因为Timer内存维护了一个任务队列和一个工作线程
TimerThread继承自Thread,是一个新创建的线程,在构造时自动启动,而它的run方法会循环地读取队列中是否还有任务,如果有任务依次执行,没有的话就暂时处于休眠状态
public static void main(String[] args) {
    Timer timer = new Timer();
    timer.schedule(new TimerTask() {
        @Override
        public void run() {
            System.out.println(Thread.currentThread().getName());
            timer.cancel();  //结束
        }
    }, 1000);
}
