electron-updater实现electron全量版本更新
在 Electron 应用中使用 electron-updater 来实现自动更新功能时,通常你会在一个专门的模块或文件中管理更新逻辑。如果你想要使用 ES6 的 import 语法来引入 electron-updater,你需要确保你的项目已经配置好了支持 ES6 模块的构建工具(如 Webpack)或者使用 Babel 这样的转译器。
以下是一个基本的示例,展示了如何使用 import 语句来引入 electron-updater 并实现基本的更新逻辑。

安装 electron-updater:
bash
npm install electron-updater --save-dev
bash
yarn add electron-updater --dev
核心代码实现
/*
 * 升级版本
 * @Author: diygw
 */
import { ipcMain } from 'electron'
import { autoUpdater } from 'electron-updater'
let mainWindow: any = null
export function upgradeHandle(window: any, feedUrl: any) {
  const msg = {
    error: '检查更新出错 ...',
    checking: '正在检查更 ...',
    updateAva: '检测到新版本 ...',
    updateNotAva: '已经是最新版本 ...',
    downloadProgress: '正在下载新版本 ...',
    downloaded: '下载完成,开始更新 ...'
  }
  mainWindow = window
  autoUpdater.autoDownload = false //true 自动升级 false 手动升级
  //设置更新包的地址
  autoUpdater.setFeedURL(feedUrl)

  //监听升级失败事件
  autoUpdater.on('error', function (message: any) {
    sendUpdateMessage({
      cmd: 'error',
      title: msg.error,
      message: message
    })
  })
  //监听开始检测更新事件
  autoUpdater.on('checking-for-update', function () {
    sendUpdateMessage({
      cmd: 'checking-for-update',
      title: msg.checking,
      message: ''
    })
  })
  //监听发现可用更新事件
  autoUpdater.on('update-available', function (message: any) {
    sendUpdateMessage({
      cmd: 'update-available',
      title: msg.updateAva,
      message: message
    })
  })
  //监听没有可用更新事件
  autoUpdater.on('update-not-available', function (message: any) {
    sendUpdateMessage({
      cmd: 'update-not-available',
      title: msg.updateNotAva,
      message: message
    })
  })

  // 更新下载进度事件
  autoUpdater.on('download-progress', function (message: any) {
    sendUpdateMessage({
      cmd: 'download-progress',
      title: msg.downloadProgress,
      message: message
    })
  })
  //监听下载完成事件
  autoUpdater.on(
    'update-downloaded',
    function (event: any) {
      sendUpdateMessage({
        cmd: 'update-downloaded',
        title: msg.downloaded,
        message: '最新版本已下载完成, 退出程序进行安装'
      })
      //退出并安装更新包
      autoUpdater.quitAndInstall()
    }
  )

  //接收渲染进程消息,开始检查更新
  ipcMain.on('checkForUpdate', () => {
    //执行自动更新检查
    autoUpdater.checkForUpdatesAndNotify()
  })
  ipcMain.on('downloadUpdate', () => {
    // 下载
    autoUpdater.downloadUpdate()
  })
}
//给渲染进程发送消息
function sendUpdateMessage(text: any) {
  mainWindow.webContents.send('update-message', text)
}
主进程引用
// 在你的主进程文件(如 main.js)中引入并使用
import { upgradeHandle } from './upgrade'
upgradeHandle(mainWindow, "https://****")
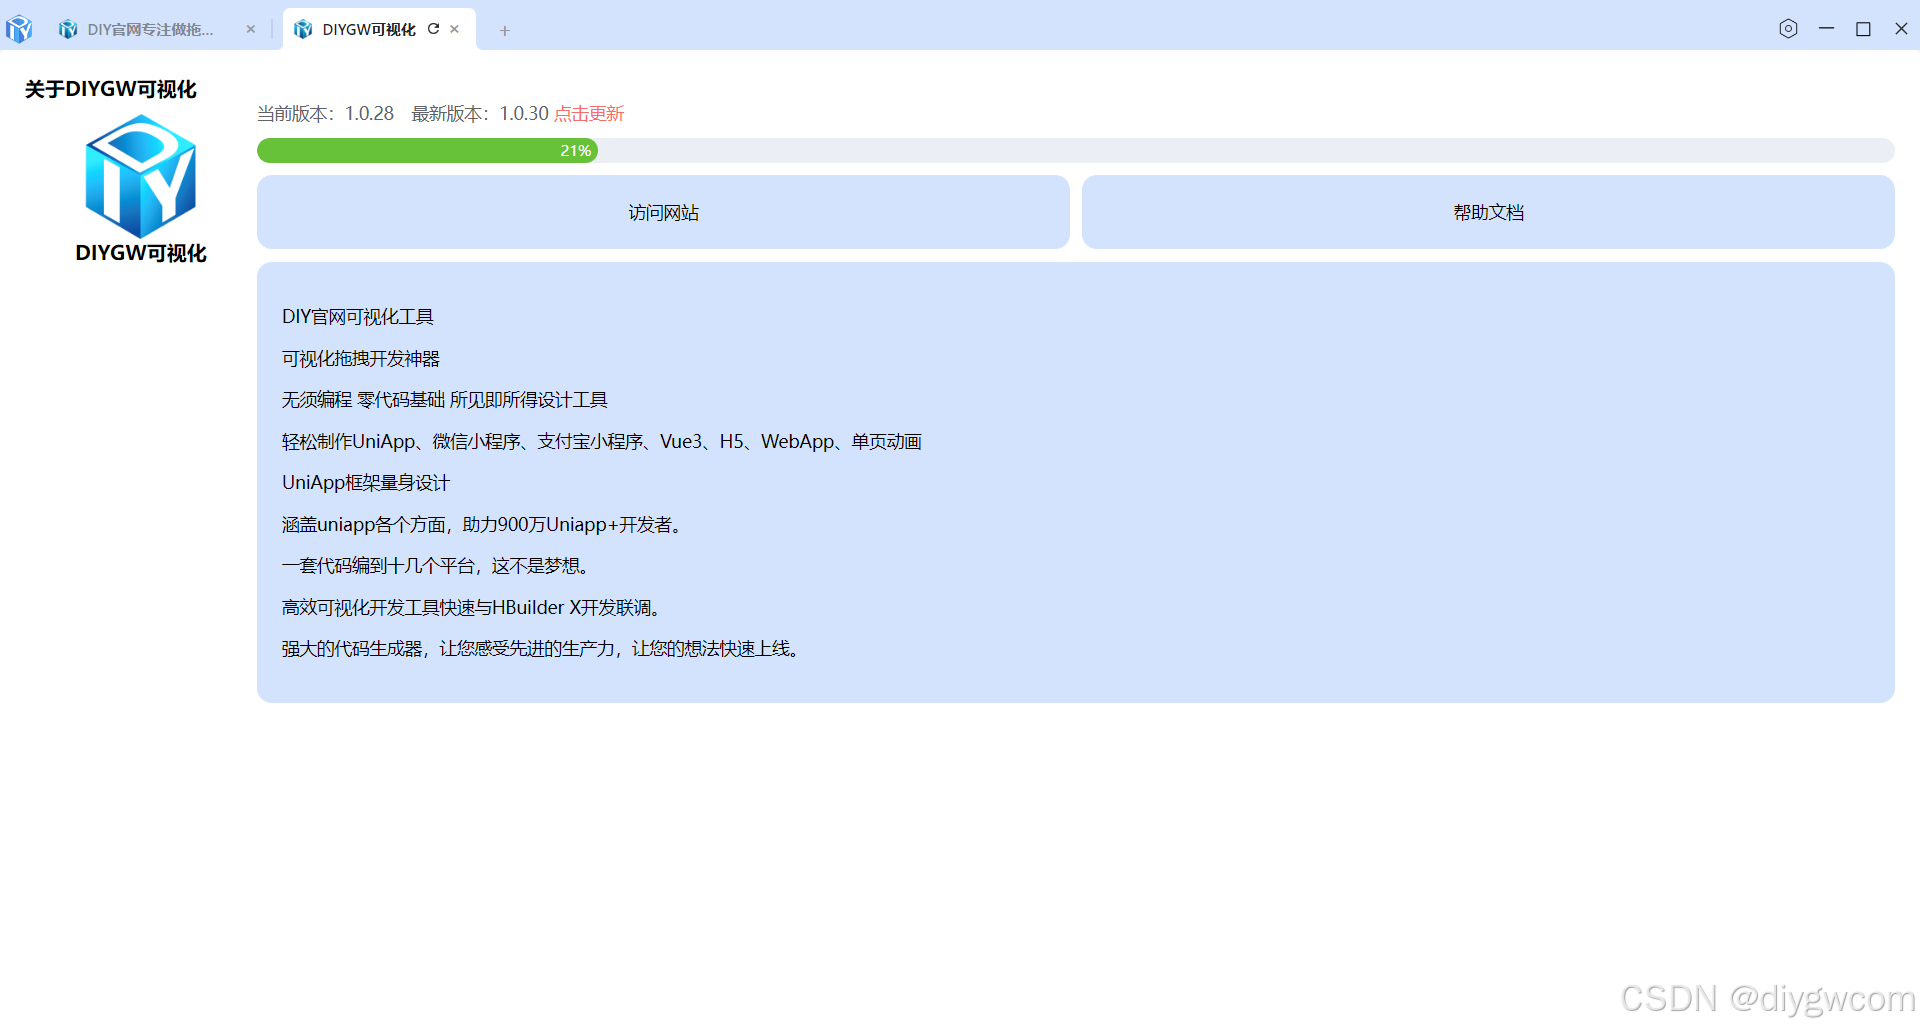
结合页面调用
<script setup lang="ts">
    import { ElMessage } from 'element-plus';
    import { reactive, ref } from 'vue';
    const dialogVisible = ref(false);
    const percentage = ref(0);
    let ipcRenderer = window.electron?.ipcRenderer;
    let state = reactive({
        oldversion: undefined,
        version: undefined,
        isnew: false
    });

    function compareVersion(version1, version2) {
        const newVersion1 =
            `${version1}`.split('.').length < 3 ? `${version1}`.concat('.0') : `${version1}`;
        const newVersion2 =
            `${version2}`.split('.').length < 3 ? `${version2}`.concat('.0') : `${version2}`;
        //计算版本号大小,转化大小
        function toNum(a) {
            const c = a.toString().split('.');
            const num_place = ['', '0', '00', '000', '0000'],
                r = num_place.reverse();
            for (let i = 0; i < c.length; i++) {
                const len = c[i].length;
                c[i] = r[len] + c[i];
            }
            return c.join('');
        }

        //检测版本号是否需要更新
        function checkPlugin(a, b) {
            const numA = toNum(a);
            const numB = toNum(b);
            return numA > numB ? 1 : numA < numB ? -1 : 0;
        }
        return checkPlugin(newVersion1, newVersion2);
    }
    if (ipcRenderer) {
        window.electron.ipcRenderer.invoke('diygw-get-version').then(res => {
            let version = res.data || res;
            state.oldversion = version;
        });
        //接收主进程版本更新消息
        window.electron.ipcRenderer.on('update-message', (event, arg) => {
            console.log(arg);
            if ('update-available' == arg.cmd) {
                state.version = arg.message.version;
                if (compareVersion(state.version, state.oldversion) > 0) {
                    state.isnew = true;
                }
                // 假设我们有一个名为 'userProfile' 的路由
                //显示升级对话框
            } else if ('download-progress' == arg.cmd) {
                //更新升级进度
                console.log(arg.message.percent);
                dialogVisible.value = true;
                let percent = Math.round(parseFloat(arg.message.percent));
                percentage.value = percent;
            } else if ('error' == arg.cmd) {
                dialogVisible.value = false;
                ElMessage.error('更新失败');
            }
        });
        window.electron.ipcRenderer.send('checkForUpdate');
    } else {
        //用来测试显示
        // state.oldversion = 1;
        // state.version = 1;
        // state.isnew = true;
    }
    const download = () => {
        window.electron.ipcRenderer.send('downloadUpdate');
    };
    const openLink = url => {
        window.electron.ipcRenderer.invoke('diygw-down', {
            text: url
        });
    };
</script>

<template>
    <div class="flex container flex-direction-column">
        <div class="text-lg text-bold">关于</div>
        <div class="flex flex1">
            <div class="flex-direction-column align-center flex" style="padding: 10px 40px">
                <img src="../assets/logo.png" style="width: 100px" />
                <div class="text-bold">DIYGW可视化</div>
            </div>
            <div class="flex1 flex-direction-column flex" style="font-size: 14px">
                <div class="flex">
                    <div>
                        <el-text class="padding-right" v-if="state.oldversion">
                            当前版本:{{ state.oldversion }}
                        </el-text>
                        <el-text v-if="state.version && state.isnew">
                            最新版本:{{ state.version }}
                        </el-text>
                        <el-text
                            class="padding-right"
                            type="danger"
                            @click="download()"
                            v-if="state.version && state.isnew"
                        >
                            点击更新
                        </el-text>
                    </div>
                </div>
                <div class="margin-top" v-if="dialogVisible">
                    <el-progress
                        status="success"
                        :text-inside="true"
                        :stroke-width="20"
                        :percentage="percentage"
                        :show-text="true"
                    ></el-progress>
                </div>
                <div class="flex text-center margin-top">
                    <div
                        @click="openLink('https://www.diygw.com')"
                        class="text-bg-tip link margin-right flex-sub"
                    >
                        访问网站
                    </div>
                    <div
                        @click="openLink('https://www.diygw.com/69')"
                        class="text-bg-tip link flex-sub"
                    >
                        帮助文档
                    </div>
                </div>

                <div class="margin-top text-bg-tip">
                    <p>DIY官网可视化工具</p>
                    <p>可视化拖拽开发神器</p>
                    <p>无须编程 零代码基础 所见即所得设计工具</p>
                    <p>轻松制作UniApp、微信小程序、支付宝小程序、Vue3、H5、WebApp、单页动画</p>
                    <p>UniApp框架量身设计</p>
                    <p>涵盖uniapp各个方面,助力900万Uniapp+开发者。</p>
                    <p>一套代码编到十几个平台,这不是梦想。</p>
                    <p>高效可视化开发工具快速与HBuilder X开发联调。</p>
                    <p>强大的代码生成器,让您感受先进的生产力,让您的想法快速上线。</p>
                </div>
            </div>
        </div>
    </div>
</template>
请注意,electron-updater 的配置可能会根据你的 Electron 打包工具(如 electron-packager, electron-builder 等)和项目设置有所不同。例如,如果你使用的是 electron-builder,你需要在 package.json 中添加一些配置来确保 electron-updater 能正常工作。
此外,上述代码中的 autoUpdater.quitAndInstall(); 调用在 macOS 上可能不是必需的,因为 macOS 上的更新通常会自动处理。在 Windows 上,你可能需要显式调用此方法来重启应用并安装更新。
最后,请确保在 Electron 的主进程中调用更新逻辑,因为 electron-updater 需要访问文件系统和其他敏感资源。
