SpringBoot实现OAuth客户端
背景
5 月份的时候,我实践并整理了一篇博客:SpringBoot搭建OAuth2,该博客完成之后,本以为能对OAuth2的认证机制更加清晰,但我却觉得自己更“迷惘”了。
抛开我在项目中积累的浅薄经验不谈,单从在网上找到的OAuth2资料来看,它更适合应用于“资源所有者,客户端,授权服务器,资源服务器”四方角色存在的场景。那么,在企业级的微服务架构中,它也是这么应用的吗?
一般的企业分布式微服务架构中,常有认证服务OAuth2、基础平台服务(负责用户信息,权限,菜单等管理),网关服务(负责负载,网关转发),业务资源服务(提供业务服务)等,这些服务在互相调用时的流程是怎么样的?怎么做的授权?用的是OAuth2中的哪种授权模式?服务之间,哪个是客户端,哪个是资服服务……等等,怎么越想脑子越乱呢?
于是,我打算结合企业微服务架构中对于OAuth的实际应用整理一篇博客,把自己不懂的全弄清楚。也借此和各位大佬们探讨下,OAuth应用于企业服务需要做哪些调整。
代码实践
结合公司对OAuth的实际使用情况,以及网上查阅到的资料,我发现要实现OAuth客户端,有两种方案。一种是官方推建的使用spring-boot-starter-oauth2-client的方式,另一种是公司DIY的网关代理的模式,这两种方式的实现我在这里都会写一下。
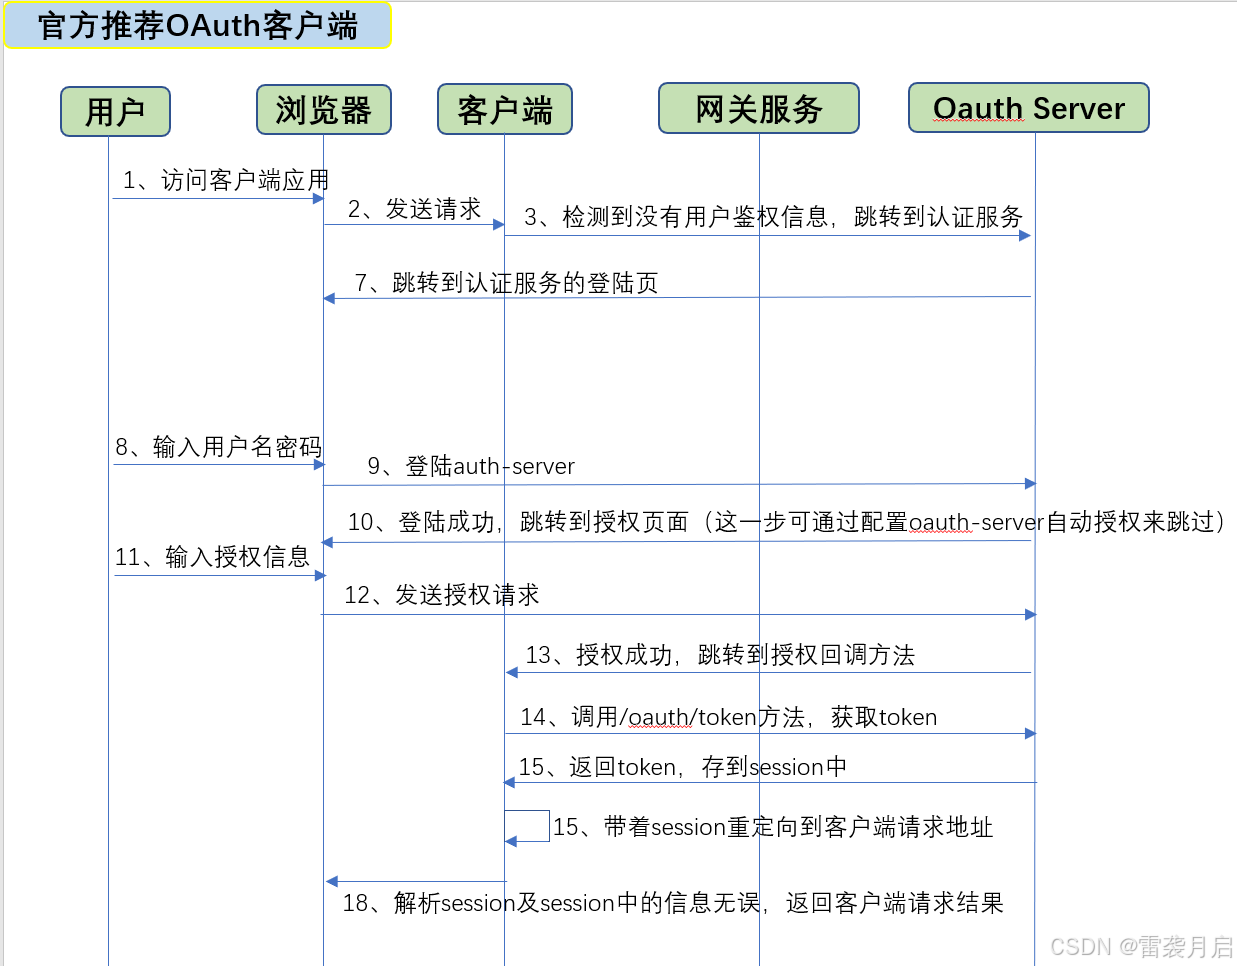
一、spring-boot-starter-oauth2-client方式
这是网上推荐的OAuth2客户端实现方式,它与OAuth Server的交互时序图如下:
代码实现如下:
1、pom.xml引入依赖包
    <parent>
        <groupId>org.springframework.boot</groupId>
        <artifactId>spring-boot-starter-parent</artifactId>
        <version>2.3.2.RELEASE</version> <!-- lookup parent from repository -->
    </parent>
    <groupId>com.client.auth2</groupId>
    <artifactId>auth-client</artifactId>
    <version>1.0</version>
    <name>auth-client</name>
    <description>auth-client</description>
    <properties>
        <java.version>1.8</java.version>
    </properties>
    <dependencies>
        <dependency>
            <groupId>org.springframework.boot</groupId>
            <artifactId>spring-boot-starter-web</artifactId>
        </dependency>

        <dependency>
            <groupId>org.projectlombok</groupId>
            <artifactId>lombok</artifactId>
        </dependency>

        <dependency>
            <groupId>org.springframework.boot</groupId>
            <artifactId>spring-boot-starter-security</artifactId>
        </dependency>
        <dependency>
            <groupId>org.springframework.boot</groupId>
            <artifactId>spring-boot-starter-oauth2-client</artifactId>
        </dependency>

    </dependencies>
2、yml添加添加OAuth服务端的配置
server:
  port: 19210
  servlet:
    context-path: /leixi
    session:
      cookie:
        # 需要更换存放sessionId的cookie名字,否则认证服务和客户端的sessionId会相互覆盖
        name: JSESSIONID-2
  max-http-header-size: 102400

spring:
  security:
    oauth2:
      client:
        registration:
          leixi-client:
            provider: auth-server    #与下面provider里的配置呼应
            client-id: client        #在OAuth Server服务端里注测的客户端Id
            client-secret: 123456    #在OAuth Server服务端里注测的客户端Secret
            authorization-grant-type: authorization_code   #客户端访问的授权模式
            redirect-uri: '{baseUrl}/{action}/oauth2/code/{registrationId}'  #客户端获得code后的回调地址,默认该地址不变
            scope: read, write  #授权的scope
            client-name: client  #客户端名称
        provider:
          auth-server:
            authorization-uri: http://127.0.0.1:19200/oauth/authorize    #OAuth Server授权码模式地址
            token-uri: http://127.0.0.1:19200/oauth/token   #OAuth Server获取Token的地址
            user-info-uri: http://127.0.0.1:19200/user/info   #OAuth获取用户信息的地址
            user-name-attribute: name
3、添加WebSecurityConfig配置
package com.client.auth2.config;

import org.springframework.context.annotation.Configuration;
import org.springframework.security.config.annotation.web.builders.HttpSecurity;
import org.springframework.security.config.annotation.web.configuration.EnableWebSecurity;
import org.springframework.security.config.annotation.web.configuration.WebSecurityConfigurerAdapter;
import org.springframework.security.config.http.SessionCreationPolicy;

@Configuration
@EnableWebSecurity
public class WebSecurityConfig extends WebSecurityConfigurerAdapter {

    @Override
    public void configure(HttpSecurity http) throws Exception {
        http
                .authorizeRequests()
                .anyRequest().authenticated()
                .and().logout()
                .and().sessionManagement().sessionCreationPolicy(SessionCreationPolicy.ALWAYS)
                .and().oauth2Client()
                .and().oauth2Login();
    }
}
4、编写一个Controller方法用于测试
/**
*
* @author leixiyueqi
* @since 2023/12/5 19:39
*/
@RestController
@Slf4j
public class DemoController {
@GetMapping("/demo")
public Object demo() {
Authentication authentication = SecurityContextHolder.getContext().getAuthentication();
log.info("authentication: {}", authentication);
return "Hello World";
}
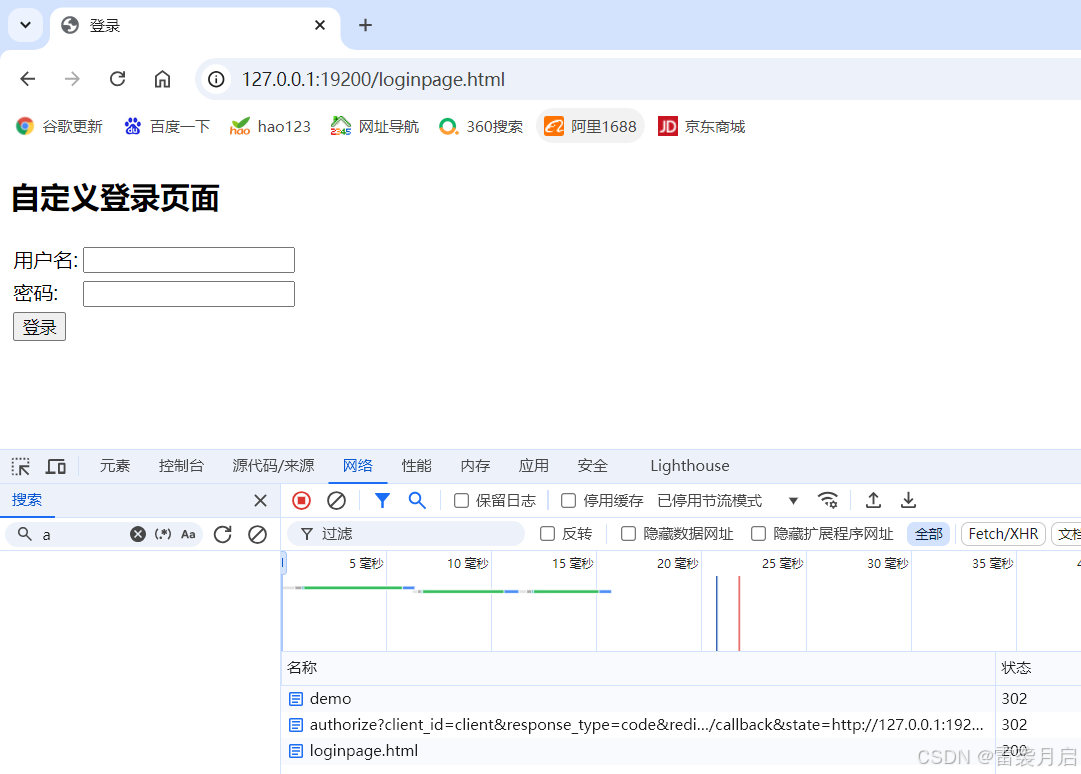
}5、结合OAuth Server进行测试,为方便测试,咱们使用上篇博客中构建的直接跳转登陆页的OAuth Server服务。访问客户端地址:http://127.0.0.1:19210/leixi/demo,测试结果如下:
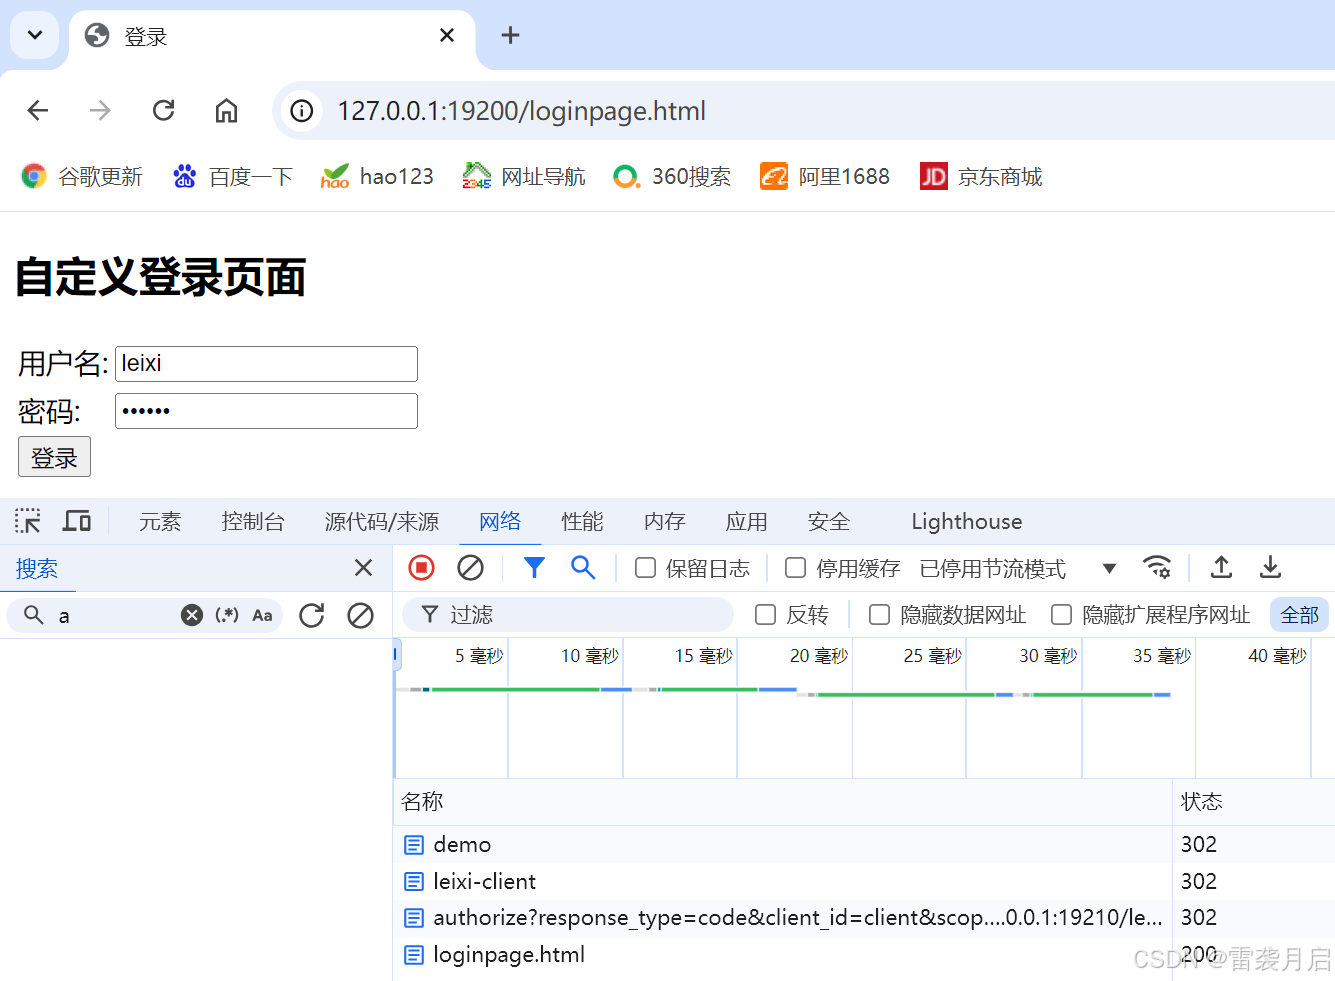
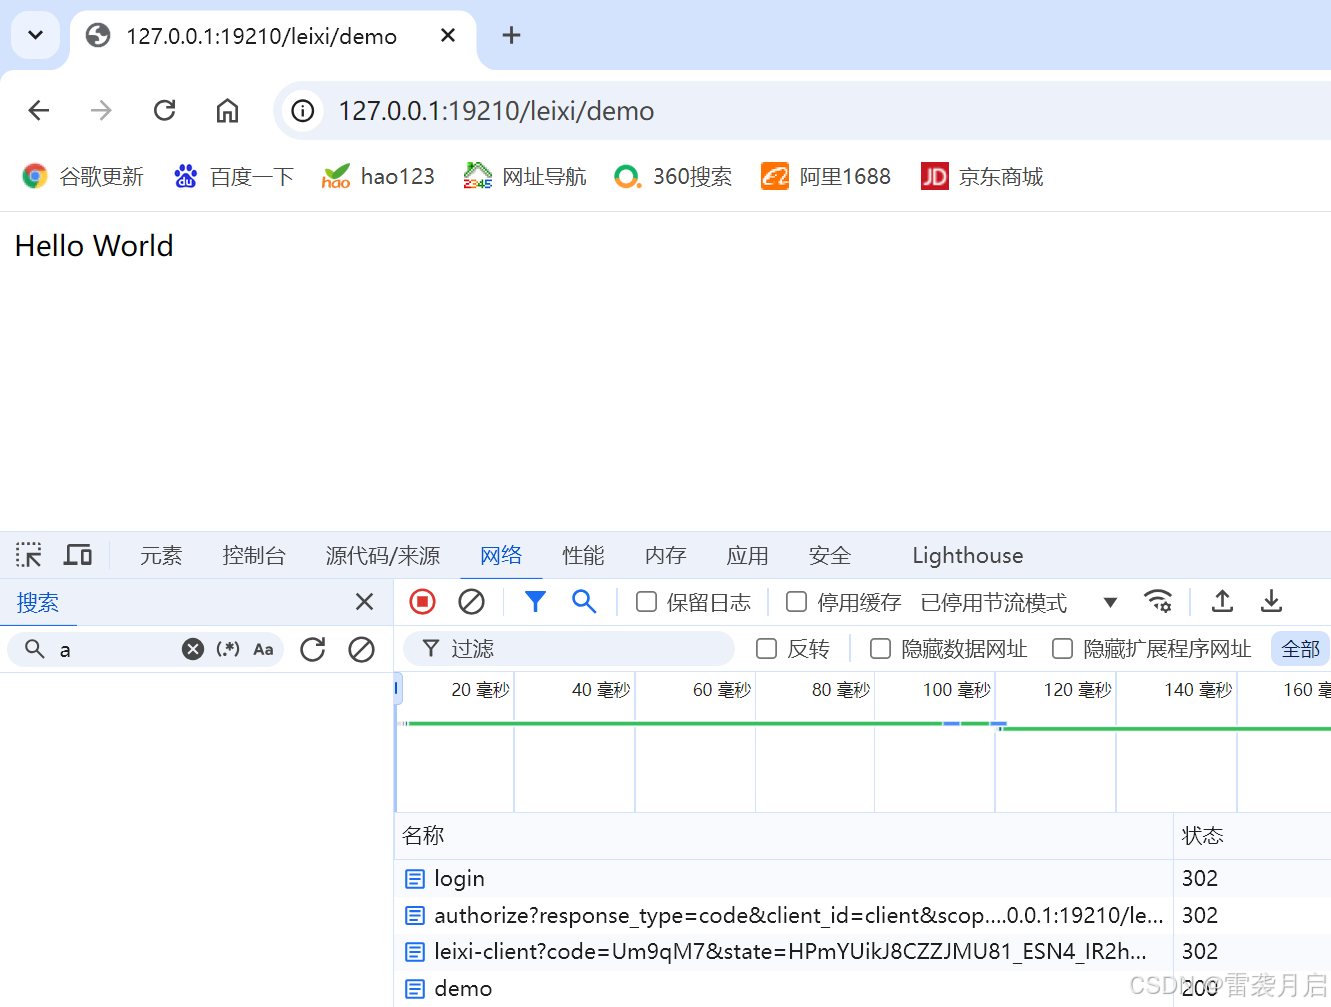
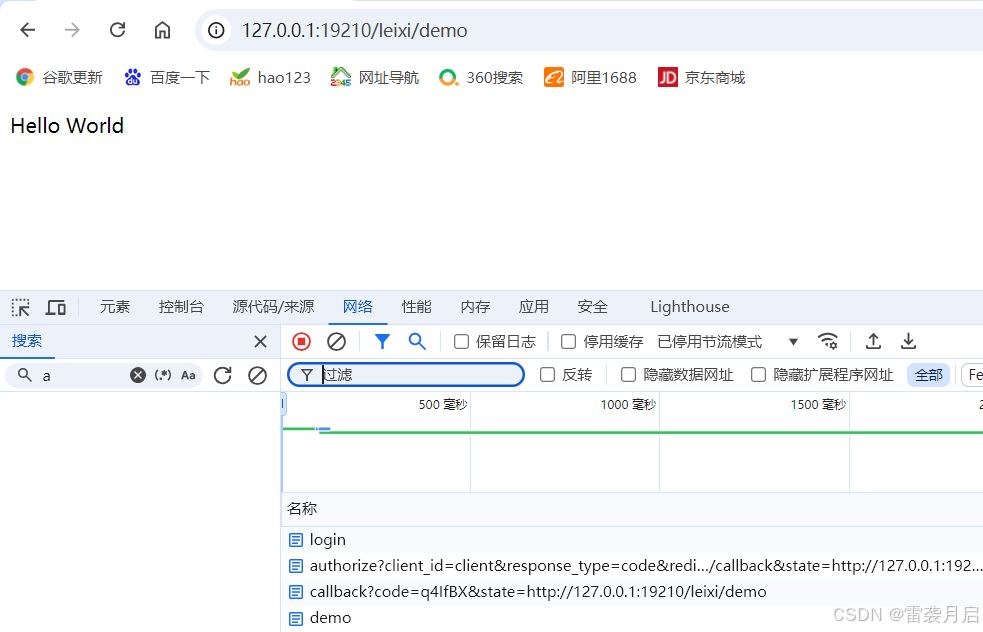
输入用户名,密码之后,正常跳转到了客户端的请求:
二、网关代理集成方式
网关代理集成方式是公司在应用OAuth Server时,结合公司的架构进行的一些个性化设计处理,它与其他服务的交互时序图如下:
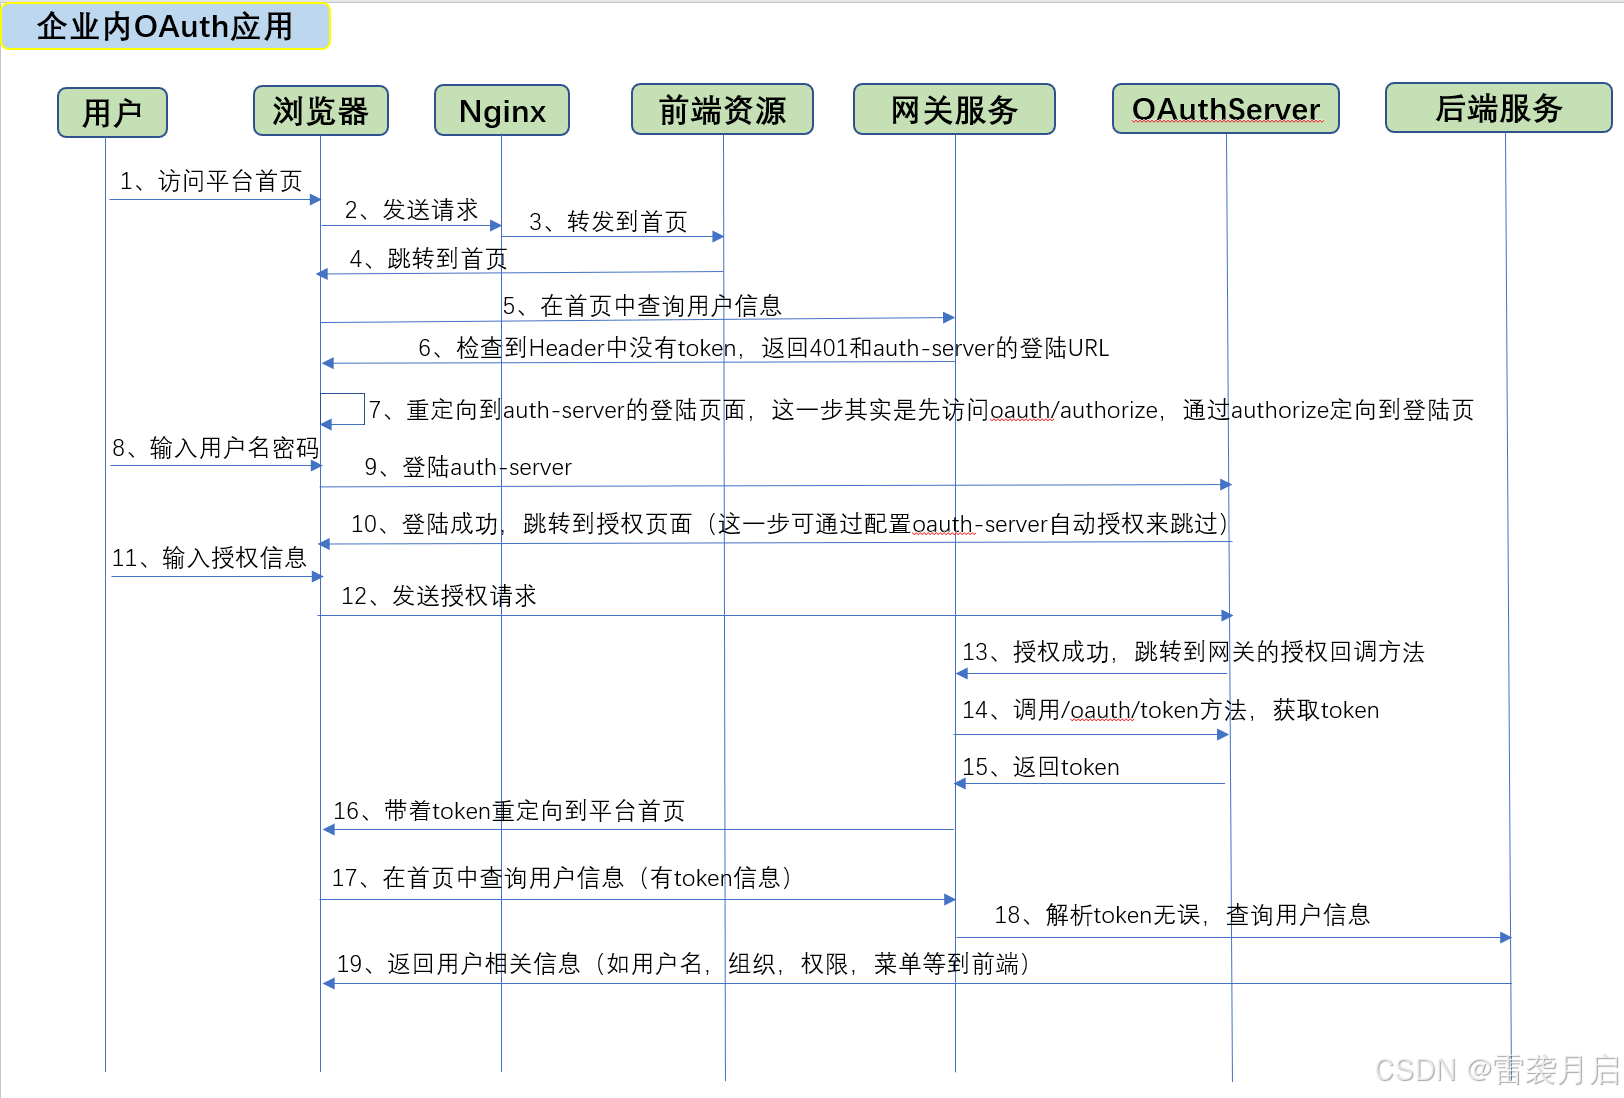
以下是一个简化版的实现,其实现逻辑如下:
1) 通过浏览器访问客户端服务,客户端通过Filter检查请求的cookie中是否有Token,
2) 如果没有Token或Token校验不通过,则重定向到OAuth Server的登陆页面。
3) OAuth Server登陆授权后,跳转到客户端的回调方法,回调方法中拿到Code,调用oauth/token来获得token.
4) 将token封装到cookie中,再重新调用客户端服务,本次Filter检查到有Token,正常放行。
5) 返回客户端服务的结果到浏览器。
下面是代码实践:
1、添加pom.xml依赖
<dependency>
            <groupId>org.springframework.boot</groupId>
            <artifactId>spring-boot-starter-web</artifactId>
        </dependency>

        <dependency>
            <groupId>org.projectlombok</groupId>
            <artifactId>lombok</artifactId>
        </dependency>
        <dependency>
            <groupId>com.alibaba</groupId>
            <artifactId>fastjson</artifactId>
            <version>1.2.83</version>
        </dependency>

        <dependency>
            <groupId>io.jsonwebtoken</groupId>
            <artifactId>jjwt-jackson</artifactId>
            <version>0.11.2</version>
        </dependency>
        <dependency>
            <groupId>io.jsonwebtoken</groupId>
            <artifactId>jjwt</artifactId>
            <version>0.9.0</version>
        </dependency>


        <!--huTool工具箱大全-->
        <dependency>
            <groupId>cn.hutool</groupId>
            <artifactId>hutool-all</artifactId>
            <version>5.3.0</version>
        </dependency>
2、添加检查cookie中Token的过滤器
/**
 *
 * @author leixiyueqi
 * @since 2024/9/18 19:39
 */
@Slf4j
@Component
public class TokenAuthFilter implements Ordered, Filter {

    private static final String authUri = "http://127.0.0.1:19200/oauth/authorize?client_id=client&response_type=code&redirect_uri=http://127.0.0.1:19210/leixi/callback&state=";

    @Override
    public void doFilter(ServletRequest request, ServletResponse response, FilterChain chain) throws IOException, ServletException {
        HttpServletRequest httpRequest = (HttpServletRequest) request;
        HttpServletResponse httpResponse = (HttpServletResponse) response;
        //String token = httpRequest.getParameter("token");  通过url的方式获取Token
        // 获取请求的URI
        String requestURI = CommonUtils.getRequestUriByHttpRequest(httpRequest);
        String token = getCookieFromRequest(httpRequest,"token");

        if (!requestURI.contains("callback")) {
            if (StringUtils.isEmpty(token)) {
                log.info("请求中未携带token信息");
                httpResponse.sendRedirect(authUri + requestURI);
            } else {
                Claims claim = CommonUtils.parseJwt(token);
                if (claim == null) {
                    log.info("token解析失败");
                    httpResponse.sendRedirect(authUri + requestURI);
                }
            }
        }
        chain.doFilter(request, response);

    }

    private String getCookieFromRequest(HttpServletRequest request,String cookieName) {
        Cookie[] cookies = request.getCookies();
        if (cookies != null) {
            for (Cookie cookie : cookies) {
                // 进行其他处理,比如验证Cookie
                if (cookieName.equals(cookie.getName())) {
                    return cookie.getValue();
                }
            }
        } else {
            log.info("No cookies found in the request.");
        }
        return null;
    }

    @Override
    public int getOrder() {
        return 2;
    }
}
3、添加调用/oauth/token请求的工具类
/**
 * 认证服务交互工具类,用于访问OAuth Server,获得Token
 *
 * @author leixiyueqi
 * @since 2024/9/18 19:39
 */

public class AuthorizationUtils {

    private static String oauthTokenUrl = "http://127.0.0.1:19200/oauth/token";

    private static final String clientId ="client";

    private static final String clientSecret ="123456";

    public static Map getAccessToken(String code, String redirectUri) {
        try {
            // 发送请求
            String body = HttpUtil.createPost(oauthTokenUrl)
                    .contentType(MediaType.APPLICATION_FORM_URLENCODED_VALUE)
                    .header("Authorization", generateAuthHeader())
                    .form("code", code)
                    .form("redirect_uri", redirectUri)
                    .form("grant_type", "authorization_code")
                    .execute()
                    .body();

            System.out.println("DibAuthorization.getAccessToken:tokenBody " +body);

            Map<String, Object> map = JSON.parseObject(body, HashMap.class);
            return map;
        } catch (Exception ex) {
            System.out.println("get access token failed : {}"+ ex.getMessage());
            throw ex;
        }
    }
    private static String generateAuthHeader() {
        String credentials = clientId + ":" + clientSecret;
        String encoded = new String(Base64.getEncoder().encode(credentials.getBytes()));
        return "Basic " + encoded;
    }

}
4、添加测试Controller
/**
 *
 * @author leixiyueqi
 * @since 2024/9/18 19:39
 */
@RestController
@Slf4j
public class DemoController {


    @GetMapping("/demo")
    public Object demo() {;
        return "Hello World";
    }

    /**
     * 客户端的回调方法,用于获得code后,通过code获得
     *
     * @param code
     * @param state
     * @param httpRequest
     * @param response
     */
    @GetMapping("/callback")
    public void callback(@RequestParam String code,
                         @RequestParam(required = false) String state,
                         ServletRequest httpRequest, ServletResponse response) {
        try {
            log.info("进入方法,callback");
            String localUri = CommonUtils.getRequestUriByHttpRequest((HttpServletRequest)httpRequest);
            Map<String, Object> map = AuthorizationUtils.getAccessToken(code, localUri);
            String jwtStr = CommonUtils.createJwt(map);
            HttpServletResponse httpResponse = (HttpServletResponse) response;
            //redirectUrl = String.format("%s%s=%s", redirectUrl, redirectUrl.contains("?") ? "&token" : "?token", jwtStr);  //将token拼装到url中。
            addCookieForToken(httpResponse, jwtStr);
            httpResponse.sendRedirect(state);
        } catch (Exception e) {
            log.error("AuthorizationCodeTokenController.callback exception:{}", e.getMessage());
        }
    }

    /**
     * 将token以cookie的形式添加到response中
     *
     * @param response
     * @param token
     * @throws Exception
     */
    private void addCookieForToken(HttpServletResponse response, String token) throws Exception {
        Cookie cookie = new Cookie("token", token);

        // 设置Cookie的有效期(以秒为单位)
        cookie.setMaxAge(60 * 60); // 有效期为1小时
        // 设置Cookie的路径
        cookie.setPath("/");
        // 设置Cookie是否只能通过HTTPS协议传输
        cookie.setSecure(true); // 如果你的应用支持HTTPS,设置为true
        // 设置Cookie是否可以通过JavaScript脚本访问
        cookie.setHttpOnly(true); // 设置为true,增加安全性

        // 添加Cookie到响应中
        response.addCookie(cookie);

        // 输出一些文本,以便查看响应
        response.setContentType("text/html;charset=UTF-8");
        response.getWriter().println("<h1>Cookie has been set.</h1>");
    }
}
5、补充下工具类
/**
 * 工具类
 *
 * @author leixiyueqi
 * @since 2024/9/18 19:39
 */
public class CommonUtils {

    private static final String secretKey = "leixi_2024";

    public static String createJwt(Map<String, Object> map) {
        return Jwts.builder().setClaims(map).setExpiration(new Date(System.currentTimeMillis() + 28800000L)).signWith(SignatureAlgorithm.HS256, secretKey).compact();
    }

    public static Claims parseJwt(String jwtString) {
        try {
            return (Claims)Jwts.parser().setSigningKey(secretKey).parseClaimsJws(jwtString).getBody();
        } catch (JwtException var2) {
            return null;
        }
    }

    public static String getRequestUriByHttpRequest(HttpServletRequest httpRequest) {
        String requestURI = httpRequest.getRequestURI();

        // 获取服务器的端口号
        int serverPort = httpRequest.getServerPort();

        // 获取请求的协议(HTTP或HTTPS)
        String scheme = httpRequest.getScheme();

        // 构建完整的URL
        StringBuilder fullUrl = new StringBuilder(scheme).append("://")
                .append(httpRequest.getServerName())
                .append(":").append(serverPort)
                .append(requestURI);
        return fullUrl.toString();
    }
}
6、测试,与上文一致,输入:http://127.0.0.1:19210/leixi/demo,通过Filter重定向跳转到/oauth/authorize,重定向到登陆页。
输入用户名,密码后,经过上文所述的认证,callback,重定向,再Filter,最终进入客户端请求。
后记与致谢
完成了这篇博客后,我终于对OAuth Server的使用,企业中的应用、与客户端的交互有了一个全盘的理解。道阻且长,行将则至,我也没想到时隔近五个月,我才把OAuth相关的知识链给跑通。参考了网上其他的博客,很多大佬在一篇博客里就把认证,自定义页面,客户端给写好了,但我自认没有能力写得那么简单直白,另一方面也想深入的剖析下它的实现,所以写得有点啰嗦了,请各位看官人多多包涵。
现在回过头看OAuth Server的四种授权模式,可知本篇博客中的两种实现都是授权码模式,那么,对于在企业内部应用OAuth,是不是可以使用其他模式呢?如更简捷的“简单模式”,这个课题,大家可以结合自己的需要进行实践。
在实践这篇博客时,我也在网上找到了很多二货,以下是我觉得对我帮助极大的,拜谢大佬!
SpringBoot+SpringSecurity OAuth2 认证服务搭建实战 (六)OAuth2经典场景~授权码模式
SpringBoot整合OAuth 2.0
超级简单的springboot整合springsecurity oauth2第三方登录