Redis存储原理
前言
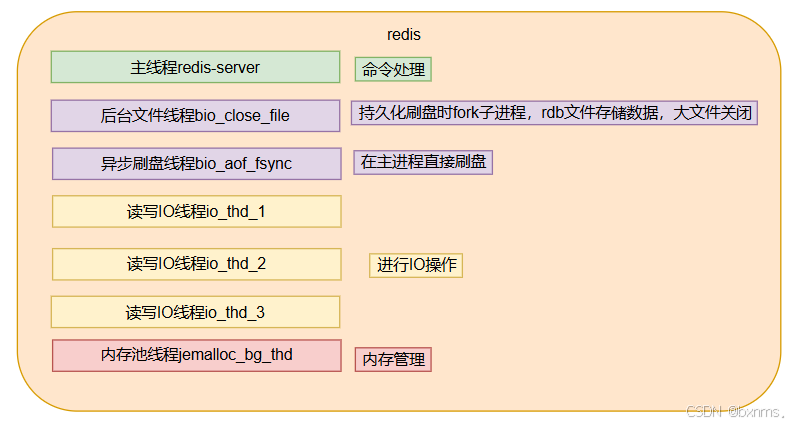
我们从redis服务谈起,redis是单reactor,命令在redis-server线程处理。还有若干读写IO线程负责IO操作(redis6.0之后,Redis之pipeline与事务)。此外还有一个内存池线程负责内存管理、一个后台文件线程负责大文件的关闭、一个异步刷盘线程负责持久化。这就使得redis在设计方面对高效的贡献。

从io密集型的角度来看,redis的磁盘IO是fork子进程异步刷盘,不占用主线程。网络IO如果有多个连接,并且发送了大量的请求,才会考虑IO多线程;从cpu密集型的角度来看,redis有高效的数据结构,加之kv原理,避免了cpu密集。那redis为什么不采用多线程呢?硬伤就是redis的多种数据类型由多种不同的数据结构实现,加锁复杂,锁的粒度不易控制。此外频繁的上下文切换会降低整体性能。那除了单reactor,redis还在什么方面对高效做出来贡献呢?hash表。
存储原理
redis使用哈希表来组织所有数据,这次我们直接杀到源码。在redisDb中我们可以看到四个dict(散列表)类型的成员(英文这里就不翻译了,原汁原味)。
typedef struct redisDb {
    kvstore *keys;              /* The keyspace for this DB */
    kvstore *expires;           /* Timeout of keys with a timeout set */
    ebuckets hexpires;          /* Hash expiration DS. Single TTL per hash (of next min field to expire) */
    dict *blocking_keys;        /* Keys with clients waiting for data (BLPOP)*/
    dict *blocking_keys_unblock_on_nokey;   /* Keys with clients waiting for
                                             * data, and should be unblocked if key is deleted (XREADEDGROUP).
                                             * This is a subset of blocking_keys*/
    dict *ready_keys;           /* Blocked keys that received a PUSH */
    dict *watched_keys;         /* WATCHED keys for MULTI/EXEC CAS */
    int id;                     /* Database ID */
    long long avg_ttl;          /* Average TTL, just for stats */
    unsigned long expires_cursor; /* Cursor of the active expire cycle. */
    list *defrag_later;         /* List of key names to attempt to defrag one by one, gradually. */
} redisDb;
可见我们需要对dict下手了,因为数据就存储在dict中。这其实类似c++类的封装,dictType中存放了所有成员函数,其中dictEntry指针数组就是元素存储的地方了。
struct dict {
    dictType *type;

    dictEntry **ht_table[2];//哈希表
    unsigned long ht_used[2];//实际存储的元素个数

    long rehashidx; /* rehashing not in progress if rehashidx == -1 */

    /* Keep small vars at end for optimal (minimal) struct padding */
    unsigned pauserehash : 15; /* If >0 rehashing is paused */

    unsigned useStoredKeyApi : 1; /* See comment of storedHashFunction above */
    signed char ht_size_exp[2]; /* exponent of size. (size = 1<<exp) */
    int16_t pauseAutoResize;  /* If >0 automatic resizing is disallowed (<0 indicates coding error) */
    void *metadata[];
};
我们来看dictEntry,也就是存储元素的结构。
/* -------------------------- types ----------------------------------------- */
struct dictEntry {
    void *key;
    union {
        void *val;
        uint64_t u64;
        int64_t s64;
        double d;
    } v;
    struct dictEntry *next;     /* Next entry in the same hash bucket. */
};

typedef struct {
    void *key;
    dictEntry *next;
} dictEntryNoValue;
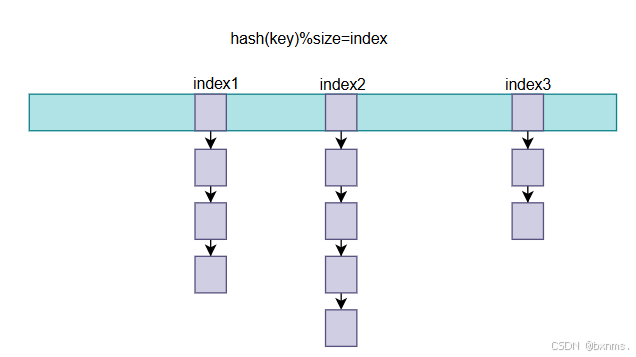
源码我们找到了,现在就可以来讨论一下哈希表了。哈希表通过hash运算得出index,如果这个地方有元素,就通过链表组织。这就对应了dictEntry **ht_table[2]。

我们知道,通过链表组织就是一种应对hash冲突的策略,hash冲突会使索引效率降低,然鹅从源码可以看到有一个负载因子,也就是已有元素与数组长度之比(used/size),负载因子越大表示hash冲突就越大,而我们知道hash时间复杂度是O(1),hash冲突到后面会使时间复杂度增加到O(n)。当负载因子大于1的时候就要进行扩容操作,也就是将数组长度翻倍,增大分母减小负载因子。而当负载因子小于0.1(恰好大于used的2^n)的时候就要进行缩容,因为这是占着茅坑不拉屎,浪费空间。不管扩容还是缩容,数组长度都会改变,这时候hash算法就变了,就要对原来的元素重新hash。

蛋是!redis是个数据库啊,rehash时就有可能有数据操作,所以它就不能像STL中的unordered_map一样直接rehash(CPU密集型的)。redis是采取渐进式rehash策略。Redis的渐进式rehash是一种在数据量增加时对哈希表进行动态扩容的机制,它能够保证数据的均匀分布和快速访问,同时避免了传统rehash操作可能带来的性能下降问题。在Redis中,渐进式rehash的实现原理和步骤如下:
- 触发条件:当哈希表中的节点数与哈希表大小的比例超过一定阈值(默认为1:1,或者在执行RDB或AOF操作时为5:1)时,就会触发rehash操作。
- 创建新的哈希表:Redis会创建一个新的哈希表,其大小是原哈希表的两倍,以容纳更多的键值对。
- 渐进式迁移:Redis不会一次性将所有键值对迁移到新哈希表,而是将迁移过程分散到后续的字典操作中。每次字典操作时,会顺便迁移一部分键值对到新哈希表,这个过程称为渐进式rehash。
- 迁移过程:在迁移过程中,Redis会维护一个
rehashidx索引,用于记录迁移的进度。每次字典操作时,会迁移rehashidx索引对应的桶中的所有键值对到新哈希表,然后rehashidx递增。 - 读写操作:在渐进式rehash进行期间,查找操作会在两个哈希表中进行,以确保不会遗漏任何键值对。而新增操作则只会在新的哈希表中进行。
- 完成rehash:当所有键值对都迁移到新哈希表后,Redis会将旧哈希表的空间释放,并将
rehashidx重置为-1,表示rehash操作完成。 - 缩容操作:除了扩容,Redis在数据量减少时也会进行缩容操作,其过程与扩容类似,也是通过渐进式rehash来完成。
渐进式rehash的优点在于它能够平滑地处理数据迁移,避免了一次性迁移可能导致的性能抖动,确保了Redis在扩容或缩容过程中的稳定性和性能。然而,它也会占用额外的内存空间,因为需要同时维护两个哈希表,并且在迁移过程中可能会导致一定程度的数据不一致。尽管如此,渐进式rehash是Redis中一个非常重要的特性,它使得Redis能够有效地处理动态数据集的变化。rehash源码如下,这里就不逐行解释了,扔给AI便可。
int dictRehash(dict *d, int n) {
    int empty_visits = n*10; /* Max number of empty buckets to visit. */
    unsigned long s0 = DICTHT_SIZE(d->ht_size_exp[0]);
    unsigned long s1 = DICTHT_SIZE(d->ht_size_exp[1]);
    if (dict_can_resize == DICT_RESIZE_FORBID || !dictIsRehashing(d)) return 0;
    /* If dict_can_resize is DICT_RESIZE_AVOID, we want to avoid rehashing.
     * - If expanding, the threshold is dict_force_resize_ratio which is 4.
     * - If shrinking, the threshold is 1 / (HASHTABLE_MIN_FILL * dict_force_resize_ratio) which is 1/32. */
    if (dict_can_resize == DICT_RESIZE_AVOID &&
        ((s1 > s0 && s1 < dict_force_resize_ratio * s0) ||
         (s1 < s0 && s0 < HASHTABLE_MIN_FILL * dict_force_resize_ratio * s1)))
    {
        return 0;
    }

    while(n-- && d->ht_used[0] != 0) {
        /* Note that rehashidx can't overflow as we are sure there are more
         * elements because ht[0].used != 0 */
        assert(DICTHT_SIZE(d->ht_size_exp[0]) > (unsigned long)d->rehashidx);
        while(d->ht_table[0][d->rehashidx] == NULL) {//旧数据为空就找下一个
            d->rehashidx++;
            if (--empty_visits == 0) return 1;
        }
        /* Move all the keys in this bucket from the old to the new hash HT */
        rehashEntriesInBucketAtIndex(d, d->rehashidx);
        d->rehashidx++;
    }

    return !dictCheckRehashingCompleted(d);
}

static void rehashEntriesInBucketAtIndex(dict *d, uint64_t idx) {
    dictEntry *de = d->ht_table[0][idx];
    uint64_t h;
    dictEntry *nextde;
    while (de) {
        nextde = dictGetNext(de);
        void *key = dictGetKey(de);
        /* Get the index in the new hash table */
        if (d->ht_size_exp[1] > d->ht_size_exp[0]) {
            h = dictHashKey(d, key, 1) & DICTHT_SIZE_MASK(d->ht_size_exp[1]);
        } else {
            /* We're shrinking the table. The tables sizes are powers of
             * two, so we simply mask the bucket index in the larger table
             * to get the bucket index in the smaller table. */
            h = idx & DICTHT_SIZE_MASK(d->ht_size_exp[1]);
        }
        if (d->type->no_value) {
            if (d->type->keys_are_odd && !d->ht_table[1][h]) {
                /* Destination bucket is empty and we can store the key
                 * directly without an allocated entry. Free the old entry
                 * if it's an allocated entry.
                 *
                 * TODO: Add a flag 'keys_are_even' and if set, we can use
                 * this optimization for these dicts too. We can set the LSB
                 * bit when stored as a dict entry and clear it again when
                 * we need the key back. */
                assert(entryIsKey(key));
                if (!entryIsKey(de)) zfree(decodeMaskedPtr(de));
                de = key;
            } else if (entryIsKey(de)) {
                /* We don't have an allocated entry but we need one. */
                de = createEntryNoValue(key, d->ht_table[1][h]);
            } else {
                /* Just move the existing entry to the destination table and
                 * update the 'next' field. */
                assert(entryIsNoValue(de));
                dictSetNext(de, d->ht_table[1][h]);
            }
        } else {
            dictSetNext(de, d->ht_table[1][h]);
        }
        d->ht_table[1][h] = de;
        d->ht_used[0]--;
        d->ht_used[1]++;
        de = nextde;
    }
    d->ht_table[0][idx] = NULL;
}
那我们怎么访问元素?用keys命令吗?非也。当执行 KEYS 命令时,Redis 会锁定数据库,然后检索所有匹配给定模式的键。如果键的数量非常多,这个操作可能会花费很长时间,在此期间,服务器不能响应其他客户端的请求,从而导致服务器阻塞。这是因为 KEYS 命令在执行期间会阻止其他操作,包括但不限于写操作,直到命令执行完成。我们可以使用scan命令。Redis 的 SCAN 命令是一个基于游标的迭代器,用于逐个元素地访问(或迭代)集合类型的元素,如列表(list)、集合(set)、有序集合(sorted set)和哈希(hash)。这个命令非常有用,因为它提供了一种方式来逐步检索大数据集,而不会像使用传统的 KEYS 命令那样对服务器性能造成严重影响。SCAN 命令的基本用法如下:
SCAN cursor [MATCH pattern] [COUNT count]cursor:游标,每次调用SCAN命令时,都会返回一个新的游标,用于下一次迭代。MATCH pattern:可选参数,用于过滤返回的元素,只返回符合给定模式的元素。COUNT count:可选参数,建议 Redis 返回的元素数量,实际返回的数量可能会更多或更少。
SCAN 命令的优点包括:
- 性能:相比于
KEYS命令,SCAN命令不会阻塞服务器,因为它是迭代地返回元素,而不是一次性返回所有匹配的元素。 - 大数据集:对于包含大量元素的集合类型,
SCAN命令可以有效地进行分批处理,这对于处理大数据集非常有用。 - 模式匹配:通过
MATCH选项,可以只返回符合特定模式的元素,这在处理具有特定前缀或模式的键时非常有用。 - 分页:在分页应用中,
SCAN可以用于实现服务器端的分页功能,通过游标来控制返回的数据范围。 - 灵活性:
COUNT参数允许你建议 Redis 返回的元素数量,这有助于控制每次迭代的负载。
需要注意的是,SCAN 命令返回的元素可能会有重复,因为 Redis 并不保证每次迭代都是从上一次停止的地方开始。因此,客户端需要准备好处理可能的重复数据。此外,SCAN 命令提供的迭代器只能保证在迭代过程中添加的新元素会被返回,但不保证它们的顺序。
