saltstack配置管理
一、saltstack的SSH工作模式
一、salt-ssh介绍
- salt-ssh 是 0.17.0 新引入的一个功能,不需要minion对客户端进行管理,也不需要master。
- salt-ssh 支持salt大部分的功能:如 grains、modules、state 等
- salt-ssh 没有使用ZeroMQ的通信架构,执行是串行模式
- salt-ssh和salt-minon可以共存,salt-minion不依赖ssh服务
类似 paramiko、pssh、ansible 这类的工具
二、Roster使用
salt-ssh需要一个名单系统来确定哪些执行目标,Salt的0.17.0版本中salt-ssh引入roster系统
roster系统编译成了一个数据结构,包含了targets,这些targets是一个目标系统主机列表和或如连接到这些targets
配置文件如下
# target的信息
    host:        # 远端主机的ip地址或者dns域名
    user:        # 登录的用户
    passwd:      # 用户密码,如果不使用此选项,则默认使用秘钥方式
# 可选的部分
    port:        #ssh端口
    sudo:        #可以通过sudo
    tty:         # 如果设置了sudo,设置这个参数为true
    priv:        # ssh秘钥的文件路径
    timeout:     # 当建立链接时等待响应时间的秒数
    minion_opts: # minion的位置路径
    thin_dir:    # target系统的存储目录,默认是/tmp/salt-<hash>
    cmd_umask:   # 使用salt-call命令的umask值
三、salt-ssh安装配置
1、安装salt-ssh
yum install salt-ssh -y2、修改roster文件,配置要管理的机器
# tail -11  /etc/salt/roster
linux-node1.example.com:
  host: 192.168.56.11
  user: root
  passwd: 123456
  port: 22

linux-node2.example.com:
  host: 192.168.56.12
  user: root
  passwd: 123456
  port: 22
3、管理测试
# salt-ssh '*' test.ping -i
linux-node1.example.com:
    True
linux-node2.example.com:
    True
4、salt-ssh命令用法
-r, –raw, –raw-shell # 直接使用shell命令
–priv #指定SSH私有密钥文件
–roster #定义使用哪个roster系统,如果定义了一个后端数据库,扫描方式,或者用户自定义的的roster系统,默认的就是/etc/salt/roster文件
–roster-file #指定roster文件
–refresh, –refresh-cache #刷新cache,如果target的grains改变会自动刷新
–max-procs #指定进程数,默认为25
-i, –ignore-host-keys #当ssh连接时,忽略keys
–passwd #指定默认密码
–key-deploy #配置keys 设置这个参数对于所有minions用来部署ssh-key认证, 这个参和–passwd结合起来使用会使初始化部署很快很方便。当调用master模块时,并加上参数 –key-deploy 即可在minions生成keys,下次开始就不使用密码
5、salt-ssh执行状态模块
salt-ssh '*' state.sls php.init 二、配置管理
状态写的应该是每次执行都是对的
一、状态间关系:实战——搭建LAMP环境
Salt Table of Contents
每个组件分开创建,以后可以复用(使用include)
salt:// 所处环境的根路径
1、基础环境
cd /srv/salt/prod
mkdir -p {apache,php,mysql}
1、Apache
apache-install:
  pkg.installed:
    - name: httpd

apache-config:
  file.managed:
    - name: /etc/httpd/conf/httpd.conf
    - source: salt://apache/files/httpd.conf
    - user: root
    - group: root
    - mode: 644

apache-service:
  service.running:
    - name: httpd
    - enable: True
2、PHP
php-install:
  pkg.installed:
    - pkgs:
      - php
      - php-pdo
      - php-mysql

php-config:
  file.managed:
    - name: /etc/php.ini
    - source: salt://php/files/php.ini
    - user: root
    - group: root
    - mode: 644
3、MySQL
mysql-install:
  pkg.installed:
    - pkgs:
      - mariadb
      - mariadb-server

mysql-config:
  file.managed:
    - name: /etc/my.cnf
    - source: salt://mysql/files/my.cnf
    - user: root
    - group: root
    - mode: 644

mysql-service:
  service.running:
    - name: mariadb
    - enable: True
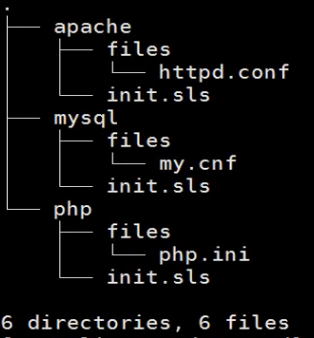
写完如下图(file下配置文件,是环境中拷贝过去的)

2、使用远程执行操作,指定statenv
#安装php
salt -S '10.0.0.10' state.sls php.init saltenv=prod
#安装MySQL
salt -S '10.0.0.10' state.sls mysql.init saltenv=prod
3、使用高级状态,将下面写入top file
vim /srv/salt/base/top.sls
prod:
  'ops-k8s-master01.local.com':
    - apache.init
    - php.init
    - mysql.init
执行高级状态
salt 'ops-k8s-master01*' state.highstate
4、top file中使用include
https://docs.saltstack.com/en/latest/topics/tutorials/states_pt3.html
在prod环境创建lamp.sls使用include,将所需组件写进入,在top file引用lamp
vim /srv/salt/prod/lamp.sls
include:
  - apache.init
  - php.init
  - mysql.init
更改top file,vim /srv/salt/base/top.sls
prod:
  'ops-k8s-master02.local.com':
    - lamp
执行高级状态
salt 'ops-k8s-master02*' state.highstate
5、扩展功能:extend
States tutorial, part 3 - Templating, Includes, Extends
示例:扩展PHP的扩展包,更改一下lamp.sls即可
vim /srv/salt/prod/lamp.sls
include:
  - apache.init
  - php.init
  - mysql.init
extend:
  php-install:
    pkg.installed:
      - name: php-mbstring
执行高级状态
salt 'ops-k8s-master02*' state.highstate
6、依赖/被依赖:require/require_in
States tutorial, part 2 - More Complex States, Requisites
1、我依赖谁:require
以Apache的配置举例,更改apache/init.sls,添加依赖并改错一下配置文件
apache-install:
  pkg.installed:
    - name: httpd

apache-config:
  file.managed:
    - name: /etc/httpd/conf/httpd.conf
    - source: salt://apache/files/httpd1.conf
    - user: root
    - group: root
    - mode: 644

apache-service:
  service.running:
    - name: httpd
    - enable: True
    - require:
      - pkg: apache-install
      - file: apache-config
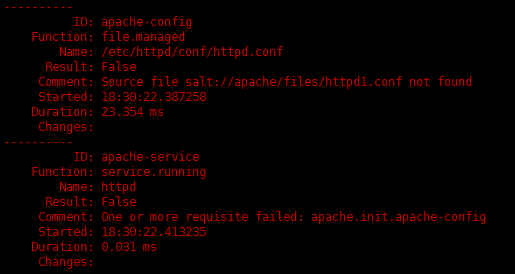
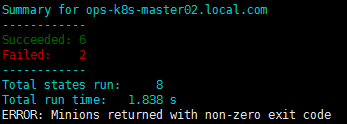
执行高级状态,报错信息如下
salt 'ops-k8s-master02*' state.highstate


验证服务状态

2、我被谁依赖:require_in
以Apache的配置举例,更改apache/init.sls,添加依赖并改错一下配置文件(红色是添加的功能)
apache-install:
  pkg.installed:
    - name: httpd
    - require_in:
      - service: apache-service

apache-config:
  file.managed:
    - name: /etc/httpd/conf/httpd.conf
    - source: salt://apache/files/httpd.conf
    - user: root
    - group: root
    - mode: 644
    - require_in:
      - service: apache-service

apache-service:
  service.running:
    - name: httpd
    - enable: True
执行高级状态
salt 'ops-k8s-master02*' state.highstate
7、监听/被监听:watch/watch_in
1、监听:watch
reload: True 文件变动,执行重载
以Apache的配置举例,更改apache/init.sls,添加依赖并改错一下配置文件(红色是添加的功能)
apache-install:
  pkg.installed:
    - name: httpd

apache-config:
  file.managed:
    - name: /etc/httpd/conf/httpd.conf
    - source: salt://apache/files/httpd.conf
    - user: root
    - group: root
    - mode: 644

apache-service:
  service.running:
    - name: httpd
    - enable: True
    - reload: True
    - watch:
      - file: apache-config
执行高级状态
salt 'ops-k8s-master02*' state.highstate
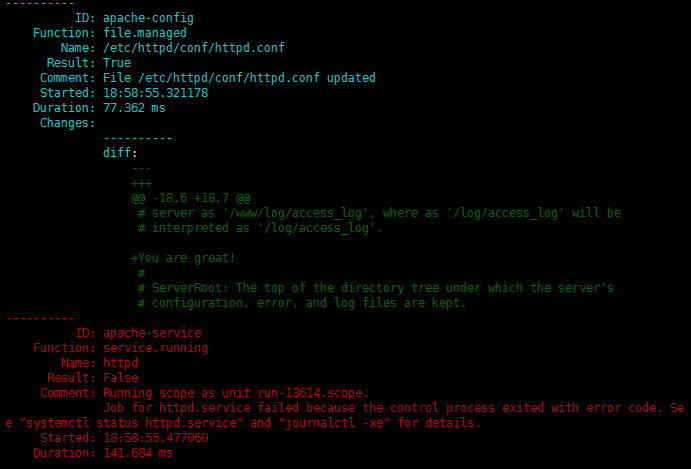
若文件修改错误,执行完,启动报错如下(salt返回值,会告知更改了什么)

若文件修改没有问题,执行完返回的状态如下

2、被监听:watch_in
以Apache的配置举例,更改apache/init.sls,添加依赖并改错一下配置文件(红色是添加的功能)
apache-install:
  pkg.installed:
    - name: httpd

apache-config:
  file.managed:
    - name: /etc/httpd/conf/httpd.conf
    - source: salt://apache/files/httpd.conf
    - user: root
    - group: root
    - mode: 644
    - watch_in:
      - service: apache-service

apache-service:
  service.running:
    - name: httpd
    - enable: True
    - reload: True
执行高级状态,不报错就OK了
salt 'ops-k8s-master02*' state.highstate
8、条件判断:unless
unless:除非后面的条件满足,不然就执行操作
需求:若文件存在,就不执行操作;若文件不存在就执行()
解决:如何判断一个文件是否存在,test -f /path/xxx
换言之即: 条件为假,就执行
1、更改httpd的配置文件,加上用户认证
在apache/files/httpd.conf添加下面的代码
<Directory "/var/www/html/admin">
    AllowOverride AuthConfig
    AuthType Basic
    AuthName "you guess"
    AuthUserFile /etc/httpd/conf/htpasswd_file
    Require user admin
</Directory>
创建示例代码
mkdir -p /var/www/html/admin
echo "User Authentication">> /var/www/html/admin/index.html
2、更改状态文件
以Apache的配置举例,更改apache/init.sls,添加依赖并改错一下配置文件(红色是添加的功能)
apache-install:
  pkg.installed:
    - name: httpd

apache-config:
  file.managed:
    - name: /etc/httpd/conf/httpd.conf
    - source: salt://apache/files/httpd.conf
    - user: root
    - group: root
    - mode: 644
    - watch_in:
      - service: apache-service

apache-auth:
  pkg.installed:
    - name: httpd-tools
  cmd.run:
    - name: htpasswd -bc /etc/httpd/conf/htpasswd_file admin admin
    - unless: test -f /etc/httpd/conf/htpasswd_file

apache-service:
  service.running:
    - name: httpd
    - enable: True
    - reload: True
3、执行高级状态,不报错就OK了
salt 'ops-k8s-master02*' state.highstate
二、jinja模板
saltstack模板:States tutorial, part 3 - Templating, Includes, Extends
jinja模板:欢迎来到 Jinja2 — Jinja2 2.7 documentation
需求:不同的主机不同的配置文件
1、实现方式一:
1、更改模板文件
vim apache/files/httpd.conf
Listen {{ IPADDR }}:{{ PORT }}
2、更改状态文件
vim apache/init.sls
apache-install:
  pkg.installed:
    - name: httpd

apache-config:
  file.managed:
    - name: /etc/httpd/conf/httpd.conf
    - source: salt://apache/files/httpd.conf
    - user: root
    - group: root
    - mode: 644
    - template: jinja
    - defaults:
      PORT: 80
      IPADDR: {{ grains['fqdn_ip4'][0] }}
    - watch_in:
      - service: apache-service

apache-auth:
  pkg.installed:
    - name: httpd-tools
  cmd.run:
    - name: htpasswd -bc /etc/httpd/conf/htpasswd_file admin admin
    - unless: test -f /etc/httpd/conf/htpasswd_file

apache-service:
  service.running:
    - name: httpd
    - enable: True
    - reload: True
3、执行高级状态
salt 'ops-k8s-master02*' state.highstate
2、实现方式二:
1、更改模板文件
vim apache/files/httpd.conf
Listen {{ grains['fqdn_ip4'][0] }}:{{ PORT }}
2、更改状态文件
vim apache/init.sls
apache-install:
  pkg.installed:
    - name: httpd

apache-config:
  file.managed:
    - name: /etc/httpd/conf/httpd.conf
    - source: salt://apache/files/httpd.conf
    - user: root
    - group: root
    - mode: 644
    - template: jinja
    - defaults:
      PORT: 80
    - watch_in:
      - service: apache-service

apache-auth:
  pkg.installed:
    - name: httpd-tools
  cmd.run:
    - name: htpasswd -bc /etc/httpd/conf/htpasswd_file admin admin
    - unless: test -f /etc/httpd/conf/htpasswd_file

apache-service:
  service.running:
    - name: httpd
    - enable: True
    - reload: True
3、执行高级状态
salt 'ops-k8s-master02*' state.highstate
