【OpenCV】场景中人的识别与前端计数
1.OpenCV代码设计讲解
突发奇想,搞个摄像头,识别一下实验室里面有几个人,计数一下(最终代码是累加计数,没有优化),拿OpenCV来玩一玩
首先,还是优先启动电脑摄像头,本项目将使用SSD进行人体检测。
deploy.prototxt与mobilenet_iter_73000.caffemodel自行从官网下载。
完整代码如下:
import cv2
import numpy as np

# 加载MobileNet-SSD模型
net = cv2.dnn.readNetFromCaffe('deploy.prototxt', 'mobilenet_iter_73000.caffemodel')


# 打开摄像头
cap = cv2.VideoCapture(0)

while cap.isOpened():
    ret, frame = cap.read()
    if ret:
        # 创建blob,预处理输入数据
        # cv2.resize(frame, (300, 300)),将输入的 frame 图像调整为 300x300 像素的大小
        # 神经网络通常要求输入图像的尺寸固定,因此需要调整图像大小
        # frame:要处理的原始图像,(300, 300):目标图像的宽度和高度
        # 0.007843:这是一个缩放因子,用于将像素值缩放到适合神经网络的范围。
		# 127.5:是一个均值值,用于对像素进行归一化处理,使用 Caffe 训练的模型,输入图像通常会减去均值以中心化数据。
        blob = cv2.dnn.blobFromImage(cv2.resize(frame, (300, 300)), 0.007843, (300, 300), 127.5)
        net.setInput(blob)

        # 进行前向传播,得到检测结果
        detections = net.forward()

        # 获取帧的宽度和高度
        # 在 OpenCV 中,图像通常被表示为一个 NumPy 数组,其维度是 (height, width, channels)
        (h, w) = frame.shape[:2]

        # 具体结构由 cv2.dnn 模块的输出格式决定。
        # 对于物体检测任务,网络输出的数据维度一般是一个 4D 的张量 (NumPy 数组),其形状大致为(1, 1, N, 7)
        # 1 (Batch size):处理的图像批次数量,通常为 1,因为我们处理的是单张图像。
        # 1 (Number of classes):如果是单类检测,这里也是 1,表示输出的类别信息(可能是分类器的层数)。
		# N (Number of detections):这是该图像中检测到的对象数量。例如,网络可能检测到 100 个对象,N 就是 100。
		# 7 (Detection details):每个检测结果包含 7 个值,分别表示:
			# 第1个值: 检测结果的标签索引(通常是类别ID)。
			# 第2个值: 置信度 (confidence score)。
			# 第3-7个值: 边界框的坐标 (bounding box coordinates: x1, y1, x2, y2)。
        # 遍历检测结果
        for i in range(detections.shape[2]):
            confidence = detections[0, 0, i, 2]

            # 设置最低置信度阈值
            if confidence > 0.4:
                idx = int(detections[0, 0, i, 1])

                # 只检测人类(index 15是人类类别)
                if idx == 15:
                    box = detections[0, 0, i, 3:7] * np.array([w, h, w, h])
                    (startX, startY, endX, endY) = box.astype("int")

                    # 画框标记人类
                    cv2.rectangle(frame, (startX, startY), (endX, endY), (0, 255, 0), 2)

        # 显示结果
        cv2.imshow("Human Detection", frame)

        # 按 'q' 键退出
        if cv2.waitKey(1) & 0xFF == ord('q'):
            break
    else:
        break

cap.release()
cv2.destroyAllWindows()
2.升级一下
给判定到的人数记录下来,因为不是什么重要数据,拿redis存一下,然后通过前端展示出来,效果如下:
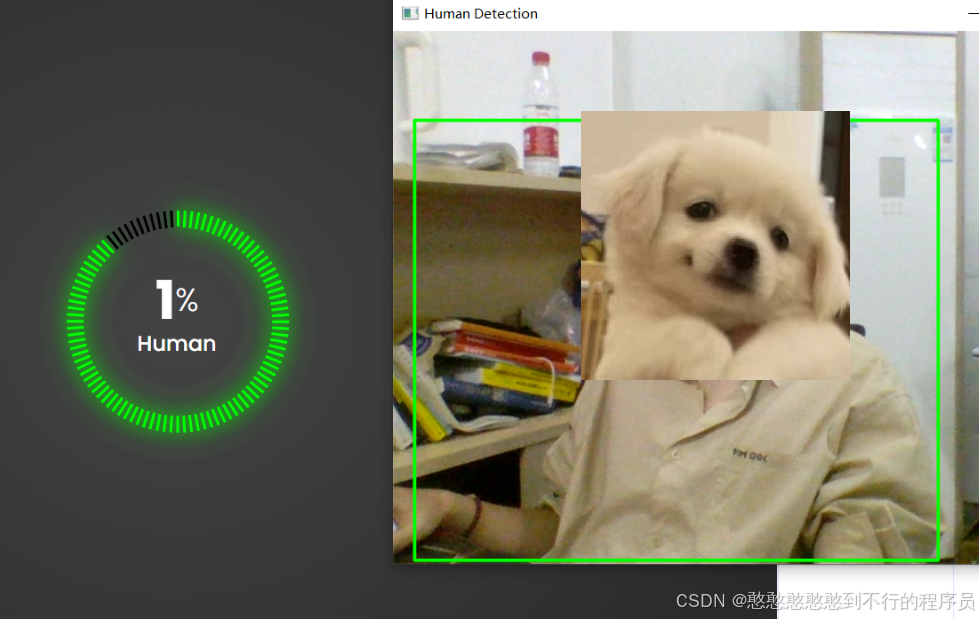
代码如下:
import cv2
import numpy as np
import redis
from flask import Flask, jsonify
from flask_cors import CORS  # 引入 CORS

# 初始化 Flask 应用
app = Flask(__name__)
CORS(app)  # 启用 CORS 支持

# 连接 Redis 服务器
r = redis.Redis(host='localhost', port=6379, db=0)

# 加载 MobileNet-SSD 模型
net = cv2.dnn.readNetFromCaffe('deploy.prototxt', 'mobilenet_iter_73000.caffemodel')

# 摄像头检测函数
def detect_humans():
    cap = cv2.VideoCapture(0)

    while cap.isOpened():
        ret, frame = cap.read()
        if ret:
            # 创建 blob,预处理输入数据
            blob = cv2.dnn.blobFromImage(cv2.resize(frame, (300, 300)), 0.007843, (300, 300), 127.5)
            net.setInput(blob)

            # 进行前向传播,得到检测结果
            detections = net.forward()

            # 获取帧的宽度和高度
            (h, w) = frame.shape[:2]

            # 初始化检测到的人数
            human_count = 0

            # 遍历检测结果
            for i in range(detections.shape[2]):
                confidence = detections[0, 0, i, 2]

                # 设置最低置信度阈值
                if confidence > 0.4:
                    idx = int(detections[0, 0, i, 1])

                    # 只检测人类(index 15 是人类类别)
                    if idx == 15:
                        human_count += 1  # 增加检测到的人数
                        box = detections[0, 0, i, 3:7] * np.array([w, h, w, h])
                        (startX, startY, endX, endY) = box.astype("int")

                        # 画框标记人类
                        cv2.rectangle(frame, (startX, startY), (endX, endY), (0, 255, 0), 2)

            # 将人数写入 Redis 缓存
            r.set('human_count', human_count)

            # 显示结果
            cv2.imshow("Human Detection", frame)

            # 按 'q' 键退出
            if cv2.waitKey(1) & 0xFF == ord('q'):
                break
        else:
            break

    cap.release()
    cv2.destroyAllWindows()

# 创建一个 API 路由来返回 Redis 中的人数
@app.route('/get_human_count', methods=['GET'])
def get_human_count():
    # 从 Redis 中获取人数
    human_count = r.get('human_count')
    if human_count:
        human_count = int(human_count)
    else:
        human_count = 0
    return jsonify({'human_count': human_count})

if __name__ == '__main__':
    # 启动摄像头检测
    from threading import Thread
    t = Thread(target=detect_humans)
    t.daemon = True
    t.start()

    # 启动 Flask 服务
    app.run(debug=True, host='0.0.0.0')
前端代码是Online Tutorials上学来的,自己稍微改了一下html的部分:
<!DOCTYPE html>
<html lang="en">
<head>
    <meta charset="UTF-8">
    <meta name="viewport" content="width=device-width, initial-scale=1.0">
    <title>Human Detection Count</title>
    <link rel="stylesheet" href="human_style.css">
</head>
<body>
    <div class="card">
        <div class="rating">
            <h2><span class="counter" data-target="0">0</span><sup>%</sup><br>Human</h2>
            <div class="block"></div>
        </div>
    </div>

    <script>
        // 初始化区块
        const rating = document.getElementsByClassName('rating')[0];
        const block = document.getElementsByClassName('block');
        for (let i = 1; i < 100; i++) {
            rating.innerHTML += "<div class='block'></div>";
            block[i].style.transform = "rotate(" + 3.6 * i + "deg)";
            block[i].style.animationDelay = `${i / 40}s`;
        }

        // 获取 Redis 中的人数并更新
        function fetchHumanCount() {
            fetch('http://127.0.0.1:5000/get_human_count')  // 后端 API 路由
                .then(response => response.json())
                .then(data => {
                    const counter = document.querySelector('.counter');
                    const target = data.human_count;  // 获取 Redis 中的值

                    counter.setAttribute('data-target', target);

                    // 启动计数器
                    const NumberCounter = () => {
                        const value = +counter.innerText;
                        if (value < target) {
                            counter.innerText = Math.ceil(value + 1);
                            setTimeout(() => {
                                NumberCounter();
                            }, 25);
                        }
                    };
                    NumberCounter();
                })
                .catch(error => console.error('Error fetching human count:', error));
        }

        // 每秒更新一次人数
        setInterval(fetchHumanCount, 1000);
    </script>
</body>
</html>
css全是Online Tutorials大佬写的,跟着视频敲了一遍:
@import url('https://fonts.googleapis.com/css?family=Poppins:200,300,400,500,600,700,800,900&display=swap');
*
{
    margin: 0;
    padding: 0%;
    box-sizing: border-box;
    font-family: 'Poppins', sans-serif;
}
body
{
    display: flex;
    justify-content: center;
    align-items: center;
    min-height: 100vh;
    background: radial-gradient(#444,#222);

}
.card
{
    position: relative;
    width: 200px;
    height: 200px;

}
.card .rating
{
    position: relative;
    width: 100%;
    height: 100%;
    /* background: rgba(107, 170, 221, 0.2); */
}
.card .rating .block
{
    position: absolute;
    width: 2px;
    height: 15px;
    background: #000;
    left: 50%;
    transform-origin: 50% 100px;
    opacity: 0;
    animation: animate 0.1s linear forwards;
}
.card .rating .block:nth-child(-n+90)
{
    background:#0f0;
    box-shadow: 0 0 15px #0f0,0 0 30px #0f0;
}
@keyframes animate {
    to
    {
        opacity: 1;
    }
}

.card .rating h2{
    position: absolute;
    top:50%;
    left: 50%;
    transform:translate(-50%,-50%);
    color: #fff;
    font-size: 1.2em;
    font-weight: 500;
    text-align: center;
    line-height: 1.5em;
}

.card .rating h2 span{
    font-size: 2.5em;
    font-weight: 700;
}

.card .rating h2 sup
{
    font-size: 1.5em;
    font-weight: 300;
}