element ui实现全局el-dialog可拖拽
此情况适用于在已有项目中,想实现全局拖拽弹出框,而逐一添加拖拽自定义指令会过于麻烦的情况下,这种情况可以尝试下此方法。
话不多说,直接上代码:
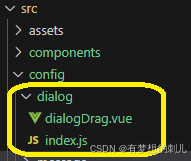
1.先在src下新建一个config文件夹,里面再新建一个dialog文件夹,在里面再新建一个dialogDrag.vue文件,用于存放弹出框拖拽逻辑。
dialogDrag.vue文件下的内容
<script>
    export default {
        mounted() {
            // 获取当前的dialog及其header
            let aimDialog = this.$el.getElementsByClassName('el-dialog')[0];
            let aimHeader = this.$el.getElementsByClassName('el-dialog__header')[0];
            // 获取总的dialog_warpper列表
            let wrapperList = document.getElementsByClassName('el-dialog__wrapper');

            aimHeader.onmousedown = (e) => {
                // 用于存放当前dialog所对应的dialog_warpper
                let aimWrap = "";
                for(let i=0; i<wrapperList.length; i++) {
                    if(wrapperList[i].childNodes[0] == aimDialog) {
                        aimWrap = wrapperList[i]
                    }
                }
                // 存放dialog最终的left与top值
                let currentLeft = "";
                let currentTop = "";


                // 通过鼠标点击位置与起始offset位置,获取起始点击x,y
                let x1 = e.clientX - aimWrap.offsetLeft;
                let y1 = e.clientY - aimWrap.offsetTop;
                document.onmousemove = (e) => {
                    // 清除选中状态
                    let selection = window.getSelection();
                    selection.removeAllRanges();
                    // 获取移动后的x,y
                    currentLeft = e.clientX - x1;
                    currentTop = e.clientY - y1;
                    aimWrap.style.left = currentLeft + 'px';
                    aimWrap.style.top = currentTop + 'px';
                }
                document.onmouseup = (e) => {
                    let dialogLeft = aimDialog.offsetLeft;  // dialog距离dialog_wrap左侧距离
                    let dialogTop = aimDialog.offsetTop;  // dialog距离dialog_wrap左侧距离

                    // 当超出20px距离时回弹20px
                    // 左侧超出
                    if(currentLeft + dialogLeft + aimDialog.clientWidth < 20) {
                        currentLeft = 20 - aimDialog.clientWidth - dialogLeft
                    }
                    // 顶部超出
                    if(currentTop + dialogTop < 20) {
                        currentTop = 20 - dialogTop
                    }
                    // 右侧超出
                    if(currentLeft + dialogLeft > aimWrap.clientWidth - 20) {
                        currentLeft = dialogLeft + aimDialog.clientWidth - 20
                    }
                    // 底部超出
                    if(currentTop + dialogTop > aimWrap.clientHeight - 20) {
                        currentTop =  aimWrap.clientHeight - dialogTop - 20
                    }

                    aimWrap.style.left = currentLeft + 'px';
                    aimWrap.style.top = currentTop + 'px';

                    document.onmousemove = null;
                    document.onmouseup = null;
                }
            }
        }
    }
</script>
<style>
 .el-dialog__header {
    /* header颜色,下面是示例,可以忽略 */
    background-color: aqua;
 }
 .el-dialog__wrapper {
    width: 100vw;
    height: 100vh;
 }
</style>
2.在 dialogDrag.vue 同级目录下新建一个index.js文件用于引入混入逻辑以及对关闭方法进行重写(复原弹出框默认的left与top为0)
index.js文件下的内容:
import dialogDragMixin from './dialogDrag'
export function installDialog(Vue, Element) {
    Element.Dialog.methods.handleClose = function(){
        if(typeof this.beforeClose==='function'){
            this.beforeClose(this.hide);
        }else{
            this.hide();
        }
        // 关闭后重置dialog_warpper的position相关
        let aimDialog = this.$el.getElementsByClassName('el-dialog')[0];
        let wrapperList = document.getElementsByClassName('el-dialog__wrapper');
        let aimWrap = "";
        for(let i=0; i<wrapperList.length; i++) {
            if(wrapperList[i].childNodes[0] == aimDialog) {
                aimWrap = wrapperList[i]
            }
        }
        window.setTimeout(() => {
            aimWrap.style.left = 0;
            aimWrap.style.top = 0;
        }, 500)

    }
    Element.Dialog.mixins.push(dialogDragMixin);
}
参考目录结构如下:

3.最后在main.js中全局引用并使用即可
import ElementUI from 'element-ui';
import 'element-ui/lib/theme-chalk/index.css';
// ... ...
import { installDialog } from '@/config/dialog';

// ... ...
installDialog(Vue, ElementUI);
效果示例:
<el-button @click="dialogVisible = true">打开弹框</el-button>

<el-dialog :visible.sync="dialogVisible">
    hello world
</el-dialog>
完成!
希望本文会对您有所帮助~ ^_^
