Day02-MySQL数据库服务体系结构
Day02-MySQL数据库服务体系结构
- 1、数据库服务连接管理
- 2、数据库服务应用配置
- 2.1 服务进行配置有什么作用?
- 2.2 应用配置有三种方式:
- 3、数据库服务多实例构建
- 4、数据库服务版本升级
- 4.1 实现升级的方法:
- 4.2 常见的数据库服务程序升级方式:
- 4.3 数据库服务升级注意事项
- 4.4 数据库服务升级过程规划(Inplace)
- 4.5 数据库服务升级过程实战
- 4.5.1 企业数据库实战练习一:演示5.6.48 ->5.7.30 本地升级
- 4.5.2 企业数据库实战练习二:演示5.7.30 ->8.0.20本地升级)
- 4.6 数据库服务升级回滚实践
- 4.6.1 数据库服务升级失败,如何回滚操作:大版本回滚
- 4.6.2 企业数据库实战练习二:跨小版本回滚
- 4.7 数据库服务升级版本确认
- 5、数据库服务工作模型
- 6、数据库服务实例构成
- 7、数据库服务程序结构
作业:
01 如何编写MySQL的systemctl启动文件;
vim /etc/systemd/system/mysqld.service
[Unit]
Description=MySQL Server
Documentation=man:mysqld(8)
Documentation=http://dev.mysql.com/doc/refman/en/using-systemd.html
After=network.target
After=syslog.target

[Install]
WantedBy=multi-user.target

[Service]
User=mysql
Group=mysql
ExecStart=/usr/local/mysql/bin/mysqld --defaults-file=/etc/my.cnf
LimitNOFILE = 5000

[root@db01 ~]# systemctl daemon-reload
[root@db01 ~]# systemctl status mysqld
● mysqld.service - MySQL Server
   Loaded: loaded (/etc/systemd/system/mysqld.service; disabled; vendor preset: disabled)
   Active: active (running) since Tue 2024-04-16 20:35:30 CST; 12min ago
     Docs: man:mysqld(8)
           http://dev.mysql.com/doc/refman/en/using-systemd.html
   CGroup: /system.slice/mysqld.service
           ├─1414 /bin/sh /usr/local/mysql/bin/mysqld_safe --datadir=/data/3306/data --pid-fi...
           └─1579 /usr/local/mysql/bin/mysqld --basedir=/usr/local/mysql --datadir=/data/3306...

Apr 16 20:35:27 db01 systemd[1]: Starting LSB: start and stop MySQL...
Apr 16 20:35:30 db01 mysqld[1399]: Starting MySQL... SUCCESS!
Apr 16 20:35:30 db01 systemd[1]: Started LSB: start and stop MySQL.
PS:以上操作过程,需要关闭数据库服务进行
02 安装好5.6 5.7数据库
安装部署5.6
# 第一步:上传程序压缩包/并进行解压
cd /usr/local/
mysql-5.6.48-linux-glibc2.12-x86_64.tar.gz
tar xf mysql-5.6.48-linux-glibc2.12-x86_64.tar.gz
ln -s mysql-5.6.48-linux-glibc2.12-x86_64 mysql56

# 第二步:创建数据存储目录
mkdir -p /data/3356/data
chown -R mysql. /data/3356/data

# 第三步:进行初始化操作
/usr/local/mysql56/scripts/mysql_install_db --user=mysql --basedir=/usr/local/mysql56/ --datadir=/data/3356/data

# 报错:
2024-04-16 21:14:55 1925 [ERROR] /usr/local/mysql56//bin/mysqld: unknown variable 'mysqlx=0'
2024-04-16 21:14:55 1925 [ERROR] Aborting
[root@db01 local]# mv /etc/my.cnf /etc/my80.cnf
[root@db01 local]# rm -rf /data/3356/data/*
[root@db01 local]# /usr/local/mysql56/scripts/mysql_install_db --user=mysql --basedir=/usr/local/mysql56/ --datadir=/data/3356/data

# 第四步:编写配置文件
vim /etc/my56.cnf
[mysql]
socket=/tmp/mysql.sock

[mysqld]
user=mysql
basedir=/usr/local/mysql56/
datadir=/data/3356/data
socket=/tmp/mysql.sock

# 第五步:启动数据库服务
vim /etc/systemd/system/mysqld56.service
[Unit]
Description=MySQL Server
Documentation=man:mysqld(8)
Documentation=http://dev.mysql.com/doc/refman/en/using-systemd.html
After=network.target
After=syslog.target

[Install]
WantedBy=multi-user.target

[Service]
User=mysql
Group=mysql
ExecStart=/usr/local/mysql56/bin/mysqld --defaults-file=/etc/my56.cnf
LimitNOFILE = 5000

systemctl daemon-reload
systemctl start mysqld56
安装部署5.7
# 第一步:上传程序压缩包/并进行解压
cd /usr/local/
mysql-5.7.30-linux-glibc2.12-x86_64.tar.gz
tar xf mysql-5.7.30-linux-glibc2.12-x86_64.tar.gz
ln -s mysql-5.7.30-linux-glibc2.12-x86_64 mysql57

# 第二步:创建数据存储目录
mkdir -p /data/3357/data
chown -R mysql. /data/3357/data

#第三步:进行初始化操作
/usr/local/mysql57/bin/mysqld --initialize-insecure --user=mysql --basedir=/usr/local/mysql57/ --datadir=/data/3357/data

# 第四步:编写配置文件
vim /etc/my57.cnf
[mysql]
socket=/tmp/mysql.sock

[mysqld]
user=mysql
basedir=/usr/local/mysql57/
datadir=/data/3357/data
socket=/tmp/mysql.sock

# 第五步:启动数据库服务
vim /etc/systemd/system/mysqld57.service
[Unit]
Description=MySQL Server
Documentation=man:mysqld(8)
Documentation=http://dev.mysql.com/doc/refman/en/using-systemd.html
After=network.target
After=syslog.target

[Install]
WantedBy=multi-user.target

[Service]
User=mysql
Group=mysql
ExecStart=/usr/local/mysql57/bin/mysqld --defaults-file=/etc/my57.cnf
LimitNOFILE = 5000

systemctl daemon-reload
systemctl start mysqld57
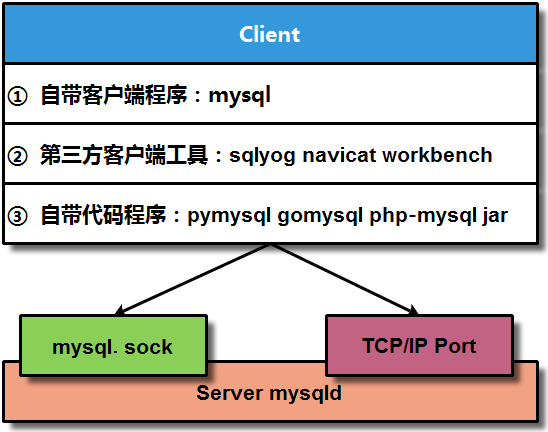
1、数据库服务连接管理
1)连接管理方式
- 本地连接:unix 套接字 配置文件中:socket=/tmp/mysql.sock
PS:利用套接字文件,可以实现在一个系统中,不同的程序可以建立连接
- 远程连接:socket(网络开发) —> TCP/IP —> IP地址 端口信息
2)连接管理方法
- 利用数据库自带的客户端命令实现连接
本地连接:mysql -uroot -p123 -S /tmp/mysql.socket
远程连接:mysql -uroot -p123 -h10.0.0.51 -P3306
- 利用第三方数据库管理工具实现连接
远程连接:可以使用的远程工具(sqlyog、navicat、workbench(官方)、dbserver)
- 利用开发程序接口或函数,以及驱动程序包连接数据
PHP - 代码test_mysql.php - 数据库建立连接
注册效果:
第一步:部署NMP环境(Windows)
phpstudy
第二步:编写连接数据库注册代码
创建库和表信息
create database oldboy;
use oldboy
CREATE TABLE users (
    id INT(10) NOT NULL PRIMARY KEY AUTO_INCREMENT,
    username varchar(30),
    password varchar(60),
    createtime int(16) not null,
    createip binary(16)
);
login.php
- 程序代码操作连接登录数据库服务:
| 序号 | 开发语言 | 连接数据库驱动程序 |
|---|---|---|
| 01 | python | 连接数据库驱动-pymysql |
| 02 | golang | 连接数据库驱动-gomysql |
| 03 | java | 连接数据库驱动-jar |
| 04 | php | 连接数据库驱动-phpmysql |
不同语言程序代码连接数据库服务驱动:https://dev.mysql.com/downloads/
2、数据库服务应用配置
2.1 服务进行配置有什么作用?
1)实现服务运行启动
2)实现某些功能作用
2.2 应用配置有三种方式:
1)利用编译安装过程实现配置
2)编写配置文件信息
# 默认配置文件:/et/my.ini
mysqld --help --verbose|grep my.cnf
/etc/my.cnf /etc/mysql/my.cnf /usr/local/mysql/etc/my.cnf ~/.my.cnf
-- 数据库服务加载配置文件顺序:
-- /etc/my.cnf -->  /etc/mysql/my.cnf --> /usr/local/mysql/etc/my.cnf --> ~/.my.cnf
问题?:如果my.cnf文件放置在了/data/3306/data/my.cnf如何加载?
配置文件内容:
[mysql]
socket=/tmp/mysql.sock
[mysqld]
user=mysql
basedir=/usr/local/mysql80
datadir=/data/3306/data
socket=/tmp/mysql.sock
升级:程序升级 数据结构变 数据内容不变
有 [ ] 部分,表示对客户端或服务端配置区域
客户端:[mysql] [mysqldump] – [client] 集合汇总
没 [ ] 部分,表示具体的配置参数信息
服务端:[mysqld] [mysqld_safe] – [server] 集合汇总
启动数据库服务程序,为什么会有两个进程信息?
一个是mysqld_safe
另一个是mysqld
简单说明:从进程管理知识分析
mysql_safe 父进程:接收任务信息
mysqld 子进程:处理任务信息 核心
知识点补充:数据库服务启动与关闭管理
运行mysqld命令 --> 产生了mysqld进程信息 --> 服务启动(不能负责关闭和重启)
mysqld命令文件 无法灵活调整
运行mysqld_safe命令 --> 产生了mysqld_safe进程信息 --> 服务启动 停止 重启
mysqld_safe脚本文件 可以根据需求灵活调整 实现不同启动 重启 停止效果
systemctl --> /etc/init.d/mysqld --> mysqld_safe --> mysqld
service --> /etc/init.d/mysqld --> mysqld_safe --> mysqld
PS:掌握数据库启动和停止方法原理
数据库服务启动和关闭方式总结:
| 序号 | 启动方式 | 关闭方式 |
|---|---|---|
| 01 | mysqld & | kill/pkill/killall (不建议) kill -9 禁用 |
| 02 | mysqld_safe & | kill/pkill/killall (不建议) |
| 03 | mysql.server start | mysql.server stop |
| 04 | service mysqld start (建议) | service mysqld stop (建议) |
| 05 | systemctl start mysqld | systemctl stop mysqld |
| 06 | > shutdown | |
| 07 | mysqladmin -uroot -poldboy123 shutdown |
3)利用启动命令参数实现配置功能
mysqld_safe --skip-grant-tables --skip-networking &
3、数据库服务多实例构建
什么是多实例:多个服务同时启动 跑不同业务,互相独立
多实例概述:一般在一个系统环境中,可以运行多个相同的服务程序信息,并且产生不同的进程和网络端口信息,就可以称为多实例概念;
多实例作用:充分利用硬件资源
构建多实例:
步骤一:多实例部署环境规划
多个实例规划 端口规划 数据目录规划 配置文件规划 套接字文件规划
| 实例信息编号 | 实例服务端口 | 实例存储路径 | 实例配置文件 | 套接字文件 |
|---|---|---|---|---|
| mysql-01 | 端口信息:3307 | /data/3307/data | /data/3307/data/my.cnf | /tmp/mysql3307.sock |
| mysql-02 | 端口信息:3308 | /data/3308/data | /data/3308/data/my.cnf | /tmp/mysql3308.sock |
| mysql-03 | 端口信息:3309 | /data/3309/data | /data/3309/data/my.cnf | /tmp/mysql3309.sock |
步骤二:多实例部署环境准备(数据目录创建)
[root@db01 ~]# mkdir -p /data/330{7..9}/data
[root@db01 ~]# chown -R mysql. /data/*
步骤三:多实例初始数据信息
mysqld --initialize-insecure --user=mysql --basedir=/usr/local/mysql --datadir=/data/3307/data
mysqld --initialize-insecure --user=mysql --basedir=/usr/local/mysql --datadir=/data/3308/data
mysqld --initialize-insecure --user=mysql --basedir=/usr/local/mysql --datadir=/data/3309/data
PS:将默认配置文件移走
步骤四:多实例配置文件编写
[root@xiaoQ-01 ~]# vim /data/3307/data/my.cnf
[mysql]
socket=/tmp/mysql3307.sock
[mysqld]
user=mysql
port=3307
basedir=/usr/local/mysql
datadir=/data/3307/data
socket=/tmp/mysql3307.sock

[root@xiaoQ-01 ~]# vim /data/3308/data/my.cnf
[mysql]
socket=/tmp/mysql3308.sock
[mysqld]
user=mysql
port=3308
basedir=/usr/local/mysql
datadir=/data/3308/data
socket=/tmp/mysql3308.sock

[root@xiaoQ-01 ~]# vim /data/3309/data/my.cnf
[mysql]
socket=/tmp/mysql3309.sock
[mysqld]
user=mysql
port=3309
basedir=/usr/local/mysql
datadir=/data/3309/data
socket=/tmp/mysql3309.sock
步骤五:多实例服务运行启动
[root@xiaoQ-01 ~]# mysqld_safe --defaults-file=/data/3307/data/my.cnf &
[root@xiaoQ-01 ~]# mysqld_safe --defaults-file=/data/3308/data/my.cnf &
[root@xiaoQ-01 ~]# mysqld_safe --defaults-file=/data/3309/data/my.cnf &
步骤六:多实例服务端口查看
[root@db01 local]# mysql -S /tmp/mysql3307.sock
Welcome to the MySQL monitor.  Commands end with ; or \g.
Your MySQL connection id is 8
Server version: 8.0.26 MySQL Community Server - GPL

Copyright (c) 2000, 2021, Oracle and/or its affiliates.

Oracle is a registered trademark of Oracle Corporation and/or its
affiliates. Other names may be trademarks of their respective
owners.

Type 'help;' or '\h' for help. Type '\c' to clear the current input statement.

mysql> show variables like '%port%';
+--------------------------+-------+
| Variable_name            | Value |
+--------------------------+-------+
| admin_port               | 33062 |
| large_files_support      | ON    |
| mysqlx_port              | 33060 |
| mysqlx_port_open_timeout | 0     |
| port                     | 3307  |
| report_host              |       |
| report_password          |       |
| report_port              | 3307  |
| report_user              |       |
| require_secure_transport | OFF   |
+--------------------------+-------+
10 rows in set (0.02 sec)
mysql> select @@port;
+--------+
| @@port |
+--------+
|   3307 |
+--------+
1 row in set (0.00 sec)

[root@db01 local]# mysql --defaults-file=/data/3307/data/my.cnf
Welcome to the MySQL monitor.  Commands end with ; or \g.
Your MySQL connection id is 9
Server version: 8.0.26 MySQL Community Server - GPL

Copyright (c) 2000, 2021, Oracle and/or its affiliates.

Oracle is a registered trademark of Oracle Corporation and/or its
affiliates. Other names may be trademarks of their respective
owners.

Type 'help;' or '\h' for help. Type '\c' to clear the current input statement.

mysql>

[root@db01 local]# ss -lntup|grep mysqld
tcp    LISTEN     0      70     [::]:33060              [::]:*                   users:(("mysqld",pid=2487,fd=21))
tcp    LISTEN     0      151    [::]:3307               [::]:*                   users:(("mysqld",pid=2487,fd=24))
tcp    LISTEN     0      151    [::]:3308               [::]:*                   users:(("mysqld",pid=2661,fd=22))
tcp    LISTEN     0      151    [::]:3309               [::]:*                   users:(("mysqld",pid=2833,fd=22))
4、数据库服务版本升级
实现程序功能升级,升级过程中:
1)不能影响数据信息
2)不能影响业务使用
4.1 实现升级的方法:
1)本地升级:单台服务器升级(Inplace-就地)
2)迁移升级:多台服务器升级(Mergeing-迁移)推荐 主从结构、数据备份、恢复
注意事项:
- 数据库服务小版本升级 5.6.1 5.6.2 5.6.3 5.6.40 5.7
- 数据库服务大版本升级 5.6.40 5.7
PS:大版本升级,是不能跨版本的:https://dev.mysql.com/doc/refman/8.0/en/upgrade-paths.html
4.2 常见的数据库服务程序升级方式:
| 方式 | 升级说明 | 备注说明 |
|---|---|---|
单台服务器升级(Inplace-就地) | 数据库服务小版本升级 | 比如:5.7.20 ->5.7.22 |
| (风险较大) | 数据库服务大版本升级 | 比如:5.7.20 ->5.8.20 |
| 迁移服务器升级(Mergeing-迁移) | 数据库服务小版本升级 | 安装新版本数据库服务(备份迁移/主从迁移) |
| (需要迁移数据) | 数据库服务大版本升级 | 安装新版本数据库服务(备份迁移/主从迁移) |
说明:数据库服务升级时,不管哪个方式升级,都应该先做好数据备份,方便升级失败的回退。
4.3 数据库服务升级注意事项
- 数据库服务版本升级时,只支持在GA(General Availability)版本之间进行升级
- 数据库服务版本升级时,支持从数据库5.6到5.7再到8.0,跨版本升级,但是需要先将5.6升级到最新小版本,在进行跨版本升级
- 数据库服务版本升级时,需要提前考虑好版本回退的方案,最好升级前做好数据备份(特别是向8.0版本升级)
- 数据库服务版本升级时,制定的升级方案和升级步骤,需要尽可能降低数据库服务停机的时间
4.4 数据库服务升级过程规划(Inplace)
- 数据库服务数据备份保存(可以采用热备和冷备两种方案,冷备是需要停止业务后备份,热备是无需停止业务备份)
- 数据库服务最新程序安装(最新版本数据库服务安装过程时,无需停止原有数据库旧版服务)
- 数据库服务原有程序关闭(网站显示维护页面)
- 数据库服务最新程序启动(加载原有程序数据实现挂库升级,并采用跳过授权表和跳过网络方式启动)
- 数据库服务升级数据结构(数据库服务升级程序后,还需要升级数据系统结构信息,因此升级时间和数据量无关)
- 数据库服务可以正常重启(数据库服务升级完毕后,确认数据库服务是可以正常完成重启操作)
- 数据库服务功能测试验证(反复核实验证与数据库服务相关的各项功能是否正常)
- 数据库服务升级工作完毕(取消网站维护页面,恢复正常网站线上运营业务)
4.5 数据库服务升级过程实战
4.5.1 企业数据库实战练习一:演示5.6.48 ->5.7.30 本地升级
数据库版本升级步骤一:数据库服务最新程序安装
[root@db01 local]# ll -d mysql-5.7.30-linux-glibc2.12-x86_64
drwxr-xr-x 9 root root 129 2024-07-26 11:32 mysql-5.7.30-linux-glibc2.12-x86_64
数据库版本升级步骤二:数据库服务原有程序关闭
[root@db01 local]# systemctl stop mysqld56.service
# 补充:尽量选择平滑关闭数据库服务
[root@xiaoQ-01 local]# vim /data/3356/my.cnf
innodb_fast_shutdown=0
-- 企业实战环境,需要添加此配置参数信息在配置文件中,实现优雅关闭数据库服务
[root@xiaoQ-01 local]# systemctl stop mysqld3356
-- 配置文件加入以上参数后,此时关闭数据库服务,会采用优雅关闭服务,而不是采用快速关闭数据库服务方式
数据库版本升级步骤三:数据库服务最新程序启动
实现挂库信息配置,然后跳过授权表和网络方式启动
# 修改旧版本数据库服务配置文件,使用新版本程序加载原有数据库中数据目录
[root@db01 local]# cat /etc/my57.cnf
[mysqld]
user=mysql
basedir=/usr/local/mysql57/
datadir=/data/3356/data
socket=/tmp/mysql.sock
innodb_fast_shutdown=0

[root@db01 local]# /usr/local/mysql57/bin/mysqld_safe --defaults-file=/etc/my57.cnf --skip-grant-tables --skip-networking &

[root@db01 local]# ps -ef|grep mysql
root       2495   1168  0 19:27 pts/0    00:00:00 /bin/sh /usr/local/mysql57/bin/mysqld_safe --defaults-file=/etc/my57.cnf --skip-grant-tables --skip-networking
mysql      2649   2495  1 19:27 pts/0    00:00:01 /usr/local/mysql57/bin/mysqld --defaults-file=/etc/my57.cnf --basedir=/usr/local/mysql57/ --datadir=/data/3356/data --plugin-dir=/usr/local/mysql57//lib/plugin --user=mysql --skip-grant-tables --skip-networking --log-error=db01.err --pid-file=db01.pid --socket=/tmp/mysql.sock
root       2680   1168  0 19:29 pts/0    00:00:00 grep --color=auto mysql
数据库版本升级步骤四:数据库服务升级数据结构
[root@db01 local]# /usr/local/mysql57/bin/mysql_upgrade -S /tmp/mysql.sock --force
...省略部分信息...
Upgrade process completed successfully.
Checking if update is needed.
-- 显示以上信息内容,表述数据库中数据结构信息升级成功
数据库版本升级步骤五:数据库服务重启正常状态
[root@db01 local]# pkill mysql
[root@db01 local]# systemctl start mysqld57.service
说明:在数据库版本从5.7升级到8.0时,可以省略mysql_upgrade升级改变数据结构信息操作,因为8.0版本会自动完成此步骤
4.5.2 企业数据库实战练习二:演示5.7.30 ->8.0.20本地升级)
数据库版本升级步骤一:数据库服务最新程序安装
# 数据库服务具体安装过程省略,通过查看服务程序目录信息确认是否安装完毕
[root@db01 local]# ll -d mysql-8.0.26-linux-glibc2.12-x86_64
drwxr-xr-x 9 root root 129 2024-07-24 15:49 mysql-8.0.26-linux-glibc2.12-x86_64
数据库版本升级步骤二:数据库服务原有程序关闭
[root@db01 local]# systemctl stop mysqld57.service
vim /data/3357/my.cnf
innodb_fast_shutdown=0
-- 企业实战环境,需要添加此配置参数信息在配置文件中,实现优雅关闭数据库服务
或者
> set global innodb_fast_shutdown=0
> select @@innodb_fast_shutdown
-- 连接进入旧版本数据库中,直接设置数据库服务功能参数信息,使之立即生效
[root@xiaoQ-01 local]# systemctl stop mysqld57
-- 配置文件加入以上参数后,此时关闭数据库服务,会采用优雅关闭服务,而不是采用快速关闭数据库服务方式

[root@db01 local]# ps -ef|grep mysql
root       2820   1168  0 19:43 pts/0    00:00:00 grep --color=auto mysql
数据库版本升级步骤三:数据库服务最新程序启动
# 修改旧版本数据库服务配置文件,使用新版本程序加载原有数据库中数据目录
[root@db01 local]# cat /etc/my57.cnf
[mysqld]
user=mysql
basedir=/usr/local/mysql/
datadir=/data/3356/data
socket=/tmp/mysql.sock
innodb_fast_shutdown=0

# 利用命令脚本文件测试启动新版本数据库程序服务
[root@db01 local]# /usr/local/mysql/bin/mysqld_safe --defaults-file=/etc/my57.cnf --skip-grant-tables --skip-networking &

# 查看数据库服务启动进程信息
[root@db01 local]# ps -ef|grep mysqld
-- 此时数据库服务启动成功后,只会显示进程信息,不会显示网络端口信息
数据库版本升级步骤四:数据库服务升级数据结构 (此步骤可省略)
说明:在数据库版本从5.7升级到8.0时,可以省略mysql_upgrade升级改变数据结构信息操作,因为8.0版本会自动完成此步骤
数据库版本升级步骤五:数据库服务重启正常状态
[root@db01 local]# pkill mysql
[root@db01 local]# vim /etc/systemd/system/mysqld.service
ExecStart=/usr/local/mysql/bin/mysqld --defaults-file=/etc/my57.cnf
-- 修改此配置信息,将原有数据库服务启动文件中程序目录修改为新版本数据库服务程序目录

[root@db01 local]# systemctl daemon-reload
[root@db01 local]# systemctl start mysqld.service

[root@db01 local]# mysql
Welcome to the MySQL monitor.  Commands end with ; or \g.
Your MySQL connection id is 8
Server version: 8.0.26 MySQL Community Server - GPL

Copyright (c) 2000, 2021, Oracle and/or its affiliates.

Oracle is a registered trademark of Oracle Corporation and/or its
affiliates. Other names may be trademarks of their respective
owners.

Type 'help;' or '\h' for help. Type '\c' to clear the current input statement.

mysql> show databases;
+--------------------+
| Database           |
+--------------------+
| information_schema |
| mysql              |
| oldboy             |
| performance_schema |
| sys                |
| test               |
+--------------------+
6 rows in set (0.00 sec)

mysql> select * from oldboy.stu;
+---------+------+--------+
| name    | age  | gender |
+---------+------+--------+
| oldboy  |   20 | m      |
| oldgirl |   25 | f      |
| oldbaby |   10 | m      |
+---------+------+--------+
3 rows in set (0.00 sec)
4.6 数据库服务升级回滚实践
4.6.1 数据库服务升级失败,如何回滚操作:大版本回滚
数据库版本回滚步骤一:数据库服务编写回滚文件
[root@db01 ~]# cp -a /data/3357/ /data/3357_backup
[root@db01 ~]# vim /data/3357/my_rollback.cnf
[mysqld]
user=mysql
basedir=/usr/local/mysql57
datadir=/data/3357_backup/data
-- 升级前做的旧版本冷备数据
socket=/tmp/mysql.sock
innodb_fast_shutdown=0
数据库版本回滚步骤二:数据库服务重新回退启动
[root@db01 ~]# /usr/local/mysql57/bin/mysqld_safe --defaults-file=/data/3356/my_rollback.cnf &
4.6.2 企业数据库实战练习二:跨小版本回滚
数据库服务官方参考链接:https://dev.mysql.com/doc/refman/5.7/en/downgrading.html
说明:对于数据库8.0版本是不支持小版本间与大版本间的回滚的,只能采取恢复升级前数据方案。
5.7.10 – 8.0.26 升级失败 — 回滚
5.7.12 – 8.0.26 升级失败 — 回滚
解决问题
5.7.12 – 8.0.26 升级失败 — 回滚
4.7 数据库服务升级版本确认
在早期升级数据服务程序时,很多企业环境升级过程,都需要有前期的模拟测试环节,并且测试环境的版本升级兼容性需要盲猜;
根本无法通过当前环境的数据库服务版本,来核实确认是否可以进行升级的兼容性版本信息,从而有效避免升级后带来的问题;
而在数据库服务8.0之后,提供了一个mysqlshell命令功能,利用命令功能中的特殊函数,可以在升级前对当前环境版本进行验证;
在升级前,对原有的数据库服务进行检测:
简而言之:就是数据库服务8.0之后,利用mysqlshell中的函数,可以实现数据库服务升级的预检查功能
安装应用mysql shell工具步骤
步骤一:上传解压8.0版本数据库mysql shell功能程序
[root@db01 local]# tar xf mysql-shell-8.0.26-linux-glibc2.12-x86-64bit.tar.gz
[root@db01 local]# ln -s mysql-shell-8.0.26-linux-glibc2.12-x86-64bit mysqlsh
步骤二:使用工具进行测试
# 确认当前5.7版本信息是否可以升级到相应的8.0版本
[root@db01 local]# cd mysqlsh/bin/
[root@db01 bin]# ll
总用量 40152
-rwxr-xr-x 1 7161 31415  7868984 2021-06-11 07:05 mysql-secret-store-login-path
-rwxr-xr-x 1 7161 31415 33241904 2021-06-11 07:04 mysqlsh

[root@db01 bin]# ./mysqlsh root:123456@10.0.0.51:3306 -e "util.checkForServerUpgrade()"
# 提前在旧版本数据库中,创建测试用户
mysql> create user root@'%' identified by '123456';
mysql> grant all on *.* to root@'%';

[root@db01 bin]# ./mysqlsh root:123456@10.0.0.51:3306 -e "util.checkForServerUpgrade()"
WARNING: Using a password on the command line interface can be insecure.
The MySQL server at 10.0.0.51:3306, version 5.7.30 - MySQL Community Server
(GPL), will now be checked for compatibility issues for upgrade to MySQL
8.0.26...

1) Usage of old temporal type
  No issues found

2) Usage of db objects with names conflicting with new reserved keywords
  No issues found

3) Usage of utf8mb3 charset
  No issues found

4) Table names in the mysql schema conflicting with new tables in 8.0
  No issues found

5) Partitioned tables using engines with non native partitioning
  No issues found

6) Foreign key constraint names longer than 64 characters
  No issues found

7) Usage of obsolete MAXDB sql_mode flag
  No issues found

8) Usage of obsolete sql_mode flags
  Notice: The following DB objects have obsolete options persisted for
    sql_mode, which will be cleared during upgrade to 8.0.
  More information:
    https://dev.mysql.com/doc/refman/8.0/en/mysql-nutshell.html#mysql-nutshell-removals

  global system variable sql_mode - defined using obsolete NO_AUTO_CREATE_USER
    option

9) ENUM/SET column definitions containing elements longer than 255 characters
  No issues found

10) Usage of partitioned tables in shared tablespaces
  No issues found

11) Circular directory references in tablespace data file paths
  No issues found

12) Usage of removed functions
  No issues found

13) Usage of removed GROUP BY ASC/DESC syntax
  No issues found

14) Removed system variables for error logging to the system log configuration
  To run this check requires full path to MySQL server configuration file to be specified at 'configPath' key of options dictionary
  More information:
    https://dev.mysql.com/doc/relnotes/mysql/8.0/en/news-8-0-13.html#mysqld-8-0-13-logging

15) Removed system variables
  To run this check requires full path to MySQL server configuration file to be specified at 'configPath' key of options dictionary
  More information:
    https://dev.mysql.com/doc/refman/8.0/en/added-deprecated-removed.html#optvars-removed

16) System variables with new default values
  To run this check requires full path to MySQL server configuration file to be specified at 'configPath' key of options dictionary
  More information:
    https://mysqlserverteam.com/new-defaults-in-mysql-8-0/

17) Zero Date, Datetime, and Timestamp values
  No issues found

18) Schema inconsistencies resulting from file removal or corruption
  No issues found

19) Tables recognized by InnoDB that belong to a different engine
  No issues found

20) Issues reported by 'check table x for upgrade' command
  No issues found

21) New default authentication plugin considerations
  Warning: The new default authentication plugin 'caching_sha2_password' offers
    more secure password hashing than previously used 'mysql_native_password'
    (and consequent improved client connection authentication). However, it also
    has compatibility implications that may affect existing MySQL installations.
    If your MySQL installation must serve pre-8.0 clients and you encounter
    compatibility issues after upgrading, the simplest way to address those
    issues is to reconfigure the server to revert to the previous default
    authentication plugin (mysql_native_password). For example, use these lines
    in the server option file:

    [mysqld]
    default_authentication_plugin=mysql_native_password

    However, the setting should be viewed as temporary, not as a long term or
    permanent solution, because it causes new accounts created with the setting
    in effect to forego the improved authentication security.
    If you are using replication please take time to understand how the
    authentication plugin changes may impact you.
  More information:
    https://dev.mysql.com/doc/refman/8.0/en/upgrading-from-previous-series.html#upgrade-caching-sha2-password-compatibility-issues
    https://dev.mysql.com/doc/refman/8.0/en/upgrading-from-previous-series.html#upgrade-caching-sha2-password-replication

Errors:   0
Warnings: 1
Notices:  1

No fatal errors were found that would prevent an upgrade, but some potential issues were detected. Please ensure that the reported issues are not significant before upgrading.
# PS:有错误就不能升级
5、数据库服务工作模型
数据服务工作模型:属于C/S架构模型 客户端 – 服务端
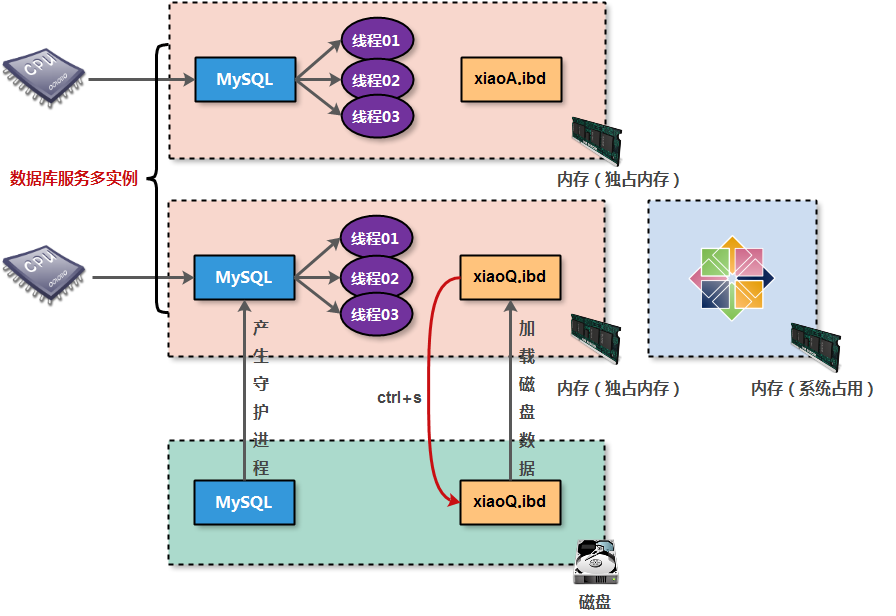
6、数据库服务实例构成
数据库服务实例就是程序运行工作的一种方式,会占用一定的内存资源和CPU资源,并且会派生出多个线程完成不同的任务需求;
MySQL实例 = mysqld + master thread监控管理 + 具体干活的thread + 预分配的内存结构
简单来说:mysql实例就是占用内存资源的统称,利用mysql实例可以对数据进行处理;
实例工作示意图:
7、数据库服务程序结构
数据库服务体系结构总览:
增 删 改 查 – 执行时候效率(系统硬件性能 资源消耗少-性能高 IO CPU 内存 )
1)客户端程序部分 (自带客户端 第三方 开发程序)
2)服务端程序部分 (server层 处理用户请求)
3)数据存储引擎部分 (负责管理磁盘-逻辑性 – 实现数据调取和存储)
内核 – 硬件 – 磁盘
select user,host from mysql.user – 命令执行过程 – 接收命令 – ? – 返回结果
08 数据库服务语句分类
09 数据库服务字符设置