内容营销:基于大模型的内容再利用
在这篇文章中,我将带你了解一个完整的自动化系统,该系统可帮助你将任何内容重新用于你想要的其他帖子。
输入的内容可以是任何东西:YouTube 视频链接、博客文章链接、大纲、推文、pdf 等……
我将在本文末尾为你提供所有代码。
一步一步地跟着我了解一切是如何运作的,这样你就可以根据自己的喜好编辑代码。

NSDT工具推荐: Three.js AI纹理开发包 - YOLO合成数据生成器 - GLTF/GLB在线编辑 - 3D模型格式在线转换 - 可编程3D场景编辑器 - REVIT导出3D模型插件 - 3D模型语义搜索引擎 - AI模型在线查看 - Three.js虚拟轴心开发包 - 3D模型在线减面 - STL模型在线切割
1、它是如何工作的?
重新利用这些帖子的主要引擎是我们的强力提示。这些提示被输入到 OpenAI 的 LLM 模型或你选择的模型中,它们将为我们完成所有工作。
就我而言,我将使用 GPT-4o。
首先,我们将从输入中的链接/文件中提取内容。
但是我们如何只用一行代码提取任何内容呢?
这是我最近开发的 Python 库 SimplerLLM。您将看到,它使 AI 工具的编码变得更加容易。

从这里开始,我实施了两种策略:
策略 1:我们获取提取的内容,使用 SimplerLLM 将其提供给 OpenAI 的 GPT-4o 模型,并根据我们使用的提示获取一段重新利用的内容。
💡 我实施这个是为了让您更容易掌握主要自动化脚本的基础。
策略 2:这是主要代码,它将获取提取的内容并生成三种不同类型的内容,也使用 SimplerLLM。
然后,我们将获取输出并将它们合并为 1 个 JSON 格式的输出。
现在,无论你使用哪种代码,输出都将保存到代码文件夹中的 txt/json 文件中。
2、策略 1:基础代码
到目前为止,你应该已经掌握了代码工作原理背后的想法。所以,让我们开始技术吧!
首先,我们的代码高度依赖于 SimplerLLM,以使其简单而简短。
因此,让我们开始安装库并导入它:
pip install simplerllm首先,我们需要创建一个 .env 文件并添加我们的 OpenAI API 密钥,以便 SimplerLLM 函数可以使用它来生成响应。
如果你没有 API 密钥,请转到 OpenAI 的网站并生成一个新密钥。然后,以以下形式将其添加到 .env 文件中:
OPENAI_API_KEY = "YOUR_API_KEY"现在,我们准备使用代码了;代码如下:
from SimplerLLM.tools.generic_loader import load_content
from SimplerLLM.language.llm import LLM, LLMProvider
from resources import text_to_x_thread, text_to_blog_post, text_to_medium_post, text_to_summary, text_to_newsletter

#This can take a youtube video link, a blog post link, a csv file, etc... as input too
file = load_content("https://learnwithhasan.com/create-ai-agents-with-python/")

#Edit the prompt name in accordance to what you want to convert it to
final_prompt = text_to_x_thread.format(input = file.content)

llm_instance = LLM.create(provider=LLMProvider.OPENAI, model_name="gpt-4o")

response = llm_instance.generate_response(prompt=final_prompt, max_tokens=1000)

with open("response.txt", "w", encoding='utf-8') as f:
    f.write(response)
如你所见,我们在代码中导入了两样东西:我们将使用的 SimplerLLM 函数和资源文件,我创建并保存了所有强力提示,我会免费提供给你!
文件变量使用 SimplerLLm 函数 load_content,该函数将你的链接/文件作为输入并加载其数据。
因此,我将首先格式化我的提示并将其存储在 final_prompt 变量中。
这可以通过使用 text_to_x_thread 提示来完成,我们从资源文件中导入该提示并将其与博客文章内容一起传递,如上所示。
现在,我们创建一个 OpenAI LLM 实例以调用他们的 GPT 模型,并使用 generate_reponse 函数调用它,如响应变量中所示。
💡 请注意,默认情况下,此函数最多返回 350 个令牌作为输出;这就是为什么我们添加了 max_tokens 参数并将其增加到 1000,因为我们的大多数输出都会有点长。
然后,我们获取生成的响应并将其保存在 response.txt 文件中。输出将如下所示:
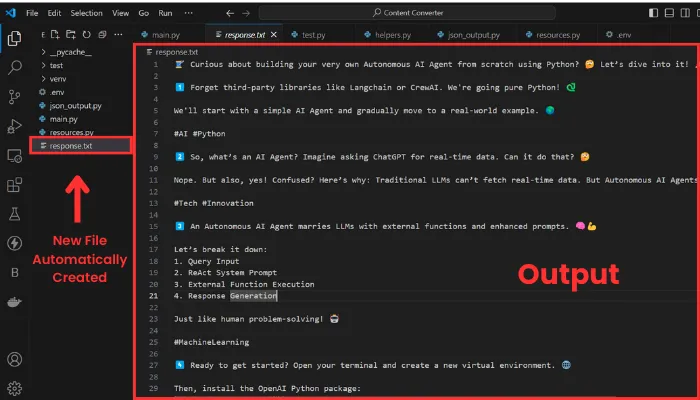
输出由十个线程组成,如果我想向你展示整个过程,那么篇幅就太长了。无论如何,我在这里的目的是向你展示它的工作原理。
现在让我们通过将 YouTube 视频转换为博客文章来尝试另一个示例。
为此,我们必须更改输入和我们正在使用的提示。
我将选择我的 YouTube 频道中的视频作为输入。
这是编辑后的代码行:
file = load_content("https://www.youtube.com/watch?v=DAmL-b_c85c")要更改提示,请编辑以下代码行:
final_prompt = text_to_blog_post.format(input = file.content)让我们运行它并查看输出:
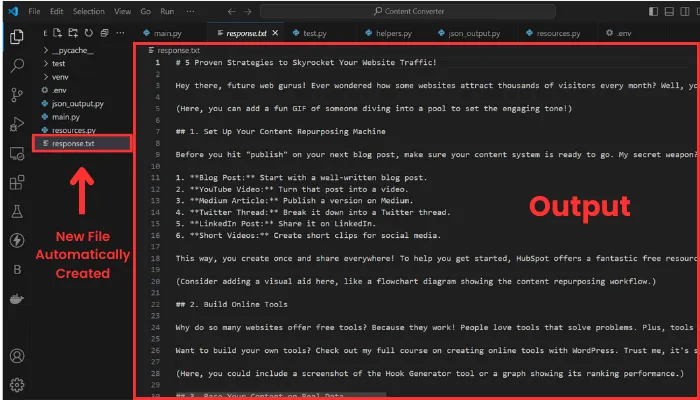
如你所见,格式已更改为博客文章,输入现在是 YouTube 视频的记录。
以下是我们上面使用的代码和 resources.py 文件,其中包含我的一些强力提示: 基础代码 , 提示 。
3、策略 2:主要代码
现在,是时候进行真正的交易了,你一直在等待什么!
在此策略中,只需单击一下,就可以将内容重新用于三个不同的内容,所有内容都格式化为 json 输出,这将使它们更易于访问。
使用此方法不需要新资源;只需要更新的代码。它在这里:
import json
from SimplerLLM.tools.generic_loader import load_content
from SimplerLLM.language.llm import LLM, LLMProvider
from resources import text_to_x_thread, text_to_summary, text_to_newsletter, format_to_json

llm_instance = LLM.create(provider=LLMProvider.OPENAI, model_name="gpt-4o")

#This can take a youtube video link, a blog post link, a csv file, etc... as input too
file = load_content("https://learnwithhasan.com/create-ai-agents-with-python/")

#Getting the 3 inputs
x_prompt = text_to_x_thread.format(input = file.content)
newsletter_prompt = text_to_newsletter.format(input = file.content)
summary_prompt = text_to_summary.format(input = file.content)

#Generating the 3 types of social posts
x_thread = llm_instance.generate_response(prompt = x_prompt, max_tokens=1000)
with open("twitter.txt", "w", encoding='utf-8') as f:
    f.write(x_thread)

newsletter_section = llm_instance.generate_response(prompt = newsletter_prompt, max_tokens=1000)
with open("newsletter.txt", "w", encoding='utf-8') as f:
    f.write(newsletter_section)

bullet_point_summary = llm_instance.generate_response(prompt = summary_prompt, max_tokens=1000)
with open("summary.txt", "w", encoding='utf-8') as f:
    f.write(bullet_point_summary)

#Converting them into json format
final_prompt = format_to_json.format(input_1 = x_thread,
                                     input_2 = newsletter_section,
                                     input_3 = bullet_point_summary)

response = llm_instance.generate_response(prompt = final_prompt, max_tokens=3000)

# Validate and write JSON with indentation for readability
try:
    json_data = json.loads(response)
    with open("Json_Result.json", "w", encoding='utf-8') as f:
        json.dump(json_data, f, ensure_ascii=False, indent=4)
    print("JSON saved successfully.")
except json.JSONDecodeError as e:
    print("Error in JSON format:", e)
    with open("Json_Result.json", "w", encoding='utf-8') as f:
        f.write(response)
此代码的结构与上面的代码非常相似;我们在这里也使用相同的函数。
主要区别在于,我们不会只生成 1 种类型的内容,而是使用 OpenAI 的 GPT 模型将所选输入重新用于三种不同类型的内容。我们将每个输出保存在具有相应名称的 TXT 文件中。
💡 请注意,你也可以在此处编辑提示以获得不同的结果,如我上面所示。
然后,在获得三个输出后,我们将使用强力提示将它们合并为一个 json 输出,并将它们保存在 json 文件中。
但是,GPT 的响应并不总是有效并生成正确的 json 格式。这就是为什么我添加了一个 try-except 语句,以便如果它不起作用,它会打印代码并将其保存为原始文本。
我无法详细介绍如何修复此问题,但你可以查看这篇博文,它肯定会帮助你提高结果。
现在,让我们尝试一下,看看我们能得到什么!
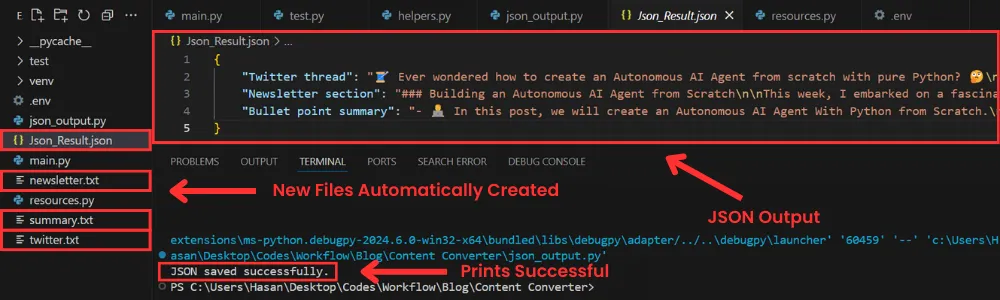
如你所见,创建了四个新文件;其中 3 个包含单独生成的三部分内容,还有一个 json 文件,其中包含最终的 json 格式输出。
随意使用提示,你将获得符合你偏好的新结果。
👉 代码可以从 这里下载。
4、为工具创建 UI
该脚本在终端中运行完美,但我们为什么不构建一个简单、用户友好的界面来更轻松地运行代码呢?
此外,对编码一无所知的人将能够在完全不与代码交互的情况下使用它。
如果我们将 streamlit 与下面的强力提示结合起来,这非常简单:
Act as an expert Python programmer specialized in building user-friendly UIs using Streamlit.  Create a Streamlit UI for the provided script.
Make sure to comment all the code to enhance understanding, particularly for beginners.
Choose the most suitable controls for the given script and aim for a professional, user-friendly interface.
The target audience is beginners who are looking to understand how to create user interfaces with Streamlit.
The style of the response should be educational and thorough. Given the instructional nature, comments should be used extensively in the code to provide context and explanations.
Output: Provide the optimized Streamlit UI code, segmented by comments explaining each part of the code for better understanding.
Input: Provided script: {your input script}
此提示是高级提示库的一部分,该库每月都会更新新的特殊提示。
无论如何,我使用了该提示,并在几秒钟内用 Streamlit 为我的工具创建了一个 UI。这是它生成的代码:
import streamlit as st
import json
from SimplerLLM.tools.generic_loader import load_content
from SimplerLLM.language.llm import LLM, LLMProvider
from resources import text_to_x_thread, text_to_summary, text_to_newsletter, format_to_json

llm_instance = LLM.create(provider=LLMProvider.OPENAI, model_name="gpt-4o")

st.title("Content Generation With A Single Click")

url = st.text_input("Enter the URL or File Name of your input:")

if st.button("Generate Content"):
    if url:
        try:
            file = load_content(url)

            x_prompt = text_to_x_thread.format(input=file.content)
            newsletter_prompt = text_to_newsletter.format(input=file.content)
            summary_prompt = text_to_summary.format(input=file.content)

            x_thread = llm_instance.generate_response(prompt=x_prompt, max_tokens=1000)
            newsletter_section = llm_instance.generate_response(prompt=newsletter_prompt, max_tokens=1000)
            bullet_point_summary = llm_instance.generate_response(prompt=summary_prompt, max_tokens=1000)

            st.subheader("Generated Twitter Thread")
            st.write(x_thread)
            st.markdown("---")

            st.subheader("Generated Newsletter Section")
            st.write(newsletter_section)
            st.markdown("---")

            st.subheader("Generated Bullet Point Summary")
            st.write(bullet_point_summary)
            st.markdown("---")

            final_prompt = format_to_json.format(
                input_1=x_thread,
                input_2=newsletter_section,
                input_3=bullet_point_summary
            )
            response = llm_instance.generate_response(prompt=final_prompt, max_tokens=3000)

            try:
                json_data = json.loads(response)
                st.markdown("### __Generated JSON Result__")
                st.json(json_data)
                st.download_button(
                    label="Download JSON Result",
                    data=json.dumps(json_data, ensure_ascii=False, indent=4),
                    file_name="Json_Result.json",
                    mime="application/json"
                )
            except json.JSONDecodeError as e:
                st.error(f"Error in JSON format: {e}")
                st.write(response)
        except Exception as e:
            st.error(f"An error occurred: {e}")
    else:
        st.warning("Please enter a valid URL.")
上面的代码会生成你选择的三种类型的内容,并显示它们,最后还会显示带有下载按钮的 json 结果,只需单击一下即可下载结果。
现在,要运行代码,你需要将代码保存为 ui.py,打开一个新终端并运行以下命令:
streamlit run ui.py当然,你可以更改文件的名称,但在运行它时你还需要将其更改为新文件的名称。
运行它后,将打开以下网页:

如你所见,它使用起来非常简单直接。只需输入链接或文件名,然后单击生成按钮即可获得所有结果。
5、奖励:将此工具变成赚钱机器
不要只将该工具保留供你使用,而是让人们使用它并向他们收取每次使用的费用。
让我解释一下:
如果你在 WordPress 网站上为你的工具构建了一个简洁的用户界面(最简单的事情之一),你可以构建一个积分系统,人们会购买积分来使用这些工具。
这是我在他的工具页面上使用的技术,他每次使用都会向人们收取一定数量的积分,具体取决于他们使用的工具。
如果你想了解如何克隆他正在使用的相同策略和商业模式,请查看这个指南,它教你如何在 WordPress 上构建 SAAS!
原文链接:基于LLM的内容再利用 - BimAnt