QT开发:深入掌握 QtGui 和 QtWidgets 布局管理:QVBoxLayout、QHBoxLayout 和 QGridLayout 的高级应用
目录
引言
1. QVBoxLayout:垂直布局管理器
基本功能
创建 QVBoxLayout
添加控件
添加控件和设置对齐方式
设置对齐方式
示例代码与详解
2. QHBoxLayout:水平布局管理器
基本功能
创建 QHBoxLayout
添加控件
添加控件和设置对齐方式
设置对齐方式
示例代码与详解
3. QGridLayout:网格布局管理器
基本功能
创建 QGridLayout
添加控件
添加控件和设置控件跨度
设置控件跨度
示例代码与详解
4. 综合示例:结合 QVBoxLayout、QHBoxLayout 和 QGridLayout 创建一个复杂布局应用程序
综合示例代码
代码解析
主垂直布局(QVBoxLayout)
顶部按钮区域(QHBoxLayout)
中心控件区域(QGridLayout)
底部按钮区域(QHBoxLayout)
5. 总结
关键要点
引言
在 Qt 开发中,布局管理器(Layouts)是组织和管理控件(widgets)位置和大小的关键工具。通过使用布局管理器,可以创建响应式和高度自适应的用户界面。本篇技术博客将详细讲解 QtGui 和 QtWidgets 模块中的布局管理:QVBoxLayout、QHBoxLayout 和 QGridLayout,帮助你轻松掌握这些布局管理器的基本概念和应用技术。
1. QVBoxLayout:垂直布局管理器
QVBoxLayout 是一个垂直布局管理器,用于将控件从上到下排列。它是创建垂直排列控件的理想选择。
基本功能
创建 QVBoxLayout
可以通过 QVBoxLayout 构造函数创建垂直布局管理器。
QVBoxLayout *vboxLayout = new QVBoxLayout();
添加控件
可以使用 addWidget 方法将控件添加到布局中。
QPushButton *button1 = new QPushButton("Button 1", this);
QPushButton *button2 = new QPushButton("Button 2", this);
vboxLayout->addWidget(button1);
vboxLayout->addWidget(button2);
添加控件和设置对齐方式
设置对齐方式
可以使用 setAlignment 方法设置控件的对齐方式。
vboxLayout->setAlignment(button1, Qt::AlignLeft);
vboxLayout->setAlignment(button2, Qt::AlignRight);
示例代码与详解
以下是一个完整的示例,展示了如何使用 QVBoxLayout 创建一个垂直布局,并将控件从上到下排列:
#include <QApplication>
#include <QWidget>
#include <QVBoxLayout>
#include <QPushButton>

class VBoxLayoutExample : public QWidget {
public:
    VBoxLayoutExample(QWidget *parent = nullptr) : QWidget(parent) {
        QVBoxLayout *vboxLayout = new QVBoxLayout(this);

        QPushButton *button1 = new QPushButton("Button 1", this);
        QPushButton *button2 = new QPushButton("Button 2", this);
        QPushButton *button3 = new QPushButton("Button 3", this);

        vboxLayout->addWidget(button1);
        vboxLayout->addWidget(button2);
        vboxLayout->addWidget(button3);

        vboxLayout->setAlignment(button1, Qt::AlignLeft);
        vboxLayout->setAlignment(button2, Qt::AlignCenter);
        vboxLayout->setAlignment(button3, Qt::AlignRight);
    }
};

int main(int argc, char *argv[]) {
    QApplication app(argc, argv);

    VBoxLayoutExample window;
    window.show();

    return app.exec();
}
运行如下:

这个示例展示了如何使用 QVBoxLayout 创建一个垂直布局,并将按钮控件从上到下排列,同时设置每个按钮的对齐方式。
2. QHBoxLayout:水平布局管理器
QHBoxLayout 是一个水平布局管理器,用于将控件从左到右排列。它是创建水平排列控件的理想选择。
基本功能
创建 QHBoxLayout
可以通过 QHBoxLayout 构造函数创建水平布局管理器。
QHBoxLayout *hboxLayout = new QHBoxLayout();
添加控件
可以使用 addWidget 方法将控件添加到布局中。
QPushButton *button1 = new QPushButton("Button 1", this);
QPushButton *button2 = new QPushButton("Button 2", this);
hboxLayout->addWidget(button1);
hboxLayout->addWidget(button2);
添加控件和设置对齐方式
设置对齐方式
可以使用 setAlignment 方法设置控件的对齐方式。
hboxLayout->setAlignment(button1, Qt::AlignTop);
hboxLayout->setAlignment(button2, Qt::AlignBottom);
示例代码与详解
以下是一个完整的示例,展示了如何使用 QHBoxLayout 创建一个水平布局,并将控件从左到右排列:
#include <QApplication>
#include <QWidget>
#include <QHBoxLayout>
#include <QPushButton>

class HBoxLayoutExample : public QWidget {
public:
    HBoxLayoutExample(QWidget *parent = nullptr) : QWidget(parent) {
        QHBoxLayout *hboxLayout = new QHBoxLayout(this);

        QPushButton *button1 = new QPushButton("Button 1", this);
        QPushButton *button2 = new QPushButton("Button 2", this);
        QPushButton *button3 = new QPushButton("Button 3", this);

        hboxLayout->addWidget(button1);
        hboxLayout->addWidget(button2);
        hboxLayout->addWidget(button3);

        hboxLayout->setAlignment(button1, Qt::AlignTop);
        hboxLayout->setAlignment(button2, Qt::AlignCenter);
        hboxLayout->setAlignment(button3, Qt::AlignBottom);
    }
};

int main(int argc, char *argv[]) {
    QApplication app(argc, argv);

    HBoxLayoutExample window;
    window.show();

    return app.exec();
}
运行结果:


这个示例展示了如何使用 QHBoxLayout 创建一个水平布局,并将按钮控件从左到右排列,同时设置每个按钮的对齐方式。
3. QGridLayout:网格布局管理器
QGridLayout 是一个网格布局管理器,可以将控件放置在网格的单元格中。它是创建复杂布局的理想选择。
基本功能
创建 QGridLayout
可以通过 QGridLayout 构造函数创建网格布局管理器。
QGridLayout *gridLayout = new QGridLayout();
添加控件
可以使用 addWidget 方法将控件添加到指定的网格单元格中。
QPushButton *button1 = new QPushButton("Button 1", this);
QPushButton *button2 = new QPushButton("Button 2", this);
gridLayout->addWidget(button1, 0, 0);
gridLayout->addWidget(button2, 0, 1);
添加控件和设置控件跨度
设置控件跨度
可以通过 addWidget 方法的额外参数设置控件的行跨度和列跨度。
QPushButton *button3 = new QPushButton("Button 3", this);
gridLayout->addWidget(button3, 1, 0, 1, 2); // 跨两列
示例代码与详解
以下是一个完整的示例,展示了如何使用 QGridLayout 创建一个网格布局,并将控件放置在指定的网格单元格中:
#include <QApplication>
#include <QWidget>
#include <QGridLayout>
#include <QPushButton>

class GridLayoutExample : public QWidget {
public:
    // 构造函数,初始化一个新的窗口部件
    GridLayoutExample(QWidget *parent = nullptr) : QWidget(parent) {
        // 创建一个新的网格布局,父对象是当前窗口部件
        QGridLayout *gridLayout = new QGridLayout(this);

        // 创建四个按钮,并将它们的文本分别设置为"Button 1"到"Button 4"
        QPushButton *button1 = new QPushButton("Button 1", this);
        QPushButton *button2 = new QPushButton("Button 2", this);
        QPushButton *button3 = new QPushButton("Button 3", this);
        QPushButton *button4 = new QPushButton("Button 4", this);

        // 将button1添加到网格布局的第0行第0列
        gridLayout->addWidget(button1, 0, 0);

        // 将button2添加到网格布局的第0行第1列
        gridLayout->addWidget(button2, 0, 1);

        // 将button3添加到网格布局的第1行第0列,并跨两列
        gridLayout->addWidget(button3, 1, 0, 1, 2);

        // 将button4添加到网格布局的第2行第0列,并跨两行
        gridLayout->addWidget(button4, 2, 0, 2, 1);

        // 设置button1在网格中的对齐方式为顶部对齐
        gridLayout->setAlignment(button1, Qt::AlignTop);

        // 设置button2在网格中的对齐方式为居中对齐
        gridLayout->setAlignment(button2, Qt::AlignCenter);

        // 设置button3在网格中的对齐方式为底部对齐
        gridLayout->setAlignment(button3, Qt::AlignBottom);

        // 设置button4在网格中的对齐方式为右对齐
        gridLayout->setAlignment(button4, Qt::AlignRight);
    }
};

int main(int argc, char *argv[]) {
    QApplication app(argc, argv);

    GridLayoutExample window;
    window.show();

    return app.exec();
}
运行结果:

这个示例展示了如何使用 QGridLayout 创建一个网格布局,并将按钮控件放置在指定的网格单元格中,同时设置每个按钮的对齐方式。
4. 综合示例:结合 QVBoxLayout、QHBoxLayout 和 QGridLayout 创建一个复杂布局应用程序
为了更好地展示 QVBoxLayout、QHBoxLayout 和 QGridLayout 的综合应用,我们将创建一个复杂的用户界面布局。这个布局包含以下部分:
- 垂直布局(
QVBoxLayout)用于排列主要部分 - 水平布局(
QHBoxLayout)用于排列顶部按钮区域 - 网格布局(
QGridLayout)用于排列中心控件区域
综合示例代码
以下是完整的应用程序代码,展示了如何结合使用 QVBoxLayout、QHBoxLayout 和 QGridLayout 创建一个复杂的用户界面布局:
#include <QApplication>
#include <QWidget>
#include <QVBoxLayout>
#include <QHBoxLayout>
#include <QGridLayout>
#include <QPushButton>
#include <QLabel>
#include <QLineEdit>

class ComplexLayoutExample : public QWidget {
public:
    // 构造函数,初始化一个新的窗口部件
    ComplexLayoutExample(QWidget *parent = nullptr) : QWidget(parent) {
        // 创建一个垂直布局作为主布局,父对象是当前窗口部件
        QVBoxLayout *mainLayout = new QVBoxLayout(this);

        // ==================
        // 顶部按钮区域
        // ==================
        // 创建一个水平布局用于顶部按钮区域
        QHBoxLayout *topButtonLayout = new QHBoxLayout();
        // 创建两个按钮,并将它们添加到顶部按钮布局中
        QPushButton *button1 = new QPushButton("Button 1", this);
        QPushButton *button2 = new QPushButton("Button 2", this);
        topButtonLayout->addWidget(button1);
        topButtonLayout->addWidget(button2);
        // 将顶部按钮布局添加到主布局中
        mainLayout->addLayout(topButtonLayout);

        // ==================
        // 中心控件区域
        // ==================
        // 创建一个网格布局用于中心控件区域
        QGridLayout *centerGridLayout = new QGridLayout();
        // 创建标签和文本编辑控件,并将它们添加到网格布局中
        QLabel *label1 = new QLabel("Label 1", this);
        QLineEdit *lineEdit1 = new QLineEdit(this);
        QLabel *label2 = new QLabel("Label 2", this);
        QLineEdit *lineEdit2 = new QLineEdit(this);
        centerGridLayout->addWidget(label1, 0, 0);
        centerGridLayout->addWidget(lineEdit1, 0, 1);
        centerGridLayout->addWidget(label2, 1, 0);
        centerGridLayout->addWidget(lineEdit2, 1, 1);
        // 将中心网格布局添加到主布局中
        mainLayout->addLayout(centerGridLayout);

        // ==================
        // 底部按钮区域
        // ==================
        // 创建一个水平布局用于底部按钮区域
        QHBoxLayout *bottomButtonLayout = new QHBoxLayout();
        // 创建两个按钮,并将它们添加到底部按钮布局中
        QPushButton *button3 = new QPushButton("Button 3", this);
        QPushButton *button4 = new QPushButton("Button 4", this);
        bottomButtonLayout->addWidget(button3);
        bottomButtonLayout->addWidget(button4);
        // 添加一个弹簧,使底部按钮区域靠底部排列
        mainLayout->addStretch();
        // 将底部按钮布局添加到主布局中
        mainLayout->addLayout(bottomButtonLayout);
    }
};

int main(int argc, char *argv[]) {
    QApplication app(argc, argv);

    ComplexLayoutExample window;
    window.show();

    return app.exec();
}
运行结果:
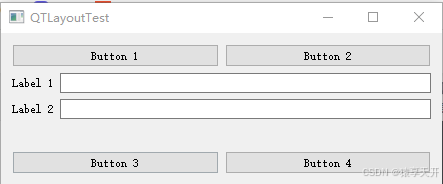
代码解析
这个综合示例展示了如何结合使用 QVBoxLayout、QHBoxLayout 和 QGridLayout 创建一个复杂的用户界面布局。以下是对各个部分的详细解析:
主垂直布局(QVBoxLayout)
QVBoxLayout *mainLayout = new QVBoxLayout(this);
QVBoxLayout:主垂直布局管理器,用于将各个部分从上到下排列。
顶部按钮区域(QHBoxLayout)
QHBoxLayout *topButtonLayout = new QHBoxLayout();
QPushButton *button1 = new QPushButton("Button 1", this);
QPushButton *button2 = new QPushButton("Button 2", this);
topButtonLayout->addWidget(button1);
topButtonLayout->addWidget(button2);
mainLayout->addLayout(topButtonLayout);
QHBoxLayout:顶部水平布局管理器,用于排列顶部按钮区域的按钮。addWidget:将按钮控件添加到水平布局中,并将布局添加到主垂直布局中。
中心控件区域(QGridLayout)
QGridLayout *centerGridLayout = new QGridLayout();
QLabel *label1 = new QLabel("Label 1", this);
QLineEdit *lineEdit1 = new QLineEdit(this);
QLabel *label2 = new QLabel("Label 2", this);
QLineEdit *lineEdit2 = new QLineEdit(this);
centerGridLayout->addWidget(label1, 0, 0);
centerGridLayout->addWidget(lineEdit1, 0, 1);
centerGridLayout->addWidget(label2, 1, 0);
centerGridLayout->addWidget(lineEdit2, 1, 1);
mainLayout->addLayout(centerGridLayout);
QGridLayout:中心网格布局管理器,用于排列中心控件区域的标签和文本输入框。addWidget:将标签和文本输入框添加到网格布局的指定单元格中,并将布局添加到主垂直布局中。
底部按钮区域(QHBoxLayout)
QHBoxLayout *bottomButtonLayout = new QHBoxLayout();
QPushButton *button3 = new QPushButton("Button 3", this);
QPushButton *button4 = new QPushButton("Button 4", this);
bottomButtonLayout->addWidget(button3);
bottomButtonLayout->addWidget(button4);
mainLayout->addStretch(); // 添加一个弹簧,以便底部按钮区域靠底部排列
mainLayout->addLayout(bottomButtonLayout);
QHBoxLayout:底部水平布局管理器,用于排列底部按钮区域的按钮。addStretch:添加一个弹簧,使底部按钮区域能够靠底部排列。addWidget:将按钮控件添加到水平布局中,并将布局添加到主垂直布局中。
这个综合示例展示了如何结合使用 QVBoxLayout、QHBoxLayout 和 QGridLayout 创建一个复杂的用户界面布局,帮助你了解多种布局管理器的综合应用。
5. 总结
本篇技术博客详细介绍了 QtGui 和 QtWidgets 模块中 QVBoxLayout、QHBoxLayout 和 QGridLayout 的基本概念和高级应用技术。通过详细解析和完整的示例代码,我们展示了如何使用这些布局管理器创建响应式和高度自适应的用户界面。
关键要点
- QVBoxLayout:垂直布局管理器,用于将控件从上到下排列,并支持设置控件的对齐方式。
- QHBoxLayout:水平布局管理器,用于将控件从左到右排列,并支持设置控件的对齐方式。
- QGridLayout:网格布局管理器,用于将控件放置在网格的单元格中,并支持设置控件的行跨度和列跨度。
- 综合应用:通过结合使用
QVBoxLayout、QHBoxLayout和QGridLayout,可以创建功能丰富且高度自适应的复杂用户界面布局。
通过掌握这些布局管理器及其应用技术,你可以轻松开发复杂的 Qt 应用程序,并自信地应对各种用户界面布局需求。希望这篇文章对你的 Qt 开发学习有所帮助!