Day13-数据库服务架构集群
Day-13-数据库服务集群构建
- 1、数据库高可用应用(MHA)
- 2、数据库读写分离应用(mysql-proxy)
- 3、数据库高可用/读写分离集群(MIC)
- 3.1 数据库服务架构集群概述介绍
- 3.2 数据库服务架构集群构建过程
1、数据库高可用应用(MHA)
2、数据库读写分离应用(mysql-proxy)
3、数据库高可用/读写分离(MIC)
4、数据库分布式存储(Mycat)
MGR集群构建(主从群组搭建)
单主模式构建
- 进行主机的配置(2N+1个主机-最少三台实例主机)
loose-group_replication_group_name="eb8441e9-8aef-4a86-a4bc-5beea315f04f"
loose-group_replication_start_on_boot=OFF
loose-group_replication_local_address="10.0.0.51:33061"
loose-group_replication_group_seeds="10.0.0.51:33061,10.0.0.52:33062,10.0.0.53:33063"
loose-group_replication_bootstrap_group=OFF
- 激活构建MGR群组功能
主节点进行激活
change master to master_user='repl',master_password='123' for channel 'group_replication_recovery';
set global group_replication_bootstrap_group=ON;
start group_replication;
set global group_replication_bootstrap_group=OFF;
从节点进行激活
change master to master_user='repl',master_password='123' for channel 'group_replication_recovery';
start group_replication;
检查确认
select * from performance_schema.replication_group_members;
-- 查看集群节点状态信息,以及集群成员信息

# 遇到集群构建异常,可以进行重置操作
stop group_replication;
reset master;
set sql_log_bin=0;
change master to master_user='repl',master_password='123' for channel 'group_replication_recovery';
start group_replication;
多主模式构建
group_replication_single_primary_mode=0
-- 设置参数表示关闭掉单master模式
group_replication_enforce_update_everywhere_checks=1
-- 这个参数设置表示多主模式下,各个节点进行严格一致性检查
1、数据库高可用应用(MHA)
MHA原主节点修复过程
第一步:修复原主节点故障/并重新启动原主节点
systemctl start mysqld
第二步:将数据信息进行恢复
通过备份/通过克隆
第三步:重新构建主从关系
change master to
master_host='10.0.0.52',
master_user='repl',
master_password='123456',
master_auto_position=1;
第四步:重新加入到MHA集群中
方式一:重新编写配置文件
vim /etc/mha/app1.cnf
[server1]
hostname=10.0.0.52
port=3306
方式二:利用命令脚本将故障节点加入到mha集群中
[root@xiaoQ-03 ~]# masterha_conf_host --command=add --conf=/etc/mha/app1.cnf --hostname=10.0.0.51 --block=server1 --params="port=3306"
补充:恢复额外补偿功能
mysql -e "show slave status\G"|grep "Master_Log"
cd /data/binlog_server
nohup mysqlbinlog -R --host=10.0.0.52 --user=mha --password=mha --raw --stop-never mysql-bin.000007 &
第五步:重新运行mha服务
[root@xiaoQ-03 ~]# nohup masterha_manager --conf=/etc/mha/app1.cnf --remove_dead_master_conf --ignore_last_failover  < /dev/null> /var/log/mha/app1/manager.log 2>&1 &
[root@xiaoQ-03 ~]# masterha_check_status --conf=/etc/mha/app1.cnf
app1 (pid:109463) is running(0:PING_OK), master:192.168.30.102
第六步:重新切换原主库为主节点
常见错误:
masterha_stop --conf=/etc/mha/app1.cnf
# 执行MHA手工切换
masterha_master_switch --conf=/etc/mha/app1.cnf --master_state=alive --new_master_host=10.0.0.51 --orig_master_is_new_slave --running_updates_limit=10000
...省略部分信息...
It is better to execute FLUSH NO_WRITE_TO_BINLOG TABLES on the master before switching. Is it ok to execute on 192.168.30.102(192.168.30.102:3306)? (YES/no):
-- 以上说明信息,表示在进行切换之前,在原有主库节点执行FLUSH NO_WRITE_TO_BINLOG TABLES这个命令
-- 此命令表示,关闭所有打开的表,强制关闭所有正在使用的表,不写入binlog;
-- 因为此时VIP还没有漂移,表示禁止原主库继续写入数据信息

# 关闭原主库的写入功能
db02 [(none)]>FLUSH NO_WRITE_TO_BINLOG TABLES;
Query OK, 0 rows affected (0.01 sec)
It is better to execute FLUSH NO_WRITE_TO_BINLOG TABLES on the master before switching. Is it ok to execute on 192.168.30.102(192.168.30.102:3306)? (YES/no): yes
Starting master switch from 192.168.30.102(192.168.30.102:3306) to 192.168.30.101(192.168.30.101:3306)? (yes/NO): yes
-- 进行再一次核实确认,是否进行手工切换
master_ip_online_change_script is not defined. If you do not disable writes on the current master manually, applications keep writing on the current master. Is it ok to proceed? (yes/NO): yes
-- 表示master_ip_online_change_script此脚本没有定义,如果没有禁止当前主库写入的禁止,业务应用仍旧访问当前主库
-- 因为此时VIP还没有进行转移;
[info] Switching master to 192.168.30.101(192.168.30.101:3306) completed successfully.
-- 提示切换完成
显示切换成功后,做检查确认:
- 检查MHA是否启动
- 检查VIP地址是否切换
将MHA重新手动启动
将VIP地址手工漂移
# 进行MHA切换核验
[root@xiaoQ-03 ~]# nohup masterha_manager --conf=/etc/mha/app1.cnf --remove_dead_master_conf --ignore_last_failover  < /dev/null> /var/log/mha/app1/manager.log 2>&1 &
-- 重新启动MHA程序

[root@xiaoQ-03 ~]# masterha_check_status --conf=/etc/mha/app1.cnf
app1 is stopped(2:NOT_RUNNING).
[1]+  退出 1                nohup masterha_manager --conf=/etc/mha/app1.cnf --remove_dead_master_conf --ignore_last_failover < /dev/null > /var/log/mha/app1/manager.log 2>&1
-- 检查状态失败,mha没有启动成功,因为vip信息并没有进行有效漂移

masterha_master_switch --conf=/etc/mha/app1.cnf --master_state=alive --new_master_host=192.168.30.102 --orig_master_is_new_slave --running_updates_limit=10000
-- 临时先切换回原有主节点,恢复MHA服务状态

[root@xiaoQ-03 ~]# nohup masterha_manager --conf=/etc/mha/app1.cnf --remove_dead_master_conf --ignore_last_failover  < /dev/null> /var/log/mha/app1/manager.log 2>&1 &
[1] 65799
[root@xiaoQ-03 ~]# masterha_check_status --conf=/etc/mha/app1.cnf
app1 (pid:65799) is running(0:PING_OK), master:192.168.30.102
-- mha服务状态恢复
在进行MHA高可用节点在线手工切换时,有以下信息需要注意:
- 在进行MHA高可用手工切换时,无法自动调整原有主库的binlog_server,需要手工重新拉取新主库的binlog;
- 在进行MHA高可用手工切换时,无法进行触发邮件脚本功能,邮件发送功能只能在MHA产生故障转移时触发;
- 在进行MHA高可用手工切换时,需要进行架构主从关系的切换,以及可以调整转移VIP地址信息;
- 在进行MHA高可用手工切换时,需要对切换前的主库进行锁定(FTWRL flush tables with read lock),避免数据不一致
正确切换方法:
[root@db03 ~]#  cd /usr/local/bin/
root@db03 bin]# cp master_ip_online_change master_ip_online_change.bak
[root@db03 bin]# vim master_ip_online_change
21 my $vip = "10.0.0.50";
22 my $key = "1";
23 my $ssh_start_vip = "/sbin/ifconfig eth0:$key $vip";
24 my $ssh_stop_vip = "/sbin/ifconfig eth0:$key $vip down";
25 my $ssh_Bcast_arp= "/sbin/arping -I eth0 -c 3 -A 10.0.0.50";

# 修改MHA服务程序配置文件:
[root@db03 bin]# vim /etc/mha/app1.cnf
master_ip_online_change_script=/usr/local/bin/master_ip_online_change

# 关闭MHA服务程序进行核查:
[root@xiaoQ-03 ~]# masterha_stop --conf=/etc/mha/app1.cnf
[root@xiaoQ-03 ~]# masterha_check_status --conf=/etc/mha/app1.cnf
app1 is stopped(2:NOT_RUNNING).
[root@xiaoQ-03 ~]# masterha_check_repl --conf=/etc/mha/app1.cnf
MySQL Replication Health is OK.

# 进行MHA服务手工在线切换:
[root@xiaoQ-03 ~]# masterha_master_switch --conf=/etc/mha/app1.cnf --master_state=alive --new_master_host=10.0.0.51 --orig_master_is_new_slave --running_updates_limit=10000
...省略部分信息...
It is better to execute FLUSH NO_WRITE_TO_BINLOG TABLES on the master before switching. Is it ok to execute on 192.168.30.102(192.168.30.102:3306)? (YES/no): yes
-- FLUSH NO_WRITE_TO_BINLOG TABLES 命令在原有主库节点需要再执行一次;
Starting master switch from 192.168.30.102(192.168.30.102:3306) to 192.168.30.101(192.168.30.101:3306)? (yes/NO): yes
Sat Jan  7 13:48:50 2023 - [info] Switching master to 192.168.30.101(192.168.30.101:3306) completed successfully.
总结:
01 MHA高可用集群部署过程
02 MHA故障修复过程
03 MHA手动切换过程
重点:MHA工作原理机制–选主原则
2、数据库读写分离应用(mysql-proxy)
在应用数据库主从架构或者数据库冗余架构时,都可以有效保证数据库逻辑故障或物理故障对业务的影响;
但是,这两种架构进行应用时,业务访问过程只是访问主数据库节点,进行读写操作,当并发量大时无型中会对主节点造成不小压力;
因此,可以设计一种新型的业务访问架构方式,可以实现将写数据请求发送到主节点,将读数据请求发送到从节点;
最终,可以有效减少主节点的业务访问压力,这样设计的数据库架构称之为读写分离架构;
读写分离架构最终目的:实现业务写的请求到达主库,实现业务读的请求到达从库,从而减少主库的压力,实现不同请求的压力分担;
可以利用读写分离中间件实现以上的功能需求:atlas(360公司出品) proxySQL
利用读写分离中间件的设置,当业务请求有select查询时,将请求发送给从库,当业务请求有update insert等修改时,将请求发送给主库
proxySQL是基于MySQL的一款开源的中间件的产品,是一个灵活的MySQL代理层,可以实现读写分离:
- proxySQL数据库中间件支持Query路由功能;
- pxoxySQL数据库中间件支持动态指定某个SQL进行缓存;
- proxySQL数据库中间件支持动态加载配置信息(无需重启ProxySQL服务)
- proxySQL数据库中间件支持故障切换和SQL的过滤功能
ProxySQL的参考网站连接:
https://www.proxysql.com/
https://github.com/sysown/proxysql/releases
第一步:安装读写分离软件
通过官方网站或者github可以下载proxySQL软件程序,并上传到数据库服务器中进行安装;
https://repo.proxysql.com/ProxySQL/
# 上传安装软件程序
[root@db03 local]# rpm -ivh proxysql-2.4.6-1-centos7.x86_64.rpm
警告:proxysql-2.4.6-1-centos7.x86_64.rpm: 头V4 RSA/SHA512 Signature, 密钥 ID 8217c97e: NOKEY
准备中...                          ################################# [100%]
正在升级/安装...
   1:proxysql-2.4.6-1                 警告:群组proxysql 不存在 - 使用root
警告:群组proxysql 不存在 - 使用root
################################# [100%]
Created symlink from /etc/systemd/system/multi-user.target.wants/proxysql.service to /etc/systemd/system/proxysql.service.

# 启动运行软件程序
[root@db03 local]# systemctl start proxysql
[root@db03 local]# netstat -lntup
Active Internet connections (only servers)
Proto Recv-Q Send-Q Local Address           Foreign Address         State       PID/Program name
tcp        0      0 0.0.0.0:6032            0.0.0.0:*               LISTEN      4387/proxysql
tcp        0      0 0.0.0.0:6033            0.0.0.0:*               LISTEN      4387/proxysql
-- 启动生成的6032端口为管理端口,用于配置数据库中间件的功能信息连接此端口
-- 启动生成的6033端口为访问端口,用于提供对外的业务访问此端口
第二步:如何对proxy进行功能配置
在连接进入6032端口之后,表示进行proxysql的管理终端环境,终端环境中会加载五个重要的功能库:
| 序号 | 库信息 | 配置信息 | 解释说明 |
|---|---|---|---|
| 01 | main | mysql_servers | 表示后端可以连接mysql服务器的列表 |
| mysql_users | 表示配置后端数据库的连接账号和监控账号 | ||
| mysql_query_rules | 表示指定query路由到后端不同服务器的规则列表 | ||
| mysql_replication_hostgroups | 表示节点分组配置信息,可以配置多个写或读节点到一个组中 | ||
| 02 | disk | 表示持久化的磁盘配置信息 | |
| 03 | stats | 表示统计信息的汇总 | |
| 04 | monitor | 表示监控收集的信息,比如数据库的监控状态等 | |
| 05 | stats_history | 表示收集的有关软件内部功能的历史指标 |
说明:一般服务是通过配置文件保存功能配置信息,proxySQL是通过数据库中的表进行配置信息的存储设置;
# 连接进入到proxySQL管理终端
[root@db03 local]# mysql -uadmin -padmin -h127.0.0.1 -P6032
mysql: [Warning] Using a password on the command line interface can be insecure.
Welcome to the MySQL monitor.  Commands end with ; or \g.
Your MySQL connection id is 1
Server version: 5.5.30 (ProxySQL Admin Module)

Copyright (c) 2000, 2021, Oracle and/or its affiliates.

Oracle is a registered trademark of Oracle Corporation and/or its
affiliates. Other names may be trademarks of their respective
owners.

Type 'help;' or '\h' for help. Type '\c' to clear the current input statement.

# 查看proxySQL终端数据库信息
db03 [(none)]>show databases;
+-----+---------------+-------------------------------------+
| seq | name          | file                                |
+-----+---------------+-------------------------------------+
| 0   | main          |                                     |
| 2   | disk          | /var/lib/proxysql/proxysql.db       |
| 3   | stats         |                                     |
| 4   | monitor       |                                     |
| 5   | stats_history | /var/lib/proxysql/proxysql_stats.db |
+-----+---------------+-------------------------------------+
5 rows in set (0.00 sec)
-- 不需要use到相应数据库中进行操作,可以操作的数据表信息如下

# 查看proxySQL终端数据表信息
db03 [(none)]>show tables;
+----------------------------------------------------+
| tables                                             |
+----------------------------------------------------+
| global_variables                                   |
| mysql_aws_aurora_hostgroups                        |
| mysql_collations                                   |
| mysql_firewall_whitelist_rules                     |
| mysql_firewall_whitelist_sqli_fingerprints         |
| mysql_firewall_whitelist_users                     |
| mysql_galera_hostgroups                            |
| mysql_group_replication_hostgroups                 |
| mysql_query_rules                                  |
| mysql_query_rules_fast_routing                     |
| mysql_replication_hostgroups                       |
| mysql_servers                                      |
| mysql_users                                        |
| proxysql_servers                                   |
| restapi_routes                                     |
| runtime_checksums_values                           |
| runtime_global_variables                           |
| runtime_mysql_aws_aurora_hostgroups                |
| runtime_mysql_firewall_whitelist_rules             |
| runtime_mysql_firewall_whitelist_sqli_fingerprints |
| runtime_mysql_firewall_whitelist_users             |
| runtime_mysql_galera_hostgroups                    |
| runtime_mysql_group_replication_hostgroups         |
| runtime_mysql_query_rules                          |
| runtime_mysql_query_rules_fast_routing             |
| runtime_mysql_replication_hostgroups               |
| runtime_mysql_servers                              |
| runtime_mysql_users                                |
| runtime_proxysql_servers                           |
| runtime_restapi_routes                             |
| runtime_scheduler                                  |
| scheduler                                          |
+----------------------------------------------------+
32 rows in set (0.01 sec)
-- 表名以runtiem_开头的表示proxySQL服务中当前运行的配置内容,不能直接修改,不带runtime是下文图中mem相关的配置
ProxySQL整套配置系统分为三层:
第一层:RUNTIME:
代表proxySQL当前正在使用的配置,无法直接修改此配置,必须要从下一层(MEM层)load加载进来;
第二层:MEMORY(主要修改的配置表)
memory层上面连接runtime层,下面连接disk持久化存储层;
在这层可以在线操作ProxySQL配置,随意进行修改,不会影响生产环境,确认正常之后再加载到runtime和持久化保存到磁盘上
具体修改操作方法为:insert、update、delete、select;
第三层:DISK/CFG FILE
持久化配置信息,重启时可以从磁盘快速加载回来;
ProxySQL基于SQL语句进行读写分离实践配置:
①. 在mysql_replication_hostgroup表中,配置读写组编号:
proxySQL会根据server的read only的取值将服务器进行分组:
- read_only=0的server,即master会被分到编号为10的写组;
- read_only=1的server,即slave会被分到编号为20的读组;(
所以需要将从库设置:set global read_only=1)
# DB01(主库上)
set global read_only=0;

# DB02/DB03(从库上)
set global read_only=1;

insert into mysql_replication_hostgroups(writer_hostgroup,reader_hostgroup,comment) values(10,20,'proxy');
save mysql servers to disk;
load mysql servers to runtime;
select * from mysql_replication_hostgroups\G
② 添加主机到ProxySQL
设置mysql_servers表
db01 [(none)]>create user monitor@'%' identified by '123';
Query OK, 0 rows affected (0.07 sec)

db01 [(none)]>grant replication client on *.* to monitor@'%';
Query OK, 0 rows affected (0.01 sec)

db01 [(none)]>select user,host from mysql.user;
+------------------+-----------+
| user             | host      |
+------------------+-----------+
| monitor          | %         |
| mha              | 10.0.0.%  |


insert into mysql_servers(hostgroup_id,hostname,port) values (10,'10.0.0.50',3306);
-- 设置10.0.0.50为MHA集群的VIP地址
insert into mysql_servers(hostgroup_id,hostname,port) values (20,'10.0.0.52',3306);
insert into mysql_servers(hostgroup_id,hostname,port) values (20,'10.0.0.53',3306);
save mysql servers to disk;
load mysql servers to runtime;
select * from mysql_servers;
PS:proxysql会使用监控用户,对主从节点的read_only状态进行监控识别
识别read_only=0时,表示可以正常划分到写组中,如果识别错误或失败,会将节点自动划分为读组中
识别read_only=1时,表示可以正常划分到读组中,如果识别错误(识别为0),也会将节点自动划分到写组中
③ 创建监控用户,并开启监控
# 主库创建监控用户
db01 [(none)]>create user monitor@'%' identified with mysql_native_password by '123';
db01 [(none)]>grant replication client on *.* to monitor@'%';
-- 在MHA集群主库进行操作

# 在proxysql中修改variables表配置信息
db03 [(none)]>set mysql-monitor_username='monitor';
db03 [(none)]>set mysql-monitor_password='123';
# 或
db03 [(none)]>update global_variables set variable_value='monitor' where variable_name='mysql-monitor_username';
db03 [(none)]>update global_variables set variable_value='123' where variable_name='mysql-monitor_password';
-- 在proxysql数据库中,创建监控节点的用户信息

db03 [(none)]>load mysql variables to runtime;
db03 [(none)]>save mysql variables to disk;

# 检查核实配置信息
db03 [(none)]>select @@mysql-monitor_username\G
*************************** 1. row ***************************
@@mysql-monitor_username: monitor
1 row in set (0.00 sec)

db03 [(none)]>select @@mysql-monitor_password\G
*************************** 1. row ***************************
@@mysql-monitor_password: 123
1 row in set (0.00 sec)

# 查询监控日志信息
db03 [(none)]>select * from mysql_server_connect_log;
-- 检查确认所有节点的连接访问情况
db03 [(none)]>select * from mysql_server_ping_log;
-- 检查确认所有节点的网络连通情况
db03 [(none)]>select * from mysql_server_read_only_log limit 3;
-- 检查确认所有节点的只读状态信息(获取主库或从库主机信息)
db03 [(none)]>select * from mysql_server_replication_lag_log;
-- 检查确认所有节点的主从延时情况
④ 创建数据库应用用户信息
创建数据库应用用户信息,利用应用用户,可以使proxySQL进行数据库节点的操作管理;
# 主库创建应用用户
db01 [(none)]>create user root@'%' identified with mysql_native_password by '123';
db01 [(none)]>grant all on *.* to root@'%';

# 在proxysql中添加数据库节点的管理用户信息
db03 [(none)]>insert into mysql_users(username,password,default_hostgroup) values('root','123',10);
db03 [(none)]>load mysql users to runtime;
db03 [(none)]>save mysql users to disk;

# 早期版本,需要开启事务的持续化(忽略)
update mysql_users set transaction_persistent=1 where username='root';
load mysql users to runtime;
save mysql users to disk;
-- 事务路由分配持续性,同一个事务的语句不会被分配到不同的组
⑤ 进行读写分离规则配置
insert into mysql_query_rules(rule_id,active,match_pattern,destination_hostgroup,apply) values (1,1,'^select.*for update$',10,1);
insert into mysql_query_rules(rule_id,active,match_pattern,destination_hostgroup,apply) values (2,1,'^select',20,1);
-- 其余数据库操作语句信息,默认路由放置到主节点进行执行
load mysql query rules to runtime;
save mysql query rules to disk;
第三步:测试读写分离效果
[root@db03 ~]# mysql -uroot -p123 -P6033 -h127.0.0.1 -e "begin;select @@server_id;commit"
mysql: [Warning] Using a password on the command line interface can be insecure.
+-------------+
| @@server_id |
+-------------+
|          51 |
+-------------+
-- 非查询操作走的是主节点

[root@db03 ~]# mysql -uroot -p123 -P6033 -h127.0.0.1 -e "select @@server_id;commit"
mysql: [Warning] Using a password on the command line interface can be insecure.
+-------------+
| @@server_id |
+-------------+
|          53 |
+-------------+
[root@db03 ~]# mysql -uroot -p123 -P6033 -h127.0.0.1 -e "select @@server_id;commit"
mysql: [Warning] Using a password on the command line interface can be insecure.
+-------------+
| @@server_id |
+-------------+
|          51 |
+-------------+
-- 查询操作走的是主节点和从节点

select * from stats_mysql_query_digest\G
-- 这个表对于分析SQL语句至关重要,是分析语句性能、定制路由规则指标的最主要来源
读写分离配置过程总结:
| 步骤 | 操作说明 | 涉及数据表信息 | 涉及操作信息 |
|---|---|---|---|
| 01 | 设置从库只读模式 | read_only=1 | |
| 02 | 添加主机组信息 | mysql_replication_hostgroups | |
| 03 | 添加主机组节点信息 | mysql_servers | |
| 04 | 添加用户信息(监控用户 应用用户) | global_variables mysql_users | |
| 05 | 添加读写分离规则 | mysql_query_rules |
解决proxysql单点故障参考:https://blog.csdn.net/kai404/article/details/77524733
第四步:读写分离架构软件配置扩展
① 基于端口进行读写分离路由
# 修改proxySQL监听SQL流量的端口号,监听多端口信息
> set mysql-interfaces='0.0.0.0:6033;0.0.0.0:6034'

# 使监听端口配置信息生效
> save mysql variables to disk;
[root@xiaoQ-03 ~]# systemctl restart proxysql

# 设定相应读写分离路由规则
> delete from mysql_query_rules;
-- 为了测试效果,先清空已有规则信息
> insert into mysql_query_rules(rule_id,active,proxy_port,destination_hostgroup,apply) values(1,1,6033,10,1),(2,1,6034,20,1);
> load mysql query rules to runtime;
> save mysql query rules to disk;
-- 除了基于端口进行分离,还可以基于监听地址(修改字段proxy_addr即可),也可以基于客户端地址(修改字段client_addr字段即可);
② 基于用户进行读写分离路由
> insert into mysql_users(username,password,default_hostgroup) values ('write','123',10),('reader','123',20);
> load mysql users to runtime;
> save mysql users to disk;

> delete from mysql_query_rules;
-- 为了测试效果,先清空已有规则信息
> insert into mysql_query_rules(rule_id,active,username,destination_hostgroup,apply) values (1,1,'write',10,1),(2,1,'reader',20,1);
> load mysql users to runtime;
> save mysql users to disk;
3、数据库高可用/读写分离集群(MIC)
(MIC-mysql 8.0 之后解决高可用 主从同步 以及读写分析原生方案)
数据库服务架构集群(MIC)
3.1 数据库服务架构集群概述介绍
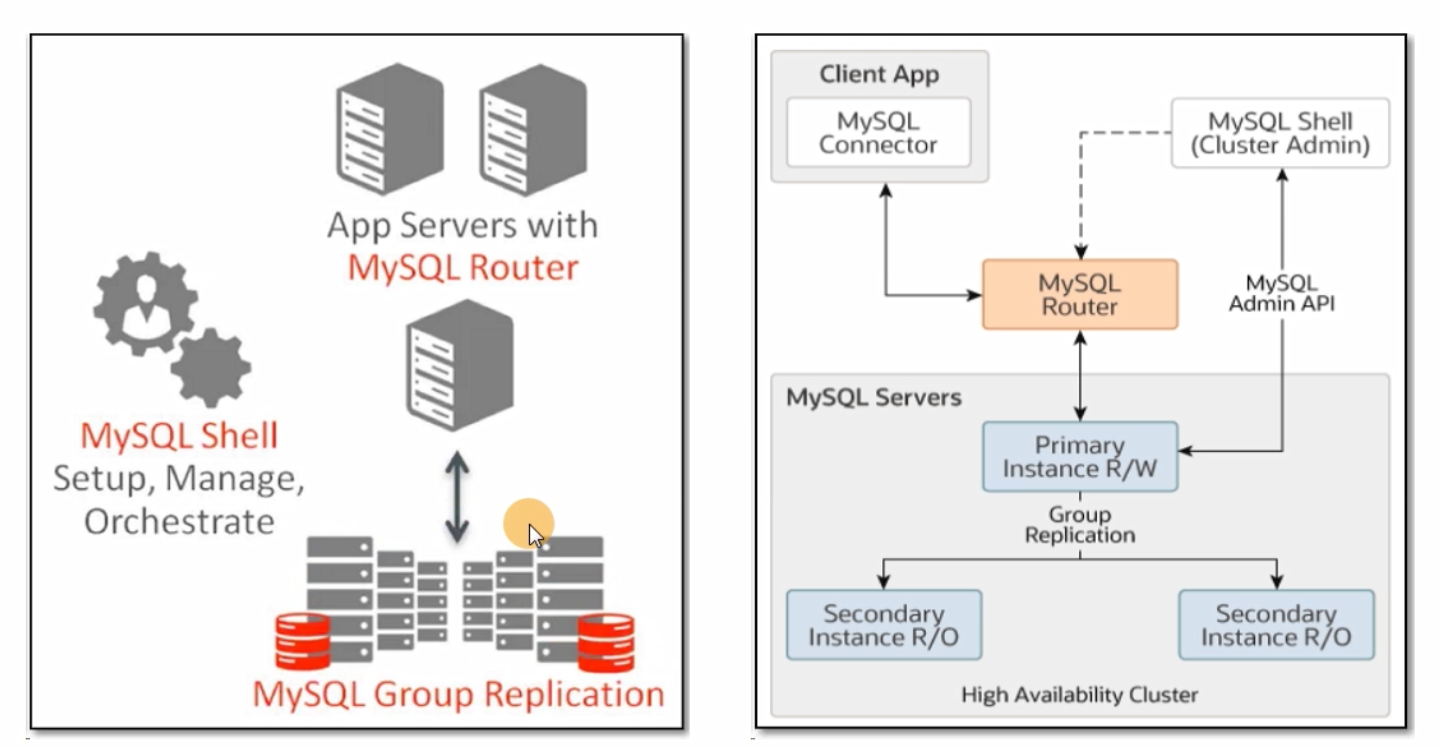
MySQL InnoDB集群提供了一个集成的,本地的,HA解决方案:MySQL InnoDB cluster;
MySQL InnoDB cluster是利用组复制的paxos协议,保障数据一致性,组复制支持单主模式和多主模式;
MySQL InnoDB cluster由以下几部分组成:
- MySQL Servers with Group Replication:
向集群的所有成员复制数据,同时提供容错,自动故障转移和弹性伸缩:(MvSOL Server 5.7.17 或更高的版本) - MySQL Router:
确保客户端请求是负载均衡的,并在任何数据库故障时,可以路由到正确的服务器;(MySQL Router 2.1.3 或更高的版本》 - MySQL shell:
通过内置的管理API创建管理Innodb集群,即统一管理MGR节点;(MySQL Shell 1.0.9或更高的版本)
3.2 数据库服务架构集群构建过程
01 架构构建主机规划说明
所需主机数量、地址名称、以及用途作用如下表说明:
| IP | Hostname | Host role | install software |
|---|---|---|---|
| 10.0.0.51 | master | mic-master | mysql、mysqlsh |
| 10.0.0.52 | slave01 | mic-slave01 | mysql、mysqlsh |
| 10.0.0.53 | slave02 | mic-slave02 | mysql、mysqlsh |
| 10.0.0.54 | manager | mic-manager | mysqlsh、mysql-router |
02 架构构建基础环境部署
第一步:安装软件程序
# 上传mysqlshell mysqlrouter程序

tar xf mysql-shell-8.0.32-linux-glibc2.12-x86-64bit.tar.gz
tar xf mysql-router-8.0.32-linux-glibc2.12-x86_64.tar.xz

ln -s mysql-shell-8.0.32-linux-glibc2.12-x86-64bit mysqlsh
ln -s mysql-router-8.0.32-linux-glibc2.12-x86_64 mysql-router

# vim /etc/profile
red_color="\[\e[31;1m\]"
green_color="\[\e[32;1m\]"
yellow_color="\[\e[33;1m\]"
blue_color="\[\e[34;1m\]"
end_color="\[\e[0m\]"

export PS1="[$red_color\u$end_color@$green_color\h$end_color $yellow_color\W$end_color $blue_color\A$end_color]\\$ "
export PATH=/usr/local/mysql/bin:/usr/local/mysqlsh/bin:/usr/local/mysql-router/bin:$PATH

source /etc/profile

[root@manager local 14:26]# echo $PATH
/usr/local/mysql/bin:/usr/local/mysqlsh/bin:/usr/local/mysql-router/bin:/usr/local/mysql/bin:/usr/local/mysqlsh/bin:/usr/local/mysql-router/bin:/usr/local/mysql/bin:/usr/local/sbin:/usr/local/bin:/usr/sbin:/usr/bin:/root/bin

vim /etc/hosts(可选)
10.0.0.51 master
10.0.0.52 slave01
10.0.0.53 slave02
10.0.0.54 manager
第二步:进行数据库初始化配置
[root@db03 local 14:35]# systemctl stop proxysql

[root@db01 ~ 13:43]# systemctl stop mysqld
[root@db01 ~ 13:43]# rm -rf /data/3306/data/*
[root@db01 ~ 13:43]# mkdir/data/3306/data/ data/3306/binlog -p
[root@db01 ~ 13:43]# chown -R mysql.mysql /data/*
-- 以上操作步骤,master和slave节点均进行配置(三台数据库节点主机进行操作)

# 编写配置文件信息
# 获取随机数信息充当uuid信息
[root@db02 ~ 11:36]# cat /proc/sys/kernel/random/uuid
45eeb45f-73dc-4046-a7fa-d6f8f6ba8362
-- 借助随机数文件生成uuid信息,因为组复制过程也是通过GTID的uuid号码,达到复制环境中的事务一致性
-- 这里采用内部GTID功能,也就是组复制的各个节点通过同一个GTID的标识,进行事务管理,所以需要给组复制设置唯一号码


# 主库db01配置文件编写
cat >/etc/my.cnf <<EOF
[client]
socket=/tmp/mysql.sock
[mysqld]
user=mysql
basedir=/usr/local/mysql
datadir=/data/3306/data
log_bin=/data/3306/binlog
server_id=51
socket=/tmp/mysql.sock

gtid_mode=ON
enforce-gtid-consistency=ON
master_info_repository=TABLE
-- 将master_info信息以表方式记录
relay_log_info_repository=TABLE
-- 将relay_log_info信息以表方式记录
log_slave_updates=ON

tmpdir=/tmp
default-storage-engine=INNODB
disabled_storage_engineS=MyISAM,BLACKHOLE,FEDERATED,CSV,ARCHIVE
max_connections=500
max_allowed_packet=32M

default_authentication_plugin=mysql_native_password
binlog_checksum=NONE
binlog_transaction_dependency_tracking=WRITESET
-- 在数据库8.0之后具有的配置,表示写集合配置信息,可以进一步提升SQL线程回放的并发度:(需要表有主键》是可以实现跨事务并发执行
transaction_write_set_extraction=XXHASH64
-- 定义写集合的hash算法信息,也属于数据库8.0之后具有的特性配置
-- 以上两行参数信息不加上,就表示与5.7版本数据库可以进行兼容,可以理解为是优化参数
loose-group_replication_group_name="1ffa8769-dacd-4803-a63a-ef33b1647ff4"
-- 设置组复制各个节点的统一唯一uuid标识信息,即同一组复制内部的唯一标识;
-- 一样就表示可以加入同一组复制中,不同就表示不加入到相同的组复制中
loose-group_replication_start_on_boot=OFF
-- 在组复制过程中也是需要启动相应线程,完成组复制任务的:
-- 此参数配置表示在服务启动时,不自动运行启动组复制功能,一般都是进行手工启动
-- 主要是防止数据库意外重启后,对组复制之间关系的影响,不能让重启后数据库自动加入到组复制中
loose-group_replication_local_address="master:33061"
-- 表示定义本地主机数据库服务的内部通讯地址和端口
loose-group_replication_group_seeds="master:33061,slave01:33062,slave02:33063"
-- 表示定义所有集群主机的内部通讯地址和端口
-- 以上地址和端口信息,表示组复制集群内部通讯时,应用的地址和端口信息;
-- 内部通讯需求:心跳检测、复制关系、日志同步、投票、选举..,都是通过内部地址和端口进行的;
loose-group_replication_bootstrap_group=OFF
-- 表示是否将此节点作为引导节点
-- 组复制在第一次进行配置时,需要先有引导节点,其他节点做为加入节点(joiner),不能都是ON,否则会产生争抢问题
-- 以上参数信息中loose,表示在没有组复制插件时,进行初始化操作只会报警告信息,而不会报错误提示
loose-group_replication_ip_whitelist="master,slave0l,slave02,manager"
EOF

# 主库db01配置文件编写
cat >/etc/my.cnf <<EOF
[client]
socket=/tmp/mysql.sock
[mysqld]
user=mysql
basedir=/usr/local/mysql
datadir=/data/3306/data
log_bin=/data/3306/binlog
server_id=51
socket=/tmp/mysql.sock

gtid_mode=ON
enforce-gtid-consistency=ON
master_info_repository=TABLE
relay_log_info_repository=TABLE
log_slave_updates=ON

tmpdir=/tmp
default-storage-engine=INNODB
disabled_storage_engines=MyISAM,BLACKHOLE,FEDERATED,CSV,ARCHIVE
max_connections=500
max_allowed_packet=32M

default_authentication_plugin=mysql_native_password
binlog_checksum=NONE
binlog_transaction_dependency_tracking=WRITESET
transaction_write_set_extraction=XXHASH64
loose-group_replication_group_name="1ffa8769-dacd-4803-a63a-ef33b1647ff4"
loose-group_replication_start_on_boot=OFF
loose-group_replication_local_address="master:33061"
loose-group_replication_group_seeds="master:33061,slave01:33062,slave02:33063"
loose-group_replication_bootstrap_group=OFF
loose-group_replication_ip_whitelist="master,slave0l,slave02,manager"
EOF

# 主库db02配置文件编写
cat >/etc/my.cnf <<EOF
[client]
socket=/tmp/mysql.sock
[mysqld]
user=mysql
basedir=/usr/local/mysql
datadir=/data/3306/data
log_bin=/data/3306/binlog
server_id=52
socket=/tmp/mysql.sock

gtid_mode=ON
enforce-gtid-consistency=ON
master_info_repository=TABLE
relay_log_info_repository=TABLE
log_slave_updates=ON
tmpdir=/tmp
default-storage-engine=INNODB
disabled_storage_engines=MyISAM,BLACKHOLE,FEDERATED,CSV,ARCHIVE
max_connections=500
max_allowed_packet=16M

default_authentication_plugin=mysql_native_password
binlog_checksum=NONE
binlog_transaction_dependency_tracking=WRITESET
plugin_load_add='group_replication.so'
transaction_write_set_extraction=XXHASH64
loose-group_replication_group_name="1ffa8769-dacd-4803-a63a-ef33b1647ff4"
loose-group_replication_start_on_boot=OFF
loose-group_replication_local_address="slave01:33062"
loose-group_replication_group_seeds="master:33061,slave01:33062,slave02:33063"
loose-group_replication_bootstrap_group=OFF
loose-group_replication_ip_whitelist="master,slave0l,slave02,manager"
loose-group_replication_ip_allow_local_disjoint_gtids_join=ON
EOF

# 主库db03配置文件编写
cat >/etc/my.cnf <<EOF
[client]
socket=/tmp/mysql.sock
[mysqld]
user=mysql
basedir=/usr/local/mysql
datadir=/data/3306/data
log_bin=/data/3306/binlog
server_id=53
socket=/tmp/mysql.sock
gtid_mode=ON
enforce_gtid_consistency=ON
master_info_repository=TABLE
relay_log_info_repository=TABLE
log_slave_updates=ON
tmpdir=/tmp
default-storage-engine=INNODB
disabled_storage_engines=MyISAM,BLACKHOLE,FEDERATED,CSV,ARCHIVE
max_connections=500
max_allowed_packet=16M
default_authentication_plugin=mysql_native_password
binlog_checksum=NONE
binlog_transaction_dependency_tracking=WRITESET
transaction_write_set_extraction=XXHASH64
loose-group_replication_group_name="1ffa8769-dacd-4803-a63a-ef33b1647ff4"
loose-group_replication_start_on_boot=OFF
loose-group_replication_local_address="slave02:33063"
loose-group_replication_group_seeds="master:33061,slave01:33062,slave02:33063"
loose-group_replication_bootstrap_group=OFF
loose-group_replication_ip_whitelist="master,slave0l,slave02,manager"
loose-group_replication_ip_allow_local_disjoint_gtids_join=OFF
EOF

# 所有节点初始化
[root@db02 ~ 13:54]# mysqld --initialize-insecure --user=mysql --basedir=/usr/local/mysql --datadir=/data/3306/data

# 所有节点启动
[root@db01 ~ 13:57]# systemctl start mysqld
第三步:添加实例到mysqlsh中,使mysqlsh可以批量管理所有数据库节点
mysql
alter user root@'localhost' identified with mysql_native_password by '123';
-- 所有节点创建root管理用户并设置密码

# 初始化配置集群节点实例(所有数据库节点均操作)
mysqlsh
shell.connect('root@localhost:3306');
dba.configureLocalInstance();
dba.checkInstanceConfiguration("root@localhost:3306");
-- 显示OK就可以了(所有节点)

[root@db03 ~ 14:04]# mysqlsh
Please provide the password for 'root@/tmp%2Fmysql.sock': ***
Save password for 'root@/tmp%2Fmysql.sock'? [Y]es/[N]o/Ne[v]er (default No): Y
MySQL Shell 8.0.32

Copyright (c) 2016, 2023, Oracle and/or its affiliates.
Oracle is a registered trademark of Oracle Corporation and/or its affiliates.
Other names may be trademarks of their respective owners.

Type '\help' or '\?' for help; '\quit' to exit.
Creating a Classic session to 'root@/tmp%2Fmysql.sock'
Fetching schema names for auto-completion... Press ^C to stop.
Your MySQL connection id is 263
Server version: 8.0.26 MySQL Community Server - GPL
No default schema selected; type \use <schema> to set one.
 MySQL  localhost  JS > shell.connect('root@localhost:3306');
Creating a session to 'root@localhost:3306'
Please provide the password for 'root@localhost:3306': ***
Save password for 'root@localhost:3306'? [Y]es/[N]o/Ne[v]er (default No): Y
Fetching schema names for auto-completion... Press ^C to stop.
Closing old connection...
Your MySQL connection id is 268
Server version: 8.0.26 MySQL Community Server - GPL
No default schema selected; type \use <schema> to set one.
<ClassicSession:root@localhost:3306>
 MySQL  localhost:3306 ssl  JS > dba.configureLocalInstance();
Configuring local MySQL instance listening at port 3306 for use in an InnoDB cluster...

This instance reports its own address as db03:3306
Clients and other cluster members will communicate with it through this address by default. If this is not correct, the report_host MySQL system variable should be changed.

ERROR: User 'root' can only connect from 'localhost'. New account(s) with proper source address specification to allow remote connection from all instances must be created to manage the cluster.

1) Create remotely usable account for 'root' with same grants and password
2) Create a new admin account for InnoDB cluster with minimal required grants
3) Ignore and continue
4) Cancel

Please select an option [1]: 1
Please provide a source address filter for the account (e.g: 192.168.% or % etc) or leave empty and press Enter to cancel.
Account Host: %

applierWorkerThreads will be set to the default value of 4.

NOTE: Some configuration options need to be fixed:
+-------------------------------+---------------+----------------+----------------------------+
| Variable                      | Current Value | Required Value | Note                       |
+-------------------------------+---------------+----------------+----------------------------+
| replica_parallel_type         | DATABASE      | LOGICAL_CLOCK  | Update the server variable |
| replica_preserve_commit_order | OFF           | ON             | Update the server variable |
+-------------------------------+---------------+----------------+----------------------------+

Do you want to perform the required configuration changes? [y/n]: y

Cluster admin user 'root'@'%' created.
Configuring instance...
The instance 'db03:3306' was configured to be used in an InnoDB cluster.
 MySQL  localhost:3306 ssl  JS > dba.checkInstanceConfiguration("root@localhost:3306");
Validating local MySQL instance listening at port 3306 for use in an InnoDB cluster...

This instance reports its own address as db03:3306
Clients and other cluster members will communicate with it through this address by default. If this is not correct, the report_host MySQL system variable should be changed.

Checking whether existing tables comply with Group Replication requirements...
No incompatible tables detected

Checking instance configuration...
Instance configuration is compatible with InnoDB cluster

The instance 'db03:3306' is valid to be used in an InnoDB cluster.

{
    "status": "ok"
}
 MySQL  localhost:3306 ssl  JS >     # ctrl + d 退出
Bye!
第四步:构建MGR主从架构
mysqlsh
shell.connect('root@master:3306');
var cluster=dba.createCluster('xiaoQ');  == change master to master_user='repl',master_password='123' for channel
                                            set global group_replication_bootstrap_group=ON;
                                            start group_replication;
                                            set global group_replication_bootstrap_group=OFF;
-- 创建出MGR群组
cluster.status();                        == select * from performance_schema.replication_group_members;
-- 查看群组信息

[root@manager ~ 14:23]# mysqlsh
MySQL Shell 8.0.32

Copyright (c) 2016, 2023, Oracle and/or its affiliates.
Oracle is a registered trademark of Oracle Corporation and/or its affiliates.
Other names may be trademarks of their respective owners.

Type '\help' or '\?' for help; '\quit' to exit.
 MySQL  JS > shell.connect('root@master:3306');
Creating a session to 'root@master:3306'
Please provide the password for 'root@master:3306': ***
Save password for 'root@master:3306'? [Y]es/[N]o/Ne[v]er (default No): Y
Fetching schema names for auto-completion... Press ^C to stop.
Your MySQL connection id is 18
Server version: 8.0.26 MySQL Community Server - GPL
No default schema selected; type \use <schema> to set one.
<ClassicSession:root@master:3306>
 MySQL  master:3306 ssl  JS > var cluster=dba.createCluster('xiaoQ');
A new InnoDB Cluster will be created on instance 'db01:3306'.

Validating instance configuration at master:3306...

This instance reports its own address as db01:3306

Instance configuration is suitable.
NOTE: Group Replication will communicate with other members using 'db01:33061'. Use the localAddress option to override.

Creating InnoDB Cluster 'xiaoQ' on 'db01:3306'...

Adding Seed Instance...
Cluster successfully created. Use Cluster.addInstance() to add MySQL instances.
At least 3 instances are needed for the cluster to be able to withstand up to
one server failure.

 MySQL  master:3306 ssl  JS > cluster.status();
 {
    "clusterName": "xiaoQ",
    "defaultReplicaSet": {
        "name": "default",
        "primary": "db01:3306",
        "ssl": "REQUIRED",
        "status": "OK_NO_TOLERANCE",
        "statusText": "Cluster is NOT tolerant to any failures.",
        "topology": {
            "db01:3306": {
                "address": "db01:3306",
                "memberRole": "PRIMARY",
                "mode": "R/W",
                "readReplicas": {},
                "replicationLag": "applier_queue_applied",
                "role": "HA",
                "status": "ONLINE",
                "version": "8.0.26"
            }
        },
        "topologyMode": "Single-Primary"
    },
    "groupInformationSourceMember": "db01:3306"
}


# 将从库节点(slave01和slave02)均添加到MGR集群中;
mysqlsh
shell.connect('root@master:3306');
var cluster=dba.getCluster('xiaoQ');     == 切换到xiaoQ群组中
cluster.addInstance('root@slave01:3306');  ==  加入指定节点信息到群组中
cluster.addInstance('root@slave02:3306');
cluster.status();
第五步:构建MIC集群mysql-router中间件
cd /etc/
mysqlrouter --bootstrap root@master:3306 -d myrouter --user=root

cd /etc/myrouter/
./start.sh
netstat -lntup
-- 是否有6446和6447端口

# 进行router代理程序连接测试
mysqlsh -uri root@localhost:6446
等价于
mysql -uroot -h127.0.0.1 -P6446 -p

# 读写分离测试
mysql -uroot -P6446 -h10.0.0.54 -p
select @@serrver_id;
-- 写的请求访问的端口
mysql -uroot -P6447 -h10.0.0.54 -p
select @@serrver_id;
-- 读的请求访问的端口
06 架构构建收尾验证操作
建立MGR+mysqlshell+mysqlrouter之后,进行集群功能验证:
- 登录主节点数据库后,新建一个数据表,并在表中插入数据,查看从节点数据会不会进行同步;
- 关闭master的数据库服务,router代理程序会将主节点自动切换到slave01、slave01从只读变更为可读写;重新启动master数据库服务后,master节点变为只读模式;
- 验证读写分离功能是否实现:
07 架构构建异常重置操作
当架构构建失败,出现未知异常错误的时候,可以将主节点配置信息清空,重新进行架构集群构建;
# 在数据库主节点进行操作
[root@master local]# mysqlsh
MvSQL JS > shell connect('root@master:3306');
MySQL JS > dba.dropMetadataSchema();
[root@master local]# mysql
mysql > stop group_replication;
mysql > reset master;
-- 清空日志,确保和从库的表没有冲突
mysql > reset slave;

# 在数据库从节点进行操作(主要清理和主库有关的主从信息,确保主库和从库的表没有冲突)
[root@slave local]# mysql
mysql > stop group_replication;
mysql > reset master;
mysql > reset slave;
数据库服务架构集群管理命令
集群节点信息查询命令
# 连接主节点,并进行定义
[root@manager myrouter]# mysqlsh
MySQL Shell 8.0.32
MySQL JS > shell.connect('root@master:3306');
MySQL JS > var cluster=dba.getCluster('xiaoQ');

# 检查节点是否符合集群标准
dba.checkInstanceConfiguration('root@master:3306');

# 集群结构信息描述
cluster.describe();

# 集群状态总览(常用)
cluster.status();

# 查看集群名字
dba.getCluster();

#查看router信息
cluster.listRouters();
集群节点创建管理命令
# 创建集群节点 dba.createCluster()
> var cluster=dba.createCluster('xiaoQ');

#添加集群节点 Cluster.addInstance()
> cluster.addInstance('root@slave0l:3306');

#移除集群节点Cluster.removeInstance()
> cluster.removeInstance('root@slave01:3306');

# 重新识别节点 Cluster.rejoinInstance()
> cluster.rejoinInstance('root@slave01:3306');
-- 如果实例离开集群,比如:丢失连接、并且没有自动重新加入集群,可以通过Cluster.rejoinInstance()方法将实例重新加入;

# 在线切换实例 Cluster.setPrimaryInstance(instance)
> cluster.setPrimaryInstance('root@slave01:3306');
> cluster.status();
> cluster.setPrimaryInstance('root@master:3306')

# 在线切换扩展
> cluster.switchToMultiPrimaryMode();
-- 切换为多primary模式
> cluster.switchToSinglePrimaryMode('root@master:3306');
-- 切换为单primary模式
-- 在切换为多primary模式后
-- 6447端口(默认只读)接收读写,并且可通过该端口访问所有集群成员;
-- 6446端口(默认读写),只能连接到其中一个成员(之前的primary成员);
集群节点故障处理操作
> dba.rebootClusterFromCompleteOutage();
-- 用于在集群完全断电后重新配置集群,如果以上操作失败,可以通过以下方式删除所有集群元数据;

> dba.dropMetadataSchema();
-- 删除集群元数据,然后dba.createCluster()重建集群;

> cluster.removeRouterMetadata(router);
-- 删除已经注册的router

MySQL  master:3306 ssl  JS > cluster.
addInstance()                    getName()                        setInstanceOption()
checkInstanceState()             help()                           setOption()
createClusterSet()               listRouters()                    setPrimaryInstance()
describe()                       name                             setupAdminAccount()
disconnect()                     options()                        setupRouterAccount()
dissolve()                       rejoinInstance()                 status()
fenceAllTraffic()                removeInstance()                 switchToMultiPrimaryMode()
fenceWrites()                    removeRouterMetadata()           switchToSinglePrimaryMode()
forceQuorumUsingPartitionOf()    rescan()                         unfenceWrites()
getClusterSet()                  resetRecoveryAccountsPassword()
 MySQL  master:3306 ssl  JS > dba.
checkInstanceConfiguration()       deploySandboxInstance()            rebootClusterFromCompleteOutage()
configureInstance()                dropMetadataSchema()               session
configureLocalInstance()           getCluster()                       startSandboxInstance()
configureReplicaSetInstance()      getClusterSet()                    stopSandboxInstance()
createCluster()                    getReplicaSet()                    upgradeMetadata()
createReplicaSet()                 help()                             verbose
deleteSandboxInstance()            killSandboxInstance()