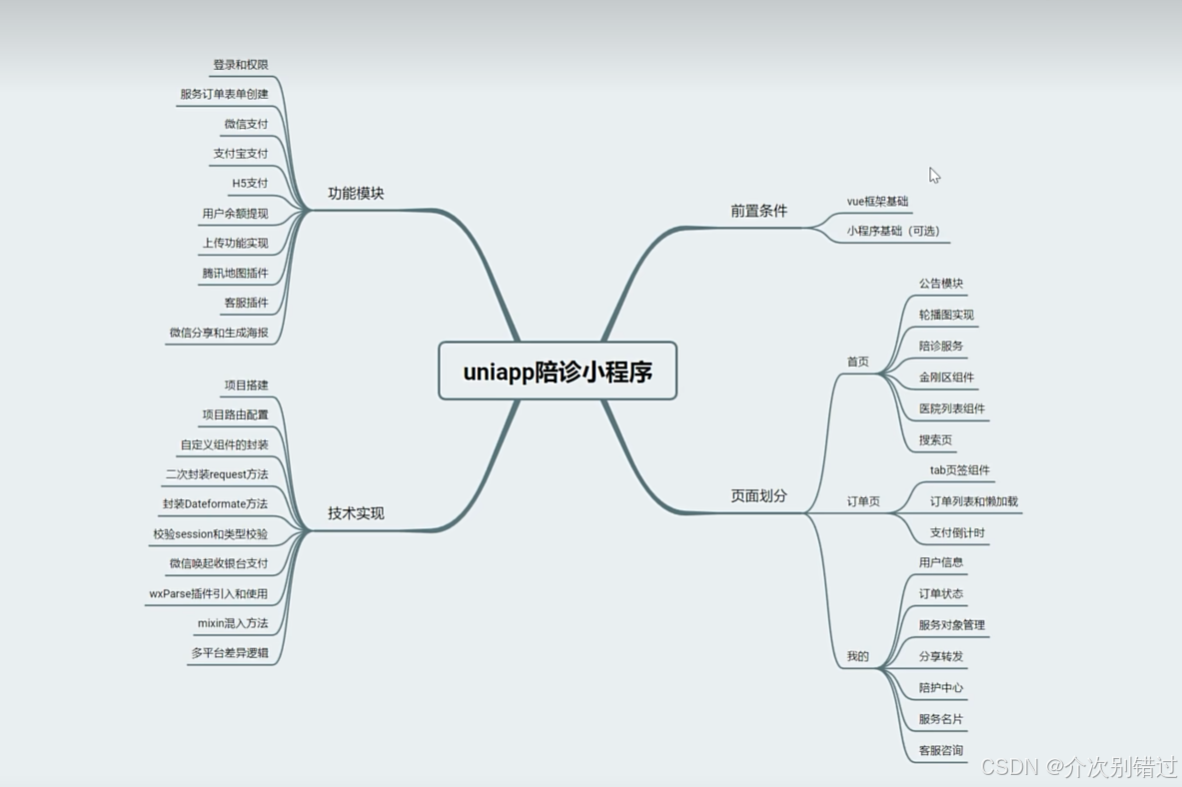
陪诊小程序之uniapp(从入门到精通)
1.uniapp如何使用vue3编写页面
<template>
	<view class="content">
		<navbar name="navbar组件"></navbar>
		<image class="logo" src="/static/logo.png"></image>
		<view class="text-area">
			<text class="title">{{title}}</text>
		</view>
		<view class="">
			11111
		</view>
		<button @click="handleClick">点我</button>
		<text>总共购买的水果数量{{totalNum}}</text>
		<my-component></my-component>
		<aComponent></aComponent>
		<navbar></navbar>
		<view v-for="item in list" :key="item.name">
			<view>
				1111
			</view>
			<text>{{item.name}}</text>
			<text>{{item.num}}</text>
		</view>
	</view>
</template>

<script setup>
	import  aComponent  from '../../../project/component/component.vue';

	import{ref,reactive,computed} from 'vue'
	import{onLoad} from '@dcloudio/uni-app'
	const title=ref('Hello')
	const list=reactive([
		{name:'apple',num:1},
		{name:'orange',num:2},
		{name:'banana',num:3}
	])
	const handleClick=()=>{
		list.forEach(item=>{
			item.num++
		})
	}
	onLoad(()=>{
		console.log('onLode生命周期')
	})
	const totalNum=computed(()=>{
		return list.reduce((total,cur)=>total+cur.num,0)
	})
</script>

<style>
	.content {
		display: flex;
		flex-direction: column;
		align-items: center;
		justify-content: center;
	}

	.logo {
		height: 200rpx;
		width: 200rpx;
		margin-top: 200rpx;
		margin-left: auto;
		margin-right: auto;
		margin-bottom: 50rpx;
	}

	.text-area {
		display: flex;
		justify-content: center;
	}

	.title {
		font-size: 36rpx;
		color: #8f8f94;
	}
</style>
引入组件的三种方式
全局引入
1.引入
import componentVue from './component/component.vue'
2.全局注册
export function createApp() {
const app = createSSRApp(App)
app.component('my-component',componentVue)
return {
app
}
}
3.页面中引入
<my-component></my-component>
局部引入
<script setup>
import aComponent from '../../../project/component/component.vue';
import{ref,reactive,computed} from 'vue'
import{onLoad} from '@dcloudio/uni-app'
const title=ref('Hello')
const list=reactive([
{name:'apple',num:1},
{name:'orange',num:2},
{name:'banana',num:3}
])
const handleClick=()=>{
list.forEach(item=>{
item.num++
})
}
onLoad(()=>{
console.log('onLode生命周期')
})
const totalNum=computed(()=>{
return list.reduce((total,cur)=>total+cur.num,0)
})
</script>
<aComponent></aComponent>自动引入
新建文件夹然后新建组件
组件引入
<navbar></navbar>2.uniapp组件通信props和$emit和插槽语法
props
组件
<template>
	<view>
		navbar组件
	</view>
</template>

<script setup>
import { defineProps } from 'vue';
defineProps(['name','content'])

</script>

<style>

</style>
组件引入数据
<navbar name="navbar组件" :content="data"></navbar>父组件(页面)向子组件传值,如果没传就用默认值
<template>
	<view>
		navbar组件
		<view>组件的name属性{{name}}</view>
		<view>组件的content属性{{content}}</view>

	</view>
</template>

<script setup>
import { defineProps } from 'vue';
// defineProps(['name','content'])
defineProps({
name:String,
	content:{
		type:String,
		default:()=>{
			return '默认值';
		}
	}
})

</script>

<style>

</style>
$emit
navbar.vue
<template>
<view>
navbar组件
<view>组件的name属性{{name}}</view>
<view>组件的content属性{{content}}</view>
<button @click="handleChange">修改content</button>
</view>
</template><script setup>
import { defineProps,defineEmits } from 'vue';
// defineProps(['name','content'])
defineProps({
name:String,
content:{
type:String,
default:()=>{
return '默认值';
}
}
})
const emit=defineEmits(['changeData'])
const handleChange=()=>{
emit('changeData','修改后的数据')
}</script>
<style>
</style>
<navbar :name="navbar组件" :content="data" @changeData="changeData"></navbar>
插槽语法
<navbar :name="navbar组件" :content="data" @changeData="changeData">
<view>我是插槽的内容</view>
</navbar>
<template>
<view>组件</view>
<view>组件的name属性{{name}}</view>
<view>组件的content属性{{content}}</view>
<slot></slot>
<button @click="handleChange">修改content</button>
</template><script setup>
import { defineProps,defineEmits } from 'vue';
// defineProps(['name','content'])
defineProps({
name:String,
content:{
type:String,
default:()=>{
return '默认值';
}
}
})
const emit=defineEmits(['changeData'])
const handleChange=()=>{
emit('changeData','修改后的数据')
}</script>
<style>
</style>
3.系统参数获取和navBar组件样式动态设计
<template>
	<view class="nav">
		<view :style="'height:'+status+'rpx;'+containerStyle">

		</view>
		<view class="navbar" :style="'height:'+navHeight+'rpx;'+containerStyle"></view>
	</view>
</template>

<script setup>
	import { ref,onBeforeMount,defineProps } from 'vue';
	const props=defineProps({
		background:{
			type:String,
			default:'rgba(255,255,255,1)'
		},
		color:{
			type:String,
			default:'rgba(0,0,0,1)'
		},
		fontSize:{
		type:String,
			default:32
		},
		icoWidth:{
			type:String,
			default:116
		},
		iconHeight:{
			type:String,
			default:38
		}

	})
	onBeforeMount(()=>{
		setNavSize()
		setStyle()
	})
	//状态栏高度
	const status=ref(0)
	//内容高度
	const navHeight=ref(0)
	//背景颜色
	const containerStyle=ref('')
	//字体样式
	const textStyle=ref('')
	//图标的样式
	const iconStyle=ref('')

	//计算状态栏高度
	const setNavSize=()=>{
		const {system,statusBarHeight}=uni.getSystemInfoSync()
		status.value=statusBarHeight*2
		// console.log(res)
		const isiOS=system.indexOf('iOS')>-1
		if(!isiOS){
			navHeight.value=96
		}else{
			navHeight.value=88


		}
		// console.log(res)
	}
	const setStyle=()=>{
	containerStyle.value=['background:'+props.background].join(";")
		textStyle.value=['color:'+props.color,'font-size'+props.fontSize+'rpx'].join(';')
		iconStyle.value=['width:'+props.icoWidth+'rpx','height:'+props.iconHeight+'rpx'].join(';')

	}


</script>

<style>
	.nav{
		position: fixed;
		width: 100%;
		top: 0;
		left: 0;
		z-index: 2;
	}

	</style>
4.页面栈获取和navBar跳转逻辑实现
index.vue
<template>
	<view class="content">
	<navbar titleText="首页"></navbar>
	<button style="margin-top: 130rpx;" @click="navigateTo">跳转</button>
	</view>
</template>

<script setup>
	import  aComponent  from '../../../project/component/component.vue';

	import{ref,reactive,computed} from 'vue'
	import{onLoad} from '@dcloudio/uni-app'
	const data=ref("动态数组")
	const title=ref('Hello')
	const list=reactive([
		{name:'apple',num:1},
		{name:'orange',num:2},
		{name:'banana',num:3}
	])
	const handleClick=()=>{
		list.forEach(item=>{
			item.num++
		})
	}
	const changeData=(val)=>{
		data.value=val
	}
	onLoad(()=>{
		console.log('onLode生命周期')
	})
	const totalNum=computed(()=>{
		return list.reduce((total,cur)=>total+cur.num,0)
	})
	const navigateTo=()=>{
		console.log(1111)
		uni.navigateTo({

			url:'/pages/search/index'
		})
	}

</script>

<style>
	.content {
		display: flex;
		flex-direction: column;
		align-items: center;
		justify-content: center;
	}

	.logo {
		height: 200rpx;
		width: 200rpx;
		margin-top: 200rpx;
		margin-left: auto;
		margin-right: auto;
		margin-bottom: 50rpx;
	}

	.text-area {
		display: flex;
		justify-content: center;
	}

	.title {
		font-size: 36rpx;
		color: #8f8f94;
	}

</style>
navbar.vue
<template>
	<view class="nav">
		<view :style="'height:'+status+'rpx;'+containerStyle"></view>

		<view class="navbar" :style="'height:'+navHeight+'rpx;'+containerStyle">
			<view class="back-icon" @click="backOrHome">
				<image v-if="pages>1" src="../../static/resource/navbar/ic_back.png" mode=""></image>
				<image v-else src="../../static/resource/navbar/ic_home.png" mode=""></image>
			</view>
			<view class="nav-title" v-if="titleText">
			<view :style="'height:'+navHeight+'rpx;line-height:'+navHeight+'rpx;'+textStyle">
				{{titleText}}
			</view>
			</view>


	</view>
	</view>
</template>

<script setup>
	import { ref,onBeforeMount,defineProps } from 'vue';
	const props=defineProps({
		background:{
			type:String,
			default:'rgba(255,255,255,1)'
		},
		color:{
			type:String,
			default:'rgba(0,0,0,1)'
		},
		fontSize:{
		type:String,
			default:32
		},
		icoWidth:{
			type:String,
			default:116
		},
		iconHeight:{
			type:String,
			default:38
		},
		titleText:{
			type:String,
			default:''
		}
	})
	onBeforeMount(()=>{
		setNavSize()
		setStyle()
		// const pages = getCurrentPages().length;
		//     console.log('当前页面栈的长度:', pages);
	})
	//状态栏高度
	const status=ref(0)
	//内容高度
	const navHeight=ref(0)
	//背景颜色
	const containerStyle=ref('')
	//字体样式
	const textStyle=ref('')
	//图标的样式
	const iconStyle=ref('')
	//页面栈的数量
	const pages=ref(getCurrentPages().length)
	console.log(pages.value,'page')
	//计算状态栏高度
	const setNavSize=()=>{
		const {system,statusBarHeight}=uni.getSystemInfoSync()
		status.value=statusBarHeight*2
		// console.log(res)
		const isiOS=system.indexOf('iOS')>-1
		if(!isiOS){
			navHeight.value=96
		}else{
			navHeight.value=88


		}
		// console.log(res)
	}
	const setStyle=()=>{
	containerStyle.value=['background:'+props.background].join(";")
		textStyle.value=['color:'+props.color,'font-size'+props.fontSize+'rpx'].join(';')
		iconStyle.value=['width:'+props.icoWidth+'rpx','height:'+props.iconHeight+'rpx'].join(';')

	}
	const backOrHome=()=>{
		if(pages.value>1){
			uni.navigateBack();
		}else{
			uni.switchTab({
				url:'/pages/index/index'
			})
		}
	}

</script>

<style>
	.nav{
		position: fixed;
		width: 100%;
		top: 0;
		left: 0;
		z-index: 2;
	}
	.back-icon{
		display: flex;
		align-items: center;
		width: 64rpx;
		height: 100%;
		margin-left:20rpx ;
	}
	.back-icon image{
		width: 64rpx;
		height: 64rpx;
	}
	.navbar{
		position:relative;
	}
	.nav-title{
	position: absolute;
		top: 0;
		left: 50%;
		transform: translate(-50%);

	}
	</style>