H7-TOOL的LUA小程序教程第15期:电压,电流,NTC热敏电阻以及4-20mA输入(2024-10-21,已经发布)
LUA脚本的好处是用户可以根据自己注册的一批API(当前TOOL已经提供了几百个函数供大家使用),实现各种小程序,不再限制Flash里面已经下载的程序,就跟手机安装APP差不多,所以在H7-TOOL里面被广泛使用,支持在线调试运行,支持离线运行。TOOL的LUA教程争取做到大家可以无痛调用各种功能函数,不需要学习成本。
简介
电压,电流,NTC热敏电阻以及4-20mA输入,可以在上位机端设置,也可以显示屏端设置
详细使用说明可以看在线或者离线操作说明手册:H7-TOOL操作说明和客户常见问题汇总贴,含PDF离线版(2024-08-16) - H7-TOOL开发工具 - 硬汉嵌入式论坛 - Powered by Discuz!
建议优先熟悉下,特别是这几个功能对应使用的引脚。

LUA函数说明:
1、启动模拟量采集。
启动模拟量采集仅需用到两个大类配置,一个负载电流测量,还有一个低速多通道。
所以启动模拟信号采集封装了两种配置
(1)负载电流测量,配置代码固定如下:
function start_dso(void)
        write_reg16(0x01FF, 1) -- 测量模式 0:示波器 1:负载电流 2:多路低速扫描
        write_reg16(0x0200, 1) -- CH1耦合,0:AC 1:DC
        write_reg16(0x0201, 1) -- CH2耦合,0:AC 1:DC

        --量程取值 0:±13.8V 1:±6.4V 2:±3.2V 3:±1.6V 4:±800mV 5:±400mV 6:±200mV 7:±100mV
        write_reg16(0x0202, 0) -- CH1量程
        write_reg16(0x0203, 0) -- CH2量程
        write_reg16(0x0204, 0) -- CH1通道直流偏值,未用
        write_reg16(0x0205, 0) -- CH2通道直流偏值,未用
        write_reg16(0x0206, 12) --采样频率 0:100 1:200 2:500 3:1K 4:2K 5:5K 6:10K 7:20K
                                                        --8:50K 9:100K 10:200K 11:500K 12:1M 13:2M 14:5M
        write_reg16(0x0207, 0) --采样深度 0:1K 1:2K 3:4K 4:8K 5:16K 6:32K
        write_reg16(0x0208, 32768) --触发电平ADC 0-65535
        write_reg16(0x0209, 50) --触发位置百分比 0-100
        write_reg16(0x020A, 0) --触发模式 0:自动 1:普通 2:单次
        write_reg16(0x020B, 0) --触发通道 0:CH1 1:CH2
        write_reg16(0x020C, 0) --触发边沿 0:下降沿 1:上升沿
        write_reg16(0x020D, 0x03) --通道使能控制 bit0 = CH1  bit1 = CH2
        write_reg16(0x020E, 1) --采集控制 0:停止 1:启动
  end
(2)低速多通道测量,配置代码固定如下:
--启动模拟量电路
function start_dso(void)
        write_reg16(0x01FF, 2) -- 测量模式 0:示波器 1:负载电流 2:多路低速扫描
        write_reg16(0x0200, 1) -- CH1耦合,0:AC 1:DC
        write_reg16(0x0201, 1) -- CH2耦合,0:AC 1:DC

        --量程取值 0:±13.8V 1:±6.4V 2:±3.2V 3:±1.6V 4:±800mV 5:±400mV 6:±200mV 7:±100mV
        write_reg16(0x0202, 0) -- CH1量程
        write_reg16(0x0203, 0) -- CH2量程
        write_reg16(0x0204, 0) -- CH1通道直流偏值,未用
        write_reg16(0x0205, 0) -- CH2通道直流偏值,未用
        write_reg16(0x0206, 12) --采样频率 0:100 1:200 2:500 3:1K 4:2K 5:5K 6:10K 7:20K
                                                        --8:50K 9:100K 10:200K 11:500K 12:1M 13:2M 14:5M
        write_reg16(0x0207, 0) --采样深度 0:1K 1:2K 3:4K 4:8K 5:16K 6:32K
        write_reg16(0x0208, 32768) --触发电平ADC 0-65535
        write_reg16(0x0209, 50) --触发位置百分比 0-100
        write_reg16(0x020A, 0) --触发模式 0:自动 1:普通 2:单次
        write_reg16(0x020B, 0) --触发通道 0:CH1 1:CH2
        write_reg16(0x020C, 0) --触发边沿 0:下降沿 1:上升沿
        write_reg16(0x020D, 0x03) --通道使能控制 bit0 = CH1  bit1 = CH2
        write_reg16(0x020E, 1) --采集控制 0:停止 1:启动
  end
2、测量函数,读取模拟值
测量函数比较简单,周期调用即可,建议100ms以上读取一次,因为所有数据100ms更新一轮
read_analog(9) --9 - 读取4-20mA
(1)电压读取
read_analog(0) -- 0 - CH1电压
read_analog(1) -- 1 - CH2电压
举例:每500ms读取一次CH1和CH2通道电压
实现代码如下:
--启动模拟量电路
function start_dso(void)
        write_reg16(0x01FF, 2) -- 测量模式 0:示波器 1:负载电流 2:多路低速扫描
        write_reg16(0x0200, 1) -- CH1耦合,0:AC 1:DC
        write_reg16(0x0201, 1) -- CH2耦合,0:AC 1:DC

        --量程取值 0:±13.8V 1:±6.4V 2:±3.2V 3:±1.6V 4:±800mV 5:±400mV 6:±200mV 7:±100mV
        write_reg16(0x0202, 0) -- CH1量程
        write_reg16(0x0203, 0) -- CH2量程
        write_reg16(0x0204, 0) -- CH1通道直流偏值,未用
        write_reg16(0x0205, 0) -- CH2通道直流偏值,未用
        write_reg16(0x0206, 12) --采样频率 0:100 1:200 2:500 3:1K 4:2K 5:5K 6:10K 7:20K
                                                        --8:50K 9:100K 10:200K 11:500K 12:1M 13:2M 14:5M
        write_reg16(0x0207, 0) --采样深度 0:1K 1:2K 3:4K 4:8K 5:16K 6:32K
        write_reg16(0x0208, 32768) --触发电平ADC 0-65535
        write_reg16(0x0209, 50) --触发位置百分比 0-100
        write_reg16(0x020A, 0) --触发模式 0:自动 1:普通 2:单次
        write_reg16(0x020B, 0) --触发通道 0:CH1 1:CH2
        write_reg16(0x020C, 0) --触发边沿 0:下降沿 1:上升沿
        write_reg16(0x020D, 0x03) --通道使能控制 bit0 = CH1  bit1 = CH2
        write_reg16(0x020E, 1) --采集控制 0:停止 1:启动
  end

print("启动电压测量")
start_dso() -- 调用一次初始化

for i = 1, 10, 1 do -- 读取10次
data1 = read_analog(0) -- 0 - CH1电压
data2 = read_analog(1) -- 1 - CH2电压
print(string.format("CH1电压:%f,CH2电压:%f", data1,data2))
delayms(500)
end
实际效果:

(2)高侧负载测量
read_analog(2) --2 - 高侧负载电压
read_analog(3) --3 - 高端负载电流
举例:每500ms读取一次
实现代码如下
--启动模拟量电路
function start_dso(void)
        write_reg16(0x01FF, 1) -- 测量模式 0:示波器 1:负载电流 2:多路低速扫描
        write_reg16(0x0200, 1) -- CH1耦合,0:AC 1:DC
        write_reg16(0x0201, 1) -- CH2耦合,0:AC 1:DC

        --量程取值 0:±13.8V 1:±6.4V 2:±3.2V 3:±1.6V 4:±800mV 5:±400mV 6:±200mV 7:±100mV
        write_reg16(0x0202, 0) -- CH1量程
        write_reg16(0x0203, 0) -- CH2量程
        write_reg16(0x0204, 0) -- CH1通道直流偏值,未用
        write_reg16(0x0205, 0) -- CH2通道直流偏值,未用
        write_reg16(0x0206, 12) --采样频率 0:100 1:200 2:500 3:1K 4:2K 5:5K 6:10K 7:20K
                                                        --8:50K 9:100K 10:200K 11:500K 12:1M 13:2M 14:5M
        write_reg16(0x0207, 0) --采样深度 0:1K 1:2K 3:4K 4:8K 5:16K 6:32K
        write_reg16(0x0208, 32768) --触发电平ADC 0-65535
        write_reg16(0x0209, 50) --触发位置百分比 0-100
        write_reg16(0x020A, 0) --触发模式 0:自动 1:普通 2:单次
        write_reg16(0x020B, 0) --触发通道 0:CH1 1:CH2
        write_reg16(0x020C, 0) --触发边沿 0:下降沿 1:上升沿
        write_reg16(0x020D, 0x03) --通道使能控制 bit0 = CH1  bit1 = CH2
        write_reg16(0x020E, 1) --采集控制 0:停止 1:启动
  end

print("启动高侧测量")
start_dso() -- 调用一次初始化

for i = 1, 10, 1 do -- 读取10次
data1 = read_analog(2) --2 - 高侧负载电压
data2 = read_analog(3) --3 - 高端负载电流
print(string.format("负载电压:%f,负载电流:%f", data1,data2))
delayms(500)
end
实际效果:

(3)TVCC测量
read_analog(4) --4 - TVCC电压
read_analog(5) --5 - TVCC电流
举例:每500ms读取一次
实现代码如下:
--启动模拟量电路
function start_dso(void)
        write_reg16(0x01FF, 2) -- 测量模式 0:示波器 1:负载电流 2:多路低速扫描
        write_reg16(0x0200, 1) -- CH1耦合,0:AC 1:DC
        write_reg16(0x0201, 1) -- CH2耦合,0:AC 1:DC

        --量程取值 0:±13.8V 1:±6.4V 2:±3.2V 3:±1.6V 4:±800mV 5:±400mV 6:±200mV 7:±100mV
        write_reg16(0x0202, 0) -- CH1量程
        write_reg16(0x0203, 0) -- CH2量程
        write_reg16(0x0204, 0) -- CH1通道直流偏值,未用
        write_reg16(0x0205, 0) -- CH2通道直流偏值,未用
        write_reg16(0x0206, 12) --采样频率 0:100 1:200 2:500 3:1K 4:2K 5:5K 6:10K 7:20K
                                                        --8:50K 9:100K 10:200K 11:500K 12:1M 13:2M 14:5M
        write_reg16(0x0207, 0) --采样深度 0:1K 1:2K 3:4K 4:8K 5:16K 6:32K
        write_reg16(0x0208, 32768) --触发电平ADC 0-65535
        write_reg16(0x0209, 50) --触发位置百分比 0-100
        write_reg16(0x020A, 0) --触发模式 0:自动 1:普通 2:单次
        write_reg16(0x020B, 0) --触发通道 0:CH1 1:CH2
        write_reg16(0x020C, 0) --触发边沿 0:下降沿 1:上升沿
        write_reg16(0x020D, 0x03) --通道使能控制 bit0 = CH1  bit1 = CH2
        write_reg16(0x020E, 1) --采集控制 0:停止 1:启动
  end

print("启动TVCC测量")
start_dso() -- 调用一次初始化

for i = 1, 10, 1 do -- 读取10次
data1 = read_analog(4) --4 - TVCC电压
data2 = read_analog(5) --5 - TVCC电流
print(string.format("TVCC电压:%f,TVCC电流:%f", data1,data2))
delayms(500)
end
(4)NTC热敏电阻测量
read_analog(6) --6 - NTC热敏电阻阻值
举例:每500ms读取一次
--启动模拟量电路
function start_dso(void)
        write_reg16(0x01FF, 2) -- 测量模式 0:示波器 1:负载电流 2:多路低速扫描
        write_reg16(0x0200, 1) -- CH1耦合,0:AC 1:DC
        write_reg16(0x0201, 1) -- CH2耦合,0:AC 1:DC

        --量程取值 0:±13.8V 1:±6.4V 2:±3.2V 3:±1.6V 4:±800mV 5:±400mV 6:±200mV 7:±100mV
        write_reg16(0x0202, 0) -- CH1量程
        write_reg16(0x0203, 0) -- CH2量程
        write_reg16(0x0204, 0) -- CH1通道直流偏值,未用
        write_reg16(0x0205, 0) -- CH2通道直流偏值,未用
        write_reg16(0x0206, 12) --采样频率 0:100 1:200 2:500 3:1K 4:2K 5:5K 6:10K 7:20K
                                                        --8:50K 9:100K 10:200K 11:500K 12:1M 13:2M 14:5M
        write_reg16(0x0207, 0) --采样深度 0:1K 1:2K 3:4K 4:8K 5:16K 6:32K
        write_reg16(0x0208, 32768) --触发电平ADC 0-65535
        write_reg16(0x0209, 50) --触发位置百分比 0-100
        write_reg16(0x020A, 0) --触发模式 0:自动 1:普通 2:单次
        write_reg16(0x020B, 0) --触发通道 0:CH1 1:CH2
        write_reg16(0x020C, 0) --触发边沿 0:下降沿 1:上升沿
        write_reg16(0x020D, 0x03) --通道使能控制 bit0 = CH1  bit1 = CH2
        write_reg16(0x020E, 1) --采集控制 0:停止 1:启动
  end

print("启动NTC热敏电阻测量")
start_dso() -- 调用一次初始化

for i = 1, 10, 1 do -- 读取10次
data1 = read_analog(6) --6 - NTC热敏电阻阻值
print(string.format("NTC热敏电阻:%f", data1))
delayms(500)
end
(5)供电电压测量
read_adc(7) --7 - 外部供电电压
read_analog(8) --8 - USB供电电压
举例:每500ms读取一次
--启动模拟量电路
function start_dso(void)
        write_reg16(0x01FF, 2) -- 测量模式 0:示波器 1:负载电流 2:多路低速扫描
        write_reg16(0x0200, 1) -- CH1耦合,0:AC 1:DC
        write_reg16(0x0201, 1) -- CH2耦合,0:AC 1:DC

        --量程取值 0:±13.8V 1:±6.4V 2:±3.2V 3:±1.6V 4:±800mV 5:±400mV 6:±200mV 7:±100mV
        write_reg16(0x0202, 0) -- CH1量程
        write_reg16(0x0203, 0) -- CH2量程
        write_reg16(0x0204, 0) -- CH1通道直流偏值,未用
        write_reg16(0x0205, 0) -- CH2通道直流偏值,未用
        write_reg16(0x0206, 12) --采样频率 0:100 1:200 2:500 3:1K 4:2K 5:5K 6:10K 7:20K
                                                        --8:50K 9:100K 10:200K 11:500K 12:1M 13:2M 14:5M
        write_reg16(0x0207, 0) --采样深度 0:1K 1:2K 3:4K 4:8K 5:16K 6:32K
        write_reg16(0x0208, 32768) --触发电平ADC 0-65535
        write_reg16(0x0209, 50) --触发位置百分比 0-100
        write_reg16(0x020A, 0) --触发模式 0:自动 1:普通 2:单次
        write_reg16(0x020B, 0) --触发通道 0:CH1 1:CH2
        write_reg16(0x020C, 0) --触发边沿 0:下降沿 1:上升沿
        write_reg16(0x020D, 0x03) --通道使能控制 bit0 = CH1  bit1 = CH2
        write_reg16(0x020E, 1) --采集控制 0:停止 1:启动
  end

print("启动供电电压测量")
start_dso() -- 调用一次初始化

for i = 1, 10, 1 do -- 读取10次
data1 = read_adc(7) --7 - 外部供电电压
data2 = read_analog(8) --8 - USB供电电压
print(string.format("外部供电电压:%f, USB供电电压:%f", data1, data2))
delayms(500)
end
(6)4-20mA测量
read_analog(9) -- 4-20mA测量
举例:每500ms读取一次
--启动模拟量电路
function start_dso(void)
        write_reg16(0x01FF, 2) -- 测量模式 0:示波器 1:负载电流 2:多路低速扫描
        write_reg16(0x0200, 1) -- CH1耦合,0:AC 1:DC
        write_reg16(0x0201, 1) -- CH2耦合,0:AC 1:DC

        --量程取值 0:±13.8V 1:±6.4V 2:±3.2V 3:±1.6V 4:±800mV 5:±400mV 6:±200mV 7:±100mV
        write_reg16(0x0202, 0) -- CH1量程
        write_reg16(0x0203, 0) -- CH2量程
        write_reg16(0x0204, 0) -- CH1通道直流偏值,未用
        write_reg16(0x0205, 0) -- CH2通道直流偏值,未用
        write_reg16(0x0206, 12) --采样频率 0:100 1:200 2:500 3:1K 4:2K 5:5K 6:10K 7:20K
                                                        --8:50K 9:100K 10:200K 11:500K 12:1M 13:2M 14:5M
        write_reg16(0x0207, 0) --采样深度 0:1K 1:2K 3:4K 4:8K 5:16K 6:32K
        write_reg16(0x0208, 32768) --触发电平ADC 0-65535
        write_reg16(0x0209, 50) --触发位置百分比 0-100
        write_reg16(0x020A, 0) --触发模式 0:自动 1:普通 2:单次
        write_reg16(0x020B, 0) --触发通道 0:CH1 1:CH2
        write_reg16(0x020C, 0) --触发边沿 0:下降沿 1:上升沿
        write_reg16(0x020D, 0x03) --通道使能控制 bit0 = CH1  bit1 = CH2
        write_reg16(0x020E, 1) --采集控制 0:停止 1:启动
  end

print("启动4-20mA测量")
start_dso() -- 调用一次初始化

for i = 1, 10, 1 do -- 读取10次
data1 = read_analog(9) -- 4-20mA测量
print(string.format("4-20mA读取:%f", data1, data2))
delayms(500)
end
测量的10mA,精度还是非常不错的

3、测量函数,直接读取ADC值
这个用法和第2步读取模拟值是完全一样的。只是这里获取的是ADC支持。
read_adc(0) --0 - CH1电压
read_adc(1) --1 - CH2电压
read_adc(2) --2 - 高侧负载电压
read_adc(3) --3 - 高端负载电流
read_adc(4) --4 - TVCC电压
read_adc(5) --5 - TVCC电流
read_adc(6) --6 - NTC热敏电阻阻值
read_adc(7) --7 - 外部供电电压
read_adc(8) --8 - USB供电电压
read_adc(9) -- 9 - 4-20mA输入
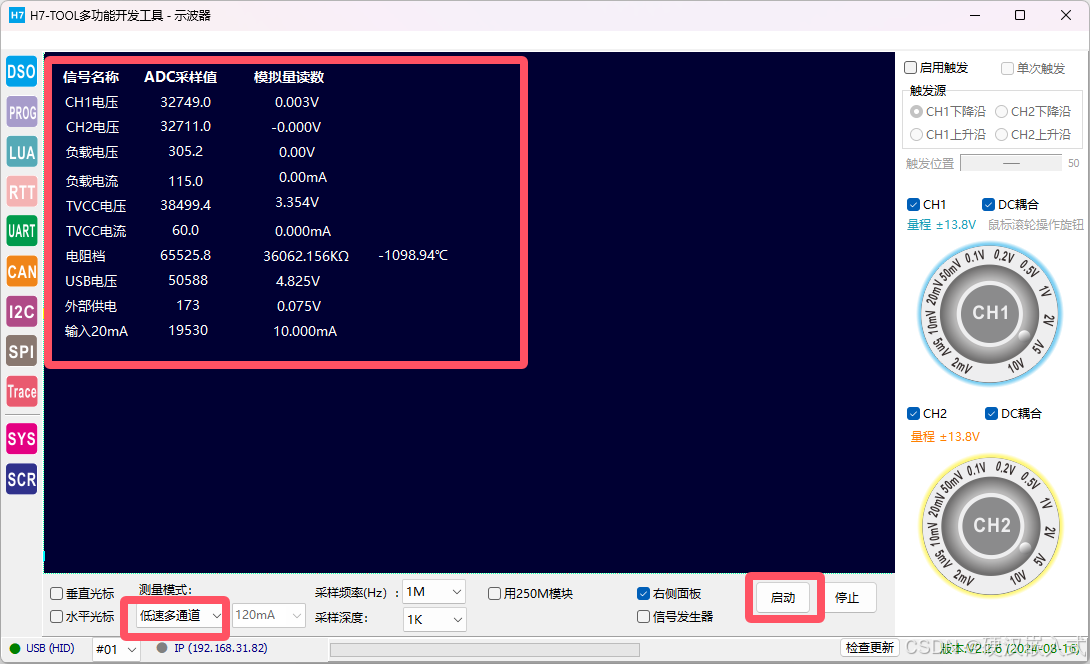
4、使用上位机同时展示这些数值