.NetCore录屏生成Gif动图程序(Form)的开发过程[代码已上传GitCode]
🌮.NetCore录屏生成Gif动图程序(Form)的开发过程
前言:
开发环境:.NetCore3.1
GitCode地址:罗马苏丹默罕默德 / RecordDesktopGif · GitCode
FrameWork版本地址:尚未同步功能
实现功能
- 选中屏幕的一块矩形区域按照设置的参数录制生成Gif动图
🌀一,截取多张图片作为帧生成Gif
⛵️思路:
和视频一样,Gif同样是由多张大小一样的图片按帧进行播放,只需要多次截图屏幕(的区域),再按时间顺序合成,则可得到录屏的Gif
使用工具:ImageSharp和System.Drawing(Tip:两个组件中有一些同名的类,需要使用全限定的类名)
代码实现
int fps = 20;   //每秒截图的数量

int Secs = 3;   //持续录制的时长

int INCR = 1;

for (int i = 1; i <= Secs* fps; i++)
{
    CaptureScreenArea(0, 0, 200, 200, ref INCR); //截取屏幕左上角200x200的区域
    Thread.Sleep(50);    //请注意这里SleepTimex(Secs*fps) = Secs(秒)
    					 //Sleep时间和fps的公式为SleepTime = 1000/fps(毫秒)
}
//用一个数组加载上面保存再TempDir文件夹下的截图
SixLabors.ImageSharp.Image[] imgs = new SixLabors.ImageSharp.Image[Secs* fps];

for (int i = 0; i < Secs* fps; i++)
{
    imgs[i] = SixLabors.ImageSharp.Image.Load($@"TempDir/{i+1}.png");
}

//创建Gif对象
Image<Rgba32> gif = new Image<Rgba32>(200, 200);
//获取Gif头帧的Meta信息
GifFrameMetadata meta = gif.Frames.RootFrame.Metadata.GetGifMetadata();

meta.FrameDelay = 0;//设置头帧开始播放的延迟

foreach (SixLabors.ImageSharp.Image im in imgs)
{	//设置加载图片的Gif格式的Meta信息
    GifFrameMetadata temp_meta = im.Frames.RootFrame.Metadata.GetGifMetadata();
    temp_meta.FrameDelay = 10;//梁振之前的间隔时间:(0~100,数值越小越快)

    gif.Frames.AddFrame(im.Frames.RootFrame); //添加到Gif中
}


gif.Metadata.GetGifMetadata().RepeatCount = 0; //设置重复次数,0则一直循环
gif.SaveAsGif("holyshit.gif");

Directory.Delete("TempDir", true);
 public static void CaptureScreenArea(int Left,int Top,int Length,int Width,ref int INCR)
{
    Bitmap bitmap = new Bitmap(Length, Width);
	//通过参数选择屏幕的区域
    System.Drawing.Rectangle rect = new System.Drawing.Rectangle(Left, Top, Length, Width);

    if (Directory.Exists("TempDir"))
    {
        using(Graphics g = Graphics.FromImage(bitmap))
        {
            g.CopyFromScreen(rect.Left, rect.Top, 0, 0, rect.Size);
        }
        //保存到上面的临时文件夹中
        bitmap.Save($@"TempDir/{INCR}.png", System.Drawing.Imaging.ImageFormat.Png);
    }
    else
    {
        Directory.CreateDirectory("TempDir");
        using (Graphics g = Graphics.FromImage(bitmap))
        {
            g.CopyFromScreen(rect.Left, rect.Top, 0, 0, rect.Size);
        }

        bitmap.Save($@"TempDir/{INCR}.png", System.Drawing.Imaging.ImageFormat.Png);
    }
    INCR++;
}
🍨 二,抽离并保存需要的参数
🌵保存方式:
- 保存在文件中(.config/.xml/.properties)
- 保存在数据库
例中需要保存的数据很少,故应保存在项目下的文件中。
🈂️Tip:这里我使用了.properties文件,但.Net默认不支持.properties格式的,需要先获取Util等工具来存取。
public class PropertiesUtil
{
    public static Hashtable Load(string file)
    {
        Hashtable ht = new Hashtable(16);
        string content = null;
        try
        {
            content = File.ReadAllText(file, System.Text.Encoding.UTF8);
        }
        catch (Exception e)
        {
            return null;
        }
        string[] rows = content.Split('\n');
        string[] kv = null;
        foreach (string c in rows)
        {
            if (c.Trim().Length == 0)
                continue;
            kv = c.Split('=');
            if (kv.Length == 1)
            {
                ht[kv[0].Trim()] = "";
            }
            else if (kv.Length == 2)
            {
                ht[kv[0].Trim()] = kv[1].Trim();
            }
        }
        return ht;
    }

    public static bool Save(string file, Hashtable ht)
    {
        if (ht == null || ht.Count == 0)
            return false;
        StringBuilder sb = new StringBuilder(ht.Count * 12);
        foreach (string k in ht.Keys)
        {
            sb.Append(k).Append('=').Append(ht[k]).Append(System.Environment.NewLine);
        }
        try
        {
            File.WriteAllText(file, sb.ToString(), System.Text.Encoding.UTF8);
            return true;
        }
        catch (Exception e)
        {
            return false;
        }
    }


}

🍏 三,创建Form获取选择的目标区域的Rectangle信息
🍶思路:
Tip:参考Win10+Shift+s的截图样式,拉取一个框定区域的方法也可以满足Gif框定屏幕区的作用域。
这类/类截图代码在WinForm的资料中有很多,以下为项目中的框选代码。
 public partial class ScreenBody : Form
{
    public ScreenBody()
    {
        this.Load += ScreenBody_Load;
        InitializeComponent();
        this.MouseDoubleClick += ScreenBody_MouseDoubleClick;
        this.MouseDown += ScreenBody_MouseDown;
        this.MouseUp += ScreenBody_MouseUp;
        this.MouseMove += ScreenBody_MouseMove;
    }

    private void InitializeComponent()
    {
        this.SuspendLayout();
        //
        // ScreenBody
        //
        this.BackgroundImageLayout = System.Windows.Forms.ImageLayout.None;
        this.ClientSize = new System.Drawing.Size(284, 261);
        this.FormBorderStyle = System.Windows.Forms.FormBorderStyle.None;
        this.Name = "ScreenBody";
        this.Opacity = 0.5D;  //一定要设置背景透明
        this.ResumeLayout(false);

    }

    private Graphics MainPainter;   //主画面
    private Pen pen;                //画笔
    private bool isDowned;          //判断鼠标是否按下
    private bool RectReady;         //矩形是否绘制完成
    private Image baseImage;        //基本图形(原来的画面)
    private Rectangle Rect;         //就是要保存的矩形
    private Point downPoint;        //鼠标按下的点
    int tmpx;
    int tmpy;
    //加载初始化
    private void ScreenBody_Load(object sender, EventArgs e)
    {
        this.WindowState = FormWindowState.Maximized;
        MainPainter = this.CreateGraphics();
        pen = new Pen(Brushes.Blue);
        isDowned = false;
        baseImage = this.BackgroundImage;
        Rect = new Rectangle();
        RectReady = false;
    }
    //双击保存
    private void ScreenBody_MouseDoubleClick(object sender, MouseEventArgs e)
    {
        if (e.Button == MouseButtons.Left && Rect.Contains(e.X, e.Y))
        {
            Image memory = new Bitmap(Rect.Width, Rect.Height);
            Graphics g = Graphics.FromImage(memory);
            g.CopyFromScreen(Rect.X + 1, Rect.Y + 1, 0, 0, Rect.Size);
            //将区域拿到主方法中
            Program.TheFinalRect = Rect;
            Console.WriteLine("Left:"+Rect.Left+" |Top:"+Rect.Top+"|长宽"+Rect.Height+"/"+Rect.Width);

            this.Dispose();
        }
    }
    //左击开始截图或移动,右击撤销
    private void ScreenBody_MouseDown(object sender, MouseEventArgs e)
    {
        if (e.Button == MouseButtons.Left)
        {
            isDowned = true;

            if (RectReady == false)
            {
                Rect.X = e.X;
                Rect.Y = e.Y;
                downPoint = new Point(e.X, e.Y);
            }
            if (RectReady == true)
            {
                tmpx = e.X;
                tmpy = e.Y;
            }
        }
        if (e.Button == MouseButtons.Right)
        {
            this.Close();
            return;
        }
    }
    //左键放开,截图方框完成
    private void ScreenBody_MouseUp(object sender, MouseEventArgs e)
    {
        if (e.Button == MouseButtons.Left)
        {
            isDowned = false;
            RectReady = true;
        }
    }
    //鼠标移动,画框或者拖动
    private void ScreenBody_MouseMove(object sender, MouseEventArgs e)
    {
        if (RectReady == false)
        {
            if (isDowned == true)
            {
                Image New = DrawScreen((Image)baseImage.Clone(), e.X, e.Y);
                MainPainter.DrawImage(New, 0, 0);
                New.Dispose();
            }
        }
        if (RectReady == true)
        {
            if (Rect.Contains(e.X, e.Y))
            {
                this.Cursor = Cursors.Hand;
                if (isDowned == true)
                {
                    //和上一次的位置比较获取偏移量
                    Rect.X = Rect.X + e.X - tmpx;
                    Rect.Y = Rect.Y + e.Y - tmpy;
                    //记录现在的位置
                    tmpx = e.X;
                    tmpy = e.Y;
                    MoveRect((Image)baseImage.Clone(), Rect);
                }
            }
            else
            {
                this.Cursor = Cursors.Arrow;
            }
        }
    }
    //画屏幕
    private Image DrawScreen(Image back, int Mouse_x, int Mouse_y)
    {
        Graphics Painter = Graphics.FromImage(back);
        DrawRect(Painter, Mouse_x, Mouse_y);
        return back;
    }
    //画矩形
    private void DrawRect(Graphics Painter, int Mouse_x, int Mouse_y)
    {
        int width = 0;
        int heigth = 0;
        try
        {
            if (Mouse_y < Rect.Y)
            {
                Rect.Y = Mouse_y;
                heigth = downPoint.Y - Mouse_y;
            }
            else
            {
                heigth = Mouse_y - downPoint.Y;
            }
            if (Mouse_x < Rect.X)
            {
                Rect.X = Mouse_x;
                width = downPoint.X - Mouse_x;
            }
            else
            {
                width = Mouse_x - downPoint.X;
            }
        }
        catch (Exception ee)
        {
            MessageBox.Show("cuo");
        }
        finally
        {
            Rect.Size = new Size(width, heigth);
            Painter.DrawRectangle(pen, Rect);
        }
    }

    //移动矩形
    private void MoveRect(Image image, Rectangle Rect)
    {
        Graphics Painter = Graphics.FromImage(image);
        Painter.DrawRectangle(pen, Rect.X, Rect.Y, Rect.Width, Rect.Height);
        MainPainter.DrawImage(image, 0, 0);
        image.Dispose();
    }


}
🏮 四,在主Form任意组件上设置监听函数完成录屏
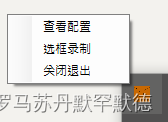
最后一步则比较随意,可以绑定到按钮上或是右键选项上
private void RecordGIF(object sender,EventArgs e)
{
    if (data["savepath"] == null || !Directory.Exists(data["savepath"].ToString())){
        MessageBox.Show("保存路径不存在,请重新设置保存路径", "FilePathNotFound保存路径不存在", MessageBoxButtons.OK, MessageBoxIcon.Error);
        return;
    }


    System.Drawing.Image img = new Bitmap(Width = Screen.AllScreens[0].Bounds.Width, Height = Screen.AllScreens[0].Bounds.Height);

    using (Graphics g = Graphics.FromImage(img))
    {
        g.CompositingMode = System.Drawing.Drawing2D.CompositingMode.SourceOver;
        using (SolidBrush brush = new(System.Drawing.Color.FromArgb(128,45,89,124)))
        {

           g.FillRectangle(brush, 0, 0, Screen.AllScreens[0].Bounds.Width, Screen.AllScreens[0].Bounds.Height);

        }
    }

    ScreenBody clip = new ScreenBody();


    clip.BackgroundImage = img;
    clip.ShowDialog();
    //阻塞主线程直到框出区域

    ClipForm progresser = new ClipForm();

    progresser.ShowDialog();

    System.Drawing.Rectangle rect = Program.TheFinalRect;   //拿到选区的rect信息

    int fps = Convert.ToInt32(data["fps"]);     //秒/帧

    int delay = Convert.ToInt32(data["delay"]); //gif延迟

    decimal Secs = Convert.ToDecimal(data["holdon"]); //持续时间

    int backsec = Convert.ToInt32(data["backsecs"]); //倒数时间

    int INCR = 1;


    int RealCount =  (int)(Secs* fps);

    for (int i = 1; i <= RealCount; i++)
    {
        Program.CaptureScreenArea(rect.Left,rect.Top, rect.Width, rect.Height, ref INCR);
        Thread.Sleep(1000/fps);
    }

    SixLabors.ImageSharp.Image[] imgs = new SixLabors.ImageSharp.Image[RealCount];

    for (int i = 0; i < RealCount; i++)
    {
        imgs[i] = SixLabors.ImageSharp.Image.Load($@"TempDir/{i + 1}.png");
    }

    Image<Rgba32> gif = new Image<Rgba32>(rect.Width, rect.Height);

    GifFrameMetadata meta = gif.Frames.RootFrame.Metadata.GetGifMetadata();

    meta.FrameDelay = 0;

    foreach (SixLabors.ImageSharp.Image im in imgs)
    {
        GifFrameMetadata temp_meta = im.Frames.RootFrame.Metadata.GetGifMetadata();
        temp_meta.FrameDelay = delay;

        gif.Frames.AddFrame(im.Frames.RootFrame);
    }


    gif.Metadata.GetGifMetadata().RepeatCount = 0;
    gif.SaveAsGif(data["savepath"]+$@"/RSA{DateTime.Now.ToString("yyyyMMddHHmmss")}.gif");

    Directory.Delete("TempDir", true);

    MessageBox.Show("截取区域完成","success",MessageBoxButtons.OK,MessageBoxIcon.Asterisk);

}
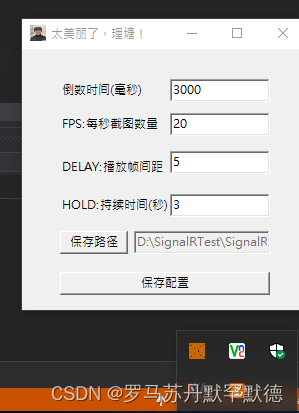
Final:运行截图