《手写Spring渐进式源码实践》实践笔记(第十四章 通过注解自动注入属性信息)
文章目录
- 第十四章 通过注解注入属性信息
- 背景
- 目标
- 设计
- 实现
- 代码结构
- 类图
- 实现步骤
- 测试
- 事先准备
- 属性配置文件
- Spring.xml 配置对象
- 测试用例
- 测试结果:
- 总结
第十四章 通过注解注入属性信息
背景
- 当前已实现 IOC、AOP 两大核心功能模块,完全可以管理 Bean 对象的注册和获取。不过这样的使用方式还是有点难用。因此在上一章节我们解决需要手动配置
Bean对象到spring.xml文件中,改为可以自动扫描带有注解@Component的对象完成自动装配和注册到Spring容器的操作。 - 那么在自动扫描包注册 Bean 对象之后,需要把原来在配置文件中通过
property name="token"配置属性和Bean的操作,改为可以自动扫描带有注解@Autowired、@Value的对象,完成bean中属性和对象的注入操作。
目标
基于当前已实现的spring核心功能,再扩充自动化功能:自动扫描包注册 Bean后,就需要把原来在配置文件中通过 property name="token" 配置属性和Bean的操作,也改为可以自动注入,实现@Autowired、@Value注解功能。
设计
-
基于已完成的 Bean 对象的基础功能,我们后续添加的功能都是围绕着 Bean 的生命周期进行的,比如
修改 Bean 的定义 BeanFactoryPostProcessor,处理 Bean 的属性要用到 BeanPostProcessor,完成个性的属性操作则专门继承 BeanPostProcessor提供新的接口,因为这样才能通过 instanceof 判断出具有标记性的接口。所有有关 Bean的操作,以及监听 Aware、获取 BeanFactory,都需要在 Bean 的生命周期中完成。 -
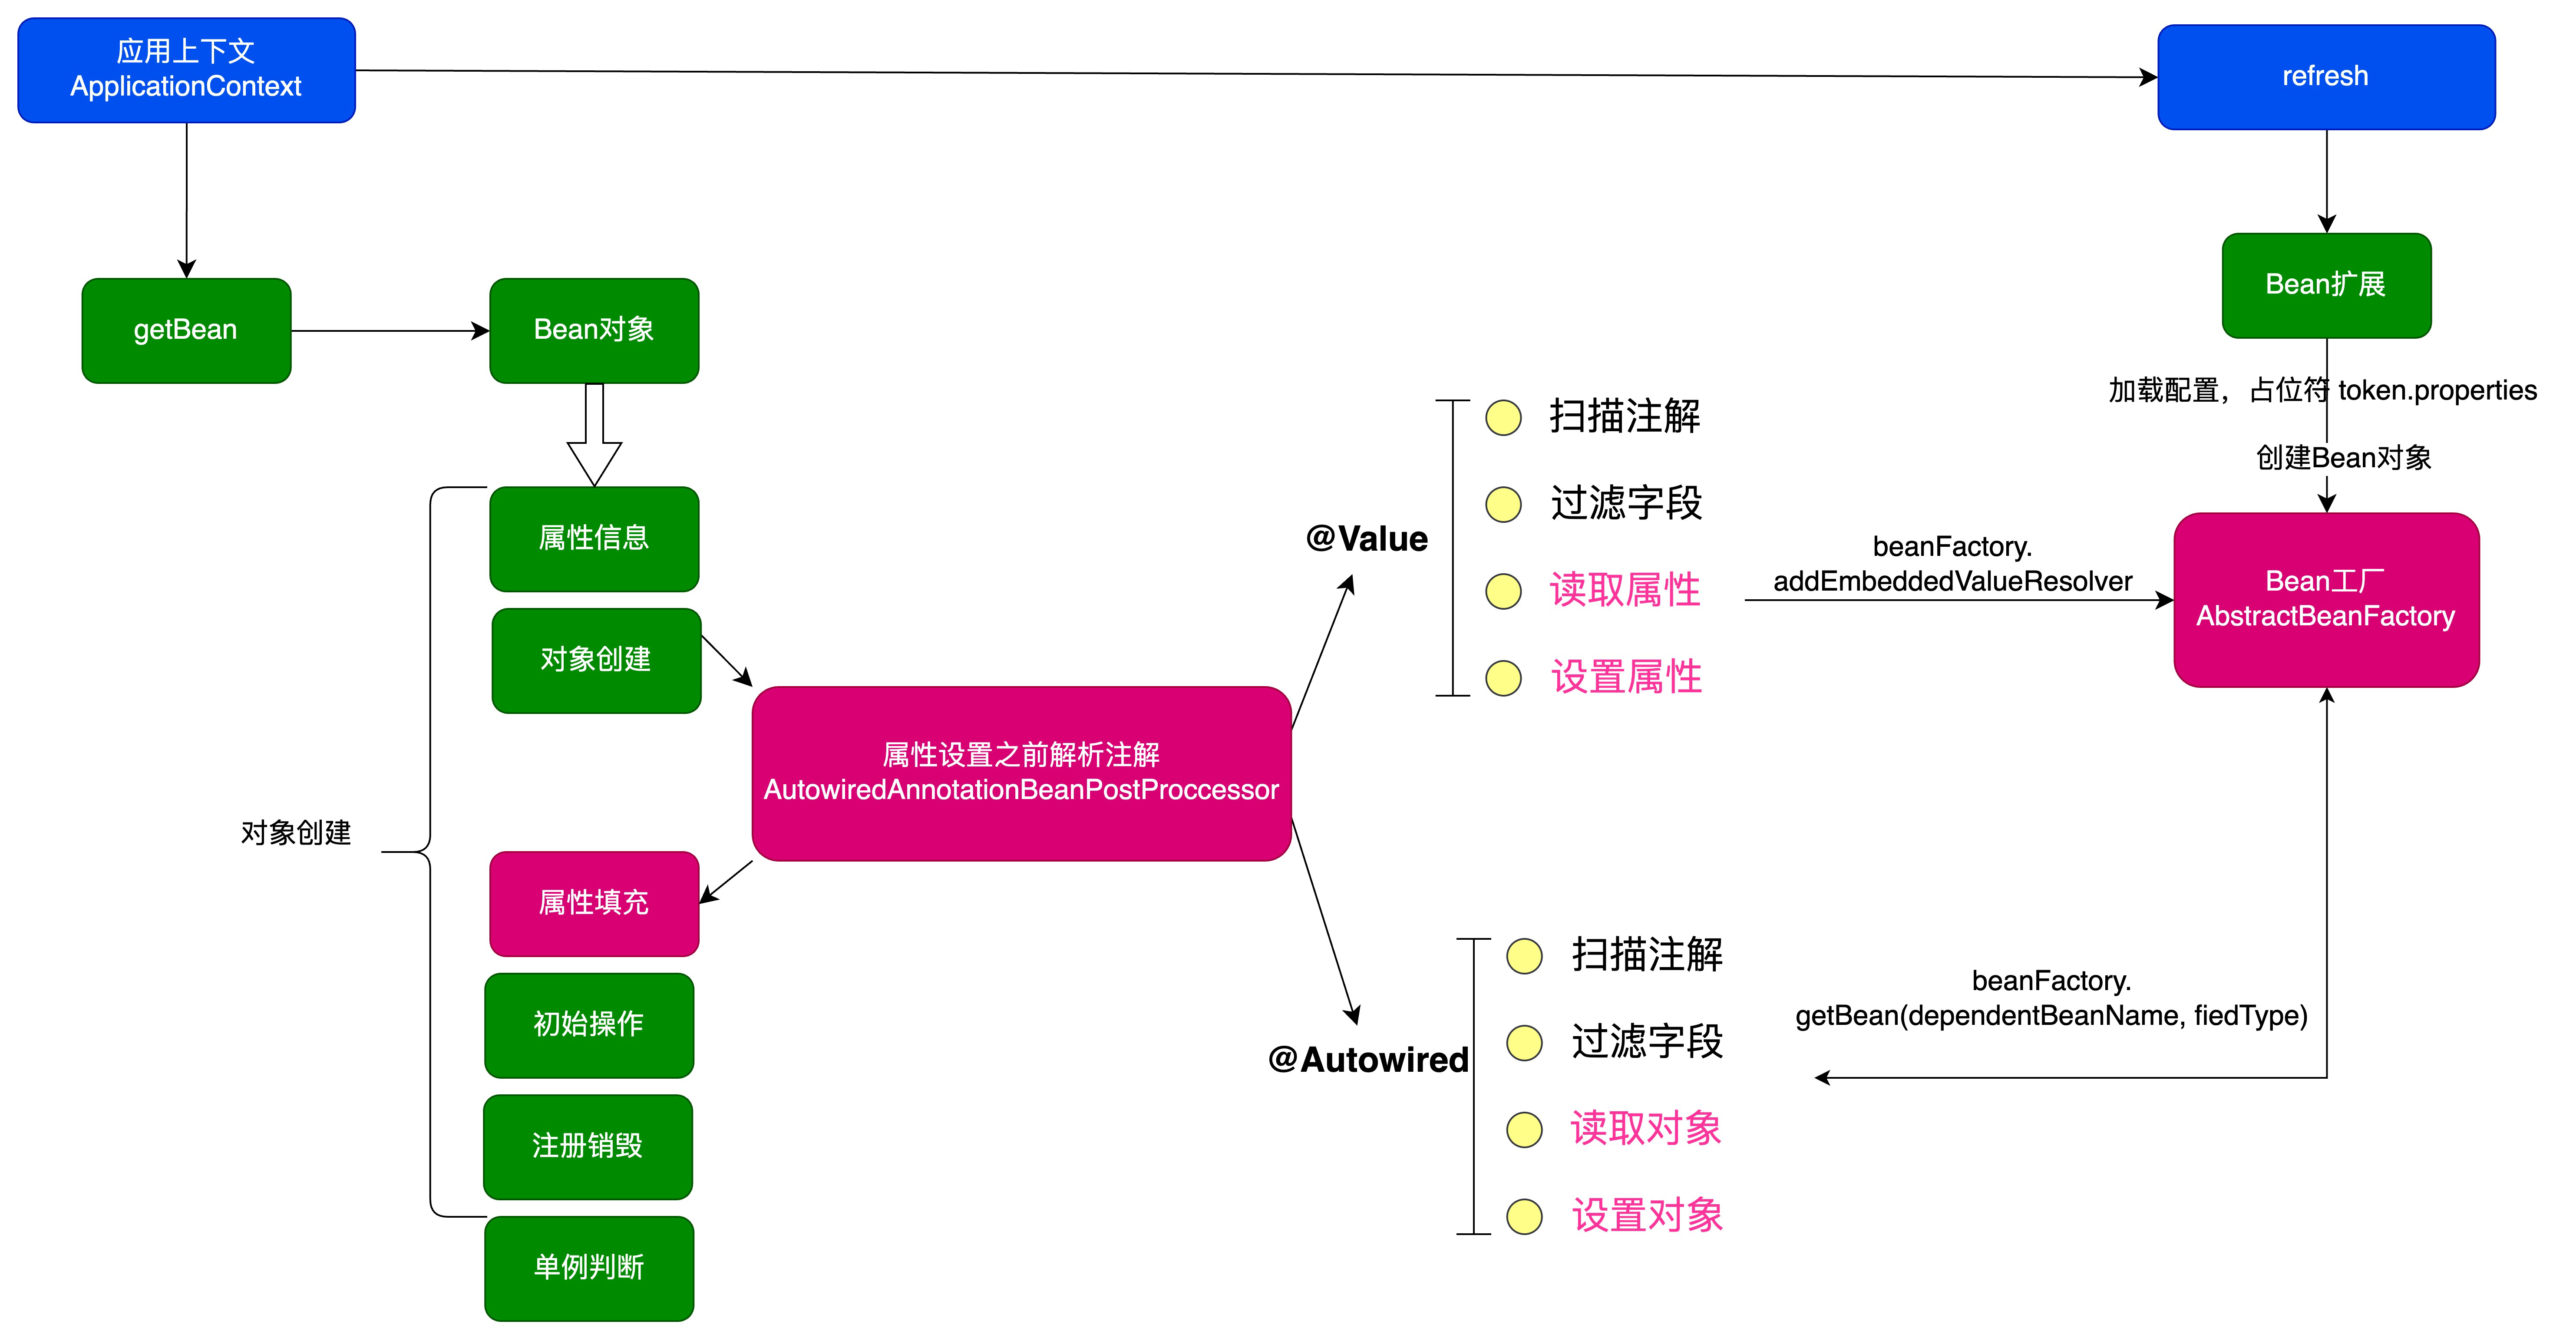
那么我们在设计属性和 Bean 对象的注入时候,也会用到 BeanPostProcessor 来完成在设置 Bean 属性之前,允许 BeanPostProcessor 修改属性值。整体设计结构如下图:

-
要处理自动扫描注入,包括属性注入、对象注入,则需要在对象属性
applyPropertyValues填充之前 ,把属性信息写入到 PropertyValues 的集合中去。这一步的操作相当于是解决了以前在 spring.xml 配置属性的过程。 -
而在属性的读取中,需要依赖于 扫描Bean 对象的类中属性,是否配置了指定注解,例如
-
field.getAnnotation(Value.class);依次拿出符合的属性并填充上相应的配置信息。这里需要注意,属性的配置信息需要依赖于 BeanFactoryPostProcessor 的实现类 PropertyPlaceholderConfigurer,把值写入到 AbstractBeanFactory的embeddedValueResolvers集合中,这样才能在属性填充中利用 beanFactory 获取相应的属性值 -
关于 @Autowired 对于对象的注入,其实这一个和属性注入的唯一区别是对于对象的获取
beanFactory.getBean(fieldType),其他的内容都相同。 -
当所有的属性被设置到 PropertyValues 完成以后,接下来就到了创建对象的下一步,属性填充,而此时就会把我们一一获取到的配置和对象填充到属性上,也就实现了自动注入的功能。
实现
代码结构

源码实现:https://github.com/swg209/spring-study/tree/main/step14-bean-property-auto
类图

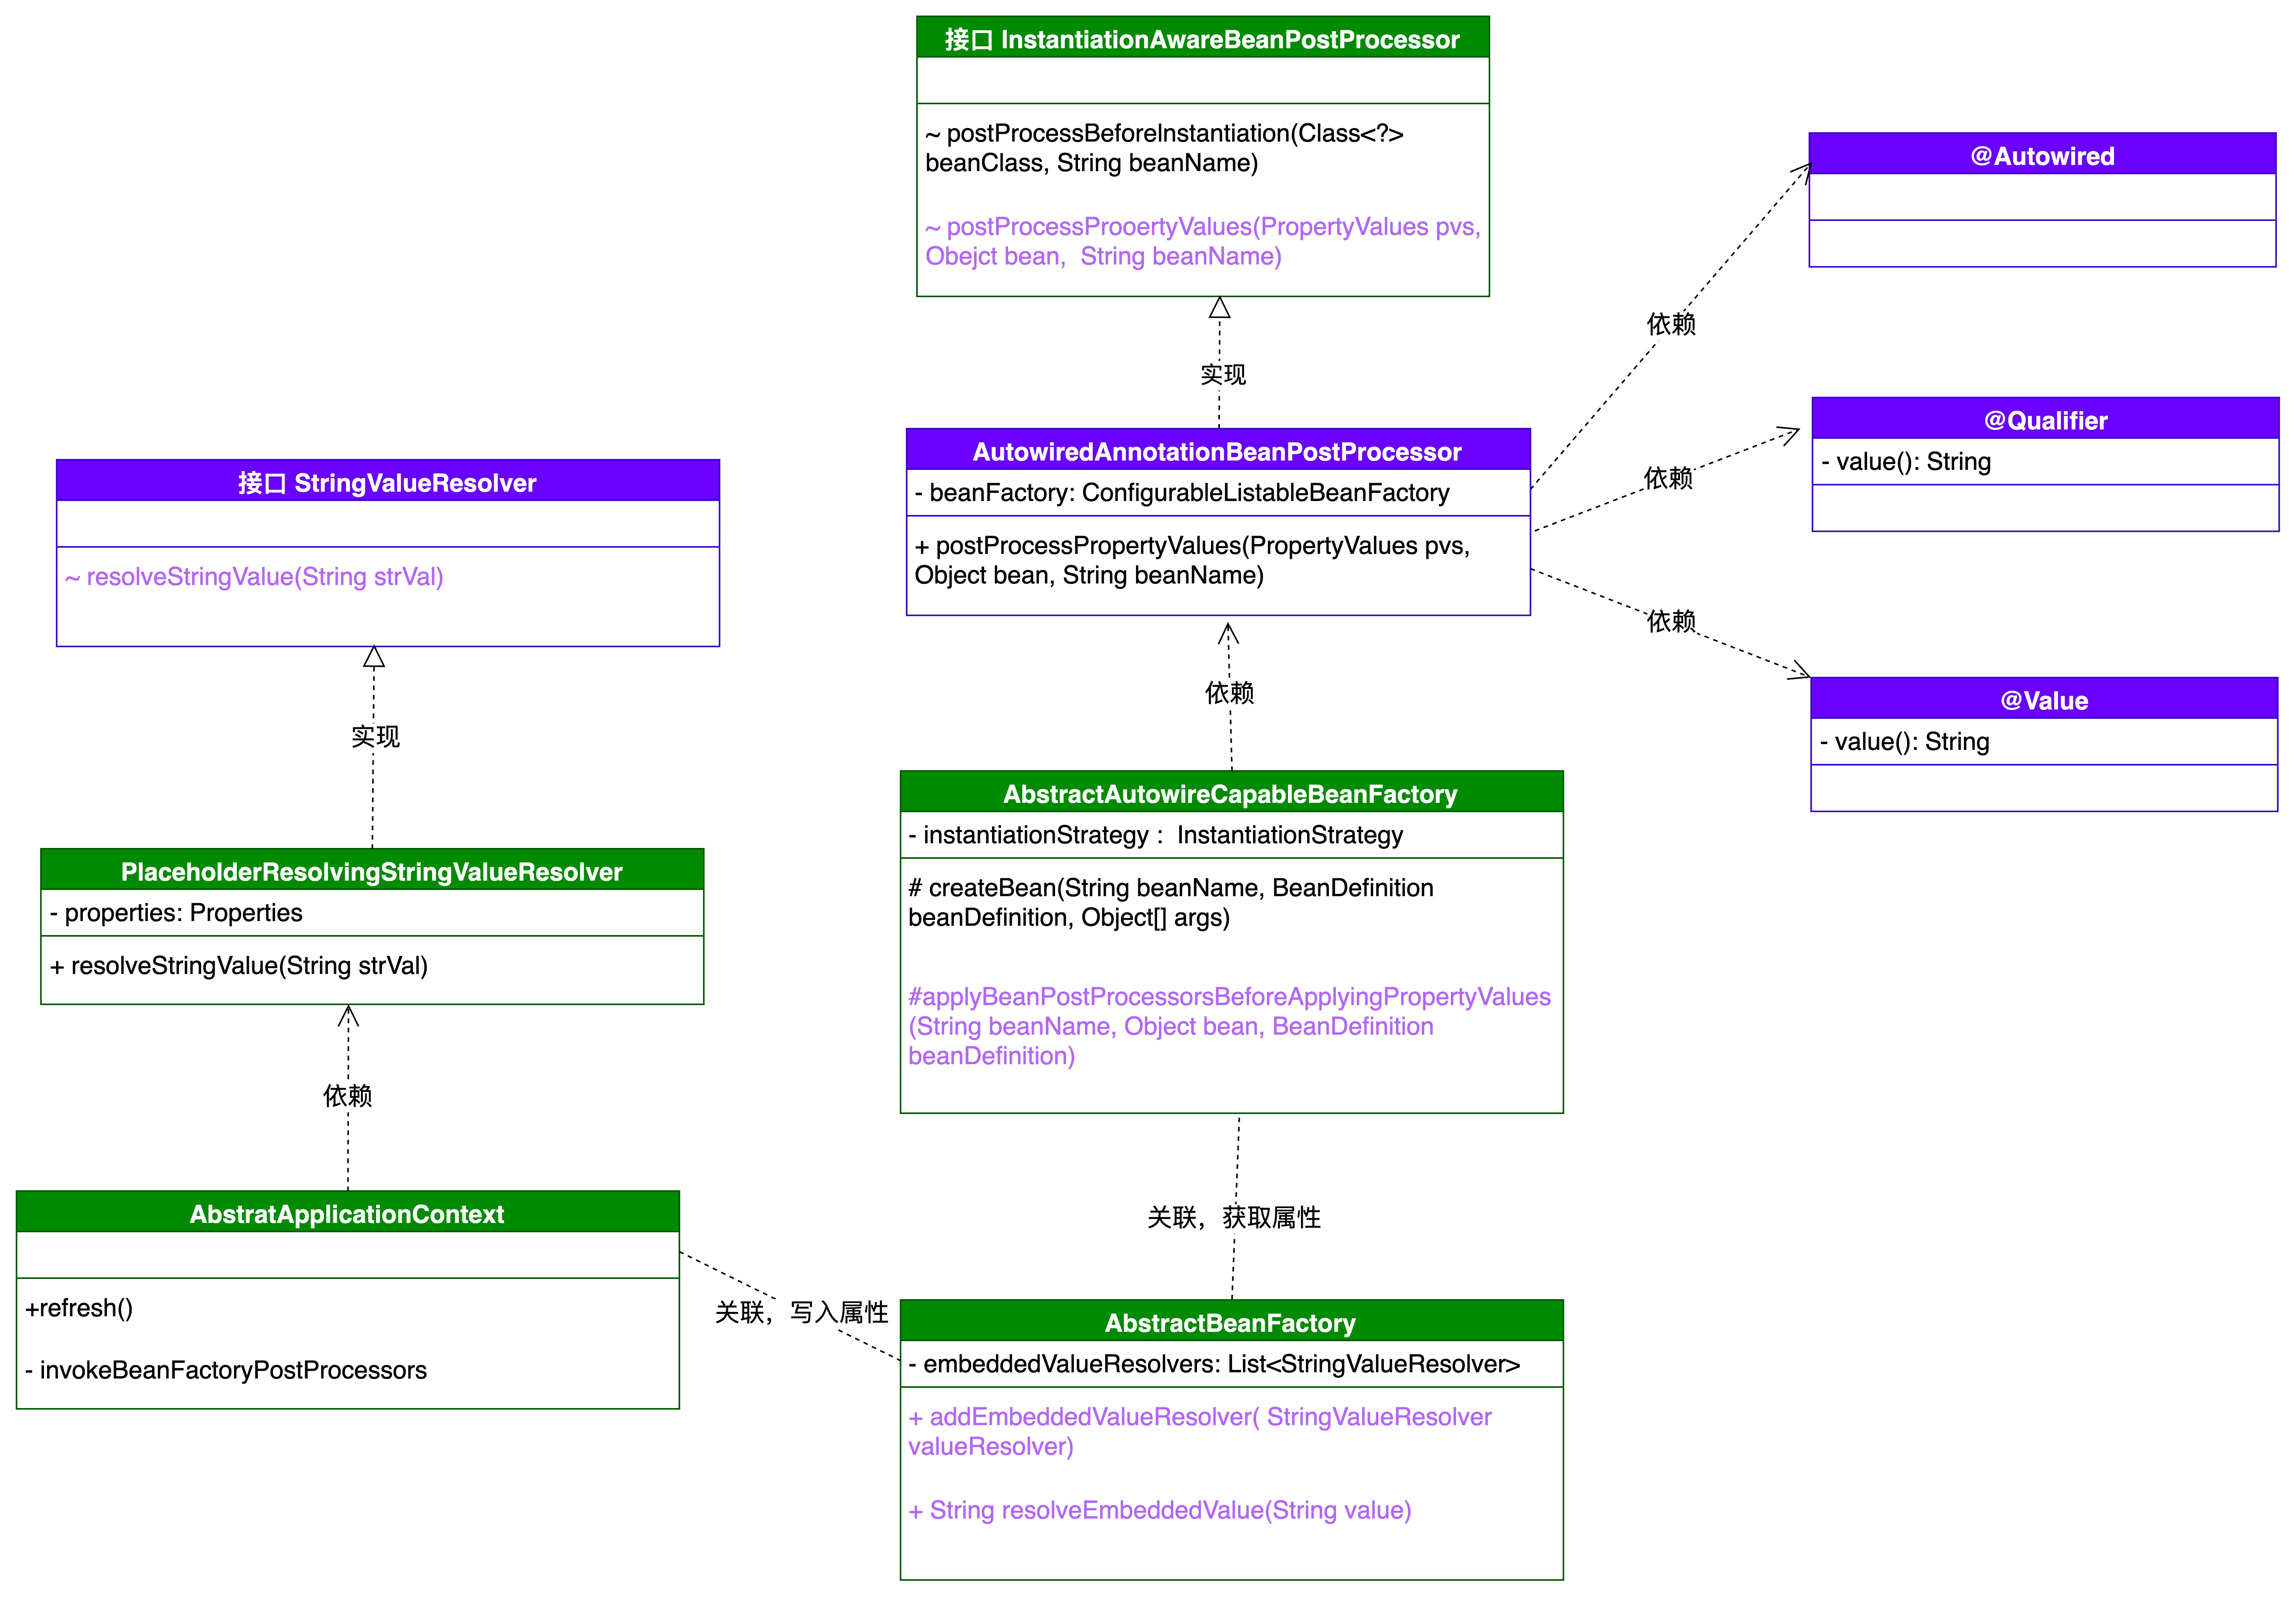
- 在整个类图中,以围绕实现接口 InstantiationAwareBeanPostProcessor 的类AutowiredAnnotationBeanPostProcessor 作为入口点,被 AbstractAutowireCapableBeanFactory创建 Bean 对象过程中调用扫描整个类的属性配置中含有自定义注解
Value、Autowired、Qualifier的属性值。 - 这里稍有变动的是关于属性值信息的获取,在注解配置的属性字段扫描到信息注入时,包括了占位符从配置文件获取信息也包括 Bean 对象,Bean 对象可以直接获取,但配置信息需要在 AbstractBeanFactory 中添加
新的属性集合 embeddedValueResolvers,由PropertyPlaceholderConfigurer#postProcessBeanFactory进行操作填充到属性集合中。
实现步骤
-
把读取到属性填充到容器
StringValueResolver定义解析字符串接口
public interface StringValueResolver {

    String resolveStringValue(String strVal);
}
填充字符串(占位符)
- 在解析属性配置的类 PropertyPlaceholderConfigurer 中,最主要的其实就是这行代码的操作
beanFactory.addEmbeddedValueResolver(valueResolver)这是把属性值写入到了 AbstractBeanFactory 的 embeddedValueResolvers 中。 - 这里说明下,embeddedValueResolvers 是 AbstractBeanFactory 类新增加的集合
List<StringValueResolver> embeddedValueResolversString resolvers to apply e.g. to annotation attribute values
public class PropertyPlaceholderConfigurer implements BeanFactoryPostProcessor { /** * 占位符前缀. */ public static final String DEFAULT_PLACEHOLDER_PREFIX = "${"; /** * 占位符后缀. */ public static final String DEFAULT_PLACEHOLDER_SUFFIX = "}"; /** * 文件路径. */ private String location; @Override public void postProcessBeanFactory(ConfigurableListableBeanFactory beanFactory) throws BeansException { try { //加载属性文件 DefaultResourceLoader resourceLoader = new DefaultResourceLoader(); Resource resource = resourceLoader.getResource(location); //占位符替换属性值 Properties properties = new Properties(); properties.load(resource.getInputStream()); //遍历所有bean定义 String[] beanDefinitionNames = beanFactory.getBeanDefinitionNames(); for (String beanName : beanDefinitionNames) { BeanDefinition beanDefinition = beanFactory.getBeanDefinition(beanName); PropertyValues propertyValues = beanDefinition.getPropertyValues(); for (PropertyValue propertyValue : propertyValues.getPropertyValues()) { Object value = propertyValue.getValue(); if (!(value instanceof String)) { continue; } value = resolvePlaceholder((String) value, properties); propertyValues.addPropertyValue(new PropertyValue(propertyValue.getName(), value)); } } //向容器中添加字符串解析器, 供解析@Value注解使用 StringValueResolver valueResolver = new PlaceholderResolvingStringValueResolver(properties); beanFactory.addEmbeddedValueResolver(valueResolver); } catch (IOException e) { throw new BeansException("Could not load properties", e); } } //解析替换占位符. private String resolvePlaceholder(String value, Properties properties) { String strVal = value; StringBuilder buffer = new StringBuilder(strVal); int startIndex = strVal.indexOf(DEFAULT_PLACEHOLDER_PREFIX); int stopIndex = strVal.indexOf(DEFAULT_PLACEHOLDER_SUFFIX); if (startIndex != -1 && stopIndex != -1 && startIndex < stopIndex) { String propKey = strVal.substring(startIndex + 2, stopIndex); String propValue = properties.getProperty(propKey); buffer.replace(startIndex, stopIndex + 1, propValue); } return buffer.toString(); } public void setLocation(String location) { this.location = location; } private class PlaceholderResolvingStringValueResolver implements StringValueResolver { private final Properties properties; private PlaceholderResolvingStringValueResolver(Properties properties) { this.properties = properties; } @Override public String resolveStringValue(String strVal) { return PropertyPlaceholderConfigurer.this.resolvePlaceholder(strVal, properties); } } } - 在解析属性配置的类 PropertyPlaceholderConfigurer 中,最主要的其实就是这行代码的操作
-
自定义属性注入注解
- 自定义注解 @Autowired @Value @Qualifier, 这3个注解在我们日常使用 Spring 也是非常常见的,注入对象、注入属性,而 Qualifier 一般与 Autowired 配合使用。
@Retention(RetentionPolicy.RUNTIME) @Target({ElementType.CONSTRUCTOR, ElementType.FIELD, ElementType.METHOD}) public @interface Autowired { } @Retention(RetentionPolicy.RUNTIME) @Target({ElementType.FIELD, ElementType.METHOD, ElementType.PARAMETER, ElementType.TYPE, ElementType.ANNOTATION_TYPE}) @Inherited @Documented public @interface Qualifier { String value() default ""; } @Target({ElementType.FIELD, ElementType.METHOD, ElementType.PARAMETER}) @Retention(RetentionPolicy.RUNTIME) @Documented public @interface Value { /** * 实际值. * * @return */ String value(); } -
扫描自定义注解
AutowiredAnnotationBeanPostProcessor
- AutowiredAnnotationBeanPostProcessor 是实现接口 InstantiationAwareBeanPostProcessor 的一个用于在 Bean 对象实例化完成后,设置属性操作前的处理属性信息的类和操作方法。只有实现了 BeanPostProcessor 接口才有机会在 Bean 的生命周期中处理初始化信息
- 核心方法 postProcessPropertyValues,主要用于处理类含有 @Value、@Autowired 注解的属性,进行属性信息的提取和设置。
- 需要注意:因为我们在 AbstractAutowireCapableBeanFactory 类中使用的是 CglibSubclassingInstantiationStrategy 进行类的创建,所以在 AutowiredAnnotationBeanPostProcessor#postProcessPropertyValues 中需要判断是否为 CGlib 创建对象,否则是不能正确拿到类信息的。
ClassUtils.isCglibProxyClass(clazz) ? clazz.getSuperclass() : clazz;
public class AutowiredAnnotationBeanPostProcessor implements InstantiationAwareBeanPostProcessor, BeanFactoryAware { private ConfigurableListableBeanFactory beanFactory; @Override public void setBeanFactory(BeanFactory beanFactory) throws BeansException { this.beanFactory = (ConfigurableListableBeanFactory) beanFactory; } @Override public PropertyValues postProcessPropertyValues(PropertyValues pvs, Object bean, String beanName) throws BeansException { // 获取类信息. Class<?> clazz = bean.getClass(); clazz = ClassUtils.isCglibProxyClass(clazz) ? clazz.getSuperclass() : clazz; // 拿到字段信息 Field[] declaredField = clazz.getDeclaredFields(); // 处理 @Value注解 for (Field field : declaredField) { Value valueAnnotation = field.getAnnotation(Value.class); if (null != valueAnnotation) { String value = valueAnnotation.value(); value = beanFactory.resolveEmbeddedValue(value); // 设置字段值 BeanUtil.setFieldValue(bean, field.getName(), value); } } // 处理 @Autowired 注解 for (Field field : declaredField) { Autowired autowiredAnnotation = field.getAnnotation(Autowired.class); if (null != autowiredAnnotation) { //获取字段类型 Class<?> fieldType = field.getType(); String dependentBeanName = null; // 获取字段上的Qualifier注解 Qualifier qualifierAnnotation = field.getAnnotation(Qualifier.class); Object dependentBean = null; if (null != qualifierAnnotation) { dependentBeanName = qualifierAnnotation.value(); dependentBean = beanFactory.getBean(dependentBeanName, fieldType); } else { dependentBean = beanFactory.getBean(fieldType); } BeanUtil.setFieldValue(bean, field.getName(), dependentBean); } } return pvs; } @Override public Object postProcessBeforeInitialization(Object bean, String beanName) throws BeansException { return null; } @Override public Object postProcessAfterInitialization(Object bean, String beanName) throws BeansException { return null; } @Override public Object postProcessBeforeInstantiation(Class<?> beanClass, String beanName) throws BeansException { return null; } } -
在Bean的生命周期中调用属性注入
AbstractAutowireCapableBeanFactory
- AbstractAutowireCapableBeanFactory#createBean 方法中有这一条新增加的方法调用,就是在
设置 Bean 属性之前,允许 BeanPostProcessor 修改属性值的操作applyBeanPostProcessorsBeforeApplyingPropertyValues - 那么这个 applyBeanPostProcessorsBeforeApplyingPropertyValues 方法中,首先就是获取已经注入的 BeanPostProcessor 集合并从中筛选出继承接口 InstantiationAwareBeanPostProcessor 的实现类。
- 最后就是调用相应的 postProcessPropertyValues 方法以及循环设置属性值信息,
beanDefinition.getPropertyValues().addPropertyValue(propertyValue);
public abstract class AbstractAutoWireCapableBeanFactory extends AbstractBeanFactory { private InstantiationStrategy instantiationStrategy = new CglibSubclassingInstantiationStrategy(); @Override public Object createBean(String beanName, BeanDefinition beanDefinition, Object[] args) throws BeansException { Object bean = null; try { //判断是否返回代理Bean对象. bean = resolveBeforeInstantiation(beanName, beanDefinition); if (null != bean) { return bean; } // 实例化 Bean bean = createBeanInstance(beanDefinition, beanName, args); // 在设置 Bean 属性之前,允许 BeanPostProcessor 修改属性值 applyBeanPostProcessorsBeforeApplyingPropertyValues(beanName, bean, beanDefinition); // 给 Bean 填充属性信息 applyPropertyValues(beanName, bean, beanDefinition); //执行Bean的初始化方法和BeanPostProcessor的前置和后置处理方法 bean = initializeBean(beanName, bean, beanDefinition); } catch (Exception e) { throw new BeansException("Instantiation of bean failed", e); } // 注册实现了DisposableBean接口的Bean对象 registerDisposableBeanIfNecessary(beanName, bean, beanDefinition); if (beanDefinition.isSingleton()) { addSingleton(beanName, bean); } return bean; } /** * 在设置 Bean 属性之前,允许 BeanPostProcessor 修改属性值 * * @param beanName * @param bean * @param beanDefinition */ private void applyBeanPostProcessorsBeforeApplyingPropertyValues(String beanName, Object bean, BeanDefinition beanDefinition) { for (BeanPostProcessor beanPostProcessor : getBeanPostProcessors()) { if (beanPostProcessor instanceof InstantiationAwareBeanPostProcessor) { PropertyValues pvs = ((InstantiationAwareBeanPostProcessor) beanPostProcessor).postProcessPropertyValues( beanDefinition.getPropertyValues(), bean, beanName); if (null != pvs) { for (PropertyValue propertyValue : pvs.getPropertyValues()) { beanDefinition.getPropertyValues().addPropertyValue(propertyValue); } } } } } private Object resolveBeforeInstantiation(String beanName, BeanDefinition beanDefinition) { Object bean = applyBeanPostProcessorsBeforeInstantiation(beanDefinition.getBeanClass(), beanName); if (null != bean) { bean = applyBeanPostProcessorsAfterInitialization(bean, beanName); } return bean; } protected Object applyBeanPostProcessorsBeforeInstantiation(Class beanClass, String beanName) { for (BeanPostProcessor beanPostProcessor : getBeanPostProcessors()) { if (beanPostProcessor instanceof InstantiationAwareBeanPostProcessor) { Object result = ((InstantiationAwareBeanPostProcessor) beanPostProcessor).postProcessBeforeInstantiation(beanClass, beanName); if (null != result) { return result; } } } return null; } private void registerDisposableBeanIfNecessary(String beanName, Object bean, BeanDefinition beanDefinition) { // 非 Singleton 类型的Bean不执行销毁方法. if (!beanDefinition.isSingleton()) { return; } if (bean instanceof DisposableBean || StrUtil.isNotEmpty(beanDefinition.getDestroyMethodName())) { registerDisposableBean(beanName, new DisposableBeanAdapter(bean, beanName, beanDefinition)); } } /** * @param beanName * @param bean * @param beanDefinition * @return */ private Object initializeBean(String beanName, Object bean, BeanDefinition beanDefinition) { // 处理Aware标识的类. invokeAwareMethods if (bean instanceof Aware) { if (bean instanceof BeanFactoryAware) { ((BeanFactoryAware) bean).setBeanFactory(this); } if (bean instanceof BeanNameAware) { ((BeanNameAware) bean).setBeanName(beanName); } if (bean instanceof BeanClassLoaderAware) { ((BeanClassLoaderAware) bean).setBeanClassLoader(getBeanClassLoader()); } } //1. 执行BeanPostProcessor Before处理 Object wrappedBean = applyBeanPostProcessorsBeforeInitialization(bean, beanName); //2. 执行Bean的初始化方法 try { invokeInitMethods(beanName, wrappedBean, beanDefinition); } catch (Exception e) { throw new BeansException("Invocation of init method of bean[" + beanName + "] failed", e); } //3. 执行BeanPostProcessor After处理 wrappedBean = applyBeanPostProcessorsAfterInitialization(bean, beanName); return wrappedBean; } private Object applyBeanPostProcessorsBeforeInitialization(Object existBean, String beanName) { Object result = existBean; for (BeanPostProcessor beanPostProcessor : getBeanPostProcessors()) { Object current = beanPostProcessor.postProcessBeforeInitialization(result, beanName); if (null == current) { return result; } result = current; } return result; } private void invokeInitMethods(String beanName, Object bean, BeanDefinition beanDefinition) throws Exception { // 1、实现接口 InitializingBean if (bean instanceof InitializingBean) { ((InitializingBean) bean).afterPropertiesSet(); } // 2、 注解配置 init-method {判断是为了避免二次执行初始化} String initMethodName = beanDefinition.getInitMethodName(); if (StrUtil.isNotEmpty(initMethodName) && !(bean instanceof InitializingBean)) { Method initMethod = beanDefinition.getBeanClass().getMethod(initMethodName); if (Objects.isNull(initMethod)) { throw new BeansException("Could not find an init method named '" + initMethodName + "' on bean with name '" + beanName + "'"); } initMethod.invoke(bean); } } private Object applyBeanPostProcessorsAfterInitialization(Object existBean, String beanName) { Object result = existBean; for (BeanPostProcessor beanPostProcessor : getBeanPostProcessors()) { Object current = beanPostProcessor.postProcessAfterInitialization(result, beanName); if (null == current) { return result; } result = current; } return result; } private Object createBeanInstance(BeanDefinition beanDefinition, String beanName, Object[] args) { Constructor constructor = null; Class<?> beanClass = beanDefinition.getBeanClass(); Constructor<?>[] declareConstructors = beanClass.getConstructors(); for (Constructor ctor : declareConstructors) { if (null != args && ctor.getParameterTypes().length == args.length) { constructor = ctor; break; } } return getInstantiationStrategy().instantiate(beanDefinition, beanName, constructor, args); } protected void applyPropertyValues(String beanName, Object bean, BeanDefinition beanDefinition) { try { PropertyValues propertyValues = beanDefinition.getPropertyValues(); for (PropertyValue propertyValue : propertyValues.getPropertyValues()) { String name = propertyValue.getName(); Object value = propertyValue.getValue(); if (value instanceof BeanReference) { // A依赖B, 获取B的实例化 BeanReference beanReference = (BeanReference) value; value = getBean(beanReference.getBeanName()); } //属性填充. BeanUtil.setFieldValue(bean, name, value); } } catch (Exception e) { throw new BeansException("Error setting property values for bean: " + beanName); } } public InstantiationStrategy getInstantiationStrategy() { return instantiationStrategy; } public void setInstantiationStrategy(InstantiationStrategy instantiationStrategy) { this.instantiationStrategy = instantiationStrategy; } } - AbstractAutowireCapableBeanFactory#createBean 方法中有这一条新增加的方法调用,就是在
测试
事先准备
配置Dao
给类配置上一个自动扫描注册 Bean 对象的注解 @Component,接下来会把这个类注入到 UserService 中。
@Component
public class UserDao {

    private static Map<String, String> hashMap = new HashMap<>();


    static {
        hashMap.put("10001", "小苏,广东,广州");
        hashMap.put("10002", "小小苏,广东,深圳");
        hashMap.put("10003", "小小小苏,广东,珠海");
    }

    public String queryUserName(String uid) {
        return hashMap.get(uid);
    }
}
UserService
- 这里包括了两种类型的注入,一个是占位符注入属性信息
@Value("${token}"),另外一个是注入对象信息@Autowired
@Component("userService")
public class UserService implements IUserService {

    @Value("${token}")
    private String token;

    @Autowired
    private UserDao userDao;

    @Override
    public String queryUserInfo() {
        try {
            Thread.sleep(new Random(1).nextInt(100));
        } catch (InterruptedException e) {
            e.printStackTrace();
        }
        return userDao.queryUserName("10001") + "," + token;
    }

    @Override
    public String register(String userName) {
        try {
            Thread.sleep(new Random(1).nextInt(100));
        } catch (InterruptedException e) {
            e.printStackTrace();
        }
        return "注册用户: " + userName + " success!";
    }

    @Override
    public String toString() {
        return "UserService#token = {" + token + "}";
    }

    public String getToken() {
        return token;
    }

    public void setToken(String token) {
        this.token = token;
    }

    public UserDao getUserDao() {
        return userDao;
    }

    public void setUserDao(UserDao userDao) {
        this.userDao = userDao;
    }
}
属性配置文件
token.properties
- 这里配置一个 token 的属性信息,用于通过占位符的方式进行获取
token=suwg1234567890
Spring.xml 配置对象
spring.xml
- 在 spring.xml 中配置了扫描属性信息和自动扫描包路径范围。
<?xml version="1.0" encoding="UTF-8"?>
<beans xmlns:xsi="http://www.w3.org/2001/XMLSchema-instance"
       xmlns:context="http://www.springframework.org/schema/context"
       xmlns="http://www.springframework.org/schema/beans"
       xsi:schemaLocation="http://www.springframework.org/schema/beans
	         http://www.springframework.org/schema/beans/spring-beans.xsd
		 http://www.springframework.org/schema/context">

    <bean class="cn.suwg.springframework.beans.factory.PropertyPlaceholderConfigurer">
        <property name="location" value="classpath:token.properties"/>
    </bean>


    <context:component-scan base-package="cn.suwg.springframework.test.bean"/>

</beans>
测试用例
- 单元测试时候就可以完整的测试一个类注入到 Spring 容器,同时这个属性信息也可以被自动扫描填充上。
public class ApiTest {


    @Test
    public void testScan() {
        ClassPathXmlApplicationContext applicationContext = new ClassPathXmlApplicationContext("classpath:spring.xml");
        IUserService userService = applicationContext.getBean("userService", IUserService.class);
        System.out.println("测试结果: " + userService.queryUserInfo());
    }

}
测试结果:
- 从测试结果可以看到现在我们的使用方式已经通过了,有自动扫描类,有注解注入属性。这与使用 Spring 框架越来越像了。

总结
-
从整个注解信息扫描注入的实现内容来看,我们一直是围绕着在
Bean 的生命周期中进行处理,就像BeanPostProcessor 用于修改新实例化 Bean 对象的扩展点,提供的接口方法可以用于处理 Bean 对象实例化前后进行处理操作。而有时候需要做一些差异化的控制,所以还需要继承 BeanPostProcessor 接口,定义新的接口 InstantiationAwareBeanPostProcessor 这样就可以区分出不同扩展点的操作了。 -
像是接口用 instanceof 判断,注解用 Field.getAnnotation(Value.class); 获取,都是相当于在
类上做的一些标识性信息,便于可以用一些方法找到这些功能点,以便进行处理。所以在我们日常开发设计的组件中,也可以运用上这些特点。 -
当你思考把你的实现融入到一个已经细分好的 Bean 生命周期中,你会发现它的设计是如此的好,可以让你在任何初始化的时间点上,任何面上,都能做你需要的扩展或者改变,这也是我们做程序设计时追求的灵活性。
参考书籍:《手写Spring渐进式源码实践》
书籍源代码:https://github.com/fuzhengwei/small-spring
