前端三件套-css
一、元素选择器
元素选择器:利用标签名称。p,h1-h6......
行内样式(内联样式):例如<p style="color:red;font-size:50px">
id选择器:针对某一个特定的标签来使用。以#定义。
class(类)选择器:可以被多种标签使用,同一个标签可以使用多个类选择器,用空格隔开。
合并选择器:选择器1,选择器2,.....{}
选择器优先级:内联样式>id选择器>类选择器>元素选择器
同优先级多次定义会执行覆盖(最后定义的为最终效果)
①后代选择器 A B{ }
例如:
<style>
ul li{
color: blue;
}
</style>
</head>
<body>
<ul>
<li>后面的后代标签都会生效</li>
<li>1</li>
<div>
<ol>
<li>也会生效</li>
</ol>
</div>
</ul>
</body>
②子代选择器 A>B{ }
例如上面的选择器则只有第一个包括的li起效后面div包括的是孙代会失效。
③相邻选择器 A+B{ }
只有相邻的第一个元素生效,只能是往下选择。
④通用选择器 A~B{ }
向下的所有元素都起效。
伪元素和伪类
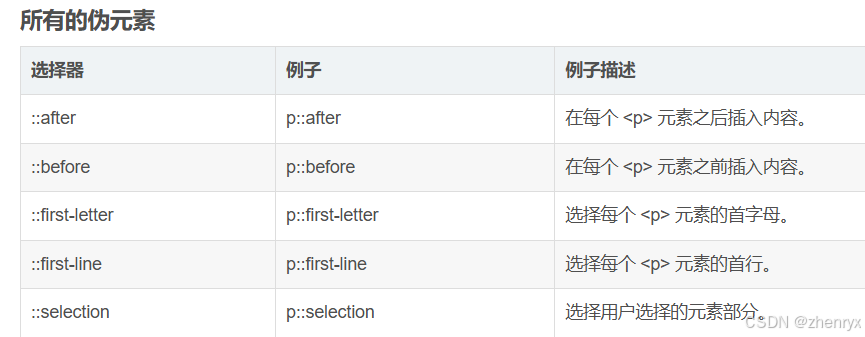
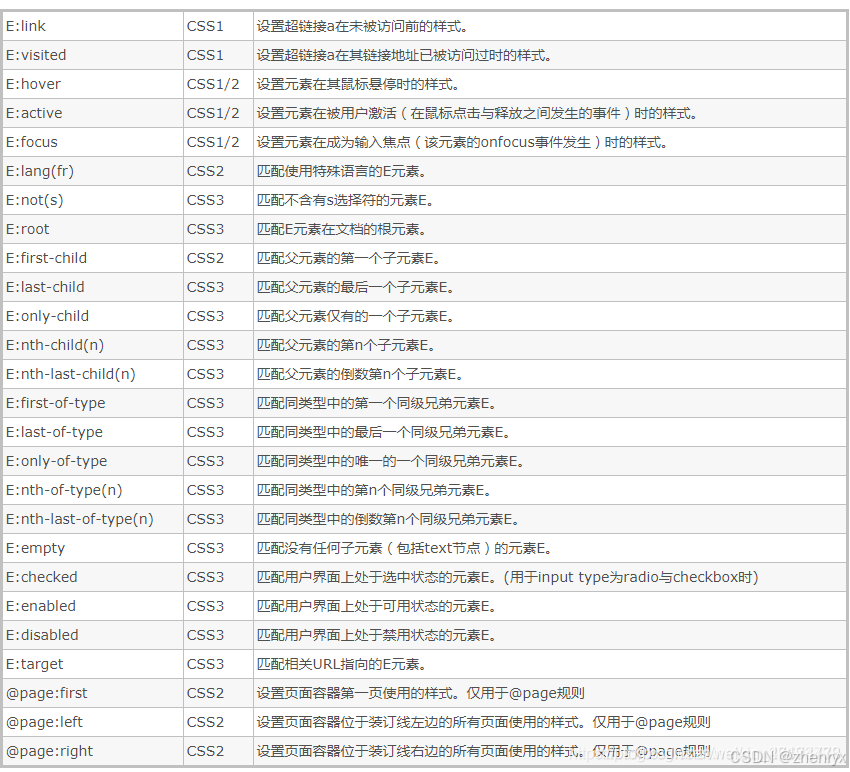
伪元素和伪类的根据区别就是:前者是创建出了一个新元素,而后者是一个已存在但你不能直接看到的元素。
伪元素
伪元素本身不存在在DOM文档中,它需要人为的去创建它。且就算你创建了伪元素,它也只是逻辑上存在,实际上也并不存在DOM文档中,也就是说你无法使用JS去获取改变它。
伪类
伪类它存在于DOM文档中,但如果你没有特别的去声明它,你就看不到它。
二、属性
1、字体属性
(1)color颜色
四种形式:
①color:red
②color:#ff0000 //十六进制形式(常用)
③color:rgb((255,0,0)
④color:rgba(255,0,0,.5) //第四个参数:0透明 1不透明 0.5半透明
(2)font-weight 字体粗细
①bold 粗体字符
②bolder 更粗的字符
③lighter 更细的字符
④400-900 细到粗 400为默认 700等同bolder
(3)font-style 字体样式
①normal 默认值
②italic 斜体字
(4)font-family 字体效果
例如:<h3 style="font-family: 黑体;">黑体:SimHei</h3>
<h3 style="font-family: 微软雅黑体;">Microsoft YaHei</h3>(默认)
2、背景属性
(1) background-color 背景颜色
(2)background-image 背景图像
(图像不够大会垂直和水平平铺)
background-image:url("");
(3)background-repeat 背景内容平铺方式
①repeat 默认
②repeat-x 水平方向平铺
③repeat-y 垂直方向平铺
④no-repeat 不平铺
默认情况例如:
(4)background-size 背景图像大小
①background-size:200px 300px;
②background-size:100% 100%; //百分比方式
③background-size:cover;//完全覆盖容器(放大裁剪)
④background-size:contain;//缩放到对于容器合适即可(自适应)
(5)background-position 背景图像位置
①自行匹配:left right top bottom center
例如 background-position:left top;//左上角
②百分比和像素方式
3、文本属性
(1)text-decoration 文本属性
①下划线:underline
②上划线:overline
③删除线:line-through
(2)text-transform 文本大小写
①首字母大写:captialize
②全部大写:uppercase
③全部小写:lowercase
(3)text-indent 首行文本缩进
text-indent:?px
4、表格属性
(1)边框
①border属性
table,td{
border:1px solid black;//边框大小 边框线样式(实线) 边框线的颜色
}
添加collapse属性 折叠边框为单边框
table{
border-collapse:collapse;
}ver
(2)表格大小:width height
(3)表格文字对齐:
水平对齐:text-align(left or right or center)
垂直对齐:vertical-align(top bottom center)
(4)表格填充
td{
padding:10px:
}//控制边框与文本的距离
5、盒子属性
盒子模型阴影
属性设置 :
box-shadow: h-shadow v-shadow blur spread color inset;
h-shadow:水平阴影的位置。可以使用负值表示阴影在元素左侧,正值表示阴影在元素右侧,0 表示没有水平阴影。
v-shadow:垂直阴影的位置。可以使用负值表示阴影在元素上方,正值表示阴影在元素下方,0 表示没有垂直阴影。
blur:模糊半径。可选值,表示阴影的模糊程度。值越大,阴影越模糊,0 表示没有模糊。
spread:阴影的扩展半径。可选值,表示阴影的大小扩展。正值表示阴影扩展,负值表示阴影收缩。
color:阴影的颜色。可选值,表示阴影的颜色,可以是 CSS 颜色值
inset:可选值,用于设置是否为内阴影。如果存在 inset,则表示是内阴影,否则为外阴影。内阴影会出现在元素内部,外阴影则出现在元素外部。
只有 前两个阴影 , 水平阴影 和 垂直阴影 必须写 , 后面的四个值可以省略 ;
三、CSS盒子模型
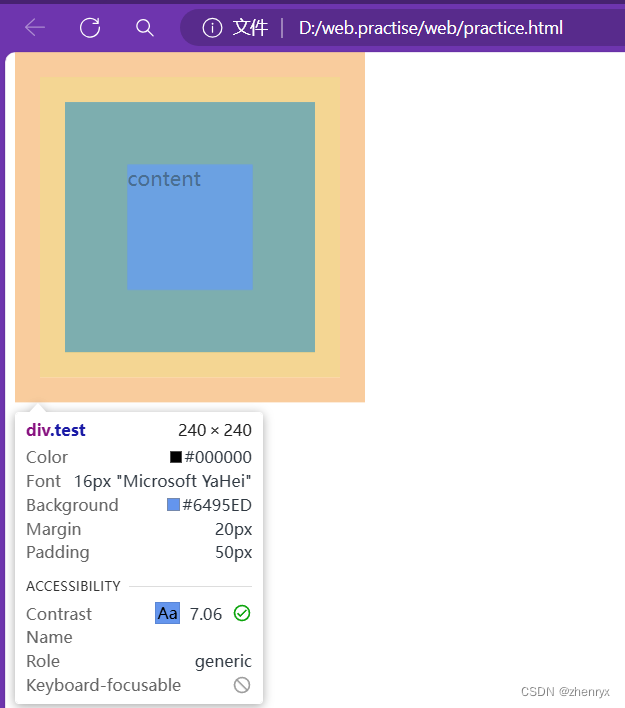
盒子模型的组成:content内容、padding内边距、border边框、margin外边距
content(内容)
<head>
    <meta charset="UTF-8">
    <meta name="viewport" content="width=device-width, initial-scale=1.0">
    <title>Document</title>
    <style>
      div{
        width: 100px;
        height: 100px;
        background-color: cornflowerblue;
        padding: 50px;
        border: 20px solid burlywood;
        margin: 20px;
      }
    </style>
</head>
<body>
<div class="test">
    content
</div>
效果
盒子模型又有两类,标准盒模型和怪异盒模型),两个盒模型可以通过box-sizing属性切换。
/* 标准盒模型 */
box-sizing: content-box;
/* 怪异盒模型 */
box-sizing: border-box;
① 标准盒模型
在标准盒模型中为盒子设置的width、height属性为content内容的宽度和高度,因此盒子模型的总宽度和总高度为:
总宽度 = width + 2 * padding + 2 * border + 2 * margin
总高度 = height + 2 * padding + 2 * border + 2 * margin
② 怪异盒模型
在怪异盒模型中,盒子的width、height属性为content内容+padding内边距+border边框的宽度和高度,因此盒子模型的总宽度和总高度为:
总宽度 = width + 2*margin
总高度 = height + 2*margin
四、布局
(1)flex布局
display:flex 使用弹性盒子(子元素默认水平排列)
容器属性
1、flex-direction 指定子元素的位置
row:横向从左到右,也是默认方式
row-reverse:反转横向排列(靠右对齐,最后一项排列在前面)
column:纵向排列
column-reverse:反转纵向排列
    <style>
      .test{
        width: 500px;
        height: 500px;
        background-color: bisque;
      }
      .box1{
        width: 100px;
        height: 100px;
        background-color: aquamarine;
      }
      .box2{
        width: 100px;
        height: 100px;
        background-color:blueviolet
      }
      .box3{
        width: 100px;
        height: 100px;
        background-color:yellowgreen
      }

    </style>
</head>
<body>
<div class="test">
   <div class="box1"></div>
   <div class="box2"></div>
   <div class="box3"></div>
</div>
</body>
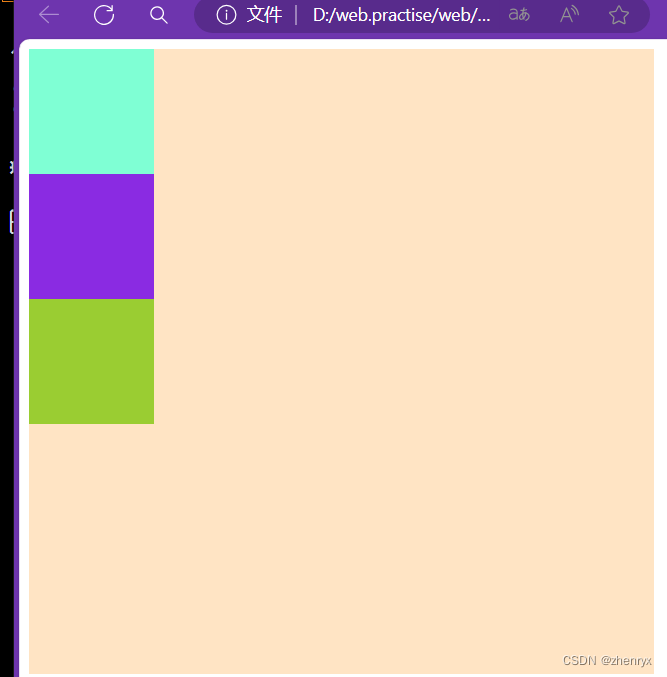
正常效果:
使用弹性盒子:
.test{
width: 500px;
height: 500px;
background-color: bisque;
display: flex;
}
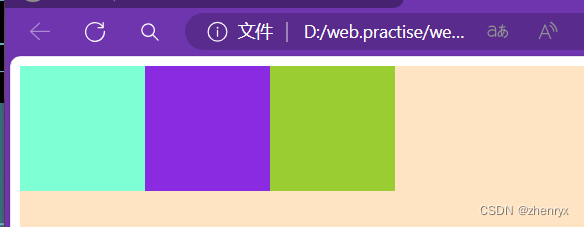
其他效果感兴趣可以自行尝试
2、flex - wrap 子元素在主轴方向上超出容器空间时是否换行。
nowrap(默认值):不换行,子元素可能会被压缩以适应容器。
wrap:换行,子元素在超出容器宽度(主轴为水平方向时)或高度(主轴为垂直方向时)时,会换行排列。
wrap - reverse:换行,但新行的添加方向与 wrap 相反。
3、两种对齐方式
justify-content(垂直方向) align-items(水平方向),在父级元素上定义
①justify-content: 子元素沿X轴排列
justify-content: flex-star; 子元素从左向右排
justify-content: flex-end; 子元素水平靠右排列
justify-content: center; 子元素水平居中排列
justify-content: space-between; 子元素水平居中散开排列
justify-content: space-around; 第一个子元素靠左,第二个子元素居中,第三个子元素靠右排列
②.align-items: 子元素沿y轴排列
align-items: flex-start; 子元素垂直于父级盒子顶部排列
align-items: flex-end; 子元素垂直于父级盒子底部排列
align-items: center; 子元素垂直居中排列
align-items: baseline; 子元素以第一行文字为基准线进行排列
align-items: strech; 当某个子元素没有设置高度时,会自动撑满子元素所在的那一列
4、设置子元素权重:flex
    <style>
      .test{
        width: 500px;
        height: 500px;
        background-color: bisque;
        display: flex;
      }
      .box1{
        width: 100px;
        height: 100px;
        background-color: aquamarine;
        flex: 3
      }
      .box2{
        width: 100px;
        height: 100px;
        background-color:blueviolet;
        flex:2
      }
      .box3{
        width: 100px;
        height: 100px;
        background-color:yellowgreen;
        flex:1
      }

    </style>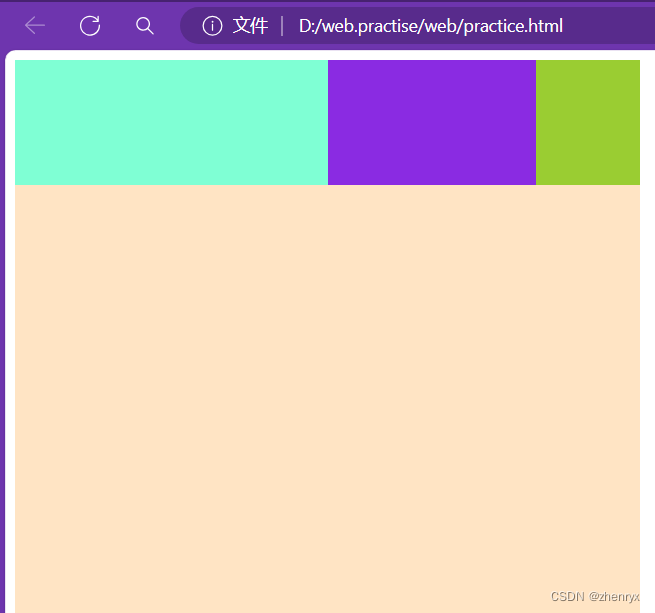
左侧固定宽度,右侧自适应:
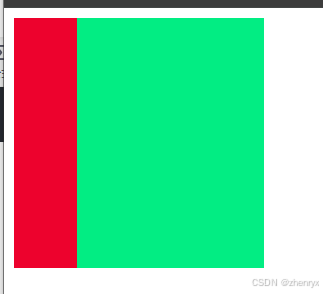
<body>
    <div class="big">
        <div class="small1">
        </div>
        <div class="small2">
        </div>
    </div>
</body>
<style>
    .big {
        width: 200px;
        height: 200px;
        background-color: blue;
       display: flex;
    }
    .small1 {
        width: 50px;
        background-color: rgb(237, 2, 45);
    }
    .small2 {
        background-color: rgb(2, 237, 131);
        flex: 1;
    }
</style>
项目属性:
1.order 设置子元素前后顺序
order:默认值是0,数值越小越靠前,可以给负数。
2.flex-grow 设置子元素的放大比例
默认值为0
flex-grow属性定义项目的放大比例,默认为0,即如果存在剩余空间,也不放大。
如果所有项目的flex-grow属性都为1,则它们将等分剩余空间(如果有的话)。如果一个项目的flex-grow属性为2,其他项目都为1,则前者占据的剩余空间将比其他项多一倍。
3.flex-shrink 设置子元素的缩小比例
默认值为1。
flex-shrink属性定义了项目的缩小比例,默认为1,即如果空间不足,该项目将缩小。(适合移动端溢出出滚动条的效果,前提是利用弹性布局写)
如果所有项目的flex-shrink属性都为1,当空间不足时,都将等比例缩小。如果一个项目的flex-shrink属性为0,其他项目都为1,则空间不足时,前者不缩小。
(2)position定位布局
常用三种值:
relative:相对定位,相对于当前元素的当前位置进行定位。元素会在原本文档流的位置进行定位
absolute:绝对定位,相对于最近已经定位的祖先元素进行定位,如果不存在已经定位的祖先元素,则相对于初始包含块进行定位。
fixed:固定定位,相对于浏览器窗口进行定位,元素会随着页面滚动而保持固定位置。
三种方式都用到四个偏移量:top bottom left right
position:absolute
.box1{
background-color: aqua;
width: 800px;
height: 400px;
position: relative;
left: 200px;
}
.box2{
background-color: rgb(255, 0, 251);
width: 700px;
height: 300px;
}
.box3{
width: 200px;
height: 200px;
background-color: blue;
position: absolute;
bottom: 10px;
}
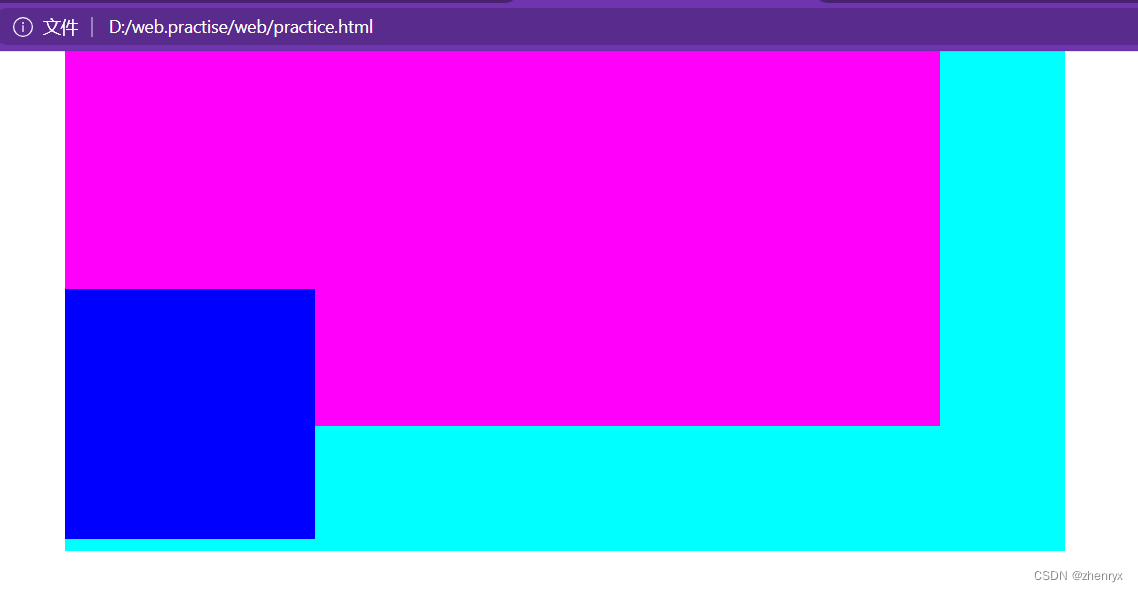
可以看出box3不是根据父元素box2进行定位而是相对于最近已经定位的祖先元素进行定位。
position:fixed
.box1{
background-color: aqua;
width: 800px;
height: 400px;
position: relative;
left: 200px;
}
.box2{
width: 200px;
height: 200px;
background-color: blue;
position: fixed;
bottom: 10px;
}
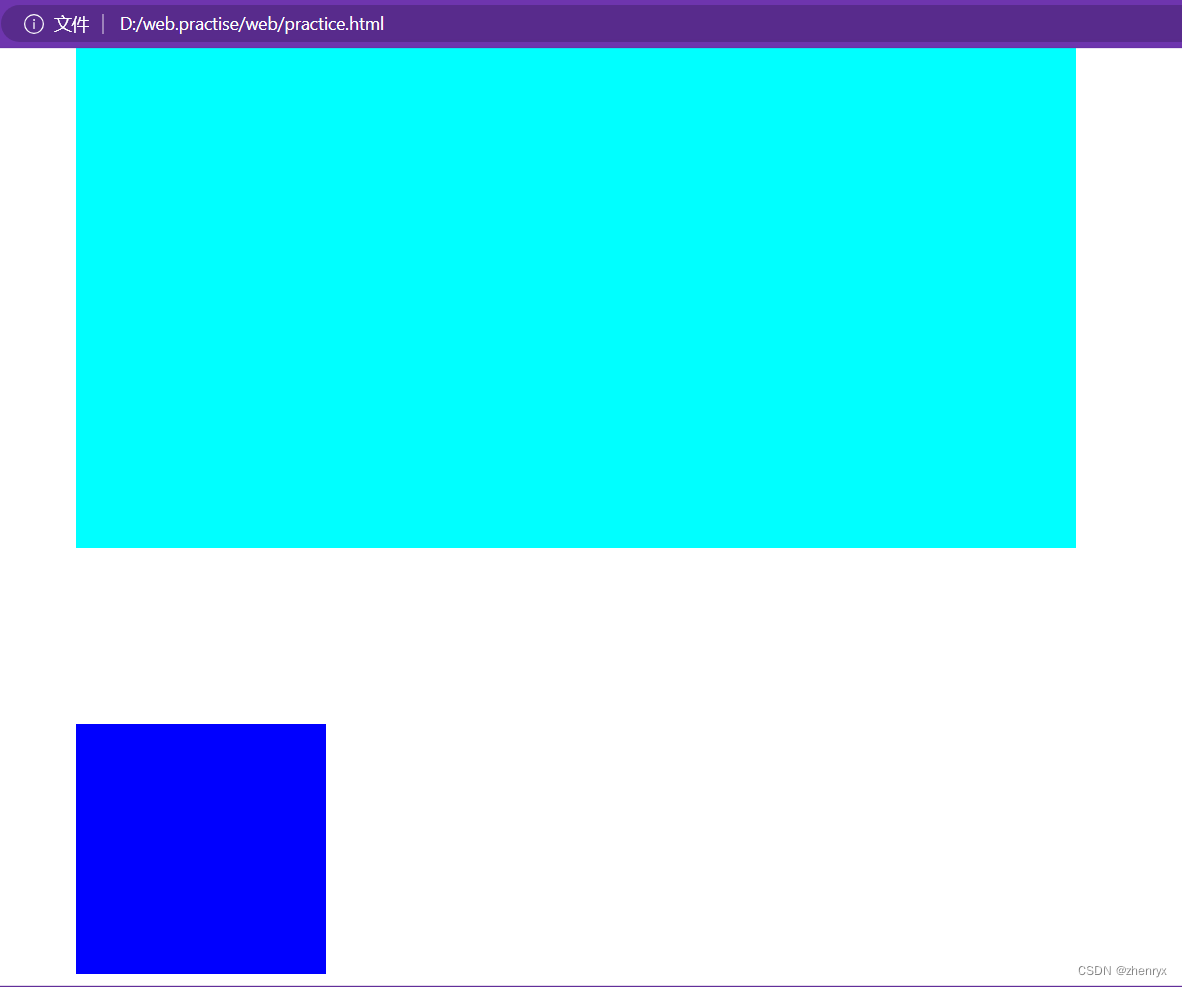
可以看出fiexd定位是根据body判定而不是根据父元素box1
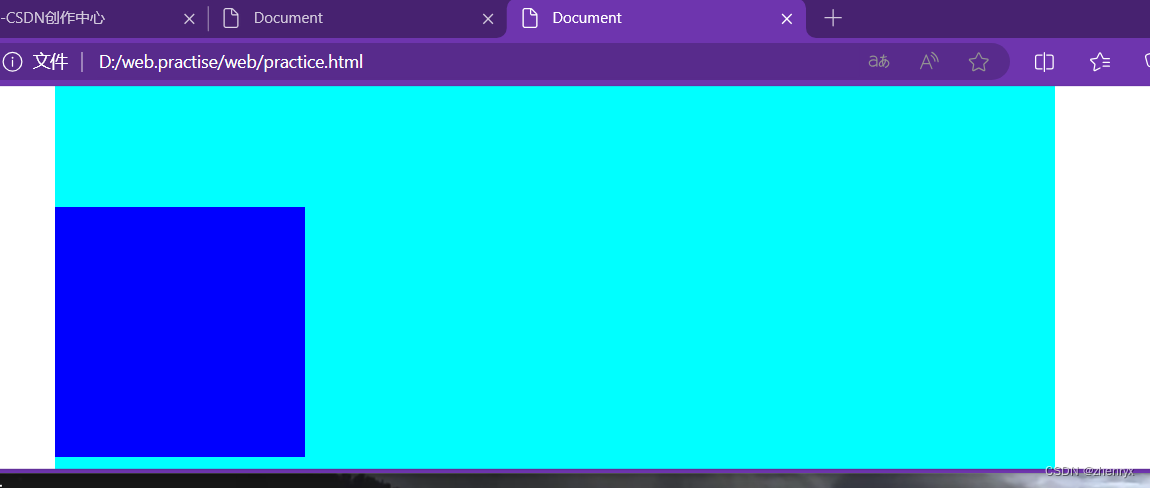
并且进行缩放后始终是相对于浏览器窗口的。
(3)Grid布局
<div class="tes">
  <div class="box1"></div>
  <div class="box2"></div>
  <div class="box3"></div>
</div>
</template>
<style lang="scss">
.tes{
  width: 100%;
  height: 100vh;
  display: grid;
  grid-template-columns: 1fr 2fr 1fr;//列的宽度自定义为父元素的1:2:1
  .box1{
    height: 100px;
    background-color: aqua;
  }
  .box2{
    height: 100px;
    background-color: rgb(255, 196, 230);
  }
  .box3{
    height: 100px;
    background-color: rgb(210, 196, 255);
  }
}
</style>
六、CSS3新属性
1.boder_radius属性 (元素圆角)
2.box-shadow属性(边框阴影)
box-shadow:X轴偏移量 Y轴偏移量 [阴影模糊半径] [阴影扩展半径] [阴影颜色] [投影方式];
值描述:
X轴偏移量:必需。水平阴影的位置,允许负值。
Y轴偏移量:必需。垂直阴影的位置,允许负值。
阴影模糊半径:可选。模糊距离,其值只能是正值,如果值为0,表示阴影没有模糊效果。
阴影扩展半径:可选。阴影的尺寸。
阴影颜色:可选。阴影的颜色。省略默认会黑色。
投影方式:可选。设置为inset时为内部阴影方式,若省略为外阴影方式。
九、字体图标
注册阿里巴巴字体库下载图标代码后放到你的项目目录下使用

网页内有使用说明

推荐使用symbol方式
居中方式大全(经典三种)

 1
1
1、
<style>
    .big {
        width: 200px;
        height: 200px;
        background-color: blue;
        display: flex;
        justify-content: center;
        align-items: center;
    }

    .small {
        width: 100px;
        height: 100px;
        background-color: rgb(237, 2, 45);
    }
</style>
2、
<style>
    .big {
        width: 200px;
        height: 200px;
        background-color: blue;
        display: flex;
    }

    .small {
        width: 100px;
        height: 100px;
        background-color: rgb(237, 2, 45);
        margin: auto;
    }
</style>
3、
<style>
    .big {
        width: 200px;
        height: 200px;
        background-color: blue;
        position: relative;
    }

    .small {
        width: 100px;
        height: 100px;
        background-color: rgb(237, 2, 45);
        position: absolute;
        left: 50%;
        top: 50%;
        transform: translate(-50%,-50%);
    }
</style>
