24.11.10 css
2.css语法结构
选择器{
样式:样式值;
样式:样式值;
}
3.css引入方式
如何在html页面中写css代码
        1.页面中直接使用style标签 编写css                          调试样式代码时使用
         <style>
            h1{
                color:red
            }
        </style>
       2.通过link标签 引入css文件                                 上线时使用
                       可使用三种路径 相对路径 相对根路径 绝对路径
        <link rel="stylesheet" href="/day2_css/css/mystyle.css">
3.在元素上 通过style属性直接编辑样式 尽量不用 后期维护更新比较麻烦
<h1 style="color: red;" >我的标题</h1>
注意:
1,2 后加载的覆盖先加载的
3 覆盖1,2加载方式
4.css常用选择器
常用选择器
        1.标签选择器(通过html标签选择元素)   选取范围较大 只要是页面中指定的标签都会选中
        2.class选择器(通过class值选元素)    选取范围精准 可以任意给元素指定class值 class值中有一个能匹配上即被选中
          class选择器 配合class多值的特性 让选取元素非常灵活
        3.id选择器(通过id值选元素)          选取范围精准 class可以替代id
                                                       id一般在写js是定义

        基本选择器的优先级
        id>class>标签    权值高的覆盖权值低的
1.标签选择器
p{
color: blue;
}
2.class选择器
.myp{
color: green;
}
3.id选择器
#aimp{
color: lightcoral;
}选择器组合方式 (了解即可)
        4并集选择器  同时选多种类型元素       选择器,选择器
        5交集选择器  同时满足多种条件的元素   选择器选择器  先元素 再其他

        6后代选择器  选取元素内部的元素       选择器 选择器  选取范围较大
        7子代选择器  选取元素内部的子元素     选择器>选择器  选取较精准

        8属性选择器  [属性名] [属性名=属性值]
        9通用选择器  *               做全局默认设置
4并集选择器
h1,.myp{
color: lightblue;
}
5.交集选择器
p.mystyle{
color: blue;
}
6.后代选择器
div p{
color: red;
}
7.子代选择器
.testdiv>div>p{
color: red;
}
8.属性选择器
[type='button']{
color: red;
}
/* .div1 [type='button']{
color: red;
}
.div2 [type='button']{
color: green;
} */
9.全局选择器
*{
color: lightpink;
}5.css常用样式
文字 背景常用设置
        常用样式属性
        1 color   文字颜色   颜色英文
                            rgb值 红 绿 蓝  0-255
                            #RGB 16进制
                            #3CF 相当于 #33CCFF

        2 font-size 文字大小    单位 像素   绝对单位
                               em rem     相对单位 默认字体倍率
                               分辨率 1080p 1920*1080
                                        2k
                                        4k

        3 font-weight 字体粗细  数大的粗

        4 font-family 字体类型  默认黑体

        5 text-align: center;  调整文字左右位置

        6 line-height: 100px;  行高  行高与块高一致 文字正好在中心点

        7.background-image: url(./imgs/niu.jpg); 背景图片
                                                  jpg png gif

        8.background-size: 50%;  调整大小比例

        9.background-repeat: no-repeat;  背景重复方式

        10. background-color: blueviolet; 背景颜色 背景图片与颜色一起使用时 图片会盖在颜色上边

        11. list-style:url(./imgs/niu2.png); 列表的标记 可以使用图片

        12. border: 1px solid black;  统一设置
                                      四条边分开设置
                                      left right top bottom

        13. border-radius  像素 百分比
            四个角可以单独设置
            border-bottom-left-radius: 30%;
<!DOCTYPE html>
<html lang="en">
<head>
<meta charset="UTF-8">
<meta name="viewport" content="width=device-width, initial-scale=1.0">
<title>Document</title>
<style>
div{
color:#3CF;
font-size: 2em;
font-weight: 900;
font-family: '楷体';
text-align: center;
width: 200px;
height: 200px;
/* border: 1px solid black;
border-radius: 10%; */
line-height: 200px;
background-image: url(./imgs/640.gif);
background-size: 50%;
background-repeat: no-repeat;
background-color: blueviolet;
border-bottom: 5px solid lightslategray;
border-left: 5px solid rgb(43, 5, 131);
border-bottom-left-radius: 30%;
border-top-right-radius: 30%;
}
a{
text-decoration: none;
}
.myul{
list-style:url(./imgs/niu2.png);
}
</style>
</head>
<body>
<div>测试</div>
<a href="###">测试超链接</a>
<!-- <img src="./imgs/niu.jpg"/> -->
<ul class="myul">
<li>尔滨装卸行李温柔得像放鸡蛋</li>
<li>郑钦文称不与选手交朋友 李娜回应</li>
<li>快递小哥在仓库遇到小猪包裹</li>
<li>王俊凯发文卡点为王源庆生</li>
</ul>
</body>
</html>
盒子模型
        盒子模型
        页面元素在排布时 使用的逻辑概念 盒子互相嵌套和排布

        content 内容大小   可以自动适应
                           也可以设置宽高
                          width height
        border  边框      特殊显示效果
        padding 内部填充   边框到内容之间填充 (元素整体会变大)
        margin  外边距     元素之间的间隔距离

        margin: 100px auto;  元素居中 特殊用法
<!DOCTYPE html>
<html lang="en">
<head>
<meta charset="UTF-8">
<meta name="viewport" content="width=device-width, initial-scale=1.0">
<title>Document</title>
<style>
.mydiv{
width: 100px;
height: 100px;
border: 10px solid black;
/* padding: 50px; 内部填充 内容与边框的间隔 */
/* padding: 50px 40px 30px 20px; */
顶部 右侧 底部 左侧
/* padding-left: 50px; */
/* 四个方向可以单独设置 */
/* margin:10px */
/* 外边距 控制元素与元素的间隔 */
/* margin-left: 50px;
margin-top: 50px; */
margin: 0px auto;
}
h1{
margin-top: 50px;
}
</style>
</head>
<body>
<div class="mydiv">
测试div<br>
12332111
</div>
<div class="mydiv">
测试div<br>
12332111
</div>
<h1>11111</h1>
</body>
</html>
div+css布局
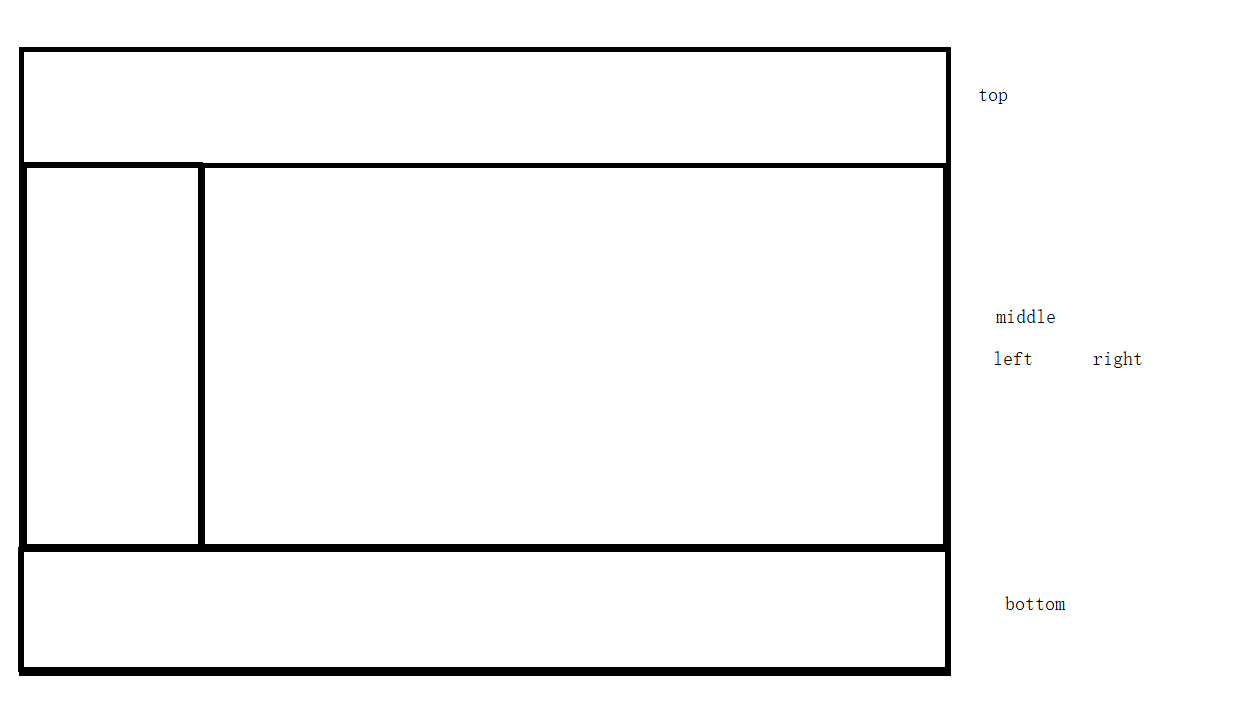
div+css布局 实际上就是在页面中画格子 大格子中套小格子


<!DOCTYPE html>
<html lang="en">
<head>
    <meta charset="UTF-8">
    <meta name="viewport" content="width=device-width, initial-scale=1.0">
    <title>Document</title>

    <style>
        /*
        页面元素排布时 像画table一样
        行加单元格的思想来布局
        div+css

        宽高排版时 为了方便适配 通常使用相对单位
        百分比  高度使用百分比时 要求父元素的高度已指定

        视窗比例相对单位
        宽度 vw 100vw 视窗宽度100%
        高度 vh 100vh 视窗高度100%


        */

        /* html,body{
            margin: 0px;
            height: 100%;
        } */
        body{
            margin: 0px;
        }
        .mainPanel{
            width: 100vw;
            height: 100vh;
            background-color: lightgrey;
        }
        .top{
            width: 100%;
            height: 15%;
            background-color: rgb(255, 179, 179);
        }
        .middle{
            width: 100%;
            height: 70%;
            background-color: rgb(156, 234, 248);
        }
        .bottom{
            width: 100%;
            height: 15%;
            background-color: rgb(222, 238, 180);
        }

        .left{
            width: 20%;
            height: 100%;
            background-color: rgb(255, 119, 187);
            float: left;
        }
        .right{
            width: 80%;
            height: 100%;
            background-color: rgb(134, 69, 255);
            float: left;
        }


    </style>

</head>

<body>
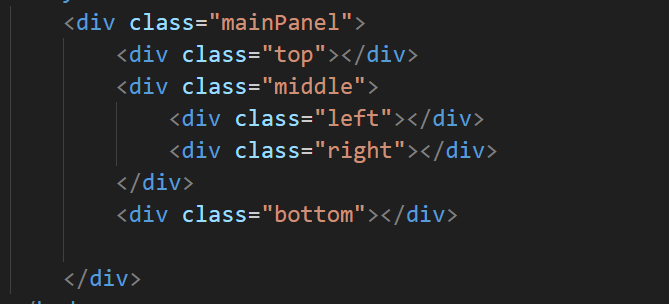
    <div class="mainPanel">
        <div class="top"></div>

        <div class="middle">
            <div class="left"></div>

            <div class="right"></div>

        </div>

        <div class="bottom"></div>

    </div>

</body>

</html>
注意:
float属性用于创建浮动框,允许元素向左或向右浮动,使其脱离常规的文档流。浮动元素会移动到包含块的左端或右端,直到它的外边缘接触到包含块或另一个浮动元素的边缘。
left:元素向左浮动。right:元素向右浮动。none:元素不浮动(默认值)。inherit:从父元素继承float属性的值
布局时 可以使用绝对单位
宽高排版时 为了方便适配 通常使用两种相对单位
百分比 高度使用百分比时 要求父元素的高度已指定 视窗比例相对单位
宽度 vw 100vw 视窗宽度100%
高度 vh 100vh 视窗高度100%显示方式属性
 display  元素显示方式
                block           块方式显示
                inline          行内方式显示
                inline-block    行内快方式显示
                none            不显示
显示规则:
块 (block) 从上到下排列 宽高有效
行内(inline) 从左到右排列 宽高无效
行内块() 从走到右排列 宽高有效 图片 表单元素(输入框 选择框 按钮.....)
透明度:
opacity: 0; 透明度 0透明-1不透 中间半透
rgba(41, 211, 168, 0.151)
透明度
伪类选择器
伪类选择器 (选取元素的交互状态)
:active  鼠标点击
:hover   鼠标悬停 (鼠标放在了某个元素上)
手型光标
cursor: pointer; 手型光标
<!DOCTYPE html>
<html lang="en">
<head>
    <meta charset="UTF-8">
    <meta name="viewport" content="width=device-width, initial-scale=1.0">
    <title>Document</title>

    <style>
        /*
        伪类选择器 (选取元素的交互状态)
        :active  鼠标点击
        :hover   鼠标悬停 (鼠标放在了某个元素上)
        这两个选择器作用在同一个元素上时会被覆盖,有一个元素不显示效果

        cursor: pointer;  手型光标

        */

        .testDiv{
            width: 100px;
            height: 100px;
            border: 1px solid black;
        }

        .testDiv:active{
            background-color: red;
        }

        .testDiv:hover{
            border: 10px solid rgb(114, 105, 105);
            cursor: pointer;
        }
        a:hover{
            font-size: 30px;
        }
    </style>

</head>

<body>
    <div class="testDiv"></div>

    <a href="###">aaaa</a>

</body>

</html>
定位属性
定位属性 position

       默认文档流 块从上到下 行内元素从左到右

       relative相对定位  元素不脱离文档流 元素以原始位置偏移

       absolute绝对定位  元素脱离文档流  以页面位置进行偏移

       fixed  固定定位  元素脱离文档流  以页面位置进行偏移 并固定在此处

       static  默认文档流

top   向下偏移  可以取负值 反方向

left  向右偏移

z-index 图层顺序  必须用在有定位改变的元素上 static时无效
<!DOCTYPE html>
<html lang="en">
<head>
<meta charset="UTF-8">
<meta name="viewport" content="width=device-width, initial-scale=1.0">
<title>Document</title>
<style>
.div1{
width: 100px;
height: 100px;
border: 1px solid black;
background-color: lightcoral;
position: fixed;
top: 10px;
left: 10px;
z-index: 1;
}
/*
定位属性 position
默认文档流 块从上到下 行内元素从左到右
relative相对定位 元素不脱离文档流 元素以原始位置偏移
absolute绝对定位 元素脱离文档流 以页面位置进行偏移
fixed 固定定位 元素脱离文档流 以页面位置进行偏移 并固定在此处
static 默认文档流
加了定位出图层
top 向下偏移 可以取负值 反方向
left 向右偏移
z-index 图层顺序 必须用在有定位改变的元素上 static时无效
*/
.div2{
width: 100px;
height: 100px;
border: 1px solid black;
background-color: lightgoldenrodyellow;
/* margin-top: 50px; */
position: fixed;
top: 30px;
left: 30px;
z-index: 2;
}
.div3{
width: 300px;
height: 100px;
border: 1px solid black;
background-color: lightskyblue;
position: fixed;
top: 50px;
left: 50%;
margin-left: -150px;
z-index: 3;
}
</style>
</head>
<body>
<div class="div1">
div1
</div>
<div class="div2">
div2
</div>
<div class="div3">
div3
</div>
<br><br><br><br><br><br><br><br><br><br><br><br><br>
<br><br><br><br><br><br><br><br><br><br><br><br><br>
<br><br><br><br><br><br><br><br><br><br><br><br><br>
<br><br><br><br><br><br><br><br><br><br><br><br><br>
</body>
</html>
