uni-app快速入门(十二)--常用API(中)
本文介绍uni-app的交互反馈、动态设置滚动条、动态设置tabbar、录音管理、视频组件控制、剪贴板API。
一、交互反馈
【消息提示框】
uni.showToast显示消息提示框,属性见uni-app官网:
uni.showToast(OBJECT) | uni-app官网uni-app,uniCloud,serverless,uni.showToast(OBJECT),参数 HarmonyOS Next 兼容性,IPromptError 的属性值,uni.hideToast(),uni.showLoading(OBJECT),参数 HarmonyOS Next 兼容![]() https://uniapp.dcloud.net.cn/api/ui/prompt.html示例:
https://uniapp.dcloud.net.cn/api/ui/prompt.html示例:
uni.showToast({
	title: '标题',
	duration: 2000
});
【loading提示框】
uni.showLoading显示loading提示框,一般用于请求服务器端数据时使用,用于在等待期间显示一个加载中的提示。当加载完毕后,关闭提示框。示例:
uni.showLoading({
	title: '加载中'
});

setTimeout(function () {
	uni.hideLoading();
}, 2000);
当加载完毕后,用uni.hideLoading()关闭提示框。
【模态窗口】
uni.showModel()显示模态窗口,可理解为消息提示框。语法比较简单,见下面示例:
uni.showModal({
	title: '提示',
	content: '这是一个模态弹窗',
	success: function (res) {
		if (res.confirm) {
			console.log('用户点击确定');
		} else if (res.cancel) {
			console.log('用户点击取消');
		}
	}
});
【操作菜单】
uni.showActionSheet显示操作菜单,经常用于选择性别、选择相册还是拍照等功能,一般是从手机底部弹出的菜单。
uni.showActionSheet({
	itemList: ['A', 'B', 'C'],
	success: function (res) {
		console.log('选中了第' + (res.tapIndex + 1) + '个按钮');
	},
	fail: function (res) {
		console.log(res.errMsg);
	}
});
二、动态设置导航条
导航条中可以动态设置的包括当前页面的标题、页面导航条颜色、显示、隐藏导航条加载动画、隐藏返回首页按钮等。官方说明见:
uni.setNavigationBarTitle(OBJECT) | uni-app官网uni-app,uniCloud,serverless,uni.setNavigationBarTitle(OBJECT),参数 HarmonyOS Next 兼容性,SetNavigationBarTitleFail 的属性值,AsyncApiResult 的属性值,uni.setNavigati![]() https://uniapp.dcloud.net.cn/api/ui/navigationbar.html【设置导航条标题】
https://uniapp.dcloud.net.cn/api/ui/navigationbar.html【设置导航条标题】
uni.setNavigationBarTitle({
	title: '新的标题'
});
【设置导航条颜色】
uni.setNavigationBarColor({
    frontColor: '#ffffff',
    backgroundColor: '#ff0000',
    animation: {
        duration: 400,
        timingFunc: 'easeIn'
    }
})
【显示和隐藏导航条加载动画】
uni.showNavigationBarLoading()和uni.hideNavigationBarLoading();
【隐藏返回首页按钮】
uni.hideHomeButton()用于隐藏返回首页按钮。
三、动态设置tabBar
uni-app可动态设置tabBar某项的内容、整体样式、隐藏/显示tabBar以及为某一项右上角添加/删除文本、显示/隐藏某一项右上角的红点等功能。例如商城底部的购物车图标右上角显示购物车的数量。tabBar使用的官方介绍见:
uni.setTabBarItem(OBJECT) | uni-app官网uni-app,uniCloud,serverless,uni.setTabBarItem(OBJECT),参数 HarmonyOS Next 兼容性,SetTabBarFail 的属性值,AsyncApiResult 的属性值,uni.setTabBarStyle(OBJECT),参数 Harmo![]() https://uniapp.dcloud.net.cn/api/ui/tabbar.html下面是设置tabBar文本和icon的示例:
https://uniapp.dcloud.net.cn/api/ui/tabbar.html下面是设置tabBar文本和icon的示例:
uni.setTabBarItem({
  index: 0,
  text: 'text',
  iconPath: '/path/to/iconPath',
  selectedIconPath: '/path/to/selectedIconPath'
})
下面是设置tabBar样式的示例:
uni.setTabBarStyle({
  color: '#FF0000',
  selectedColor: '#00FF00',
  backgroundColor: '#0000FF',
  borderStyle: 'white'
})
下面是显示、隐藏tabBar的示例:
uni.showTabBar({animation:true})
uni.hideTabBar({animation:true})
【为tabBar右上角添加/删除文本】
如果实现购物车右上角显示数字,参考下面的代码:
uni.setTabBarBadge({index :1,text:'10'}) //tabBar第二项右上角文本设置为10,index为1 是第二项
uni.removeTabBarBadge({index :1}) //移除文本
【在tabBar右上角显示红点】
uni.showTabBarRedDot({index:2})
uni.hideTabBarRedDot({index:2})
四、录音管理
录音通常用于开发聊天系统时发送语音的功能,也可以利用录音配合人工智能API实现语音识别功能。官方介绍见:uni.getRecorderManager() | uni-app官网uni-app,uniCloud,serverless,uni.getRecorderManager(),start(options),onStop(callback),onFrameRecorded(callback),onError(callback),示例![]() https://uniapp.dcloud.net.cn/api/media/record-manager.html下面是录音管理的示例代码,示例代码包括了创建音频控制组件、监听录音停止事件、开始录音、录音结束、播放录音等。最终录音的音频为aac格式,如果将录音文件上传到服务器,可以使用res.tempFilePath字段:
https://uniapp.dcloud.net.cn/api/media/record-manager.html下面是录音管理的示例代码,示例代码包括了创建音频控制组件、监听录音停止事件、开始录音、录音结束、播放录音等。最终录音的音频为aac格式,如果将录音文件上传到服务器,可以使用res.tempFilePath字段:
<template>
<view>
<button @tap="startRecord">开始录音</button>
<button @tap="endRecord">停止录音</button>
<button @tap="playVoice">播放录音</button>
</view>
</template>
<script>
export default {
name: "recorder",
onLoad() {
//创建录音管理器实例
this.recorderManager = uni.getRecorderManager();
//创建音频组件控制实例
this.innerAudioContext = uni.createInnerAudioContext();
//停止录音事件
this.recorderManager.onStop((res)=> {
console.log('recorder stop' + JSON.stringify(res));
//音频文件路径
this.voicePath = res.tempFilePath;
});
},
methods:{
startRecord() {
console.log('开始录音');
this.recorderManager.start({
format:"mp3"
});
},
endRecord() {
console.log('录音结束');
this.recorderManager.stop();
},
playVoice() {
console.log('播放录音');
if (this.voicePath) {
this.innerAudioContext.src = this.voicePath;
this.innerAudioContext.play();
}
}
}
}
</script>
<style scoped>
</style>
五、视频组件控制
视频组件控制可控制<video>组件使用js实现播放、暂停、全屏、弹幕等功能。
使用uni.createVideoContext创建并返回video上下文videoContext对象,可以操作组件内的<video>组件。视频组件控制官方说明见:
uni.createVideoContext(videoId, componentInstance) | uni-app官网uni-app,uniCloud,serverless,uni.createVideoContext(videoId, componentInstance)![]() https://uniapp.dcloud.net.cn/api/media/video-context.html下面是示例代码:
https://uniapp.dcloud.net.cn/api/media/video-context.html下面是示例代码:
<template>
<view>
<video id="myVideo" :src="videoUrl" controls style="width:100%;height:500rpx;" object-fit="fill" @timeupdate="getTime" :danmu-list="danmuList" :danmu-btn="true"></video>
当前播放时间:{{currentTime|formatSeconds}}/{{duration|formatSeconds}}
<input type="text" placeholder="请输入弹幕内容" v-model="danmuValue">
<button @click="sendDanmu()">发送弹幕</button>
<button @click="play()">播放</button>
<button @click="pause()">暂停</button>
<button @click="goTime()">前进15秒</button>
<button @click="backTime()">后退15秒</button>
</view>
</template>
<script>
export default {
name: "video-component",
data(){
return {
videoUrl:"https://www.xxx.com/aaa.m3u8",
currentTime:"00:00",
duration:"00:00",
danmuList: [{
text: '第 1s 出现的弹幕',
color: '#ff0000',
time: 1
},
{
text: '第 3s 出现的弹幕',
color: '#ff00ff',
time: 3
}
],
danmuValue:""
}
},
onReady(){
//创建视频组件控制实例
this.videoContext = uni.createVideoContext('myVideo')
},
methods:{
play(){
this.videoContext.play();
},
pause(){
this.videoContext.pause();
},
//获取时长
getTime(e){
// console.log(e);
this.currentTime=e.detail.currentTime;
this.duration=e.detail.duration;
},
goTime(){
this.videoContext.seek(this.currentTime+15);
},
backTime(){
this.videoContext.seek(this.currentTime-15);
},
//发送弹幕
sendDanmu(){
this.videoContext.sendDanmu({
text: this.danmuValue,
color: this.getRandomColor()
})
},
getRandomColor() {
const rgb = []
for (let i = 0; i < 3; ++i) {
let color = Math.floor(Math.random() * 256).toString(16)
color = color.length == 1 ? '0' + color : color
rgb.push(color)
}
console.log('#' + rgb.join(''));
return '#' + rgb.join('')
}
},
filters:{
formatSeconds(val){
let minute=parseInt(val/60)?parseInt(val/60):"0";//分
let second=parseInt(val%60)?parseInt(val%60):"0"; //秒
if(minute<10){
minute="0"+minute;
}
if(second<10){
second="0"+second;
}
return minute+":"+second;
}
}
}
</script>
<style scoped>
</style>
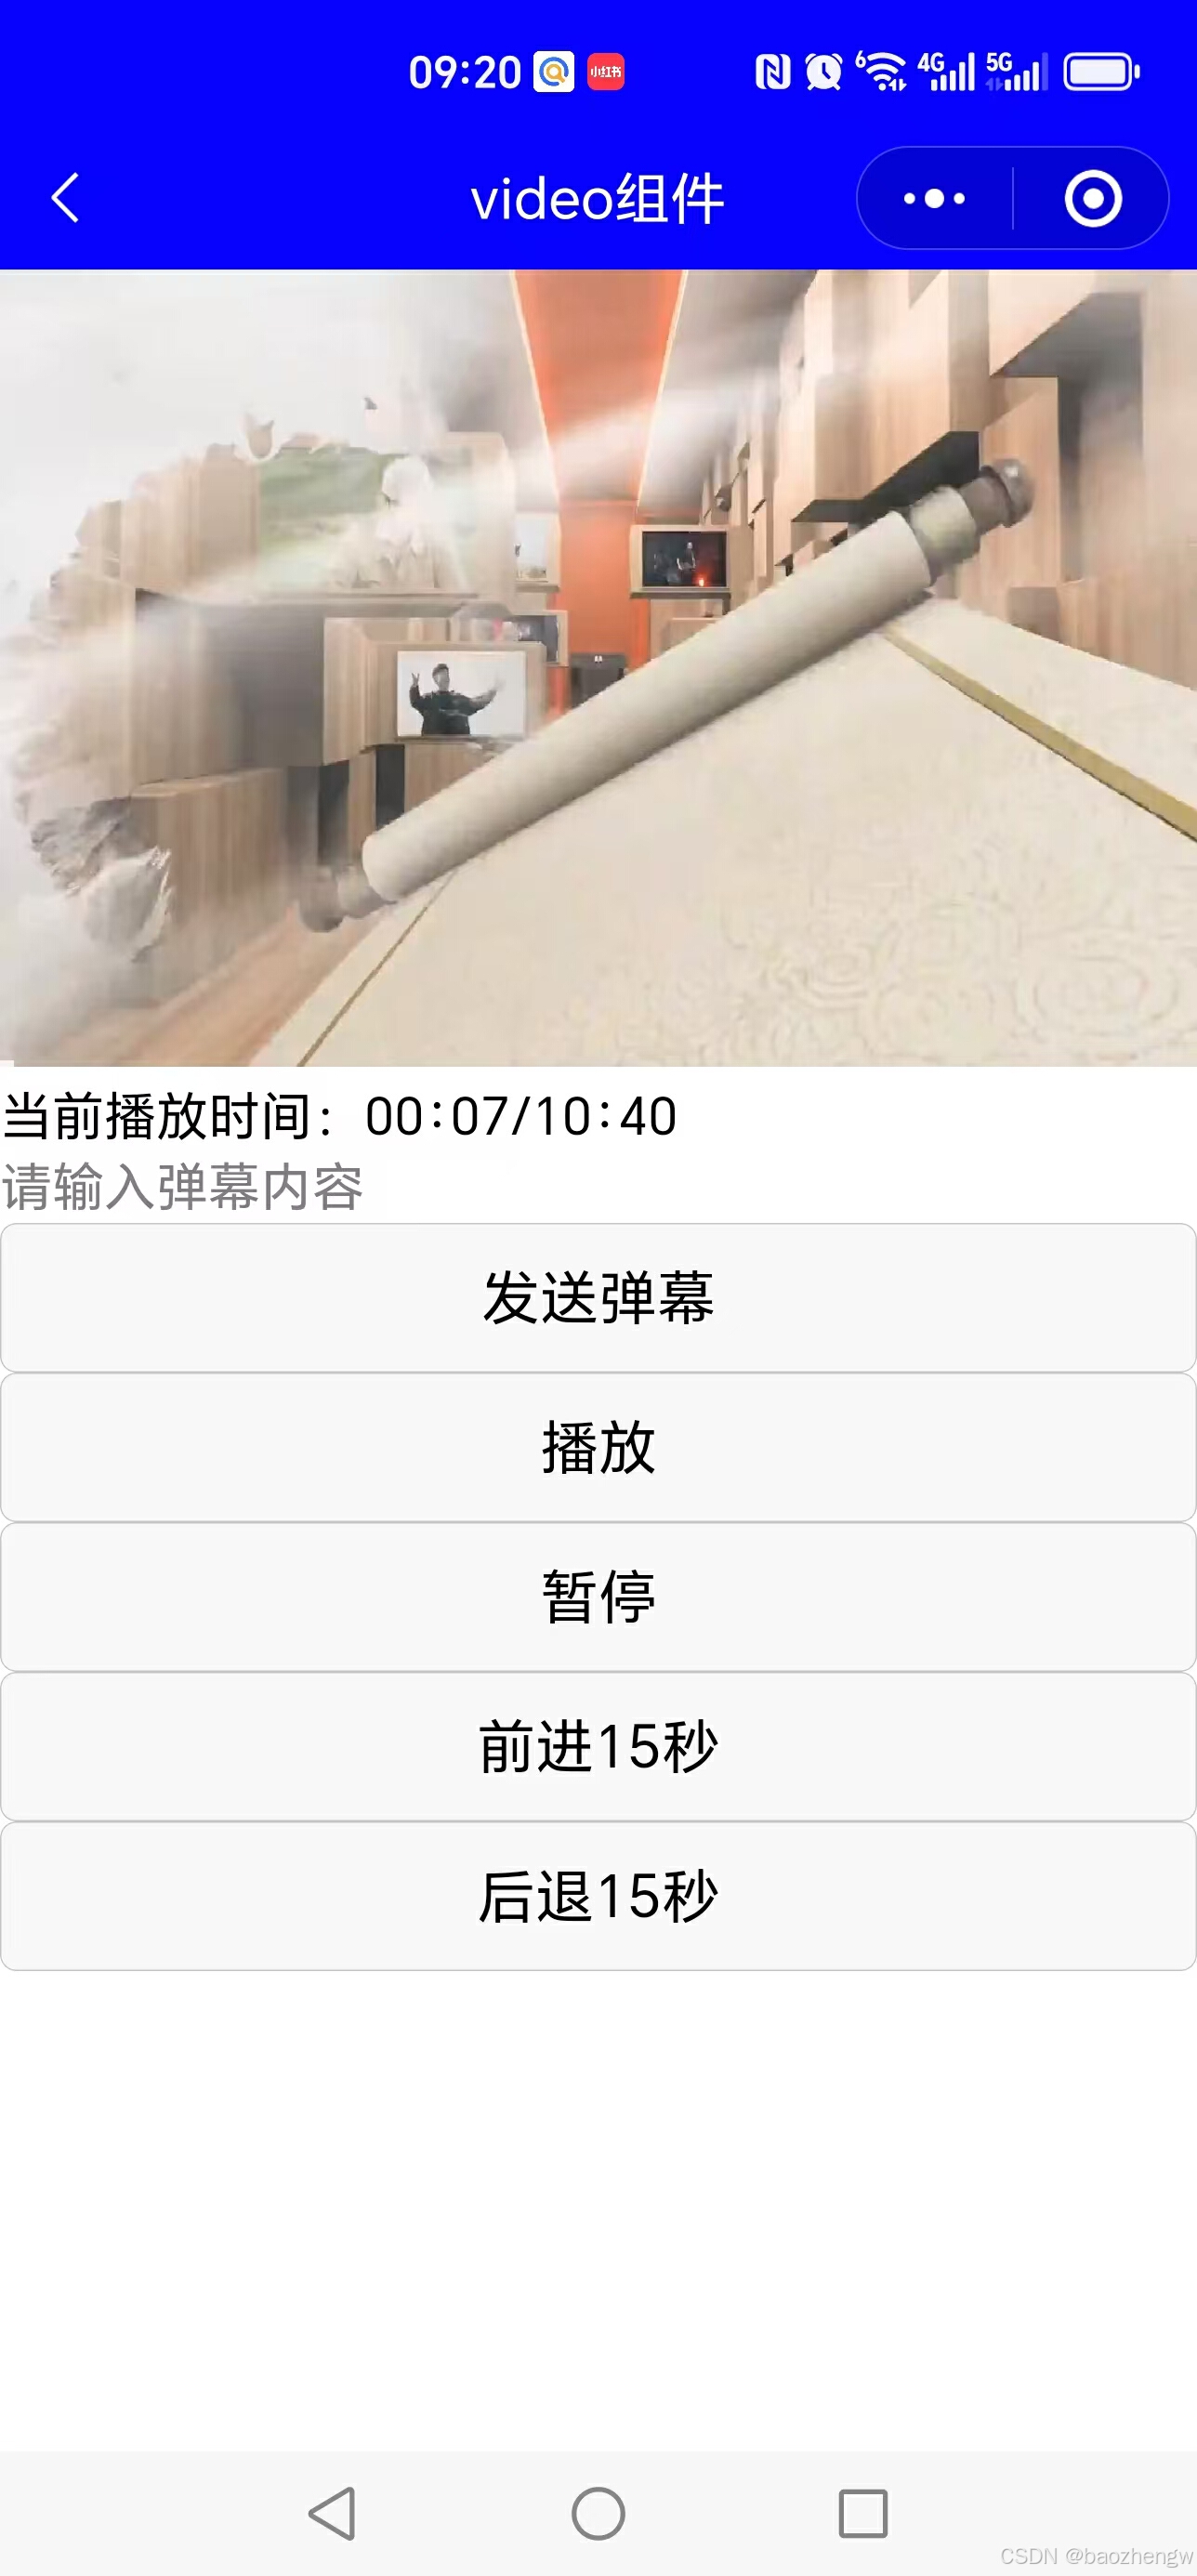
演示效果:

在上面的代码中还使用了uni.createVodeContext('myVideo').sendDanmu()发送弹幕,并设置随机弹幕文本颜色。发送弹幕需要在video组件上设置enable-danmu属性为true。在实际开发中,弹幕内容应该让所有观看视频的用户看到,需要通过webSocket实现。首先是搭建服务器端的socket环境,然后通过客户端的WebSocket连接通信。后续会在 Java开发示例搭建一个websocket服务器。在uni-app中使用websocket参考官方示例:
uni.connectSocket(OBJECT) | uni-app官网uni-app,uniCloud,serverless,uni.connectSocket(OBJECT),参数 HarmonyOS Next 兼容性,ConnectSocketSuccess 的属性值,ConnectSocketFail 的属性值,返回值 HarmonyOS Next 兼容性,So![]() https://uniapp.dcloud.net.cn/api/request/websocket.html 在上面的示例中,在请输入弹幕内容的地方输入弹幕文字,然后点发送弹幕,就可以在视频的顶部看到弹幕的内容,不过这个是本地发的,只有自己能看到。实际项目中需要通过websocket实现发弹幕让大家都能看到。
https://uniapp.dcloud.net.cn/api/request/websocket.html 在上面的示例中,在请输入弹幕内容的地方输入弹幕文字,然后点发送弹幕,就可以在视频的顶部看到弹幕的内容,不过这个是本地发的,只有自己能看到。实际项目中需要通过websocket实现发弹幕让大家都能看到。
六、剪贴板
uni-app中可设置剪贴板内容和获取剪贴板内容,同时可实现复制口令功能。官方文档见:
uni-app官网uni-app,uniCloud,serverless,uni.setClipboardData(OBJECT),参数 HarmonyOS Next 兼容性,uni.getClipboardData(OBJECT),参数 HarmonyOS Next 兼容性,GetClipboardDataSucc![]() https://uniapp.dcloud.net.cn/api/system/clipboard.html 向剪贴板加入内容:
https://uniapp.dcloud.net.cn/api/system/clipboard.html 向剪贴板加入内容:
uni.setClipboardData({
	data: 'hello',
	success: function () {
		console.log('success');
	}
});
获取剪贴板内容:
uni.getClipboardData({
	success: function (res) {
		console.log(res.data);
	}
});
