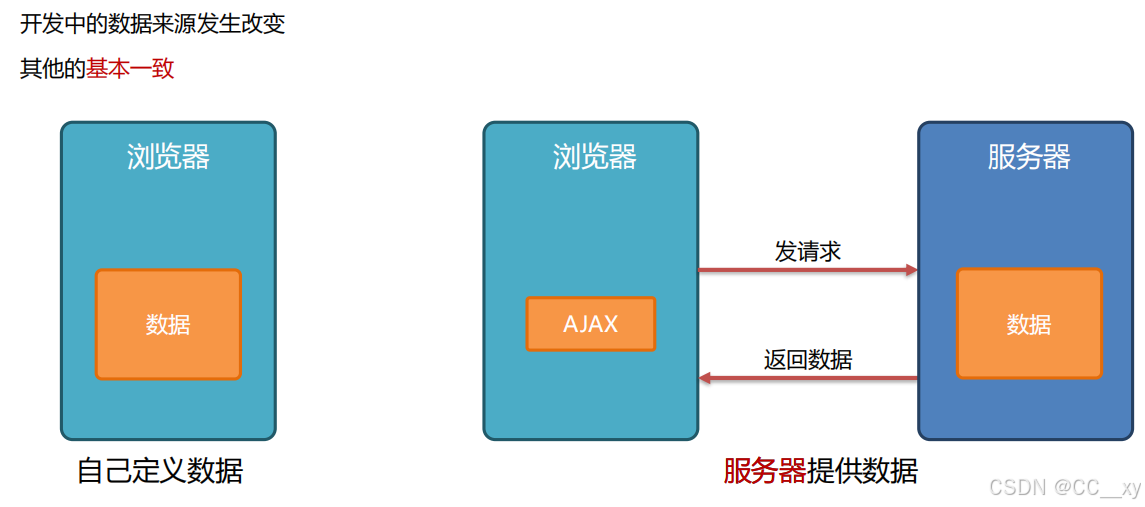
AJAX一、axios使用,url组成(协议,域名,资源路径)查询参数和化简,错误处理,请求/响应报文,状态码,接口文档,
一、AJAX是什么
概念
:
AJAX是一种与服务器(后端)通信的技术

二、请求库axios的基本用法
1导包
2使用
// 1. 发请求
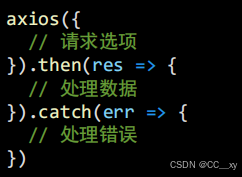
axios({
url: '请求地址'
}).then(res => {
// 2.接收并使用数据
})
<body>
    <p class="province">
        <!-- 数据渲染到这里 -->
    </p>
    <button class="btn">渲染省份数据</button>
    <!--
      axios库地址: https://cdn.jsdelivr.net/npm/axios/dist/axios.min.js
      省份数据地址: http://hmajax.itheima.net/api/province
      需求: 点击按钮 通过 axios 获取省份数据 并渲染
     -->
    <!-- 使用axios记得先导包 -->
    <script src="https://cdn.jsdelivr.net/npm/axios/dist/axios.min.js"></script>
    <script>
        axios({
                //发起请求
                //请求地址--后端提供
                url: 'http://hmajax.itheima.net/api/province'

            }).then((res) => {
                // 拿到结果
                document.querySelector('.province').innerHTML = res.data.list.join('-')
            })
            // .then(函数)拿请求成功的结果→结果在函数的形参位置保存
    </script>
</body>
二、 URL
概念:URL是资源在网络上的地址
URL
代表着是
统一资源定位符
(
Uniform Resource Locator
)
理论上说,每个有效的
URL
都指向一个唯一的资源。这个资源可以是一个
HTML
页面,一个
CSS
文档,一幅图像,等
<body>
    <div></div>
    <button class="btn">获取新闻数据并输出</button>
    <!-- 1. 导包 -->
    <script src="https://cdn.jsdelivr.net/npm/axios/dist/axios.min.js"></script>
    <!--
    新闻地址:http://hmajax.itheima.net/api/news
    需求: 点击按钮 通过axios 获取新闻数据 并输出
  -->
    <script>
        const btn = document.querySelector('.btn')

        btn.addEventListener('click', function() {
            axios({
                //请求数据
                url: 'http://hmajax.itheima.net/api/news'
            }).then((res) => {
                console.log(res)
                let a = ''
                res.data.data.forEach(element => {
                    a += `
                  ${element.source}</br>
                      <i>${element.time}</i>
                    <img src='${element.img}'></br>

                    <p> ${element.title} </p>
                    `
                });
                document.querySelector('div').innerHTML = a
            })
        })
    </script>
</body>
1.URL常见组成部分

协议 :
规定了浏览器
发送
及服务器
返回
内容的
格式
,常见的有
http、https
域名:
表示正在请求网络上的
哪个服务器
资源路径:
资源在服务器的
位置,
资源和路径的对应关系由
服务器决定
三、URL查询参数


<!DOCTYPE html>
<html lang="zh-CN">

<head>
    <meta charset="UTF-8">
    <meta http-equiv="X-UA-Compatible" content="IE=edge">
    <meta name="viewport" content="width=device-width, initial-scale=1.0">
    <title>Document</title>
</head>

<body>

    <input type="text">
    <button class="btn">获取城市数据并渲染</button>
    <ul>
        <!-- <li>商丘</li> -->
    </ul>
    <!-- 1. 导包 -->
    <script src="https://cdn.jsdelivr.net/npm/axios/dist/axios.min.js"></script>
    <!--
    城市数据:http://hmajax.itheima.net/api/city
      获取某个省所有的城市
      查询参数名:pname
      说明:传递省份或直辖市名比如 北京、广东省…
    需求: 点击按钮 通过axios 获取某个省的城市 并输出
  -->
    <script>
        // 发请求, 拿到某个省的数据
        // const ul = document.querySelector('ul')
        // document.querySelector('.btn').addEventListener('click', function() {
        //         axios({
        //             url: 'http://hmajax.itheima.net/api/city?pname=河南省'
        //         }).then((res) => {
        //             console.log(res)
        //             let str = res.data.list.map(item => {
        //                 return `
        //             <li>${item}</li>
        //             `

        //             }).join('')
        //             ul.innerHTML = str + `共有${res.data.list.length}个城市`
        //         })

        //     })
        const ul = document.querySelector('ul')
        const inp = document.querySelector('input')
        const btn = document.querySelector('.btn')
        btn.addEventListener('click', function() {
            axios({
                url: 'http://hmajax.itheima.net/api/city',
                params: {
                    pname: inp.value
                }
            }).then(res => {

                if (res.data.list.length == 0) {
                    alert(res.data.message)
                    return
                }

                console.log(res)
                let str = res.data.list.map(item => {
                    return `
                    <li>${item}</li>
                    `

                }).join('')
                ul.innerHTML = str + `共有${res.data.list.length}个城市`
            })
        })
    </script>

</body>

</html>
1.查询参数的简化
/*
  http://hmajax.itheima.net/api/area
  传递某个省份内某个城市的所有区县
  查询参数名:pname、cname
  pname说明:传递省份或直辖市名,比如 北京、湖北省…
  cname说明:省份内的城市,比如 北京市、武汉市…
  核心功能:查询地区,并渲染列表
*/
const province = document.querySelector('.province')
const city = document.querySelector('.city')
const btn = document.querySelector('button')
const ul = document.querySelector('.list-group')

// btn.addEventListener('click', function() {
//     axios({
//         url: `http://hmajax.itheima.net/api/area?pname=${province.value}&cname=${city.value}`
//     }).then(res => {
//         console.log(res)
//         let str = res.data.list.map(item => {
//             return `
//               <li class="list-group-item">${item}</li>
//               `
//         }).join('')
//         ul.innerHTML = str
//     })
// })


// 查询参数的化简

btn.addEventListener('click', function() {

    //先获取value值保存一个变量
    // const pval = province.value
    // const cval = city.value
    const pname = province.value
    const cname = city.value
    axios({
        url: `  http://hmajax.itheima.net/api/area`,
        params: {
            // pname: province.value,
            // cname: city.value

            // pname: pname,
            // cname: cname
            pname,
            cname

        }
    }).then(res => {
        let str = res.data.list.map(item => {

            return `
              <li class="list-group-item">${item}</li>
    `
        }).join('')
        ul.innerHTML = str
    })
})四、常用请求方法
请求方法表明对服务器资源执行的操作。
请求方法 不区分大小写
get 获取数据 从服务器获取的参数, 查询参数
post提交数据,比如想注册一个账号,就需要把用户输入的数据存起来,
只要是body参数,就写data
GET获取数据,
POST提交,
PUT修改数据,全部,
DELETE删除数据,
PATCH修改数据,部分
请求报文,发给服务器的内容(后端)

<!DOCTYPE html>
<html lang="zh-CN">

<head>
    <meta charset="UTF-8">
    <meta http-equiv="X-UA-Compatible" content="IE=edge">
    <meta name="viewport" content="width=device-width, initial-scale=1.0">
    <title>Document</title>
</head>

<body>
    <button class="btn">注册用户</button>
    <!-- 1. 导包 -->
    <script src="https://cdn.jsdelivr.net/npm/axios/dist/axios.min.js"></script>
    <!--
    请求地址(url):http://hmajax.itheima.net/api/register
    注册用户
    请求方法:POST
    参数:username,password
    说明:username 用户名(中英文和数字组成, 最少8位),password 密码(最少6位)
    需求:点击按钮 通过axios提交用户数据,完成用户注册
   -->
    <script>
        document.querySelector('.btn').addEventListener('click', function() {
            axios({
                url: 'http://hmajax.itheima.net/api/register',
                // /注册账号 把本地的数据 发送到服务器 → post
                method: 'post',
                data: {
                    username: 'hahao',
                    password: '123456'
                }
            }).then(res => {
                alert(res.data.message)
                console.log(res)

            }).catch(error => {
                //失败的结果
                console.log(error)

                alert(error.response.data.message)
                    // 200的是成功的,400是服务器错了
            })
        })
    </script>

</body>

</html>
<!-- 请求方法 不区分大小写-->
<!-- get 获取数据 从服务器获取的参数, 查询参数-->
<!-- post提交数据,比如想注册一个账号,就需要把用户输入的数据存起来,只要是body参数,就写data -->
<!-- 请求报文,发给服务器的内容(后端) -->
五、错误错误处理
在
then
方法的后面,通过点语法调用
catch
方法,传入
回调函数
并定义
形参

<!DOCTYPE html>
<html lang="en">

<head>
    <meta charset="UTF-8">
    <meta name="viewport" content="width=device-width, initial-scale=1.0">
    <title>Document</title>
</head>

<body>

    <script>
        //trycatch尝试执行代码,如果出错,把报错信息发到百度去搜索
        try {
            const p = document.querySelector('p')
            p.innerHTML = 'try catch尝试抓住'
        } catch (errror) {
            location.href = 'https://www.baidu.com/s?wd=' + errror //拼一个百度的查询参数(抓住的报错)
        }
    </script>
</body>

</html>六、HTTP协议-请求报文
规定了浏览器
发送
及服务器
返回
内容的
格式
请求报文:
浏览器按照HTTP协议要求的
格式,
发送给服务器(后端)的内容
1. 请求行:请求方法,URL
,协议
2. 请求头:
以键值对的格式携带的附加信息,比如:
Content-Type
3. 空行:分隔请求头,空行之后的是发送给服务器的资源
4. 请求体:发送的资源(请求体)
七、HTTP协议-响应报文
规定了浏览器发送及服务器返回内容的格式
响应报文:
服务器按照HTTP协议要求的
格式,
返回给浏览器的内容
1. 响应行(状态行):
协议、
HTTP响应状态码
、状态信息
2. 响应头:
以键值对的格式携带的附加信息,比如:
Content-Type
3. 空行:分隔响应头,空行之后的是服务器返回的资源
4. 响应体:返回的资源
响应状态码

接口文档
由
后端
提供的
描述接口
的文章
 八,例
八,例
需求如下:
-
在输入框中输入信息,点击发送或者按回车键能够将发送消息展示到页面
-
发送消息以后,机器人回复消息并将其展示到页面上

<!DOCTYPE html>
<html lang="en">

<head>
    <meta charset="UTF-8">
    <meta http-equiv="X-UA-Compatible" content="IE=edge">
    <meta name="viewport" content="width=device-width, initial-scale=1.0">
    <title>聊天机器人</title>
    <!-- 字体图标 -->
    <link rel="stylesheet" href="https://at.alicdn.com/t/c/font_3736758_vxpb728fcyh.css">
    <!-- 初始化样式 -->
    <link rel="stylesheet" href="https://cdn.jsdelivr.net/npm/reset.css@2.0.2/reset.min.css">
    <!-- 公共 -->
    <style>
        * {
            box-sizing: border-box;
        }

        html,
        body {
            width: 100%;
            height: 100%;
            overflow: hidden;
        }

        .container {
            width: 100%;
            height: 100%;
            background-color: #f5f4f4;
            position: relative;
            display: flex;
            flex-direction: column;
        }
    </style>
    <!-- 头部 -->
    <style>
        .top {
            width: 100%;
            height: 44px;
            padding: 15px 7px 12px 21px;
            background-color: #f5f4f4;
            display: flex;
            justify-content: space-between;
            position: fixed;
            top: 0;
            left: 0;
        }
    </style>
    <!-- 好友名字 -->
    <style>
        .friend_name {
            width: 100%;
            height: 44px;
            padding: 14px 19px 14px;
            background-color: #f5f4f4;
            text-align: center;
            position: fixed;
            top: 44px;
            left: 0;
        }

        .friend_name img {
            width: 10px;
            height: 16px;
            position: absolute;
            left: 19px;
        }
    </style>
    <!-- 聊天区域 -->
    <style>
        .chat {
            width: 100%;
            /* 顶部留出88px的2个头部导航的高度 */
            /* 底部留出89px内边距让出固定在底部的对话框-防止遮挡 */
            /* 再多留出10px, 最后一条消息距离底部 */
            padding: 88px 20px 99px;
            flex: 1;
            overflow-y: scroll;
        }
        /* 隐藏滚动条 */

        .chat::-webkit-scrollbar {
            display: none;
        }

        .chat ul {
            padding-top: 20px;
        }

        .chat img {
            width: 35px;
            height: 35px;
            border-radius: 50%;
        }

        .chat li {
            display: flex;
            align-items: top;
        }

        .chat li~li {
            /* 除了第一个li, 选择所有的兄弟li标签 */
            margin-top: 20px;
        }

        .chat .right {
            display: flex;
            justify-content: flex-end;
        }

        .left span {
            margin-left: 10px;
            border-radius: 1px 10px 1px 10px;
            display: inline-block;
            padding: 12px 16px;
            background-image: linear-gradient(180deg, #B1E393 0%, #50D287 100%);
            box-shadow: 2px 2px 10px 0px rgba(201, 201, 201, 0.1);
            color: #FFFFFF;
        }

        .right span {
            margin-right: 10px;
            border-radius: 1px 10px 1px 10px;
            display: inline-block;
            padding: 12px 16px;
            background: #FFFFFF;
            border: 1px solid rgba(247, 247, 247, 1);
            color: #000000;
        }
    </style>
    <!-- 底部区域(发送消息) -->
    <style>
        .bottom_div {
            width: 100%;
            height: 89px;
            position: fixed;
            left: 0;
            bottom: 0;
            background: #FFFFFF;
            box-shadow: 0px -5px 7px 0px rgba(168, 168, 168, 0.05);
            border-radius: 25px 25px 0px 0px;
            padding: 15px 15px 0px 15px;
        }
        /* 外框盒子 */

        .send_box {
            display: flex;
        }

        .send_box img {
            width: 34px;
            height: 34px;
        }
        /* 输入框背景 */

        .input_bg {
            height: 35px;
            background: #f3f3f3;
            border-radius: 50px;
            padding-left: 17px;
            flex: 1;
            margin-right: 15px;
            /* 让input宽度高度 */
            display: flex;
        }

        .input_bg input {
            border: 0;
            outline: 0;
            background-color: transparent;
            display: inline-block;
            width: 100%;
        }
        /* 修改输入框默认占位文字
        webkit内核, firefox18-, firfox19+, 其他
        */

        .input_bg input::-webkit-input-placeholder,
        .input_bg input:-moz-placeholder,
        .input_bg input::-moz-placeholder,
        .input_bg input:-ms-input-placeholder {
            font-family: PingFangSC-Regular;
            font-size: 26px;
            color: #C7C7C7;
            letter-spacing: 0;
            font-weight: 400;
        }
        /* 底部黑色小条 */

        .black_border {
            margin-top: 10px;
            height: 34px;
            text-align: center;
        }

        .black_border span {
            display: inline-block;
            background-color: #000;
            width: 105px;
            height: 4px;
            border-radius: 50px;
        }
    </style>
    <!-- PC端单独适配成移动大小 -->
    <style>
        /* PC端居中显示手机 */

        @media screen and (min-width: 1200px) {
            .container {
                width: 375px;
                margin: 0 auto;
                border: 1px solid black;
                /* 让fixed固定定位标签参照当前标签 */
                transform: translate(0px);
            }
        }
    </style>
</head>

<body>
    <div class="container">
        <!-- 头部 -->
        <div class="top">
            <span>9:41</span>
            <div class="icon">
                <i class="iconfont icon-xinhao"></i>
                <i class="iconfont icon-xinhao1"></i>
                <i class="iconfont icon-electricity-full"></i>
            </div>
        </div>
        <!-- 好友名字 -->
        <div class="friend_name">
            <img src="./assets/arrow-left.png" alt="">
            <span>使劲夸夸</span>
        </div>
        <!-- 聊天区域 -->
        <div class="chat">
            <ul class="chat_list">
                <!-- 他的消息 -->
                <li class="left">
                    <img src="./assets/you.png" alt="">
                    <span>小宝贝</span>
                </li>
                <!-- 我的消息 -->
                <li class="right">
                    <span>干啥</span>
                    <img src="./assets/me.png" alt="">
                </li>
                <li class="left">
                    <img src="./assets/you.png" alt="">
                    <span>小宝贝</span>
                </li>
            </ul>
        </div>
        <!-- 底部固定 -->
        <div class="bottom_div">
            <!-- 发送消息 -->
            <div class="send_box">
                <div class="input_bg">
                    <input class="chat_input" type="text" placeholder="说点什么吧">
                </div>
                <img class="send_img" src="./assets/send.png" alt="">
            </div>
            <!-- 底部黑条 -->
            <div class="black_border">
                <span></span>
            </div>
        </div>
    </div>
</body>

</html>
<script src="https://cdn.jsdelivr.net/npm/axios/dist/axios.min.js"></script>
<script>
// 获取机器人回答消息 - 接口地址: http://hmajax.itheima.net/api/robot
// 查询参数名: spoken
// 查询参数值: 我说的消息
const inp = document.querySelector('.chat_input')
const btn = document.querySelector('.send_img')
// 点击发送按钮时,调用后端接口
btn.addEventListener('click', function() {
sendRequest()
})
// 在输入框回车键时,调用后端接口
inp.addEventListener('keyup', function(e) {
if (e.key == 'Enter') {
sendRequest()
}
})
//调用后端接口,获取机器人回复的信息
function sendRequest() {
// if () {
// }
let values = inp.value //把输入框的值先存起来,防止清空后没法把值传送后端(服务器)
document.querySelector('.chat_list').innerHTML += ` <li class="right">
<span>${values}</span>
<img src="./assets/me.png" alt="">
</li>`
//我的消息的输入框的值在点击发送后要清空
inp.value = ''
axios({
url: 'https://hmajax.itheima.net/api/robot',
method: 'get', //请求方法有:get post PUT修改(部分) DELETE删除 PATCH(整体)
// post的请求参数是data,get的请求参数是params,都可以有多个
params: {
// 输入框用变量存起来的值
spoken: values,
}
}).then(function(res) { //result结果
// res.data是返回的整体数据
document.querySelector('.chat_list').innerHTML += `
<li class="left">
<img src="./assets/you.png" alt="">
<span>${res.data.data.info.text}</span>
</li>
`
}).catch(err => { //error 错误 message信息 response响应 request请求
// 报错信息,用机器人返回界面显示
document.querySelector('.chat_list').innerHTML += `
<li class="left">
<img src="./assets/you.png" alt="">
<span>${err.response.data.message}</span>
</li>
`
})
}
</script>

