小车AI视觉交互--2.颜色跟随
一、实验目标
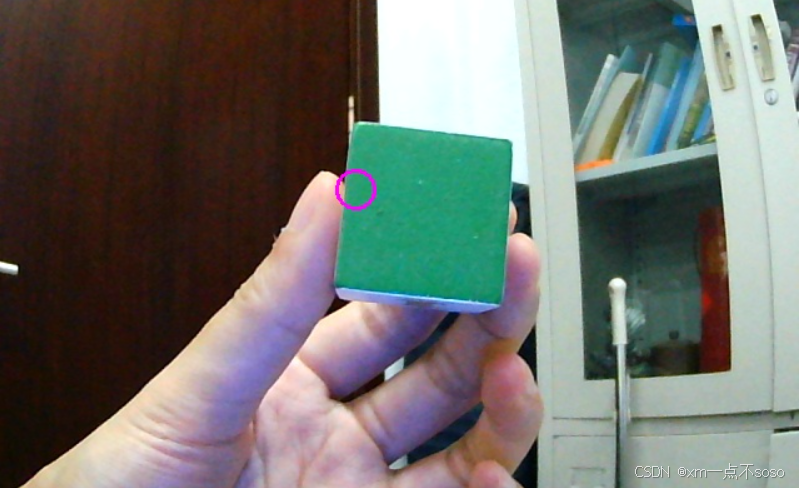
前面利用了颜色对象在摄像头画面的x,y不同位置通过云台进行跟踪,接下来我们可以在这个基础上修改下,x方向改为车身左右运动进行跟随,然后根据识别的图像外切圆大小进行前进的控制,通过二者叠加来整体控制小车电机运动。
二、实验源码
import sys
sys.path.append('/home/pi/project_demo/lib')
#导入麦克纳姆小车驱动库 Import Mecanum Car Driver Library
from McLumk_Wheel_Sports import *
sys.path.append('/home/pi/software/oled_yahboom/')
from yahboom_oled import *
# 创建oled对象 Create an oled object
oled = Yahboom_OLED(debug=False)
#bgr8转jpeg格式 bgr8 to jpeg format
import enum
import cv2
def bgr8_to_jpeg(value, quality=75):
return bytes(cv2.imencode('.jpg', value)[1])
#显示摄像头组件 Display camera components
import traitlets
import ipywidgets.widgets as widgets
from IPython.display import display
import time
# 线程功能操作库 Thread function operation library
import threading
import inspect
import ctypes
import numpy as np
image_widget = widgets.Image(format='jpeg', width=640, height=480)
image = cv2.VideoCapture(0)
image.set(3, 320)
image.set(4, 240)
image.set(5, 30) #设置帧率 Setting the frame rate
# image.set(cv2.CAP_PROP_FOURCC, cv2.VideoWriter.fourcc('M', 'J', 'P', 'G'))
# image.set(cv2.CAP_PROP_BRIGHTNESS, 62) #设置亮度 -64 - 64 0.0 Set Brightness -64 - 64 0.0
# image.set(cv2.CAP_PROP_CONTRAST, 63) #设置对比度 -64 - 64 2.0 Set Contrast -64 - 64 2.0
# image.set(cv2.CAP_PROP_EXPOSURE, 4800) #设置曝光值 1.0 - 5000 156.0 Set the exposure value 1.0 - 5000 156.0
ret, frame = image.read()
# from picamera2 import Picamera2, Preview
# import libcamera
# picam2 = Picamera2()
# camera_config = picam2.create_preview_configuration(main={"format":'RGB888',"size":(320,240)})
# camera_config["transform"] = libcamera.Transform(hflip=1, vflip=1)
# picam2.configure(camera_config)
# # picam2.stop_preview() #停止相机预览,防止占用资源,从而开启相机失败 Stop camera preview to prevent resources from being occupied, which may cause camera startup failure
# # picam2.start_preview(True) #开启相机预览 Open camera preview
# picam2.start()
# frame = picam2.capture_array()
image_widget.value = bgr8_to_jpeg(frame)
global g_mode
g_mode = 0
global color_x, color_y, color_radius
color_x = color_y = color_radius = 0
global color_lower
#color_lower = np.array([0, 43, 46])
global color_upper
#color_upper = np.array([10, 255, 255])
color_lower = np.array([0,70,72])
color_upper = np.array([7, 255, 255])
Redbutton = widgets.Button(
value=False,
description='red',
disabled=False,
button_style='', # 'success', 'info', 'warning', 'danger' or ''
tooltip='Description',
icon='uncheck' )
Greenbutton = widgets.Button(
value=False,
description='green',
disabled=False,
button_style='', # 'success', 'info', 'warning', 'danger' or ''
tooltip='Description',
icon='uncheck' )
Bluebutton = widgets.Button(
value=False,
description='blue',
disabled=False,
button_style='', # 'success', 'info', 'warning', 'danger' or ''
tooltip='Description',
icon='uncheck' )
Yellowbutton = widgets.Button(
value=False,
description='yellow',
disabled=False,
button_style='', # 'success', 'info', 'warning', 'danger' or ''
tooltip='Description',
icon='uncheck' )
Orangebutton = widgets.Button(
value=False,
description='orange',
disabled=False,
button_style='', # 'success', 'info', 'warning', 'danger' or ''
tooltip='Description',
icon='uncheck' )
Closebutton = widgets.Button(
value=False,
description='close',
disabled=False,
button_style='', # 'success', 'info', 'warning', 'danger' or ''
tooltip='Description',
icon='uncheck' )
output = widgets.Output()
def ALL_Uncheck():
Redbutton.icon = 'uncheck'
Greenbutton.icon = 'uncheck'
Bluebutton.icon = 'uncheck'
Yellowbutton.icon = 'uncheck'
Orangebutton.icon = 'uncheck'
def on_Redbutton_clicked(b):
global color_lower, color_upper, g_mode
global target_valuex, target_valuey
ALL_Uncheck()
b.icon = 'check'
#color_lower = np.array([0, 43, 46])
#color_upper = np.array([10, 255, 255])
color_lower = np.array([0,43,89])
color_upper = np.array([7, 255, 255])
g_mode = 1
with output:
bot.Ctrl_WQ2812_ALL(1,0)#红色 red
oled.clear()
oled.add_line("Color_Follow", 1)
oled.add_line("color: red", 3)
oled.refresh()
bot.Ctrl_Servo(1,90)
bot.Ctrl_Servo(2,10)
print("RedButton clicked.")
def on_Greenbutton_clicked(b):
global color_lower, color_upper, g_mode
global target_valuex, target_valuey
ALL_Uncheck()
b.icon = 'check'
#color_lower = np.array([35, 43, 46])
#color_upper = np.array([77, 255, 255])
color_lower = np.array([54,104,64])
color_upper = np.array([78, 255, 255])
g_mode = 1
with output:
bot.Ctrl_WQ2812_ALL(1,1)#绿色 green
oled.clear()
oled.add_line("Color_Follow", 1)
oled.add_line("color: green", 3)
oled.refresh()
bot.Ctrl_Servo(1,90)
bot.Ctrl_Servo(2,10)
print("GreenButton clicked.")
def on_Bluebutton_clicked(b):
global color_lower, color_upper, g_mode
global target_valuex, target_valuey
ALL_Uncheck()
b.icon = 'check'
#color_lower=np.array([100, 43, 46])
#color_upper = np.array([124, 255, 255])
color_lower = np.array([92,100,62])
color_upper = np.array([121, 255, 255])
g_mode = 1
with output:
bot.Ctrl_WQ2812_ALL(1,2)#蓝色
oled.clear()
oled.add_line("Color_Follow", 1)
oled.add_line("color: blue", 3)
oled.refresh()
bot.Ctrl_Servo(1,90)
bot.Ctrl_Servo(2,10)
print("Bluebutton clicked.")
def on_Yellowbutton_clicked(b):
global color_lower, color_upper, g_mode
global target_valuex, target_valuey
ALL_Uncheck()
b.icon = 'check'
#color_lower = np.array([26, 43, 46])
#color_upper = np.array([34, 255, 255])
color_lower = np.array([26,100,91])
color_upper = np.array([32, 255, 255])
g_mode = 1
with output:
bot.Ctrl_WQ2812_ALL(1,3)#黄色 yellow
oled.clear()
oled.add_line("Color_Follow", 1)
oled.add_line("color: yellow", 3)
oled.refresh()
bot.Ctrl_Servo(1,90)
bot.Ctrl_Servo(2,10)
print("Yellowbutton clicked.")
def on_Orangebutton_clicked(b):
global color_lower, color_upper, g_mode
global target_valuex, target_valuey
ALL_Uncheck()
b.icon = 'check'
color_lower = np.array([11, 43, 46])
color_upper = np.array([25, 255, 255])
g_mode = 1
with output:
bot.Ctrl_WQ2812_brightness_ALL(255, 48, 0)
oled.clear()
oled.add_line("Color_Follow", 1)
oled.add_line("color: orange", 3)
oled.refresh()
bot.Ctrl_Servo(1,90)
bot.Ctrl_Servo(2,10)
print("Orangebutton clicked.")
def on_Closebutton_clicked(b):
global g_mode
ALL_Uncheck()
g_mode = 0
with output:
bot.Ctrl_WQ2812_ALL(0,0)
oled.clear()
oled.add_line("Color_Follow", 1)
oled.add_line("color: none", 3)
oled.refresh()
bot.Ctrl_Servo(1,90)
bot.Ctrl_Servo(2,10)
print("CloseButton clicked.")
Redbutton.on_click(on_Redbutton_clicked)
Greenbutton.on_click(on_Greenbutton_clicked)
Bluebutton.on_click(on_Bluebutton_clicked)
Yellowbutton.on_click(on_Yellowbutton_clicked)
Orangebutton.on_click(on_Orangebutton_clicked)
Closebutton.on_click(on_Closebutton_clicked)
import PID
direction_pid = PID.PositionalPID(0.8, 0, 0.2)
yservo_pid = PID.PositionalPID(0.8, 0.4, 0.01)
speed_pid = PID.PositionalPID(1.1, 0, 0.2)
# 定义 target_servox 和 target_servoy 在外部 Define target_servox and target_servoy externally
target_servox = 90
target_servoy = 25
def servo_reset():
bot.Ctrl_Servo(1,90)
bot.Ctrl_Servo(2,25)
servo_reset()
def Color_Recongnize():
oled.init_oled_process() #初始化oled进程 Initialize oled process
global color_lower, color_upper, g_mode, first_read, while_cnt
global color_x, target_servox,target_servoy,picture,speed_value
t_start = time.time()
fps = 0
ret, frame = image.read()
#frame = picam2.capture_array()
#frame = cv2.resize(frame, (300, 300))
frame = cv2.GaussianBlur(frame,(5,5),0)
first_read = 1
while_cnt = 0
speed=30
time.sleep(1)
while True:
ret, frame = image.read()
#frame = picam2.capture_array()
#frame = cv2.resize(frame, (300, 300))
#frame = cv2.GaussianBlur(frame,(3,3),0)
hsv = cv2.cvtColor(frame,cv2.COLOR_BGR2HSV)
mask = cv2.inRange(hsv,color_lower,color_upper)
mask = cv2.erode(mask,None,iterations=2)
mask = cv2.dilate(mask,None,iterations=2)
mask = cv2.GaussianBlur(mask,(5,5),0)
cnts = cv2.findContours(mask.copy(),cv2.RETR_EXTERNAL,cv2.CHAIN_APPROX_SIMPLE)[-2]
if g_mode == 1: # 按钮切换开关 Push button switch
if len(cnts) > 0:
cnt = max (cnts, key = cv2.contourArea)
(color_x,color_y),color_radius = cv2.minEnclosingCircle(cnt)
if color_radius > 10:
# 将检测到的颜色用原形线圈标记出来 Mark the detected color with a prototype circle
cv2.circle(frame,(int(color_x),int(color_y)),int(color_radius),(255,0,255),2)
direction_pid.SystemOutput = color_x
direction_pid.SetStepSignal(250)
direction_pid.SetInertiaTime(0.01, 0.05)
target_valuex = int(direction_pid.SystemOutput+65)
#print("color_x %f", color_x)
#print("target_valuex %d", target_valuex)
# 将云台转动至PID调校位置 Turn the gimbal to the PID adjustment position
if math.fabs(180 - color_y) > 75:
# 输入Y轴方向参数PID控制输入 Input Y-axis direction parameter PID control input
yservo_pid.SystemOutput = color_y
yservo_pid.SetStepSignal(250)
yservo_pid.SetInertiaTime(0.01, 0.1)
target_valuey = int(1150+yservo_pid.SystemOutput)
target_servoy = int((target_valuey-500)/10)
#print("target_servoy %d", target_servoy)
if target_servoy > 110:
target_servoy = 110
if target_servoy < 0:
target_servoy = 0
#print(target_servoy)
speed_pid.SystemOutput = int(color_radius)
speed_pid.SetStepSignal(80)
speed_pid.SetInertiaTime(0.01, 0.1)
speed_value = int(speed_pid.SystemOutput)
#print("color_radius %d", color_radius)
if speed_value > 255:
speed_value = 255
if speed_value < 0:
speed_value = 0
if(target_valuex>70):
rotate_left(int(speed/6))# speed
elif(target_valuex<-70):
rotate_right(int(speed/6))
elif(65<color_radius<90):#调试目标半径70~90 Debug target radius 70~90
stop_robot()
elif(color_radius>90):#调试目标半径90 Debug target radius 90
if(abs(target_valuex)<30):
move_backward(speed)
elif(20<color_radius<75):
if(abs(target_valuex)<30):
move_forward(speed_value)
else:stop_robot()
bot.Ctrl_Servo(2,target_servoy)
else:
stop_robot()
else:
stop_robot()
else:
stop_robot()
fps = fps + 1
mfps = fps / (time.time() - t_start)
cv2.putText(frame, "FPS " + str(int(mfps)), (40,40), cv2.FONT_HERSHEY_SIMPLEX, 0.8, (0,255,255), 3)
#cv2.putText(frame, "1" , (160,120), cv2.FONT_HERSHEY_SIMPLEX, 0.8, (0,255,255), 3)
image_widget.value = bgr8_to_jpeg(frame)
1. 无死区控制,实时性高,舵机会一直工作,抖动频繁;
display(image_widget)
display(Redbutton, Greenbutton, Bluebutton, Yellowbutton, Orangebutton, Closebutton, output)
thread1 = threading.Thread(target=Color_Recongnize)
thread1.setdaemon=True
thread1.start()
2. 带死区控制,跟随实时性差一些,舵机在死区范围内不运动,抖动较稳定;
stop_thread(thread1)
servo_reset()
#使用完成对象记住释放掉对象,不然下一个程序使用这个对象模块会被占用,导致无法使用# Release resources
# picam2.stop()
# picam2.close()
image.release()
stop_robot() 跟随是依据识别颜色在图像中呈现的大小进行接近的,也就是物体越小需要靠得越近才会停止接近,物体越大可能离得很远就不接近。
三、实验现象
代码块运行后,我们可以通过按钮控制小车的跟随不同的颜色,选择后,小车会随着带颜色的物体前后左右运动。同时RGB灯条也会亮起识别的颜色,oled显示识别的颜色因摄像头受光线影响较大。若效果不好时,需要调节代码里识别的颜色的hsv值。

