ElasticSearch常见的索引_集群的备份与恢复方案
方案一:使用Elasticsearch的快照和恢复功能进行备份和恢复。该方案适用于集群整体备份与迁移,包括全量、增量备份和恢复。
方案二:通过reindex操作在集群内或跨集群同步数据。该方案适用于相同集群但不同索引层面的迁移,或者跨集群的索引迁移。缺点是跨集群迁移时需要在elasticsearch.yml中添加目标集群IP白名单。
方案三:使用elasticdump来迁移映射和数据。该方案适用于仅对索引层面进行数据或映射的迁移,支持analyzer/mapping/data等操作。相较于reindex跨集群操作,elasticdump无须配置白名单。
思考:直接拷贝文件能实现集群备份吗?
reindex 更适合同集群内
elasticsearch-dump
elasticsearch-dump 是一个开源的用于导入和导出 Elasticsearch 数据的命令行工具,通过将 输入(input) 发送到输出(output)进行工作。输入和输出即可以是 Elasticsearch URL 也可以是文件。
Elasticsearch/OpenSearch:
- format:
{protocol}://{host}:{port}/{index} - example:
http://127.0.0.1:9200/my_index
File:
- format:
{FilePath} - example:
/Users/evantahler/Desktop/dump.json
github 地址:https://github.com/elasticsearch-dump/elasticsearch-dump
使用
安装 elasticsearch-dump
前提:需要 node 环境
npm install elasticdump
./bin/elasticdump
npm install elasticdump -g
elasticdump
迁移指定索引的settings
node elasticdump \
--input=http://"<UserName>:<YourPassword>"@<YourEsHost>/<YourEsIndex> \
--output=http://"<OtherName>:<OtherPassword>"@<OtherEsHost>/<OtherEsIndex> \
--type=settings
导出指定索引的mapping
node D:\software\nodejs\node_global\node_modules\elasticdump\bin\elasticdump --input=https://elastic:r9wUensJ6tO3Wv1A*Wnn@192.168.2.131:9200/user_test --output=/data/my_index_mapping.json --type=mapping
报错如下:
Wed, 23 Oct 2024 05:55:34 GMT | starting dump
Wed, 23 Oct 2024 05:55:34 GMT | Error Emitted => self-signed certificate in certificate chain
Wed, 23 Oct 2024 05:55:34 GMT | Error Emitted => self-signed certificate in certificate chain
Wed, 23 Oct 2024 05:55:34 GMT | Total Writes: 0
Wed, 23 Oct 2024 05:55:34 GMT | dump ended with error (get phase) => Error: self-signed certificate in certificate chain
解决方案:
这个错误是由于 SSL 证书验证失败导致的。SSL 证书验证用于确保与服务器建立的连接是安全和可信的。
在这种情况下,错误消息中提到了 “certificate verify failed: self signed certificate in certificate chain”,这意味着服务器使用的是自签名证书,而不是由受信任的证书颁发机构(CA)签署的证书。
由于之前未接触过证书相关内容,这里我选择暂时忽略证书验证错误。
NODE_TLS_REJECT_UNAUTHORIZED=0解决办法:https://developer.aliyun.com/article/1341433
Windows 环境下设置环境变量,使用 set 语法,命名后不加空格,直接附上两个 &&, 然后空格,跟上新的命令。
设置变量后再执行 elasticdump 操作。
set NODE_TLS_REJECT_UNAUTHORIZED=0
node D:\software\nodejs\node_global\node_modules\elasticdump\bin\elasticdump --input=https://elastic:r9wUensJ6tO3Wv1A*Wnn@192.168.2.131:9200/user_test --output=/data/my_index_mapping.json --type=mapping
成功:
Tue, 03 Dec 2024 06:53:18 GMT | starting dump
(node:30260) Warning: Setting the NODE_TLS_REJECT_UNAUTHORIZED environment variable to '0' makes TLS connections and HTTPS requests insecure by disabling certificate verification.
(Use `node --trace-warnings ...` to show where the warning was created)
Tue, 03 Dec 2024 06:53:18 GMT | got 1 objects from source elasticsearch (offset: 0)
Tue, 03 Dec 2024 06:53:18 GMT | sent 1 objects to destination file, wrote 1
Tue, 03 Dec 2024 06:53:18 GMT | got 0 objects from source elasticsearch (offset: 1)
Tue, 03 Dec 2024 06:53:18 GMT | Total Writes: 1
Tue, 03 Dec 2024 06:53:18 GMT | dump complete
这里注意,导出文件目录需要提前创建,否则会报异常。
导出整个索引:
node D:\software\nodejs\node_global\node_modules\elasticdump\bin\elasticdump --input=https://elastic:r9wUensJ6tO3Wv1A*Wnn@192.168.2.131:9200/user_test --output==D:\elasticdump\user_test_data_dump.json --type=data
导入并覆盖索引数据:
node D:\software\nodejs\node_global\node_modules\elasticdump\bin\elasticdump --input=D:\my_data.json --output==https://elastic:r9wUensJ6tO3Wv1A*Wnn@192.168.2.131:9200/user_test --type=data --overwrite
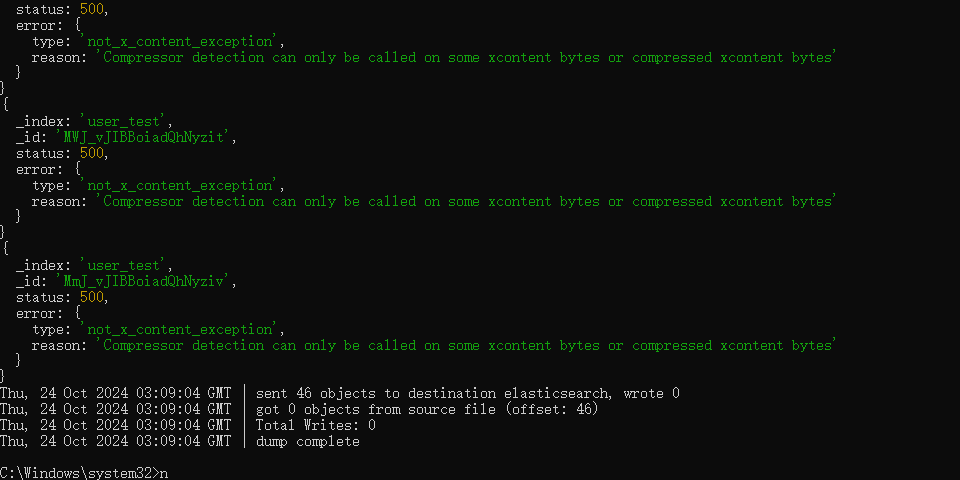
导入过程中遇到报错如下图:

报错信息如下:
{
  _index: 'user_test',
  _id: 'MmJ_vJIBBoiadQhNyziv',
  status: 500,
  error: {
    type: 'not_x_content_exception',
    reason: 'Compressor detection can only be called on some xcontent bytes or compressed xcontent bytes'
  }
解决方案:https://blog.csdn.net/star1210644725/article/details/134254334
原因是导入的JSON数据格式不对
当前 json文件内容:
{"index":{}}
{"id":"B0IAFZ9FOC","name":"小鹏汽车汽车充电站(三沙永兴港务综合楼小鹏20kW目的地站)","type":"","type_code":"11100","address":"永兴岛机场路永兴港务综合楼地面停车场","province_name":"海南省","province_code":"460000","city_name":"三沙","city_code":"289","distrcit_name":"西沙区","district_code":"460301","geopoint_gcj02":"16.833967,112.34004","geopoint_bd09":"16.840137798581825,112.34653419459671","geopoint_wgs84":"16.835594173343946,112.33512523956057"}
修改后 json文件内容:
{"_index":"user_test","_id":"kWJbvJIBBoiadQhNBzfq","_score":1,"_source":{"id":"B0IAFZ9FOC","name":"小鹏汽车汽车充电站(三沙永兴港务综合楼小鹏20kW目的地站)","type":"","type_code":"11100","address":"永兴岛机场路永兴港务综合楼地面停车场","province_name":"海南省","province_code":"460000","city_name":"三沙","city_code":"289","distrcit_name":"西沙区","district_code":"460301","geopoint_gcj02":"16.833967,112.34004","geopoint_bd09":"16.840137798581825,112.34653419459671","geopoint_wgs84":"16.835594173343946,112.33512523956057"}}
再次导入,成功
C:\Windows\system32>node D:\software\nodejs\node_global\node_modules\elasticdump\bin\elasticdump --input=D:\elasticdump\my_index_data.json --output=https://elastic:r9wUensJ6tO3Wv1A*Wnn@192.168.2.131:9200/user_test --type=data --overwrite
Thu, 24 Oct 2024 03:11:48 GMT | starting dump
Thu, 24 Oct 2024 03:11:48 GMT | got 23 objects from source file (offset: 0)
(node:2820) Warning: Setting the NODE_TLS_REJECT_UNAUTHORIZED environment variable to '0' makes TLS connections and HTTPS requests insecure by disabling certificate verification.
(Use `node --trace-warnings ...` to show where the warning was created)
Thu, 24 Oct 2024 03:11:49 GMT | sent 23 objects to destination elasticsearch, wrote 23
Thu, 24 Oct 2024 03:11:49 GMT | got 0 objects from source file (offset: 23)
Thu, 24 Oct 2024 03:11:49 GMT | Total Writes: 23
Thu, 24 Oct 2024 03:11:49 GMT | dump complete
Reference
https://www.alibabacloud.com/help/zh/es/use-cases/use-elasticsearch-dump-to-migrate-data
https://www.elastic.co/guide/en/elasticsearch/reference/current/snapshot-restore.html
ElasticSearch 实战:使用elasticdump导出导入数据](https://blog.csdn.net/qq_33240556/article/details/137261150))
对数据文件内容格式有特殊限制,个人感觉更适合用于ES迁移到ES。
Snapshot and restore
快照可以对正在运行的 ElasticSearch 集群进行备份。
快照可以做一下事情:
- 定期备份数据,不用停止 ElasticSearch 运行;
- 在删除数据或机器故障后恢复数据;
- 在不同的集群间转移数据;
- 降低存储成本。
快照工作流
Elasticsearch 将快照存储在一个被称为快照存储库的集群外部存储位置。在拍摄快照或恢复数据前必须在 ElasticSearch 集群中注册这个快照仓库。Elasticsearch 支持多种云存储库类型,包括:
- 亚马逊网络服务 S3
- 谷歌云存储(GCS)
- 微软 Azure
注册快照存储库后,我们可以使用快照生命周期管理(SLM)自动拍摄和管理快照。之后我们可以恢复或者转移数据。
Elasticsearch的快照和恢复功能是一种备份及恢复索引数据的方法,可保护数据免于意外丢失或受到系统故障的影响。
ElasticSearch 将快照存储到快照仓库里。在你可以进行快照拍摄或恢复之前,你必须在集群上注册一个快照存储库。
快照操作步骤
https://www.elastic.co/guide/en/elasticsearch/reference/current/snapshot-restore.html
使用创建快照 API。快照名称支持日期数学。
创建快照
- 注册快照,将文件系统的路径或父目录添加到每个 ElasticSearch 节点的
<font style="color:rgb(0, 0, 0);">elasticsearch.yml</font>文件中的<font style="color:rgb(0, 0, 0);">path.repo</font>设置中
path:
  repo:
    - /www/elasticsearch/elasticsearch-8.15.2/backup
- 注册仓库指定文件路径
PUT /_snapshot/my_backup
{
    "type": "fs",
    "settings": {
        "location": "/www/elasticsearch/elasticsearch-8.15.2/backup"
    }
}
响应结果:
{
  "acknowledged": true
}
创造前置模拟条件,构造几条数据。
PUT /snapshot_test

POST /_bulk
{ "index" : { "_index" : "snapshot_test", "_id" : "1" } }
{ "field1" : "value1" }
{ "delete" : { "_index" : "snapshot_test", "_id" : "2" } }
{ "create" : { "_index" : "snapshot_test", "_id" : "3" } }
{ "field1" : "value3" }
{ "update" : {"_id" : "1", "_index" : "snapshot_test"} }
{ "doc" : {"field2" : "value2"} }
- 拍摄快照
- 全量备份,即创建整个集群的快照、
PUT /_snapshot/my_backup/snapshot_cluster?wait_for_completion=true
2. 按需备份
PUT /_snapshot/my_backup/snapshot_test?wait_for_completion=true
{
    "indices": "snapshot_*",
    "ignore_unanailablt": true,
    "include_global_state": false,
    "metedata": {
        "taken_by": "mingyi",
        "taken_because": "backup before upgrading"
    }
}

{
    "snapshot": {
        "snapshot": "my_backup",
        "uuid": "V2teco__TtK8PvhFbPCz5w",
        "version_id": 7040299,
        "version": "7.4.2",
        "indices": [
            "my_backup"
        ],
        "include_global_state": false,
        "state": "SUCCESS",
        "start_time": "2024-12-02T16:24:04.841Z",
        "start_time_in_millis": 1733156644841,
        "end_time": "2024-12-02T16:24:05.043Z",
        "end_time_in_millis": 1733156645043,
        "duration_in_millis": 202,
        "failures": [],
        "shards": {
            "total": 1,
            "failed": 0,
            "successful": 1
        }
    }
}
恢复快照
为了保护集群安全,Elasticsearch 8.X版本不再默认选择批量删除索引。如果需要进行该操作,可以使用以下命令行开启批量操作功能。
POST /_snapshot/{快照仓库名}/{索引名}/_restore
快照常见操作
# 查看快照库
GET /_snapshot?pretty

# 查看所有快照存储库
GET /_snapshot/_all

# 查看快照状态
GET /_snapshot/my_backup/snapshot_test/_status

# 删除快照
DELETE /_snapshot/my_backup/snapshot_test
遇到问题
Docker 内执行请求报错:
{
    "error": {
        "root_cause": [
            {
                "type": "exception",
                "reason": "failed to create blob container"
            }
        ],
        "type": "exception",
        "reason": "failed to create blob container",
        "caused_by": {
            "type": "access_denied_exception",
            "reason": "/www/elasticsearch/backup/tests-asrNlJfrQqy9DGEe2OkXoA"
        }
    },
    "status": 500
}
进入容器内执行如下命令后再请求,正常。
chown -R elasticsearch /www/elasticsearch/backup
bulk api
curl -H 'Content-Type: application/x-ndjson' -s -XPOST localhost:9200/_bulk --data-binary @accounts.json
使用
准备索引文件:
{"id":"5829F807-7A3C-4E1B-8DB1-5F938DEAAE64","province":"辽宁省","city":"沈阳市","district":"大东区","land_name":"东至:用地界线南至:用地界线及山嘴子路北侧道路红线西至:东望街东侧道路红线北至:用地界线","usage_level":"工业用地","public_notice_number":"沈土网挂[2024]13号","data_source":"中国土地市场网","data_source_url":"https://www.landchina.com/#/landDetail?id=gyggzd5140a162-7896-444b-93b4-121ac355b11b&type=高级搜索&path=出让公告","crawl_time":"2024-07-31 15:30:24"}
{"id":"0005E5AD-2311-49E4-B8D0-F930643677A2","province":"辽宁省","city":"沈阳市","district":"苏家屯区","land_name":"东至:用地界线西至:18米规划路东侧道路红线南至:四环路北侧规划绿线北至:18米规划路南侧道路红线","usage_level":"其它用地","public_notice_number":"沈土网挂[2024]14号","data_source":"中国土地市场网","data_source_url":"https://www.landchina.com/#/landSupplyDetail?id=gygg1e19375c-103f-40d6-ba4d-982329b2f542&type=出让公告&path=0","crawl_time":"2024-08-06 14:31:35"}
调用接口
curl -H 'Content-Type: application/x-ndjson' -XPOST https://elastic:r9wUensJ6tO3Wv1A*Wnn@192.168.2.131:9200/user_test/_bulk --data-binary @D:\index_data.json
响应结果:
curl: (6) Could not resolve host: application
curl: (60) schannel: SEC_E_UNTRUSTED_ROOT (0x80090325) - 证书链是由不受信任的颁发机构颁发的。
More details here: https://curl.se/docs/sslcerts.html
解决方案:https://wenku.csdn.net/answer/4cp3ucvbbu
再次请求:
curl -k -H "Content-Type: application/x-ndjson" -H "Authorization: ApiKey VVZlZWo1SUJyN3VPRWVRb0dfUkc6REhBYXVjbkFTcEdKRUpKT2MxeFp6Zw==" -X POST "https://192.168.2.131:9200/user_test/_bulk" --data-binary @D:\index_data.json
{
    "error": {
        "root_cause": [
            {
                "type": "illegal_argument_exception",
                "reason": "Malformed action/metadata line [1], expected field [create], [delete], [index] or [update] but found [id]"
            }
        ],
        "type": "illegal_argument_exception",
        "reason": "Malformed action/metadata line [1], expected field [create], [delete], [index] or [update] but found [id]"
    },
    "status": 400
}
原因是 json 文件格式不正确,修改格式为(切记最后要留一个空行):
{ "index": {} }
{"id":"5829F807-7A3C-4E1B-8DB1-5F938DEAAE64","province":"辽宁省","city":"沈阳市","district":"大东区","land_name":"东至:用地界线南至:用地界线及山嘴子路北侧道路红线西至:东望街东侧道路红线北至:用地界线","usage_level":"工业用地","public_notice_number":"沈土网挂[2024]13号","data_source":"中国土地市场网","data_source_url":"https://www.landchina.com/#/landDetail?id=gyggzd5140a162-7896-444b-93b4-121ac355b11b&type=高级搜索&path=出让公告","crawl_time":"2024-07-31 15:30:24"}
{ "index": {} }
{"id":"0005E5AD-2311-49E4-B8D0-F930643677A2","province":"辽宁省","city":"沈阳市","district":"苏家屯区","land_name":"东至:用地界线西至:18米规划路东侧道路红线南至:四环路北侧规划绿线北至:18米规划路南侧道路红线","usage_level":"其它用地","public_notice_number":"沈土网挂[2024]14号","data_source":"中国土地市场网","data_source_url":"https://www.landchina.com/#/landSupplyDetail?id=gygg1e19375c-103f-40d6-ba4d-982329b2f542&type=出让公告&path=0","crawl_time":"2024-08-06 14:31:35"}
再次执行请求,结果如下:
{
    "errors": false,
    "took": 0,
    "items": [
        {
            "index": {
                "_index": "user_test",
                "_id": "05jPi5MBRvkzqTvFLXbX",
                "_version": 1,
                "result": "created",
                "_shards": {
                    "total": 2,
                    "successful": 1,
                    "failed": 0
                },
                "_seq_no": 2,
                "_primary_term": 1,
                "status": 201
            }
        },
        {
            "index": {
                "_index": "user_test",
                "_id": "1JjPi5MBRvkzqTvFLXbX",
                "_version": 1,
                "result": "created",
                "_shards": {
                    "total": 2,
                    "successful": 1,
                    "failed": 0
                },
                "_seq_no": 3,
                "_primary_term": 1,
                "status": 201
            }
        }
    ]
}
Reference
https://www.elastic.co/guide/en/elasticsearch/reference/current/docs-bulk.html
https://www.elastic.co/guide/en/elasticsearch/client/java-api-client/current/indexing-bulk.html
Postman方式:https://blog.csdn.net/SevenBerry/article/details/124873987
