使用Python开发PPT图片提取与九宫格合并工具
在日常工作中,我们经常需要处理PPT中的图片,有时需要批量提取,有时需要将多张图片合并成特定布局。本文将介绍如何使用Python开发一个图形界面工具,实现PPT图片提取和九宫格合并功能。
C:\pythoncode\new\pptextractandmerge.py
全部代码
import wx
import os
from pptx import Presentation
from PIL import Image
import io

class MainFrame(wx.Frame):
    def __init__(self):
        super().__init__(parent=None, title='PPT图片提取与合并工具', size=(600, 400))
        self.ppt_path = ''
        self.output_dir = ''
        self.InitUI()

    def InitUI(self):
        panel = wx.Panel(self)
        vbox = wx.BoxSizer(wx.VERTICAL)

        # PPT选择
        hbox1 = wx.BoxSizer(wx.HORIZONTAL)
        self.ppt_text = wx.TextCtrl(panel)
        choose_btn = wx.Button(panel, label='选择PPT')
        choose_btn.Bind(wx.EVT_BUTTON, self.OnChoosePPT)
        hbox1.Add(self.ppt_text, proportion=1, flag=wx.EXPAND|wx.ALL, border=5)
        hbox1.Add(choose_btn, flag=wx.ALL, border=5)

        # 输出目录选择
        hbox2 = wx.BoxSizer(wx.HORIZONTAL)
        self.dir_text = wx.TextCtrl(panel)
        dir_btn = wx.Button(panel, label='选择输出目录')
        dir_btn.Bind(wx.EVT_BUTTON, self.OnChooseDir)
        hbox2.Add(self.dir_text, proportion=1, flag=wx.EXPAND|wx.ALL, border=5)
        hbox2.Add(dir_btn, flag=wx.ALL, border=5)

        # 提取按钮
        extract_btn = wx.Button(panel, label='提取图片')
        extract_btn.Bind(wx.EVT_BUTTON, self.OnExtract)

        # 合并设置
        hbox3 = wx.BoxSizer(wx.HORIZONTAL)
        row_label = wx.StaticText(panel, label='行数:')
        self.row_text = wx.TextCtrl(panel, value='3')
        col_label = wx.StaticText(panel, label='列数:')
        self.col_text = wx.TextCtrl(panel, value='3')
        merge_btn = wx.Button(panel, label='合并图片')
        merge_btn.Bind(wx.EVT_BUTTON, self.OnMerge)

        hbox3.Add(row_label, flag=wx.ALL, border=5)
        hbox3.Add(self.row_text, flag=wx.ALL, border=5)
        hbox3.Add(col_label, flag=wx.ALL, border=5)
        hbox3.Add(self.col_text, flag=wx.ALL, border=5)
        hbox3.Add(merge_btn, flag=wx.ALL, border=5)

        # 状态显示
        self.status_text = wx.TextCtrl(panel, style=wx.TE_MULTILINE|wx.TE_READONLY)

        # 添加到主布局
        vbox.Add(hbox1, flag=wx.EXPAND)
        vbox.Add(hbox2, flag=wx.EXPAND)
        vbox.Add(extract_btn, flag=wx.EXPAND|wx.ALL, border=5)
        vbox.Add(hbox3, flag=wx.EXPAND)
        vbox.Add(self.status_text, proportion=1, flag=wx.EXPAND|wx.ALL, border=5)

        panel.SetSizer(vbox)

    def OnChoosePPT(self, event):
        dlg = wx.FileDialog(self, "选择PPT文件", "", "",
                          "PPT files (*.pptx)|*.pptx", wx.FD_OPEN)
        if dlg.ShowModal() == wx.ID_OK:
            self.ppt_path = dlg.GetPath()
            self.ppt_text.SetValue(self.ppt_path)
        dlg.Destroy()

    def OnChooseDir(self, event):
        dlg = wx.DirDialog(self, "选择输出目录")
        if dlg.ShowModal() == wx.ID_OK:
            self.output_dir = dlg.GetPath()
            self.dir_text.SetValue(self.output_dir)
        dlg.Destroy()

    def OnExtract(self, event):
        if not self.ppt_path or not self.output_dir:
            wx.MessageBox('请选择PPT文件和输出目录', '错误')
            return

        try:
            prs = Presentation(self.ppt_path)
            image_count = 0

            for slide in prs.slides:
                for shape in slide.shapes:
                    if hasattr(shape, "image"):
                        image_stream = io.BytesIO(shape.image.blob)
                        image = Image.open(image_stream)
                        image_path = os.path.join(self.output_dir, f'image_{image_count}.png')
                        image.save(image_path)
                        image_count += 1

            self.status_text.AppendText(f'成功提取{image_count}张图片\n')

        except Exception as e:
            wx.MessageBox(f'提取图片时出错: {str(e)}', '错误')

    def OnMerge(self, event):
        try:
            rows = int(self.row_text.GetValue())
            cols = int(self.col_text.GetValue())
        except ValueError:
            wx.MessageBox('请输入有效的行数和列数', '错误')
            return

        if not self.output_dir:
            wx.MessageBox('请选择输出目录', '错误')
            return

        try:
            # 获取所有图片文件
            image_files = [f for f in os.listdir(self.output_dir)
                         if f.startswith('image_') and f.endswith('.png')]
            image_files.sort()

            if len(image_files) < rows * cols:
                wx.MessageBox('图片数量不足', '错误')
                return

            # 读取第一张图片获取尺寸
            first_image = Image.open(os.path.join(self.output_dir, image_files[0]))
            img_width, img_height = first_image.size

            # 创建合并后的画布
            merged = Image.new('RGB', (img_width * cols, img_height * rows))

            # 拼接图片
            for idx, img_file in enumerate(image_files[:rows * cols]):
                if idx >= rows * cols:
                    break

                img = Image.open(os.path.join(self.output_dir, img_file))
                x = (idx % cols) * img_width
                y = (idx // cols) * img_height
                merged.paste(img, (x, y))

            # 保存合并后的图片
            merged_path = os.path.join(self.output_dir, 'merged.png')
            merged.save(merged_path)
            self.status_text.AppendText(f'成功合并图片: {merged_path}\n')

        except Exception as e:
            wx.MessageBox(f'合并图片时出错: {str(e)}', '错误')

def main():
    app = wx.App()
    frame = MainFrame()
    frame.Show()
    app.MainLoop()

if __name__ == '__main__':
    main()
功能概述
这个工具主要实现两个核心功能:
- 从PPT文档中批量提取所有图片
- 将提取的图片按照指定的行列数合并成九宫格布局
技术栈选择
为了实现这个工具,我们选用了以下Python库:
- wxPython:用于创建图形用户界面
- python-pptx:用于处理PPT文档
- Pillow(PIL):用于图片处理和合并
- io:用于处理二进制数据流
详细设计
1. 用户界面设计
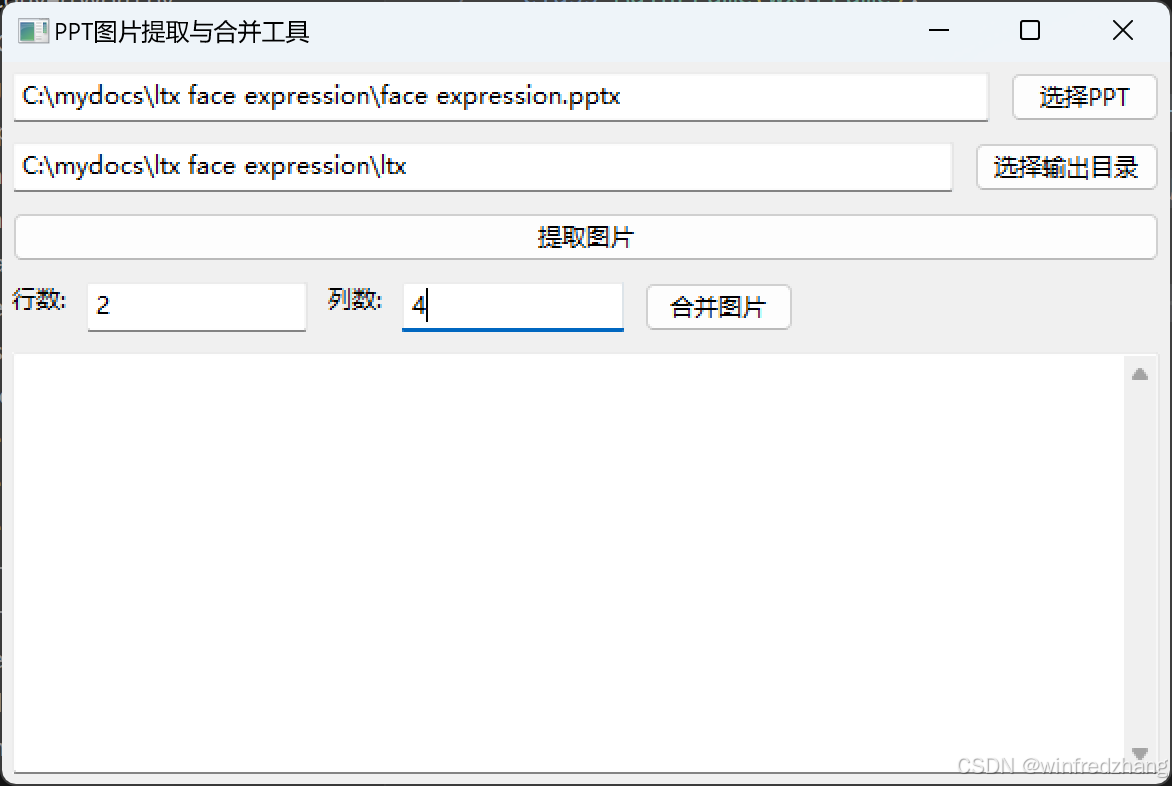
我们使用wxPython创建了一个简洁的图形界面,包含以下组件:
- PPT文件选择区域
- 输出目录选择区域
- 图片提取按钮
- 行列数输入框
- 图片合并按钮
- 状态显示文本框
界面布局采用垂直和水平布局器(BoxSizer)组合,确保各个组件能够合理排列和自适应窗口大小。
2. 核心功能实现
PPT图片提取功能
def OnExtract(self, event):
    if not self.ppt_path or not self.output_dir:
        wx.MessageBox('请选择PPT文件和输出目录', '错误')
        return

    try:
        prs = Presentation(self.ppt_path)
        image_count = 0

        for slide in prs.slides:
            for shape in slide.shapes:
                if hasattr(shape, "image"):
                    image_stream = io.BytesIO(shape.image.blob)
                    image = Image.open(image_stream)
                    image_path = os.path.join(self.output_dir, f'image_{image_count}.png')
                    image.save(image_path)
                    image_count += 1

        self.status_text.AppendText(f'成功提取{image_count}张图片\n')

    except Exception as e:
        wx.MessageBox(f'提取图片时出错: {str(e)}', '错误')
这段代码通过python-pptx库打开PPT文档,遍历所有幻灯片和形状,找到图片类型的形状后,将其转换为PIL Image对象并保存到指定目录。
图片合并功能
def OnMerge(self, event):
    try:
        rows = int(self.row_text.GetValue())
        cols = int(self.col_text.GetValue())
    except ValueError:
        wx.MessageBox('请输入有效的行数和列数', '错误')
        return

    # ... 获取图片文件列表 ...

    # 创建合并后的画布
    merged = Image.new('RGB', (img_width * cols, img_height * rows))

    # 拼接图片
    for idx, img_file in enumerate(image_files[:rows * cols]):
        if idx >= rows * cols:
            break

        img = Image.open(os.path.join(self.output_dir, img_file))
        x = (idx % cols) * img_width
        y = (idx // cols) * img_height
        merged.paste(img, (x, y))

    merged.save(os.path.join(self.output_dir, 'merged.png'))
合并功能首先创建一个足够大的空白画布,然后按照行列顺序将图片粘贴到对应位置。
使用说明
环境准备
在使用此工具前,需要安装必要的Python库:
pip install wxPython python-pptx Pillow
使用步骤
- 运行程序
- 点击"选择PPT"按钮,选择要处理的PPT文件
- 点击"选择输出目录"按钮,选择图片保存位置
- 点击"提取图片"按钮,程序会自动提取PPT中的所有图片
- 输入想要的行数和列数(默认3x3)
- 点击"合并图片"按钮,程序会生成合并后的图片
结果如下

注意事项
- PPT文件必须是.pptx格式
- 确保有足够的磁盘空间存储提取的图片
- 合并时,建议使用相同尺寸的图片,否则可能会出现布局不均匀的情况
- 图片数量应不少于行数×列数,否则会提示错误
