Kotlin 协程基础知识总结一 —— 挂起、调度器与结构化并发
1、认识协程
(P2)协程难在哪?
- 是 Java 中没有的新概念
- 概念不清晰,我们看到的大多是不同语言对于协程的实现或衍生
- Kotlin 基础不够扎实
- 多线程编程基础太弱
(P3)协程基于线程,它是轻量级的线程。
(P4)在 Android 中协程用来解决什么问题:
- 处理耗时任务:耗时任务常常会阻塞主线程
- 保证主线程安全:确保安全地从主线程调用任何 suspend 函数
GlobalScope 作为全局作用域可能会造成内存泄漏,官方不建议使用它。而是使用 MainScope、ViewModelScope 以及 LifecycleScope 等与 Lifecycle 绑定的作用域。
2、异步任务与协程
(P6)使用异步任务 AsyncTask 执行网络请求时,由于结果通过回调函数上的参数返回给使用者,一旦有多个请求,就可能出现回调地狱的情况。
(P7)使用协程发送网络请求不用通过回调函数即可直接获取到请求结果:
GlobalScope.launch {
    val user = withContext(Dispathcers.IO) {
        userServiceApi.getUser("xxx")
    }
    nameTextView.text = "address:${user?.address}"
}
其中 userServiceApi 是 Retrofit 定义的网络请求接口,getUser() 会得到一个 User 对象。需要注意的是,如果使用 Retrofit 进行网络请求,所执行的方法是 suspend 方法,那么可以不必显式通过 withContext() 切换到 IO 调度器,Retrofit 内部适配了协程,会自动切换到 IO 调度器。
协程的作用:
- 可以让异步任务同步化,杜绝回调地狱
- 核心的点是,函数或者一段程序能够被挂起,稍后再在挂起的位置恢复(挂起的理解在下一节)
3、挂起
这部分了解挂起以及挂起和阻塞的区别非常重要。
首先说阻塞,它的对象是线程,线程被阻塞时无法执行线程内其他代码,只能等待阻塞完成。造成阻塞的原因可能是在进行网络请求或 IO 操作,甚至是调用了 Thread.sleep() 这些耗时操作。
而挂起的对象是协程。协程在执行耗时任务时,为了不阻塞线程,它会记录下当前任务执行到哪里了,这个位置称为挂起点。然后挂起协程去执行线程内其他(协程的)代码,等到被挂起的任务内的耗时操作执行完毕(比如网络请求拿到结果了,IO 操作进行完毕了,或者 delay() 指定的休眠时间耗尽了),再恢复挂起协程的执行。这里的挂起 suspend 与恢复 resume 就是协程新增的,也是核心的操作。
(P8)协程的挂起与恢复:常规函数的基础操作包括 invoke(或 call)和 return,协程则新增了 suspend 和 resume:
- suspend:也称为挂起或暂停,用于暂停执行当前协程,并保存所有局部变量
- resume:用于让已暂停的协程从暂停处继续执行
suspend 关键字的作用主要是标记,用来提示 JVM 此函数执行的是耗时操作。
(P9)栈帧中函数的调用流程。先明确函数的调用流程,在主线程中,点击按钮开启协程:
GlobalScope.launch {
    getUser()
}
将协程内的异步操作声明为挂起函数,因此 getUser() 必须声明为 suspend:
	private suspend fun getUser() {
        val user = get()
        show(user)
    }
getUser() 内的 get() 是耗时操作需要异步执行,因此将其声明为挂起函数,而 show() 是更新 UI 的,无需异步执行因此就声明为普通函数:
	private suspend fun get() = withContext(Dispathcers.IO) {
        userServiceApi.getUser("xxx")
    }

	private fun show(user: User) {
        nameTextView.text = "address:${user?.address}"
    }
来看方法执行时,栈帧的操作过程。首先 getUser() 入栈,是在主线程的栈帧中:
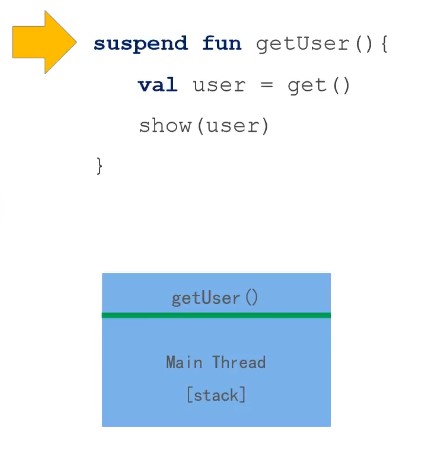
开始执行 getUser() 后,会先将其挂起(因为 getUser() 是一个挂起函数),然后准备执行 get() 让其入栈:
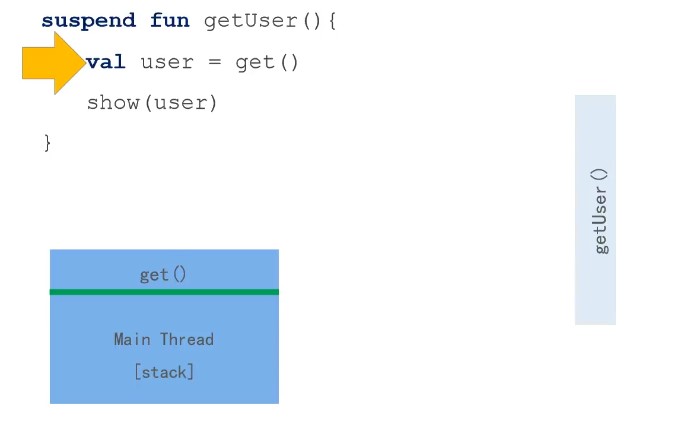
紧接着,开始执行 get(),由于其是挂起函数,因此将其挂起:
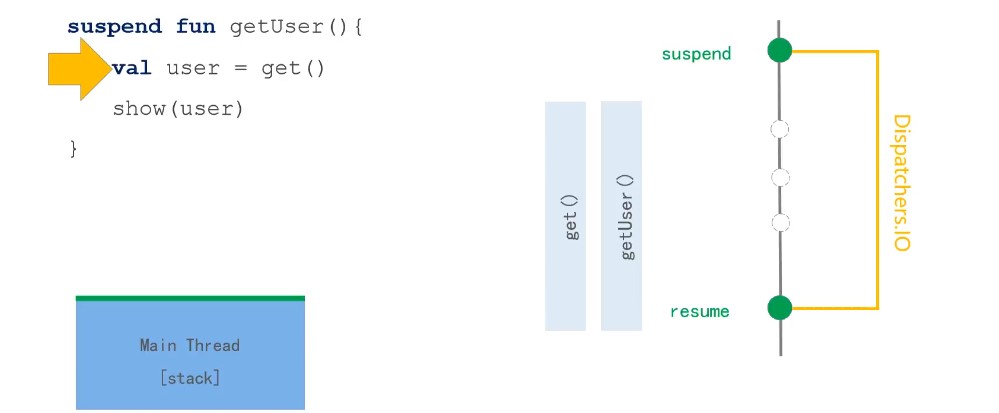
由于 get() 内通过 Dispatcher.IO 切换线程进行异步任务,因此 get() 挂起后是在 Dispatcher.IO 对应的子线程内执行获取 User 信息的任务,执行完毕后才走到 resume 的位置结束挂起状态:
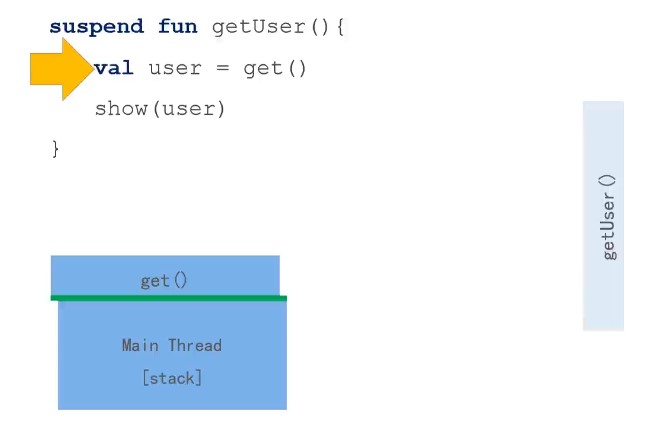
结束挂起状态的 get() 回到栈帧中,然后将返回值给到 user 对象就出栈。然后 getUser() 也结束挂起状态,回到栈帧中执行一般方法 show():
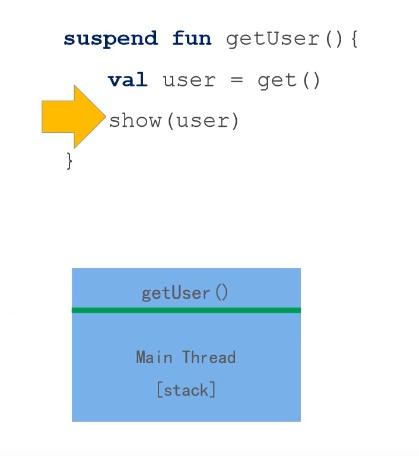
执行完 show() 后 getUser() 出栈,整个过程结束。
协程与挂起函数内既可以调用挂起函数,也可以调用普通函数。协程挂起后不会阻塞当前线程,并且会去执行其他协程。
(P10)挂起与阻塞对比:
- 挂起一般指协程,挂起不阻塞线程。当协程挂起时,会记录当前协程的挂起点,然后继续执行其他协程,当挂起结束后(比如调用 delay 等挂起函数,或者 suspend 函数执行完毕),接着挂起点继续执行当前协程
- 阻塞则是针对线程的,在耗时任务结束之前,当前线程不会执行其他代码,必须等到耗时任务结束才能继续执行
或者可以说,挂起也是阻塞的,只不过它阻塞的是协程而不是线程。
(P11)代码对比挂起与阻塞:
- Delay.delay() 是挂起函数,会挂起当前协程,不阻塞线程
- Thread.sleep() 会阻塞当前线程
(P12)协程的实现,分为两个层次:
- 基础设施层:标准库的协程 API,主要对协程提供了概念和语义上最基本的支持
- 业务框架层:协程的上层框架支持
基础设施层与业务框架层就好比 NIO 和 Netty,Netty 框架对 NIO 又做了一层封装使得灵活多变的 NIO 更易使用。
假如你要通过基础设施层创建一个协程对象可能非常麻烦,但是通过业务框架层就很简单。我们来看一下基础设施层创建、启动协程的方法:
// suspend 是协程体,通过 createCoroutine 创建 Continuation
val continuation = suspend {
    println("Coroutine body")
}.createCoroutine(object : Continuation<Unit> {
    override val context: CoroutineContext
    get() = EmptyCoroutineContext

	// 协程内部还是使用了回调函数的
    override fun resumeWith(result: Result<Unit>) {
        println("Coroutine end:$result")
    }
})

// 手动启动协程
continuation.resume(Unit)
Continuation 很重要,协程的挂起点就是通过它保存起来的。
4、调度器
(P13)所有协程都在调度器中运行,包括主线程的协程:
- Dispatchers.Main:Android 主线程,执行 UI 相关轻量级任务,可以调用 suspend 函数、UI 函数、更新 LiveData 等
- Dispatchers.IO:非主线程,专门对磁盘和网络 IO 进行了优化,常用于进行数据库、文件读写、网络处理等操作
- Dispatchers.Default:非主线程,专门对 CPU 密集型任务进行了优化,常用于数组排序、JSON 数据解析、处理差异判断。该调度器的协程取消方式与其他的不同
5、结构化并发
(P14)任务泄漏:指协程任务丢失,无法追踪,会导致内存、CPU、磁盘资源浪费,甚至发送了一个无用的请求
为了避免协程泄漏,Kotlin 引入了结构化并发机制。
(P15)结构化并发可以做到:
- 取消任务:不再需要某项任务时取消它
- 追踪任务:追踪正在执行的任务
- 发出错误信号:协程失败时发出错误信号表明有错误发生
上述功能都是通过协程作用域 CoroutineScope 实现的。定义协程时必须指定其 CoroutineScope,它会跟踪所有协程,也可以取消由它启动的所有协程。
常用的相关 API:
- GlobalScope:声明周期是 Process 级别的,即便 Activity 或 Fragment 已经销毁,协程仍会继续执行
- MainScope:在 Activity 中使用,可以在 onDestroy() 中取消协程
- ViewModelScope:只能在 ViewModel 中使用,绑定 ViewModel 的生命周期
- LifecycleScope:只能在 Activity、Fragment 中使用,会绑定二者的生命周期
(P16)MainScope 的使用示例:
class MainActivity : AppCompatActivity() {

    // MainScope() 是工厂函数
    private val mainScope = MainScope()

    @SuppressLint("SetTextI18n")
    override fun onCreate(savedInstanceState: Bundle?) {
        super.onCreate(savedInstanceState)
        val binding =
            DataBindingUtil.setContentView<ActivityMainBinding>(this, R.layout.activity_main)
        binding.btnStart.setOnClickListener {
            mainScope.launch {
                // getUser() 是 Retrofit 内定义的网络请求方法
                val user = userServiceApi.getUser("xx")
                binding.tvResult.text = "address:${user?.address}"
            }
        }
    }

    override fun onDestroy() {
        super.onDestroy()
        // Activity 生命周期结束,要取消协程,取消成功会抛出 CancellationException
        mainScope.cancel()
    }
}
MainScope() 函数名字首字母大写了,其实隐含着该方法是使用了工厂模式的函数,提供 MainScope 对象:
@Suppress("FunctionName")
public fun MainScope(): CoroutineScope = ContextScope(SupervisorJob() + Dispatchers.Main)
此外 getUser() 是 Retrofit 的接口 API 中定义的请求网络数据的挂起函数。一般情况下执行网络请求需要通过 withContext 切换到 Dispatchers.IO 这个专供 IO 操作的子线程中进行,但是由于 Retrofit 内部对 Kotlin 适配时进行了优化,当它检测到调用的是挂起函数时,会自动切换到 Dispatchers.IO,无需我们使用者手动切换了。
除了上面这种形式,也可以通过委托的方式实现 CoroutineScope 接口:
class MainActivity : AppCompatActivity(), CoroutineScope by MainScope() {

    // MainScope() 是工厂函数
//    private val mainScope = MainScope()

    @SuppressLint("SetTextI18n")
    override fun onCreate(savedInstanceState: Bundle?) {
        super.onCreate(savedInstanceState)
        val binding =
            DataBindingUtil.setContentView<ActivityMainBinding>(this, R.layout.activity_main)
        binding.btnStart.setOnClickListener {
            launch {
                // getUser() 是 Retrofit 内定义的网络请求方法
                val user = userServiceApi.getUser("xx")
                binding.tvResult.text = "address:${user?.address}"
            }
        }
    }

    override fun onDestroy() {
        super.onDestroy()
        // Activity 生命周期结束,要取消协程,取消成功会抛出 CancellationException
        cancel()
    }
}
这样你在调用 launch 和 cancel 时就不用显式写出对象了,因为它会自动使用我们指定的 CoroutineScope 的实现对象 MainScope。
我们简单看一下 CoroutineScope,该接口内只包含一个协程上下文对象 CoroutineContext:
public interface CoroutineScope {
    public val coroutineContext: CoroutineContext
}
那么 MainScope 作为其实现类会提供该上下文对象:
@Suppress("FunctionName")
public fun MainScope(): CoroutineScope = ContextScope(SupervisorJob() + Dispatchers.Main)
所以我们在 MainActivity 中使用的其实还是这个 MainScope 对象。
ContextScope 是 CoroutineScope 的实现类,CoroutineScope 通过扩展函数对 + 进行了运算符重载,实际上会将组成 CoroutineScope 的元素(如 Job、Dispatchers 等)都合并到 CombinedContext 中。CoroutineScope 的组成在后续章节中会详解。
(P17)协程上手:主要是 Kotlin + Coroutine + MVVM + DataBinding 实现数据加载。
首先要导入所需依赖:
dependencies {
    def kotlin_version = "1.8.0"
    implementation "androidx.core:core-ktx:$kotlin_version"
    implementation 'androidx.appcompat:appcompat:1.4.1'
    implementation 'com.google.android.material:material:1.5.0'

    def coroutines_version = "1.6.4"
    implementation "org.jetbrains.kotlinx:kotlinx-coroutines-core:$coroutines_version"
    implementation "org.jetbrains.kotlinx:kotlinx-coroutines-android:$coroutines_version"

    def lifecycle_version = "2.2.0"
    implementation "androidx.lifecycle:lifecycle-runtime-ktx:$lifecycle_version"
    implementation "androidx.lifecycle:lifecycle-viewmodel-ktx:$lifecycle_version"
    implementation "androidx.lifecycle:lifecycle-livedata-ktx:$lifecycle_version"

    def retrofit_version = "2.9.0"
    implementation "com.squareup.retrofit2:retrofit:$retrofit_version"
    implementation "com.squareup.retrofit2:converter-moshi:$retrofit_version"

    def activity_version = "1.8.0"
    implementation "androidx.activity:activity-ktx:$activity_version"
}
androidx.core 包括 view 和 animation 等相关内容,是必须导入的一项;androidx.lifecycle 则需要导入基础的 runtime,此外还需要 viewmodel 和 livedata 两个组件;至于 androidx.activity 是必须导入的,因为它在 ActivityViewModelLazy.kt 文件中提供了扩展方法 viewModels() 可以用于 ViewModel 的初始化。
实际上,导入的依赖是会去下载它们依赖的依赖的。比如所有以 ktx 为后缀的库,会去下载对应的 androidx 标准库,如我们只显式引入了 androidx.activity:activity-ktx:1.8.0 这个库,但是你去 AS 查看依赖的外部库,它对应的 androidx.activity:activity:1.8.0 也被下载了,其他的库也是类似的情况。这实际上是因为 ktx 库只是提供了 Kotlin 的一些扩展函数,核心功能还是没有 ktx 的那个库实现的。
除了添加依赖之外,gradle 中还需开启 DataBinding:
android {
    dataBinding {
        enabled = true
    }
}
然后就开始撸码,先把 Retrofit 对象和接口 Api 准备好:
const val TAG = "UserApi"

// data 类 User 是网络请求的结果
data class User(val id: Int, val name: String)

// 网络请求接口
interface UserServiceApi {
    @GET("user")
    fun loadUser(@Query("name") name: String): Call<User>
}

// 全局的 UserServiceApi 实例
val userServiceApi: UserServiceApi by lazy {
    val okHttpClient = OkHttpClient.Builder()
        .addInterceptor {
            it.proceed(it.request()).apply { Log.d(TAG, "request: ${it.request()}") }
        }
        .build()
    val retrofit = Retrofit.Builder()
        .client(okHttpClient)
        .baseUrl("https://www.xxx.com")
        .addConverterFactory(MoshiConverterFactory.create())
        .build()
    retrofit.create(UserServiceApi::class.java)
}
给 OkHttpClient 添加拦截器时,addInterceptor() 的参数是 Interceptor 接口,该接口的唯一方法是 intercept():
public interface Interceptor {
  Response intercept(Chain chain) throws IOException;
}
实际上 addInterceptor 闭包的实现就是 intercept() 的实现方法体,参数 it 就是 intercept() 的参数 Chain,它也是一个接口:
public interface Interceptor {
  Response intercept(Chain chain) throws IOException;

  interface Chain {
    Request request();

    Response proceed(Request request) throws IOException;

    @Nullable Connection connection();

    Call call();

    int connectTimeoutMillis();

    Chain withConnectTimeout(int timeout, TimeUnit unit);

    int readTimeoutMillis();

    Chain withReadTimeout(int timeout, TimeUnit unit);

    int writeTimeoutMillis();

    Chain withWriteTimeout(int timeout, TimeUnit unit);
  }
}
具体来说,就是在拦截时通过责任链对象 Chain 调用 proceed() 进行正常的请求处理,同时将请求数据作为 Log 输出。
接下来就是使用全局的 userServiceApi 调用接口方法进行网络请求,获取数据。根据 Google 官方的建议,这些请求不应该放在 Activity 或 ViewModel 中,而是应该放在提供这种类型数据的仓库中。所以我们新建 UserRepository 调用 Retrofit 的接口方法:
class UserRepository {
    suspend fun getUser(name: String): User? {
        return userServiceApi.loadUser(name).execute().body()
    }
}
然后由 ViewModel 持有 UserRepository 进行方法调用获取 User 对象:
class MainViewModel : ViewModel() {

    val userLiveData = MutableLiveData<User>()
    private val userRepository = UserRepository()

    fun getUser(name: String) {
        viewModelScope.launch {
            userLiveData.value = userRepository.getUser(name)
        }
    }
}
再向上就是 Activity 持有 ViewModel,在点击按钮时通过该 ViewModel 对象触发 getUser() 获取 userLiveData:
class MainActivity : AppCompatActivity() {

    private val mainViewModel: MainViewModel by viewModels()

    override fun onCreate(savedInstanceState: Bundle?) {
        super.onCreate(savedInstanceState)
        val binding =
            DataBindingUtil.setContentView<ActivityMainBinding>(this, R.layout.activity_main)
        binding.viewModel = mainViewModel
        binding.lifecycleOwner = this
        binding.btnStart.setOnClickListener {
            mainViewModel.getUser("xx")
        }
    }
}
其中 binding.viewModel 是布局文件中定义的 MainViewModel 变量,在页面的 TextView 中显示 User 需要借助该变量:
<?xml version="1.0" encoding="utf-8"?>
<layout xmlns:android="http://schemas.android.com/apk/res/android"
    xmlns:tools="http://schemas.android.com/tools">

    <data>
        <variable
            name="viewModel"
            type="com.coroutine.basic.viewmodel.MainViewModel" />
    </data>

    <RelativeLayout
        android:layout_width="match_parent"
        android:layout_height="match_parent"
        android:gravity="center"
        tools:context=".activity.MainActivity">

        <Button
            android:id="@+id/btnStart"
            android:layout_width="wrap_content"
            android:layout_height="wrap_content"
            android:text="执行异步请求" />

        <TextView
            android:id="@+id/tvResult"
            android:layout_width="wrap_content"
            android:layout_height="wrap_content"
            android:layout_below="@id/btnStart"
            android:text="@{viewModel.userLiveData.name}" />
    </RelativeLayout>
</layout>
你可以看到,使用 viewModelScope 启动协程时,无需像 P16 使用 MainScope 那样,需要手动的在宿主生命周期结束时手动的结束写成(Activity 的 onDestroy() 调用 cancel()),该操作已由框架完成。并且,使用 Kotlin Coroutine + MVVM + DataBinding 的结构使得代码看起来也很清爽。
