ros2-4.2 用python实现人脸识别
需求:创建一个人脸检测服务提供图像,返回人脸数量位置信息
难点分析:
1.人脸怎么识别?face_recognition
2.图片数据和结果怎么传递?服务通信就很合适
3.没有合适的消息接口?自定义一个
4.2.1 自定义服务接口
在chat4/chapt_ws/src下新创建功能包
ros2 pkg create chapt4_interfaces --dependencies rosidl_default_generators sensor_msgs --license Apache-2.0
创建好功能包,在chapt4_interfaces 下创建目录srv,在srv下面创建文件:FaceDetector.srv
内容如下
sensor_msgs/Image image  # 原始图像
---
int16 number      # 人脸个数
float32 use_time  # 识别耗时
int32[] top       # 人脸在图像中位置
int32[] right
int32[] bottom
int32[] left
---分成了两部分,上面表示请求类型是 sensor_msgs/Image的图像。下面是response部分。
然后,再CMakeLists.txt 对该接口文件进行注册,声明为接口文件,添加依赖。代码如下
cmake_minimum_required(VERSION 3.8)
project(chapt4_interfaces)

if(CMAKE_COMPILER_IS_GNUCXX OR CMAKE_CXX_COMPILER_ID MATCHES "Clang")
  add_compile_options(-Wall -Wextra -Wpedantic)
endif()

# find dependencies
find_package(ament_cmake REQUIRED)
find_package(rosidl_default_generators REQUIRED)
find_package(sensor_msgs REQUIRED)

rosidl_generate_interfaces(${PROJECT_NAME}
  "srv/FaceDetector.srv"
  DEPENDENCIES sensor_msgs
)


if(BUILD_TESTING)
  find_package(ament_lint_auto REQUIRED)
  # the following line skips the linter which checks for copyrights
  # comment the line when a copyright and license is added to all source files
  set(ament_cmake_copyright_FOUND TRUE)
  # the following line skips cpplint (only works in a git repo)
  # comment the line when this package is in a git repo and when
  # a copyright and license is added to all source files
  set(ament_cmake_cpplint_FOUND TRUE)
  ament_lint_auto_find_test_dependencies()
endif()

ament_package()
还修改下package.xml ,添加<member_of_group>rosidl_interface_packages</member_of_group>,接下来进行构建。
bohu@bohu-TM1701:~/chapt4/chapt4_ws$ colcon build
Starting >>> chapt4_interfaces
Finished <<< chapt4_interfaces [6.51s]
Summary: 1 package finished [7.56s]
bohu@bohu-TM1701:~/chapt4/chapt4_ws$ source install/setup.bash
bohu@bohu-TM1701:~/chapt4/chapt4_ws$ ros2 interface show chapt4_interfaces/srv/FaceDetector
sensor_msgs/Image image # 原始图像
std_msgs/Header header #
builtin_interfaces/Time stamp
int32 sec
uint32 nanosec
string frame_id
# Header frame_id should be optical frame of camera
# origin of frame should be optical center of cameara
# +x should point to the right in the image
# +y should point down in the image
# +z should point into to plane of the image
# If the frame_id here and the frame_id of the CameraInfo
# message associated with the image conflict
# the behavior is undefined
uint32 height #
uint32 width #
string encoding #
# taken from the list of strings in include/sensor_msgs/image_encodings.hpp
uint8 is_bigendian #
uint32 step #
uint8[] data #
---
int16 number # 人脸个数
float32 use_time # 识别耗时
int32[] top # 人脸在图像中位置
int32[] right
int32[] bottom
int32[] left
4.2.2 人脸检测
pip3 install face_recognition -i https://pypi.tuna.tsinghua.edu.cn/simple
我安装的时候,对于依赖的dlib卡主了好几分钟。
Building wheel for dlib (setup.py) ... 一直在等
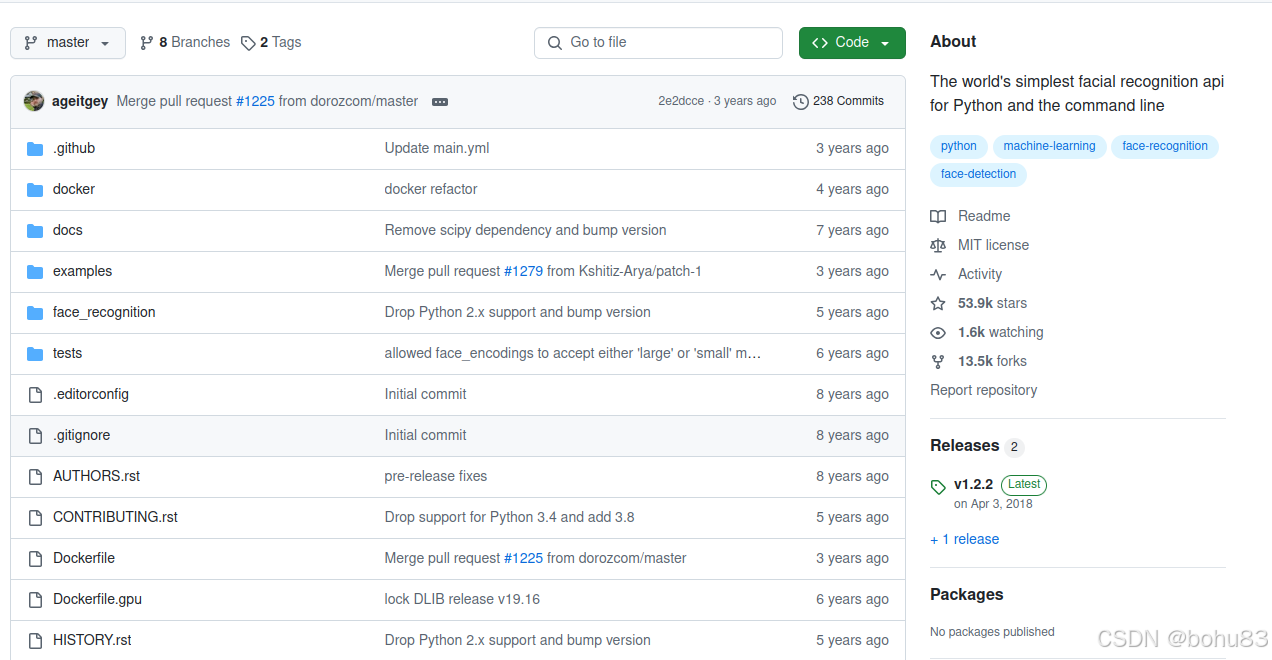
关于 face_recognition
- github : GitHub - ageitgey/face_recognition: The world's simplest facial recognition api for Python and the command line

可以使用Python和命令行工具提取、识别、操作人脸。应该是1.2.2版本之后不在发新版本维护了。
创建demo_python_service 功能包。
ros2 pkg create demo_python_service --build-type ament_python --dependencies rclpy chapt4_interfaces --license Apache-2.0
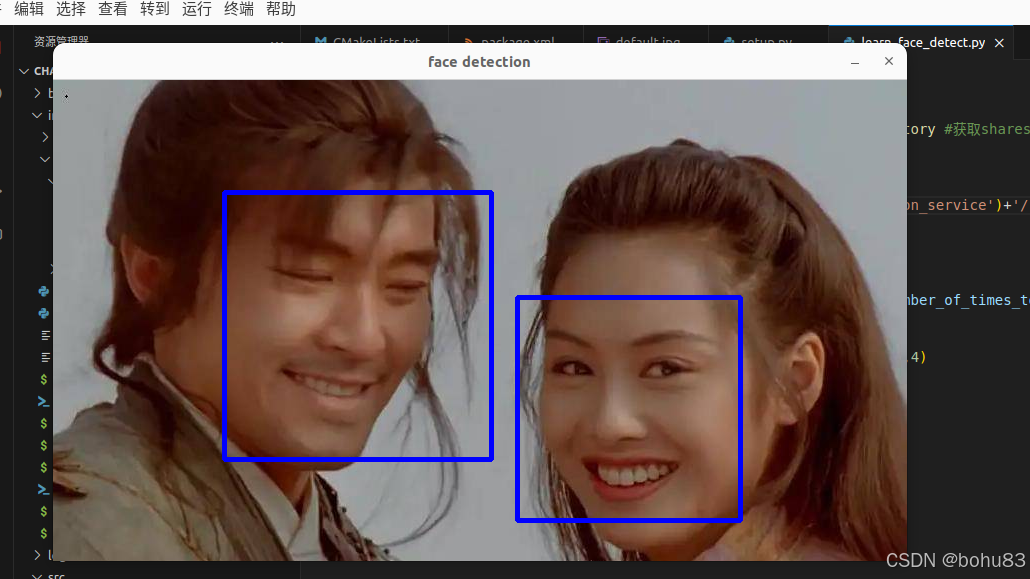
添加一张图片,网上找了张我喜欢的大话西游。
在setup.py增加对于图片的复制配置,默认是不会复制到install下面
data_files=[
('share/ament_index/resource_index/packages',
['resource/' + package_name]),
('share/' + package_name, ['package.xml']),
('share/' + package_name+"/resource", ['resource/default.jpg']),
],
再次构建功能包,就发现图片被复制到chapt4_ws/install/demo_python_service/目录下
/share/demo_python_service/resource 有图片。
编写代码src/demo_python_service/demo_python_service 下创建文件:learn_face_detect.py.代码如下:
import face_recognition
import cv2
from ament_index_python.packages import get_package_share_directory #获取shares目录绝对路径

def main():
    #获取图片绝对路径
    default_image_path = get_package_share_directory('demo_python_service')+'/resource/default.jpg'
    print(f"path:{default_image_path}")
    #cv2加载图片
    image = cv2.imread(default_image_path)
    #检测人脸
    face_recognitions =face_recognition.face_locations(image,number_of_times_to_upsample=1,model='hog')
    #绘制人脸边框
    for top,right,bottom,left in face_recognitions:
        cv2.rectangle(image,(left,top),(right,bottom),(255,0,0),4)
    #显示结果
    cv2.imshow('face detection',image)
    cv2.waitKey(0)
依赖了face_recognition、cv2. 在setup.py对于learn_face_detect节点注册。构建并运行。
bohu@bohu-TM1701:~/chapt4/chapt4_ws$ colcon build
Starting >>> chapt4_interfaces
Finished <<< chapt4_interfaces [0.77s]
Starting >>> demo_python_service
Finished <<< demo_python_service [1.37s]

Summary: 2 packages finished [2.52s]
bohu@bohu-TM1701:~/chapt4/chapt4_ws$ source install/setup.bash
bohu@bohu-TM1701:~/chapt4/chapt4_ws$ ros2 run demo_python_service learn_face_detect
path:/home/bohu/chapt4/chapt4_ws/install/demo_python_service/share/demo_python_service/resource/default.jpg
效果如下:

4.2.3 人脸检测服务实现
在demo_python_service目录下创建face_detect_node.py 文件,代码如下:
import rclpy
from rclpy.node import Node
from chapt4_interfaces.srv import FaceDetector
import face_recognition
import cv2
from ament_index_python.packages import get_package_share_directory #获取shares目录绝对路径
from cv_bridge import CvBridge #用于图片格式转换
import time

class FaceDetectorionNode(Node):
    def __init__(self):
        super().__init__('face_detection_node')
        self.service_ = self.create_service(FaceDetector,'face_detect',self.detect_face_callback)
        self.bridge = CvBridge();
        self.number_of_times_to_upsample =1;
        self.model = "hog"
        self.default_image_path = get_package_share_directory('demo_python_service')+'/resource/default.jpg'
        self.get_logger().info("人脸检测服务已经启动")

    def detect_face_callback(self,request,response):
        if request.image.data:
            cv_image = self.bridge.imgmsg_to_cv2(request.image)
        else:
            cv_image = cv2.imread(self.default_image_path) #没有图像用默认兜底
            self.get_logger().info(f"传入图像为空,使用默认图像。")
         #cv_image 已经是一个opencv格式的图像
        start_time = time.time()
        self.get_logger().info(f"加载完成图像,开始识别")
         #检测人脸
        face_recognitions =face_recognition.face_locations(cv_image,
        number_of_times_to_upsample=self.number_of_times_to_upsample,model=self.model)
        response.use_time = time.time() -start_time
        response.number = len(face_recognitions)
        for top,right,bottom,left in face_recognitions:
            response.top.append(top)
            response.right.append(right)
            response.bottom.append(bottom)
            response.left.append(left)


        return response    #必须返回response

def main(args=None):
    rclpy.init(args=args)
    node = FaceDetectorionNode()
    rclpy.spin(node)
    rclpy.shutdown()
注意的是,使用了CvBridge 进行图片格式(从ros2的图像到opencv格式)的转换。
在代码FaceDetectorionNode 类中继承了Node,并在初始化__init__方法中调用create_service创建了一个服务,三个参数:FaceDetector 是消息接口,第二个face_detect是服务名,第三个detect_face_callback是回调函数。主要逻辑处理在回调函数。response需要返回,其余逻辑跟上一节类似,图像格式转换,进行检测,对response数据赋值。
接着在setup.py对face_detect_node节点进行注册,然后构建和运行。
bohu@bohu-TM1701:~/chapt4/chapt4_ws$ colcon build
Starting >>> chapt4_interfaces
Finished <<< chapt4_interfaces [0.64s]
Starting >>> demo_python_service
Finished <<< demo_python_service [1.17s]

Summary: 2 packages finished [2.16s]
bohu@bohu-TM1701:~/chapt4/chapt4_ws$ ros2 run demo_python_service face_detect_node
[INFO] [1736320005.105902282] [face_detection_node]: 人脸检测服务已经启动
[INFO] [1736320181.732996097] [face_detection_node]: 传入图像为空,使用默认图像。
[INFO] [1736320181.733454024] [face_detection_node]: 加载完成图像,开始识别
新开终端,查看服务列表并调用
bohu@bohu-TM1701:~/chapt4/chapt4_ws$ ros2 service list -t
/face_detect [chapt4_interfaces/srv/FaceDetector]
/face_detection_node/describe_parameters [rcl_interfaces/srv/DescribeParameters]
/face_detection_node/get_parameter_types [rcl_interfaces/srv/GetParameterTypes]
/face_detection_node/get_parameters [rcl_interfaces/srv/GetParameters]
/face_detection_node/list_parameters [rcl_interfaces/srv/ListParameters]
/face_detection_node/set_parameters [rcl_interfaces/srv/SetParameters]
/face_detection_node/set_parameters_atomically [rcl_interfaces/srv/SetParametersAtomically]
bohu@bohu-TM1701:~/chapt4/chapt4_ws$ source install/setup.bash
bohu@bohu-TM1701:~/chapt4/chapt4_ws$ ros2 service call /face_detect chapt4_interfaces/srv/FaceDetector
requester: making request: chapt4_interfaces.srv.FaceDetector_Request(image=sensor_msgs.msg.Image(header=std_msgs.msg.Header(stamp=builtin_interfaces.msg.Time(sec=0, nanosec=0), frame_id=''), height=0, width=0, encoding='', is_bigendian=0, step=0, data=[]))

response:
chapt4_interfaces.srv.FaceDetector_Response(number=2, use_time=0.2230970859527588, top=[217, 112], right=[687, 438], bottom=[440, 379], left=[464, 171])
4.2.4 人脸检测客户端实现
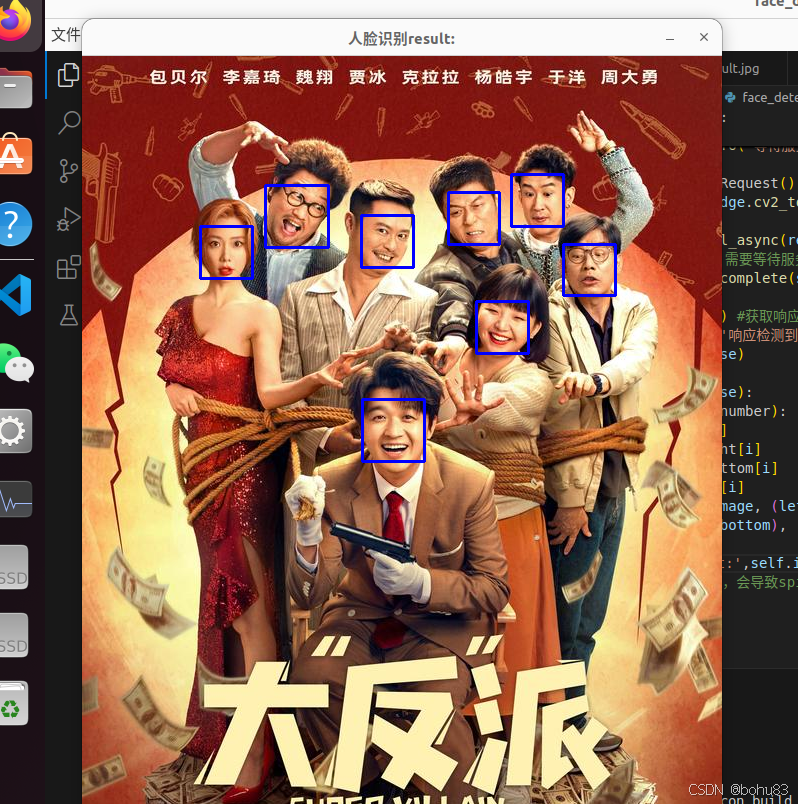
再次换一张图片,我这次换了电影海报,人脸多一些。放到resouce下,叫做2.jpg
setup.py也要加一下新图片复制。
接着src/demo_python_service/demo_python_service 下创建文件:face_detect_client_node.py
代码如下:
import rclpy
from rclpy.node import Node
from chapt4_interfaces.srv import FaceDetector
import face_recognition
import cv2
from ament_index_python.packages import get_package_share_directory #获取shares目录绝对路径
from cv_bridge import CvBridge #用于图片格式转换
import time

class FaceDetectClientNode(Node):
    def __init__(self):
        super().__init__('face_detect_client_node')
        self.bridge = CvBridge();
        self.default_image_path = get_package_share_directory('demo_python_service')+'/resource/2.jpg'
        self.get_logger().info("人脸检测客户端已经启动")
        self.client = self.create_client(FaceDetector,'face_detect')
        self.image = cv2.imread(self.default_image_path)

    def send_request(self):
        #1 判断服务端是否在线
        while self.client.wait_for_service(timeout_sec=1.0) is False:
            self.get_logger().info('等待服务端上线')
        #2构造request
        request =  FaceDetector.Request()
        request.image = self.bridge.cv2_to_imgmsg(self.image)
        #3 发送请求并等待处理完成
        future = self.client.call_async(request)
        #现在future 并没有包含结果,需要等待服务端处理完成,不能直接sleep
        #rclpy.spin_until_future_complete(self,future)
        def reslut_callback(result_future):
            response =result_future.result() #获取响应
            self.get_logger().info(f'响应检测到{response.number}张脸,耗时{response.use_time}')
            self.show_respnse(response)
        future.add_done_callback(reslut_callback)

    def show_respnse(self,response):
        for i in range(response.number):
            top = response.top[i]
            right = response.right[i]
            bottom = response.bottom[i]
            left = response.left[i]
            cv2.rectangle(self.image, (left, top),
                        (right, bottom), (255, 0, 0), 2)

        cv2.imshow('人脸识别result:',self.image)
        cv2.waitKey(0) #也是阻塞的


def main(args=None):
    rclpy.init(args=args)
    node = FaceDetectClientNode()
    node.send_request()
    rclpy.spin(node)
    rclpy.shutdown()
处理显示图像跟之前差不多,send_request比较巧妙的一点是可以使用异步请求,返回的future没有包含结果,需要等服务端处理完成。这里书上例子采用rclpy.spin_until_future_complete 来等待异步返回结果,视频里小鱼老师用回调函数又演示了一版。
还是要在setup.py注册face_detect_client_node 节点,接着构建。
先启动服务端 ros2 run demo_python_service face_detect_node,再运行客户端
bohu@bohu-TM1701:~/chapt4/chapt4_ws$ colcon build
Starting >>> chapt4_interfaces
Finished <<< chapt4_interfaces [0.71s]
Starting >>> demo_python_service
Finished <<< demo_python_service [1.40s]

Summary: 2 packages finished [2.47s]
bohu@bohu-TM1701:~/chapt4/chapt4_ws$ ros2 run demo_python_service face_detect_client_node
[INFO] [1736326208.922806215] [face_detect_client_node]: 人脸检测客户端已经启动
[INFO] [1736326209.369307885] [face_detect_client_node]: 响应检测到8张脸,耗时0.34261298179626465
识别效果还是不错的。
