51c~Pytorch~合集4
我自己的原文哦~ https://blog.51cto.com/whaosoft/12311033
一、Pytorch~训练-使用
这里介绍了Pytorch中已经训练好的模型如何使用
Pytorch中提供了很多已经在ImageNet数据集上训练好的模型了,可以直接被加载到模型中进行预测任务。预训练模型存放在Pytorch的torchvision中库,在torchvision库的models模块下可以查看内置的模型,models模块中的模型包含四大类,如图所示:
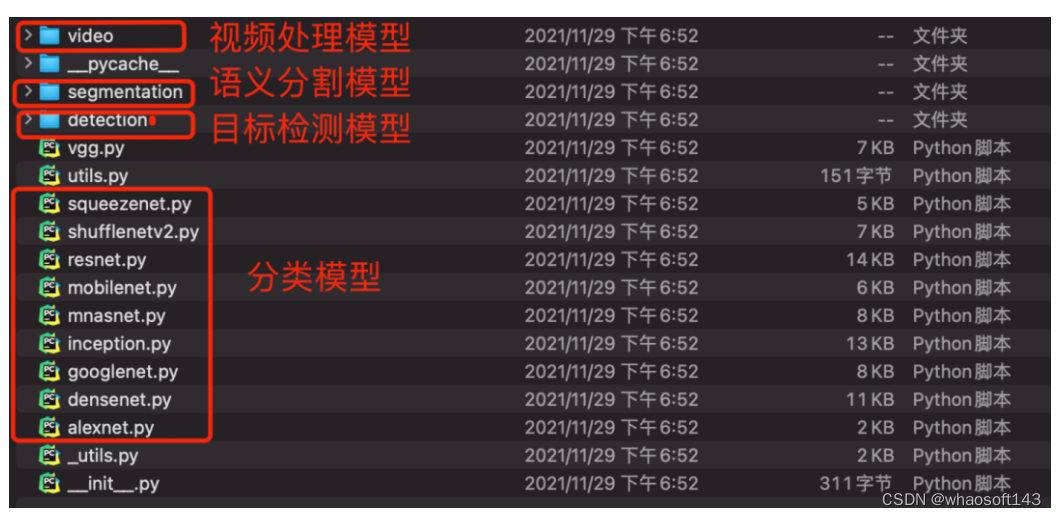
01 图像分类代码实现
# coding: utf-8

from PIL import Image
import matplotlib.pyplot as plt
plt.rcParams['font.sans-serif'] = ['SimHei']  # 步骤一(替换sans-serif字体)
plt.rcParams['axes.unicode_minus'] = False   # 步骤二(解决坐标轴负数的负号显示问题)
import json
import numpy as np

import torch
import torch.nn.functional as F
from torchvision import models, transforms

# 1.下载并加载预训练模型
model = models.resnet18(pretrained=True)
model = model.eval()

# 2.加载标签并对输入数据进行处理
labels_path = './imagenet_class_index.json'
with open(labels_path) as json_data:
    idx2labels = json.load(json_data)
# print(idx2labels)


def getone(onestr):
    return onestr.replace(',', ' ')


# 加载中文标签
with open('./zh_label.csv', 'r+', encoding='gbk') as f:
    # print(f)
    # print(map(getone, list(f)))
    zh_labels = list(map(getone, list(f)))

    print(len(zh_labels), type(zh_labels), zh_labels[:5])


transform = transforms.Compose([
    transforms.Resize(256),
    transforms.CenterCrop(224),
    transforms.ToTensor(),
    transforms.Normalize(
        mean=[0.485, 0.456, 0.406],
        std=[0.229, 0.224, 0.225]
    )
])

# 3.使用模型进行预测
def preimg(img):
    if img.mode == 'RGBA':
        ch = 4
        a = np.asarray(img)[:, :, :3]
        img = Image.fromarray(a)
    return img


im = preimg(Image.open('panda.jpg'))
transformed_img = transform(im)

inputimg = transformed_img.unsqueeze(0)

output = model(inputimg)
output = F.softmax(output, dim=1)

prediction_score, pred_label_idx = torch.topk(output, 3)
prediction_score = prediction_score.detach().numpy()[0]
print(prediction_score[0])

pred_label_idx = pred_label_idx.detach().numpy()[0]
print(pred_label_idx)

predicted_label = idx2labels[str(pred_label_idx[0])][1]
print(predicted_label)

predicted_label_zh = zh_labels[pred_label_idx[0] + 1]
print(predicted_label_zh)

# 4.预测结果可视化
fig, (ax1, ax2) = plt.subplots(1, 2, figsize=(10, 8))
fig.sca(ax1)
ax1.imshow(im)
plt.xticks([])
plt.yticks([])

barlist = ax2.bar(range(3), [i for i in prediction_score])
barlist[0].set_color('g')

plt.sca(ax2)
plt.ylim([0, 1.1])

plt.xticks(range(3),
           # [idx2labels[str(i)][1] for i in pred_label_idx],
           [zh_labels[pred_label_idx[i] + 1] for i in range(3)],
           rotation='45')
fig.subplots_adjust(bottom=0.2)
plt.show()
图像分类结果图
输入一张熊猫图片,右边输出模型的预测结果,如上图所示。
02 目标检测代码实现
from PIL import Image
import matplotlib.pyplot as plt
import torch
import torchvision.transforms as T
import torchvision
import torch
import numpy as np
import cv2
import random

# 加载maskrcnn模型进行目标检测
model = torchvision.models.detection.maskrcnn_resnet50_fpn(pretrained=True)
model.eval()
COCO_INSTANCE_CATEGORY_NAMES = [
    '__background__', 'person', 'bicycle', 'car', 'motorcycle', 'airplane', 'bus',
    'train', 'truck', 'boat', 'traffic light', 'fire hydrant', 'N/A', 'stop sign',
    'parking meter', 'bench', 'bird', 'cat', 'dog', 'horse', 'sheep', 'cow',
    'elephant', 'bear', 'zebra', 'giraffe', 'N/A', 'backpack', 'umbrella', 'N/A', 'N/A',
    'handbag', 'tie', 'suitcase', 'frisbee', 'skis', 'snowboard', 'sports ball',
    'kite', 'baseball bat', 'baseball glove', 'skateboard', 'surfboard', 'tennis racket',
    'bottle', 'N/A', 'wine glass', 'cup', 'fork', 'knife', 'spoon', 'bowl',
    'banana', 'apple', 'sandwich', 'orange', 'broccoli', 'carrot', 'hot dog', 'pizza',
    'donut', 'cake', 'chair', 'couch', 'potted plant', 'bed', 'N/A', 'dining table',
    'N/A', 'N/A', 'toilet', 'N/A', 'tv', 'laptop', 'mouse', 'remote', 'keyboard', 'cell phone',
    'microwave', 'oven', 'toaster', 'sink', 'refrigerator', 'N/A', 'book',
    'clock', 'vase', 'scissors', 'teddy bear', 'hair drier', 'toothbrush'
]


def get_prediction(img_path, threshold):
    img = Image.open(img_path)
    transform = T.Compose([T.ToTensor()])
    img = transform(img)
    pred = model([img])
    print('pred')
    print(pred)
    pred_score = list(pred[0]['scores'].detach().numpy())
    pred_t = [pred_score.index(x) for x in pred_score if x > threshold][-1]
    print("masks>0.5")
    print(pred[0]['masks'] > 0.5)
    masks = (pred[0]['masks'] > 0.5).squeeze().detach().cpu().numpy()
    print("this is masks")
    print(masks)
    pred_class = [COCO_INSTANCE_CATEGORY_NAMES[i] for i in list(pred[0]['labels'].numpy())]
    pred_boxes = [[(i[0], i[1]), (i[2], i[3])] for i in list(pred[0]['boxes'].detach().numpy())]
    masks = masks[:pred_t + 1]
    pred_boxes = pred_boxes[:pred_t + 1]
    pred_class = pred_class[:pred_t + 1]
    return masks, pred_boxes, pred_class


def random_colour_masks(image):
    colours = [[0, 255, 0], [0, 0, 255], [255, 0, 0], [0, 255, 255], [255, 255, 0], [255, 0, 255], [80, 70, 180],
               [250, 80, 190], [245, 145, 50], [70, 150, 250], [50, 190, 190]]
    r = np.zeros_like(image).astype(np.uint8)
    g = np.zeros_like(image).astype(np.uint8)
    b = np.zeros_like(image).astype(np.uint8)
    r[image == 1], g[image == 1], b[image == 1] = colours[random.randrange(0, 10)]
    coloured_mask = np.stack([r, g, b], axis=2)
    return coloured_mask


def instance_segmentation_api(img_path, threshold=0.5, rect_th=3, text_size=10, text_th=3):
    masks, boxes, pred_cls = get_prediction(img_path, threshold)
    img = cv2.imread(img_path)
    img = cv2.cvtColor(img, cv2.COLOR_BGR2RGB)
    for i in range(len(masks)):
        rgb_mask, randcol = random_colour_masks(masks[i]), (random.randint(0, 255), random.randint(0, 255), random.randint(0, 255))
        img = cv2.addWeighted(img, 1, rgb_mask, 0.5, 0)
        cv2.rectangle(img, boxes[i][0], boxes[i][1], color=randcol, thickness=rect_th)
        cv2.putText(img, pred_cls[i], boxes[i][0], cv2.FONT_HERSHEY_SIMPLEX, text_size, randcol, thickness=text_th)
    plt.figure(figsize=(20, 30))
    plt.imshow(img)
    plt.xticks([])
    plt.yticks([])
    plt.show()


instance_segmentation_api('./horse.jpg')

03 语义分割代码实现
import torch
import matplotlib.pyplot as plt
from PIL import Image
import numpy as np
from torchvision import models
from torchvision import transforms

# 加载deeplabv3模型进行语义分割
model = models.segmentation.deeplabv3_resnet101(pretrained=True)
model = model.eval()

transform = transforms.Compose([
    transforms.Resize(256),
    transforms.CenterCrop(224),
    transforms.ToTensor(),
    transforms.Normalize(
        mean=[0.485, 0.456, 0.406],
        std=[0.229, 0.224, 0.225]
    )
])

def preimg(img):
    if img.mode == 'RGBA':
        ch = 4
        a = np.asarray(img)[:, :, :3]
        img = Image.fromarray(a)
    return img

img = Image.open('./horse.jpg')
plt.imshow(img)
plt.axis('off')
plt.show()

im = preimg(img)

inputimg = transform(im).unsqueeze(0)

tt = np.transpose(inputimg.detach().numpy()[0], (1, 2, 0))
plt.imshow(tt)
plt.axis('off')
plt.show()


output = model(inputimg)
print(output['out'].shape)


output = torch.argmax(output['out'].squeeze(),
                      dim=0).detach().cpu().numpy()

resultclass = set(list(output.flat))
print(resultclass)


def decode_segmap(image, nc=21):
    label_colors = np.array(
        [(0, 0, 0), (128, 0, 0), (0, 128, 0), (128, 128, 0),
         (0, 0, 128), (128, 0, 128), (0, 128, 128), (128, 128, 128),
         (64, 0, 0), (192, 0, 0), (64, 128, 0), (192, 128, 0),
         (64, 0, 128), (192, 0, 128), (64, 128, 128), (192, 128, 128),
         (0, 64, 0), (128, 64, 0), (0, 192, 0), (128, 192, 0), (0, 64, 128)]

    )
    r = np.zeros_like(image).astype(np.uint8)
    g = np.zeros_like(image).astype(np.uint8)
    b = np.zeros_like(image).astype(np.uint8)

    for l in range(0, nc):
        idx = image == l
        r[idx] = label_colors[l, 0]
        g[idx] = label_colors[l, 1]
        b[idx] = label_colors[l, 2]

    return np.stack([r, g, b], axis=2)


rgb = decode_segmap(output)
print(rgb)

img = Image.fromarray(rgb)
plt.axis('off')
plt.imshow(img)
plt.show()
模型从图中识别出了两个类别的内容,索引值分别为13、15,所对应的分类名称是马和人。调用函数,通过对预测结果进行染色,得到的预测结果如上图所示。
二、Pytorch~单卡改多卡
搬来了这个,这是尝试单卡改多卡加速的过程中出现的bug记录:一是继承DistributedSampler的漏洞百出,二是master进程无法正常结束,这里详细的阐述了出错的细节以及给出了修改的方法。
先说明一下背景,目前正在魔改以下这篇论文的代码:
https://github.com/QipengGuo/GraphWriter-DGLgithub.com
由于每次完成实验需要5个小时(baseline),自己的模型需要更久(2倍),非常不利于调参和发现问题,所以开始尝试使用多卡加速。
torch.nn.DataParallel ==> 简称 DP
torch.nn.parallel.DistributedDataParallel ==> 简称DDP
一开始采用dp试图加速,结果因为dgl的实现(每个batch的点都会打包进一个batch,从而不可分割),而torch.nn.DataParallel的实现是把一个batch切分成更小,再加上他的加速性能也不如ddp,所以我开始尝试魔改成ddp。
另外,作者在实现Sampler的时候是继承了torch.utils.data.Sampler这个类的,目的在于agenda数据集的文本长度严重不均衡,如下:

为了让模型更快train完,把长度相近的文本打包成一个batch(温馨提醒,torchtext也有相关的类 bucketiterator[1],大概形式如下:
class BucketSampler(torch.utils.data.Sampler):
    def __init__(self, data_source, batch_size=32):
        self.data_source = data_source
        self.batch_size = batch_size

    def __iter__(self):
        idxs, lens, batch, middle_batch_size, long_batch_size = basesampler(self.data_source , self.batch_size)
        for idx in idxs:
            batch.append(idx)
            mlen = max([0]+[lens[x] for x in batch])
            #if (mlen<100 and len(batch) == 32) or (mlen>100 and mlen<220 and len(batch) >= 24) or (mlen>220 and len(batch)>=8) or len(batch)==32:
            if (mlen<100 and len(batch) == self.batch_size) or (mlen>100 and mlen<220 and len(batch) >= middle_batch_size) or (mlen>220 and len(batch)>=long_batch_size) or len(batch)==self.batch_size:
                yield batch
                batch = []
        if len(batch) > 0:
            yield batch

    def __len__(self):
        return (len(self.data_source)+self.batch_size-1)//self.batch_size
这是背景。
写bug第一步:继承DistributedSampler的漏洞百出
我一开始理想当然的把作者的sampler源码crtl-cv下来,唯独只改动了这里:
class DDPBaseBucketSampler(torch.utils.data.distributed.DistributedSampler):随后就发现了几个问题:
- dataloader不会发包;
- dataloader给每个进程发的是完整的数据,按武德来说,应该是1/n的数据,n为你设置的gpu数量;
然后我就开始看起了源码[2],很快啊:
def __iter__(self) -> Iterator[T_co]:
        if self.shuffle:
            # deterministically shuffle based on epoch and seed
            g = torch.Generator()
            g.manual_seed(self.seed + self.epoch)
            indices = torch.randperm(len(self.dataset), generator=g).tolist()  # type: ignore
        else:
            indices = list(range(len(self.dataset)))  # type: ignore

        if not self.drop_last:
            # add extra samples to make it evenly divisible
            padding_size = self.total_size - len(indices)
            if padding_size <= len(indices):
                indices += indices[:padding_size]
            else:
                indices += (indices * math.ceil(padding_size / len(indices)))[:padding_size]
        else:
            # remove tail of data to make it evenly divisible.
            indices = indices[:self.total_size]
        assert len(indices) == self.total_size

        # subsample
        indices = indices[self.rank:self.total_size:self.num_replicas] # 这一步保证每个进程拿到的数据不同
        assert len(indices) == self.num_samples

return iter(indices)这里最关键的问题是是什么呢?首先在torch.utils.data.distributed.DistributedSampler里面,数据集的变量叫self.dataset而不是data_source;其次和torch.utils.data.Sampler要求你_重写__iter__函数不同:
def __iter__(self) -> Iterator[T_co]:
        raise NotImplementedError
DistributedSampler这个父类里有部分实现,如果你没有考虑到这部分,就自然会出现每个进程拿到的数据都是all的情况。
于是我重写了我的DDPBaseBucketSampler类:
def basesampler(lens, indices, batch_size):
    # the magic number comes from the author's code
    t1 = []
    t2 = []
    t3 = []
    for i, l in enumerate(lens):
        if (l<100):
            t1.append(indices[i])
        elif (l>100 and l<220):
            t2.append(indices[i])
        else:
            t3.append(indices[i])
    datas = [t1,t2,t3]
    random.shuffle(datas)
    idxs = sum(datas, [])
    batch = []

    #为了保证不爆卡,我们给不同长度的数据上保护锁
    middle_batch_size = min(int(batch_size * 0.75) , 32)
    long_batch_size = min(int(batch_size * 0.5) , 24)

    return idxs, batch, middle_batch_size, long_batch_size

class DDPBaseBucketSampler(torch.utils.data.distributed.DistributedSampler):
    '''
    这里要注意和单GPU的sampler类同步
    '''
    def __init__(self, dataset, num_replicas, rank, shuffle=True, batch_size=32):
        super(DDPBaseBucketSampler, self).__init__(dataset, num_replicas, rank, shuffle)
        self.batch_size = batch_size

    def __iter__(self):
        # deterministically shuffle based on epoch
        g = torch.Generator()
        g.manual_seed(self.epoch)
        #print('here is pytorch code and you can delete it in the /home/lzk/anaconda3/lib/python3.7/site-packages/torch/utils/data')
        if self.shuffle:
            indices = torch.randperm(len(self.dataset), generator=g).tolist()
        else:
            indices = list(range(len(self.dataset)))
        # add extra samples to make it evenly divisible
        indices += indices[:(self.total_size - len(indices))]
        assert len(indices) == self.total_size

        indices = indices[self.rank:self.total_size:self.num_replicas]
        assert len(indices) == self.num_samples

        # 然后我也要拿到每个数据的长度 (每个rank不同)
        lens = torch.Tensor([len(x) for x in self.dataset])

        idxs, batch, middle_batch_size, long_batch_size = basesampler(lens[indices], indices, self.batch_size)

        for idx in idxs:
            batch.append(idx)
            mlen = max([0]+[lens[x] for x in batch])
            #if (mlen<100 and len(batch) == 32) or (mlen>100 and mlen<220 and len(batch) >= 24) or (mlen>220 and len(batch)>=8) or len(batch)==32:
            if (mlen<100 and len(batch) == self.batch_size) or (mlen>100 and mlen<220 and len(batch) >= middle_batch_size) or (mlen>220 and len(batch)>=long_batch_size) or len(batch)==self.batch_size:
                yield batch
                batch = []
        # print('应该出现2次如果是2个进程的话')
        if len(batch) > 0:
            yield batch

    def __len__(self):
        return (len(self.dataset)+self.batch_size-1)//self.batch_size
后面每个进程终于可以跑属于自己的数据了(1/n,n=进程数量=GPU数量,单机)
紧接着问题又来了,我发现训练过程正常结束后,主进程无法退出mp.spawn()函数。
写bug第二步,master进程无法正常结束
number workers ddp pytorch下无法正常结束。具体表现为,mp.spawn传递的函数参数可以顺利运行完,但是master进程一直占着卡,不退出。一开始我怀疑是sampler函数的分发batch的机制导致的,什么意思呢?就是由于每个进程拿到的数据不一样,各自进程执行sampler类的时候,由于我规定了长度接近的文本打包在一起,所以可能master进程有一百个iter,slave只有80个,然后我马上试了一下,很快啊:
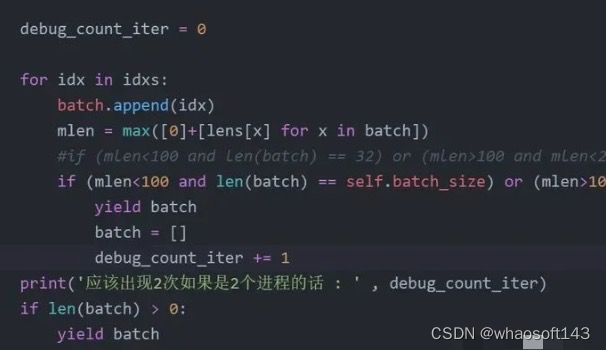
▲DDPBucketSampler(torch.utils.data.distributed.DistributedSampler)类迭代函数__iter__
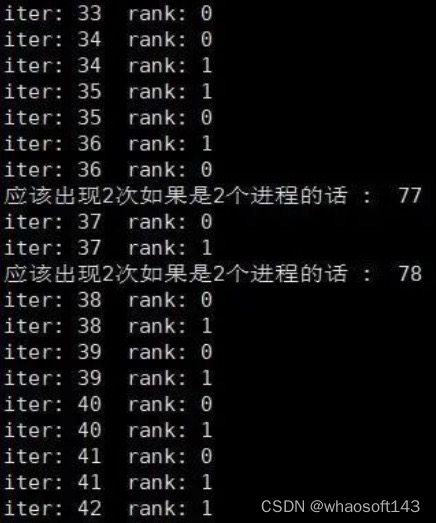
▲都能够正常打印,证明__iter__函数没有问题
发现只有细微的差别,并且,程序最后都越过了这些print,应该不会是batch数量不一致导致的问题。(顺便指的一提的是,sampler在很早的时候就把batch打包好了)
加了摧毁进程,也于事无补
if args.is_ddp:
     dist.destroy_process_group()
     print('rank destroy_process_group: ' , rank)
然后只能点击强制退出
File "train.py", line 322, in <module>
    main(args.gpu, args)
  File "/home/lzk/anaconda3/lib/python3.7/site-packages/torch/multiprocessing/spawn.py", line 171, in spawn
    while not spawn_context.join():
  File "/home/lzk/anaconda3/lib/python3.7/site-packages/torch/multiprocessing/spawn.py", line 77, in join
    timeout=timeout,
  File "/home/lzk/anaconda3/lib/python3.7/multiprocessing/connection.py", line 920, in wait
    ready = selector.select(timeout)
  File "/home/lzk/anaconda3/lib/python3.7/selectors.py", line 415, in select
    fd_event_list = self._selector.poll(timeout)
TypeError: keyboard_interrupt_handler() takes 1 positional argument but 2 were given
^CError in atexit._run_exitfuncs:
Traceback (most recent call last):
  File "/home/lzk/anaconda3/lib/python3.7/multiprocessing/popen_fork.py", line 28, in poll
    pid, sts = os.waitpid(self.pid, flag)
TypeError: keyboard_interrupt_handler() takes 1 positional argument but 2 were given
代码参考:基于Python初探Linux下的僵尸进程和孤儿进程(三)[3]、 Multiprocessing in python blocked[4]
很显然是pytorch master进程产生死锁了,变成了僵尸进程。
再探究,发现当我把dataloader的number workers设为0的时候,程序可以正常结束。经过我的注释大法后我发现,哪怕我把for _i , batch in enumerate(dataloader)内的代码全部注释改为pass,程序还是会出现master无法正常结束的情况。所以问题锁定在dataloader身上。参考:nero:PyTorch DataLoader初探[5]
另外一种想法是,mp.spawn出现了问题。使用此方式启动的进程,只会执行和 target 参数或者 run() 方法相关的代码。Windows 平台只能使用此方法,事实上该平台默认使用的也是该启动方式。相比其他两种方式,此方式启动进程的效率最低。参考:Python设置进程启动的3种方式[6]
现在试一下,绕开mp.spawn函数,用shell脚本实现ddp,能不能不报错:
python -m torch.distributed.launch --nproc_per_node=2 --nnodes=1 --node_rank=0 --master_addr="192.168.1.201" --master_port=23456 我的文件.py参数解释:
- nnodes:因为是单机多卡,所以设为1,显然node_rank 只能是0了
- local_rank:进程在运行的时候,会利用args插入local_rank这个参数标识进程序号
一番改动后,发现问题有所好转,最直观的感受是速度快了非常多!!现在我没有父进程的问题了,但还是在运行完所有的程序后,无法正常结束:

此时的代码运行到:
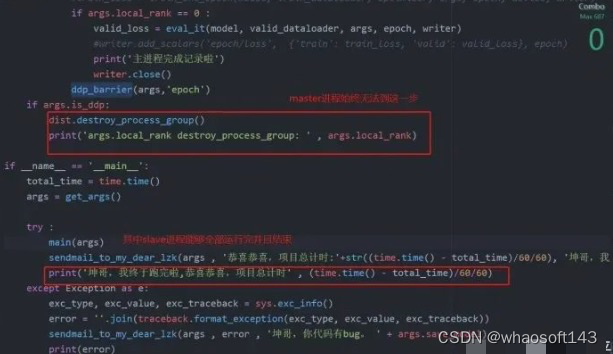
上面的代码是main函数,2个进程(master,salve)都可以越过barrier,其中slave顺利结束,但是master却迟迟不见踪影:

这个时候ctrl+c终止,发现:
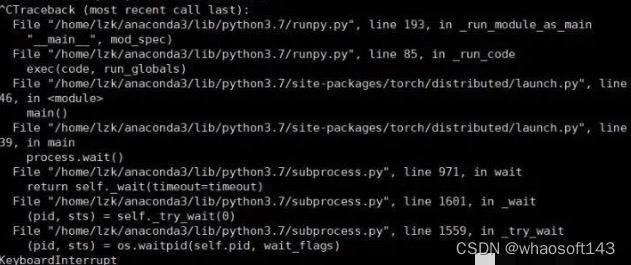
顺着报错路径去torch/distributed/launch.py, line 239找代码:
def main():
    args = parse_args()

    # world size in terms of number of processes
    dist_world_size = args.nproc_per_node * args.nnodes

    # set PyTorch distributed related environmental variables
    current_env = os.environ.copy()
    current_env["MASTER_ADDR"] = args.master_addr
    current_env["MASTER_PORT"] = str(args.master_port)
    current_env["WORLD_SIZE"] = str(dist_world_size)

    processes = []

    if 'OMP_NUM_THREADS' not in os.environ and args.nproc_per_node > 1:
        current_env["OMP_NUM_THREADS"] = str(1)
        print("*****************************************\n"
              "Setting OMP_NUM_THREADS environment variable for each process "
              "to be {} in default, to avoid your system being overloaded, "
              "please further tune the variable for optimal performance in "
              "your application as needed. \n"
              "*****************************************".format(current_env["OMP_NUM_THREADS"]))

    for local_rank in range(0, args.nproc_per_node):
        # each process's rank
        dist_rank = args.nproc_per_node * args.node_rank + local_rank
        current_env["RANK"] = str(dist_rank)
        current_env["LOCAL_RANK"] = str(local_rank)

        # spawn the processes
        if args.use_env:
            cmd = [sys.executable, "-u",
                   args.training_script] + args.training_script_args
        else:
            cmd = [sys.executable,
                   "-u",
                   args.training_script,
                   "--local_rank={}".format(local_rank)] + args.training_script_args

        process = subprocess.Popen(cmd, env=current_env)
        processes.append(process)

    for process in processes:
        process.wait() # 等待运行结束
        if process.returncode != 0:
            raise subprocess.CalledProcessError(returncode=process.returncode,
                                                cmd=cmd)
可恶,master和dataloader到底有什么关系哇。。
这个问题终于在昨天(2020/12/22)被解决了,说来也好笑,左手是graphwriter的ddp实现,无法正常退出,右手是minst的ddp最小例程,可以正常退出,于是我开始了删减大法。替换了数据集,model,然后让dataloader空转,都没有发现问题,最后一步步逼近,知道我把自己的代码这一行注释掉以后,终于可以正常结束了:
def main(args):
    ############################################################
    print('local_rank : ' , args.local_rank )
    if args.is_ddp:
        dist.init_process_group(
        	backend='nccl',
       		init_method='env://',
        	world_size=args.world_size,
        	rank=args.local_rank
        )
    ############################################################
    # torch.multiprocessing.set_sharing_strategy('file_system')  万恶之源

    os.environ["CUDA_VISIBLE_DEVICES"] = os.environ["CUDA_VISIBLE_DEVICES"].split(',')[args.local_rank]
    args.device = torch.device(0)
    ...
为什么我当时会加上这句话呢?因为当时在调试number worker的时候(当时年轻,以为越大越好,所以设置成了number workers = cpu.count()),发现系统报错,说超出了打开文件的最大数量限制。在torch.multiprocessing的设定里,共享策略(参考pytorch中文文档[7])默认是File descriptor,此策略将使用文件描述符作为共享内存句柄。当存储被移动到共享内存中,一个由shm_open获得的文件描述符被缓存。当时,文档还提到:
如果你的系统对打开的文件描述符数量有限制,并且无法提高,你应该使用
file_system策略。
所以我换成了torch.multiprocessing.set_sharing_strategy('file_system'),但是却忽略文档里的共享内存泄露警告。显然,或许这不是严重的问题,文档里提到:

也有可能我所说的master进程就是这个torch_shm_manager,因为destory进程组始终无法结束0号进程:

这个BUG结束了,真开心,期待下一个BUG快快到来。 感谢原著的好文啊
三、PyTorch2.0~Dynamo
浅入深地好好聊一聊,PyTorch 2.0 中的 Dynamo,是如何完成 Graph trace 的。
随着 PyTorch 2.0 的正式发布,相信很多小伙伴已经使用过 PyTorch 2.0 的 compile 功能,也尝试写过自己的编译后端,对模型做一些定制化的优化。得益于 Dynamo 强大的字节码解析能力,我们能够在不关心代码解析过程的情况下,随心所欲地写编译优化后端。然而,由于字节码解析部分实现的复杂性,目前并没有比较完整的资料介绍其工作原理。今天我们就来由浅入深地好好聊一聊,PyTorch 2.0 中的 Dynamo,是如何完成 Graph trace 的。
之前提到,Dynamo 是如何通过 PEP 523 改变 Python 默认的函数(帧评估)执行流程,将它从下图的 Default Python Behavior 转变为 TorchDynamo Behavior:
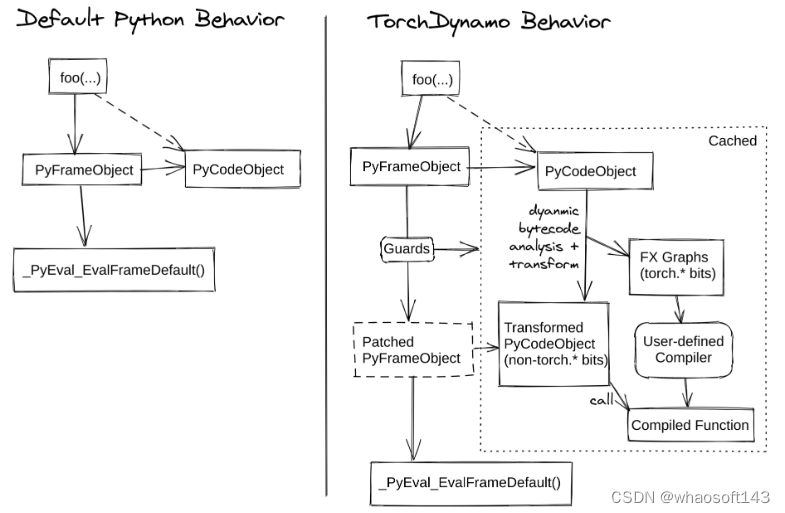
在了解 Dynamo 设计的基石后,我们就可以一步一步地理解上图右侧栏各个流程框图的含义:
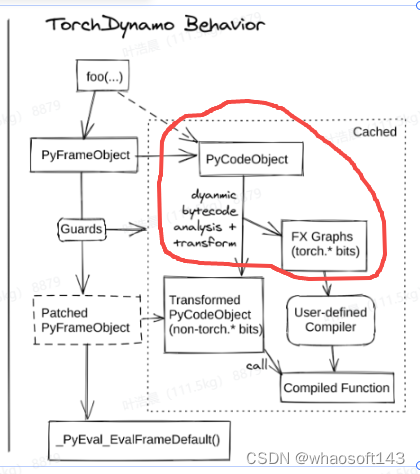
- 在第一次执行被 torch.compile 编译的函数时,会走上图右侧的分支,从 PythonFrameObject(帧的定义可以见之前)中解析出 PyCodeObject
- 基于 PyCodeObject 中的字节码解析出 fx graph,同时生成守卫(Guard),并在解析过程中使用指定后端对代码进行编译
- 将编译后的代码替换原有的代码,获得 Transformed PyCodeObject,函数实际运行时会调用编译后的代码
- 第二次执行时,守卫会判断是否需要重新编译,如果不需要则会从缓存中直接读取上次编译的代码,否则会触发重新编译
好的好的,一口气抛出这么多概念,相信不少小伙伴会有一种说了等于没说的感觉。没关系,今天我们由浅入深,详细介绍每一个步骤的内容。whaoの开发板商城aiot物联网设备
第一章:Dynamo 的帧执行流程
上篇文章我们提到,Dynamo 基于 PEP 523,设计了一个自定义的帧执行函数,而今天我们就来看看,这个函数具体做了哪些事(只保留了代码的主体逻辑,且不考虑 subgraph 等更复杂的情况):
1. 调用 torch.compile 编译函数时,编译返回的函数实际为 _TorchDynamoContext 里定义的 _fn 函数(https://github.com/pytorch/pytorch/blob/38da54e9c9471565812d2be123ee4e9fd6bfdbc0/torch/_dynamo/eval_frame.py#L215)
2. _fn 会把 Python 默认的帧执行函数替换为 Dynamo 自定义的帧执行函数 _custom_eval_frame(https://github.com/pytorch/pytorch/blob/141a2ebcf199c3f20b08e090b7e2a0527c5d9da5/torch/csrc/dynamo/eval_frame.c#L636)
3. 执行目标函数时,会进入 _custom_eval_frame,并调用 callback 函数(关于 callback 函数的功能可以见之前)对帧进行解析,并返回编译结果 result
- callback:用于解析字节码,进行 Graph trace,最后返回编译结果
- result:即 GuardedCode 实例(https://github.com/pytorch/pytorch/blob/a9b9fd90a273e3430b2c58632b890ba095db5369/torch/_dynamo/convert_frame.py#L391),其中 code 属性为编译优化后的代码,check_fn 为检查代码,用于检查当前是否需要重新编译函数。
调用 callback 函数时还需要传入 cache_size 参数,表示当前是第几次编译该函数,第一次调用时其值为 0。当 cache_size 大于阈值时,不再编译该函数,按照原有逻辑执行。
4. 将 result 缓存到 extra,其中 extra 是一个链表,每执行一次编译链表都会新增一个元素。往后每次执行函数时都会根据当前帧的状态和 extra 中的往期编译结果来判断是否需要进行重新编译
5. 执行编译后的代码,返回结果
6. 第 2 次执行时,加载上次生成的 extra,进行查表操作(lookup)。遍历 extra 中的每个元素,执行 GuardedCode.check_fn
- 如果 extra 中某个元素的 check_fn 返回 True,则把该元素放到链表的最前端,方便下一次检查时优先遍历。同时终止遍历,运行之前编译好的代码。
- 如果所有的 check_fn 均返回 Fasle,则重复执行 2~4 步骤。需要注意的是,每执行一轮 2-4 步骤。
如果你觉得上述流程说得通,继续按照文章顺序阅读即可,如果你觉得上述流程存在逻辑缺陷,可以直接移步编译子图一节。> 如果你对 C 代码不是很熟,也可以跳过这部分的理解,只需要记住:字节码解析最终会返回 GuardedCode 实例,该实例含有两属性,其中 check_fn 用来判断代码是否需要重新编译的,code 部分则存放编译好的代码。
第二章:字节码解析与图生成
第一章提到的编译好的代码(GuardedCode.code)其实已经是 Dynamo 编译器前端解析+后端编译的最终产物了,而现在我们要介绍的字节码解析,正是前端解析的具体流程。本章我们会深入 callback 函数,理解如何从帧中解析字节码,获取模型图结构,最终生成 GuardedCode。
在 CPython 中,Python 代码是在 CPython 的虚拟机中执行的,而执行的过程,正是上篇文章我们提到的 _PyEval_EvalFrameDefault 函数,它会将帧中函数的代码,解析成一系列的字节码,并在一大串的 switch-case 中逐条执行字节码,CPython 支持的所有字节码见 opcode.h(https://github.com/python/cpython/blob/e6b0bd59481b9bc4570736c1f5ef291dbbe06b8e/Include/opcode.h)。
我们可以在 Python 代码中,通过使用 dis.dis 函数,来查看任意一个函数在 CPython 虚拟机中执行时的字节码:
import dis

def add(x, y):
    res = x + y
    return res

# 以表格的形式输出字节码信息
dis.dis(add)
# 逐条输出字节码详细信息
for inst in dis.Bytecode(add):
    print(inst)
输出:
# 代码行数     # 代码对应的字节码            # 变量名
#   5           0 LOAD_FAST                0 (x)
#               2 LOAD_FAST                1 (y)
#               4 BINARY_ADD
#               6 STORE_FAST               2 (z)
#
#   6           8 LOAD_FAST                2 (z)
#               10 RETURN_VALUE

# Instruction(opname='LOAD_FAST', opcode=124, arg=0, argval='x', argrepr='x', offset=0, starts_line=5, is_jump_target=False)
# Instruction(opname='LOAD_FAST', opcode=124, arg=1, argval='y', argrepr='y', offset=2, starts_line=None, is_jump_target=False)
# Instruction(opname='BINARY_ADD', opcode=23, arg=None, argval=None, argrepr='', offset=4, starts_line=None, is_jump_target=False)
# Instruction(opname='STORE_FAST', opcode=125, arg=2, argval='res', argrepr='res', offset=6, starts_line=None, is_jump_target=False)
# Instruction(opname='LOAD_FAST', opcode=124, arg=2, argval='res', argrepr='res', offset=8, starts_line=6, is_jump_target=False)
# Instruction(opname='RETURN_VALUE', opcode=83, arg=None, argval=None, argrepr='', offset=10, starts_line=None, is_jump_target=False)
这些字节码到底做了什么事呢,CPython 用非常复杂的 C 代码来解析每个字节码,而 Dynamo 则在 Python 层面对字节码进行解析,并 trace 模型的图结构的。

如上图所示,字节码的解析可以大体分成以下 7 个步骤:
- 解析输入参数 x,y,将其存储到局部变量(local_var)
- LOAD_FAST x:将变量 x push 入栈
- LOAD_FAST y:将变量 y push入栈
- BINARY_ADD:从 stack 中 pop 出 x,y ,计算出结果后将其 push 入栈
- STORE_FAST res:从 stack 中 pop 出栈顶元素(即上一步的结果),并将其存储到局部变量 res
- LOAD_FAST res:将变量 res push入栈
- RETURN_VALUE:pop 出栈中的 res 并返回
Dynamo 实现了 InstructionTranslator(https://github.com/pytorch/pytorch/blob/bda9d7ba73fa6f8f1aa01189cc2b03d81601cb9e/torch/_dynamo/symbolic_convert.py#L424) 来解析字节码,为了方便理解其核心内容,这边实现了简易版的 SimpleInstructionTranslator:
在看样例代码之前,我们先介绍几个概念:
- torch.fx.Graph 是 Dynamo 解析字节码后生成的 intermediate representation (IR),换句话说 torch.fx.Graph 是解析字节码后,trace 得到的图结构。在示例代码中把它理解成简单的图数据结构就可以。
- Graph.create_node 可以为图生成一系列的节点,传入的 op 为节点类型,其中输入节点的类型为 "placeholder",输出节点的类型为 "output",函数调用的节点类型为 “call_function”。
- Graph.python_code 可以从 trace 得到的图生成代码,这边我们用它来校验图的正确性。
import dis
import operator
from dis import Instruction

from torch.fx import Graph

class SimpleInstructionTranslator:
    def __init__(self, instructions, inputs) -> None:
        self.graph = Graph()
        self.instructions = instructions
        self.stack = []
        self.locals = {}
        for input in inputs:
            node = self.graph.create_node(op='placeholder', target=input, args=(), kwargs={}, name=input)
            self.locals[input] = node

    def run(self):
        for inst in self.instructions:
            print(f'parse the bytecode op {inst.opname}')
            getattr(self, inst.opname)(inst)
        return self.graph

    def LOAD_FAST(self, inst: Instruction):
        argval = inst.argval
        self.push(self.locals[argval])
        return

    def STORE_FAST(self, inst: Instruction):
        argval = inst.argval
        self.locals[argval] = self.pop()
        return

    def BINARY_ADD(self, inst: Instruction):
        add = operator.add
        node = self.graph.create_node(op='call_function', target=add, args=(self.pop(), self.pop()), kwargs={}, name=inst.argval)
        self.push(node)
        return

    def push(self, val):
        self.stack.append(val)
        return

    def pop(self):
        return self.stack.pop()

    def RETURN_VALUE(self, inst):
        output = self.pop()
        return self.graph.create_node(op='output', target='output', args=(output, ), name='output')


def add(x, y):
    res = x + y
    return res

if __name__ == '__main__':
    instructions = dis.Bytecode(add)
    translator = SimpleInstructionTranslator(instructions, ('x', 'y'))
    translator.run()
    translator.graph.print_tabular()
    print(translator.graph.python_code('root').src)


# parse the bytecode op LOAD_FAST
# parse the bytecode op LOAD_FAST
# parse the bytecode op BINARY_ADD
# parse the bytecode op STORE_FAST
# parse the bytecode op LOAD_FAST
# parse the bytecode op RETURN_VALUE

# opcode         name    target                   args    kwargs
# -------------  ------  -----------------------  ------  --------
# placeholder    x       x                        ()      {}
# placeholder    y       y                        ()      {}
# call_function  add     <built-in function add>  (y, x)  {}
# output         output  output                   (add,)  {}

# Generated code:
# def forward(self, x, y):
#     add = y + x;  y = x = None
#     return add
SimpleInstructionTranslator 会在 run 函数中,对每条字节码进行解析。每个同名的字节码函数,都在模拟相应字节码解析的流程。SimpleInstructionTranslator 只实现了LOAD_FAST LOAD_FAST BINARY_ADD RETURN_VALUE 三个字节码解析函数,因此它只能解析简单加法操作的函数,这里再给一个稍微复杂一点点的例子:
def add_three(x, y, z):
    res1 = x + y
    res2 = res1 + z
    return res2

if __name__ == '__main__':
    instructions = dis.Bytecode(add_three)
    translator = SimpleInstructionTranslator(instructions, ('x', 'y', 'z'))
    translator.run()
    translator.graph.print_tabular()
    print(translator.graph.python_code('root').src)

# parse the bytecode op LOAD_FAST
# parse the bytecode op LOAD_FAST
# parse the bytecode op BINARY_ADD
# parse the bytecode op STORE_FAST
# parse the bytecode op LOAD_FAST
# parse the bytecode op LOAD_FAST
# parse the bytecode op BINARY_ADD
# parse the bytecode op STORE_FAST
# parse the bytecode op LOAD_FAST
# parse the bytecode op RETURN_VALUE

# opcode         name    target                   args      kwargs
# -------------  ------  -----------------------  --------  --------
# placeholder    x       x                        ()        {}
# placeholder    y       y                        ()        {}
# placeholder    z       z                        ()        {}
# call_function  add     <built-in function add>  (y, x)    {}
# call_function  add_1   <built-in function add>  (z, add)  {}
# output         output  output                   (add_1,)  {}

# def forward(self, x, y, z):
#     add = y + x;  y = x = None
#     add_1 = z + add;  z = add = None
#     return add_1 world!");
显然,SimpleInstructionTranslator 依旧很好地完成了 add_three 字节码解析和图 trace 的工作。
由于实际解析的代码会更加的复杂,官方的 InstructionTranslator 实现了更多的字节码解析函数,处理各种各样的 corner case。
事实上,PyTorch 并没有往 stack 里 push GraphNode 而选择往里面 push 一个新的抽象 VariableTracker,并在此基础上引入了 Guard 的概念。后续我们将会从原理和源码层面分析,为什么需要 VariableTracker 和 Guard,以及它们又是如何实现的。
为什么需要 VariableTracker
字节码信息的不完整性
字节码不会包含程序的运行时信息,如果光从字节码去 trace 模型,那和从抽象语法树(AST)去 trace 模型没有太大区别,trace 得到的图也不具备动态特性(没有输入自然没有办法根据输入做动态判断)。
再举个最简单的例子,对于这样一行代码:self.layer1(x),字节码解析的过程中会触发:
- LOAD_FAST:加载 self,push 入栈
- LOAD_ATTR:pop 出 self,加载 layer1,将 layer1 push 入栈
- LOAD_FAST:将 x push 入栈
- CALL_FUNCTION pop 出 layer1 和 x,并执行 layer1(x)
然而问题在于此时程序没有运行,没法获取到 self.layer1 这个函数,自然也没法进一步解析这个函数的字节码了。Dynamo 的顶层设计决定了 trace 的过程会从 frame evaluation(https://github.com/pytorch/pytorch/blob/141a2ebcf199c3f20b08e090b7e2a0527c5d9da5/torch/csrc/dynamo/eval_frame.c#L636) 入手,在运行阶段完成图的追踪。程序运行时我们可以获得输入信息,因此我们需要一个数据结构去承载字节码以外的信息,那就是 VariableTracker。
Graph 的动态特性
Dynamo trace 出来图的动态特性,是由守卫(guard) 所赋予的,而守卫的载体就是 VariableTracker,这部分我们后续会进行详细介绍。
字节码信息对于模型图结构是“冗余”的
Dynamo 基于字节码的 graph trace,其目的不是 trace 出一个完整 Python 的图表示,否则这和基于字节码重构抽象语法树也没有太大区别。这里给出一个简单的例子:
import torch
import torch.nn as nn
from torch._dynamo.bytecode_transformation import cleaned_instructions

class Model(nn.Module):
    def __init__(self):
        super().__init__()
        self.linear1 = nn.Linear(1, 1)
        self.linear2 = nn.Linear(1, 1)

    def forward(self, x):
        return self.linear1(x) + self.linear2(x)

def custom_backend(gm, example_inputs):
    gm.graph.print_tabular()
    return gm.forward

if __name__ == '__main__':
    model = Model()
    instructions = cleaned_instructions(model.forward.__code__)
    for i in instructions:
        print(i)


    compiled_model = torch.compile(model, backend=custom_backend)
    compiled_model(torch.rand(1, 1))

# Instruction(opcode=124, opname='LOAD_FAST', arg=0, argval='self', offset=0, starts_line=16, is_jump_target=False, target=None)
# Instruction(opcode=106, opname='LOAD_ATTR', arg=0, argval='linear1', offset=2, starts_line=None, is_jump_target=False, target=None)
# Instruction(opcode=124, opname='LOAD_FAST', arg=1, argval='x', offset=4, starts_line=None, is_jump_target=False, target=None)
# Instruction(opcode=131, opname='CALL_FUNCTION', arg=1, argval=1, offset=6, starts_line=None, is_jump_target=False, target=None)
# Instruction(opcode=124, opname='LOAD_FAST', arg=0, argval='self', offset=8, starts_line=None, is_jump_target=False, target=None)
# Instruction(opcode=106, opname='LOAD_ATTR', arg=1, argval='linear2', offset=10, starts_line=None, is_jump_target=False, target=None)
# Instruction(opcode=124, opname='LOAD_FAST', arg=1, argval='x', offset=12, starts_line=None, is_jump_target=False, target=None)
# Instruction(opcode=131, opname='CALL_FUNCTION', arg=1, argval=1, offset=14, starts_line=None, is_jump_target=False, target=None)
# Instruction(opcode=23, opname='BINARY_ADD', arg=None, argval=None, offset=16, starts_line=None, is_jump_target=False, target=None)
# Instruction(opcode=83, opname='RETURN_VALUE', arg=None, argval=None, offset=18, starts_line=None, is_jump_target=False, target=None)

# opcode         name          target                   args                          kwargs
# -------------  ------------  -----------------------  ----------------------------  --------
# placeholder    x             x                        ()                            {}
# call_module    self_linear1  self_linear1             (x,)                          {}
# call_module    self_linear2  self_linear2             (x,)                          {}
# call_function  add           <built-in function add>  (self_linear1, self_linear2)  {}
# output         output        output                   ((add,),)                     {}
可以看到,torch.compile 解析出来的图结构,只包含了部分字节码信息,LOAD_ATTR 并没有体现在 trace 出来的 graph 上。这事实上也归功于 stack push pop 的不是 Node 实例,而是 VariableTracker 实例。因此在执行 LOAD_ATTR 的字节码解析函数时,不需要往 graph 中新增一个 node,再将其 push 入栈,为 Graph 更新一个 get_attr 节点了。
VariableTracker
既然 Node 不适合直接作为字节码解析过程中,push pop 操作的载体,Dynamo 就设计了一个新的数据类,VariableTracker。其功能顾名思义,就是用来追踪字节码解析过程中产生的变量。VariableTracker 能够接受函数运行时的信息,并控制 Graph 的生成。
设想一下,如果我们把样例代码中的所有 Node,都替换成 VariableTracker,直接面临的问题就有两个:
- Node 是有 op type 的,不同类型 op type 的 Node 相互组合才可以生成 PythonCode 的 Graph,那么 VariableTracker 应该如何体现节点类型的不同呢?
- VariableTracker 又应该如何和 Node 关联,以生成最终的 Graph 呢?
不同类型的 VariableTrackers
正如问题里提到的,解析不同类型的字节码需要生成不同类型的 VariableTracker,例如在执行 CALL_FUNCTION 之前,我们需往先 stack 里 push 一个 UserFunctionVariable,再往 stack 里 push 一个 TensorVariable (假设函数的输入是 Tensor 类型)。最后在 CALL_FUNCTION 里将二者 pop 出来,调用 UserFunctionVariable 的方法模拟函数执行。
Dynamo 在 variables 文件夹(https://github.com/pytorch/pytorch/tree/main/torch/_dynamo/variables)中定义了所有的 VariableTracker 类型,感兴趣的话可以看看每个 VariableTracker 的功能。
基于 VariableTracker 生成 Graph
上一节我们提到,LOAD_ATTR 之类的字节码是不会生成相应的 Node 的(绝大部分情况),因此 LOAD_ATTR 就不应该调用 Graph.create_node 来生成相应的节点。而像 CALL_FUNCTION 之类的字节码,是否生成新的节点,会视 VariableTracker 的具体值而定,例如:
def foo(x, y):
    return x + y

def foo1(x, y):
    return
foo 中的 BINARAY_ADD 字节码作为内置函数(BuiltinVariable),解析时会生成新的节点, 而 foo1 作为是一个空函数 ,则不会生成新的节点。因此是否生成新的节点,是和 VariableTracker 实例本身相关,而如果要在 InstructionTranslator 这一层处理这些逻辑,这部分代码的可读性将是一个灾难。
因此 Dynamo 新增了一层抽象 VariableBuilder(https://github.com/pytorch/pytorch/blob/38b687ed4de5d74423ef0d0a60a4aa007d0c4ec9/torch/_dynamo/variables/builder.py#L149) 来负责 VariableTracker 的构建,并控制过程中是否生成新的 Node 等操作(包括生成 Guard,下一节会介绍)。
这边贴一段 VariableBuilder 生成 TensorVariable 代码片段,大家自行感受一下(冰山一角):
def wrap_tensor(self, value: torch.Tensor):
        if self.get_source().guard_source().is_nn_module():
            return self.tx.output.register_attr_or_module(
                value,
                self.name,
                source=self.get_source(),
                # Guards are done inside register_attr_or_module
                # guards=self.make_guards(GuardBuilder.TENSOR_MATCH),
            )

        if is_constant_source(self.get_source()):
            return self.tx.output.register_attr_or_module(
                value,
                re.sub(r"[^a-zA-Z0-9]+", "_", self.name),
                source=self.get_source(),
                # Guards are added inside register_attr_or_module
            )
        ...
这边给大家简单翻译一下(可以简单把 source 理解成数据源,用于帮助 Guard 生成检查代码):
- 如果这个 Tensor 是来自于一个 nn.Module 的(类似 register_buffer),那么他就会往 graph 里注册一个节点,并返回一个 TensorVariable
- 如果这个 Tensor 的数据来源是一个常量(torch.Tensor(1)),操作同上,只不过名字会有所不同
- ...
不要急,走进 register_attr_or_module 这个函数,你会看到更多的 if-else。不得不说,Dynamo 为了处理代码的各种情况,可以说全是 hardcode,让人看了痛苦不堪。
回到这个问题本身,如果 VariableBuilder 全权负责全部 VariableTracker 的构建和 Graph 节点的更新,那么从层次上来讲好像也还算清晰,InstructionTranslator 也可以免于判断什么时候需要新增节点。例如对于输入参数,InstructionTranslator 直接使用 VariableBuilder 构建一系列的 VariableTracker,完全不需要关心 Graph 相关的逻辑,做到模块之间的功能解耦。
self.symbolic_locals = collections.OrderedDict(
            (
                k,
                VariableBuilder(
                    self,
                    LocalInputSource(k, code_options["co_varnames"].index(k))
                    if k in code_options["co_varnames"]
                    else LocalSource((k)),
                )(f_locals[k]),
            )
            for k in vars
            if k in f_locals
        )
守卫(Guard)
前面介绍的种种只是在描述 Dynamo 是如何通过字节码生 trace graph,而为了让 trace 出来的 graph 保持动态特性,就离不开核心组件:Guard。在构建 VariableTracker 时,可能会绑定一个或多个 guard,用于生成监视变量的检查代码,也就是我们最初提到的 check_fn。需要注意的是,Graph trace 阶段可能会生成非常多的 guard,但是最后只有部分 guard 会被用于生成 check_fn,这其实也很好理解,因为只有部分变量都会造成模型的动态结构。
Guard 功能的实现主要依赖两个模块:Guard 和 GuardBuilder。
Guard:https://github.com/pytorch/pytorch/blob/542fb0b1fad6bf61929df16e2133e9a296820f08/torch/_guards.py#L82)
GuardBuilder:https://github.com/pytorch/pytorch/blob/542fb0b1fad6bf61929df16e2133e9a296820f08/torch/_dynamo/guards.py#L85
Guard:Graph trace 过程中生成,记录最后生成检查代码阶段所需的额外信息,并最后存储生成后的代码。这边最主要介绍初始化阶段的两个核心参数:
- source:记录守护的变量名 name,例如 "self.layer1.state",变量名用于生成检查代码
- create_fn:用于生成检查代码的函数,其值通常为 GuardBuilder 的 method,在 GuardBuilder 部分展开介绍
GuardBuilder:Graph trace 完成后,基于 trace 过程中生成的 Guards ,生成最终的检查代码。
我们通过一些代码示例来理解 Guard 和 GuardBuilder 是如何起作用的。首先修改 Dynamo 的配置,以输出 Guard 相关的日志:
import logging

import torch
import torch._dynamo.config
import torch.nn as nn

torch._dynamo.config.log_level = logging.INFO
torch._dynamo.config.output_code = True

class Model(nn.Module):
    def __init__(self):
        super().__init__()
        self.linear1 = nn.Linear(1, 1)
        self.linear2 = nn.Linear(1, 1)
        self.x = 1

    def forward(self, x):
        return self.linear1(x) + self.linear2(x)


if __name__ == '__main__':
    model = Model()
    compiled_model = torch.compile(model)
    compiled_model(torch.rand(1, 1))arded_class': None
            }
Guard 相关的输出日志:
local 'x' TENSOR_MATCH
{
    'guard_types': ['TENSOR_MATCH'],
    'code': None,
    'obj_weakref': <weakref at 0x7f9035c8bce0; to 'Tensor' at 0x7f8f95bddd00>
    'guarded_class': <weakref at 0x7f8f98cf9440; to 'torch._C._TensorMeta' at 0x57f3e10 (Tensor)>
}

-
local 'self' NN_MODULE
{
    'guard_types': ['ID_MATCH'],
    'code': ['___check_obj_id(self, 140260021010384)'],
    'obj_weakref': <weakref at 0x7f8f9864a110; to 'Model' at 0x7f90d4ba7fd0>
    'guarded_class': <weakref at 0x7f90d4bc71a0; to 'type' at 0x705e0f0 (Model)>
}

-
local_nn_module 'self.linear1' NN_MODULE
{
    'guard_types': None,
    'code': None,
    'obj_weakref': None
    'guarded_class': None
}

-
local_nn_module 'self.linear2' NN_MODULE
{
    'guard_types': None,
    'code': None,
    'obj_weakref': None
    'guarded_class': None
}
默认配置下,Dynamo 不会对 nn.Module 进行检查,即假设训练过程中,nn.Module 不会发生 inplace 的替换,因此此处 self.linear1 和 self.linear2 的 guard 均为 None,代码执行时不会对其进行检查。上述代码实际起作用的 Guard 只有输入 self 和 x,这边重点介绍 guard_types 和 code 属性。
对于不同类型的变量,守卫生成代码的方式也会有所不同。Guard 借助 GuardBuilder(https://github.com/pytorch/pytorch/blob/573b2deb4b9a056d25c4e969bdc1e0230c508650/torch/_dynamo/guards.py#L85) 定义了一系列不同类型变量的守护方式(感觉这个类名容易让人产生误解,认为 Guard 是通过 GuardBuider 构建而成的。然而事实上,GuardBuilder 是用于构建 check_fn,即检查代码的)。例如 CONSTANT_MATCH,TENSOR_MATCH 等等。Graph trace 完成之后,生成的 Guards 会调用这些方法以生成 check_fn。
出于性能方面的考虑,check_fn 会调用 guards.cpp 里实现 C 函数以实现状态检查(尤其是 Tensor 类型,在 Python 里做检查性能损耗严重),这边给出两个例子。
1. 检查变量 id 是否相等(ID_MATCH),check_fn 会调用以下函数
static PyObject* check_obj_id(PyObject* dummy, PyObject* args) {
  // faster `lambda obj, expected: id(obj) == expected`
  PyObject* obj;
  unsigned long long expected;
  if (!PyArg_ParseTuple(args, "OK", &obj, &expected)) {
    return NULL;
  }
  if (obj == (void*)expected) {
    Py_RETURN_TRUE;
  } else {
    Py_RETURN_FALSE;
  }
}
此处 C++ 层面实现的 check_obj_id 对应 Guard 信息中的

检查 self 参数时,check_obj_id 会根据其 id 是否匹配,来决定是否需要进行重复编译
2. 检查 Tensor 是否匹配(TENSOR_MATCH),check_fn 会调用以下函数
对于 Tensor 类型数据的检查,出于效率方面的考虑,检查代码同样在 C++ 代码里实现:
bool check(const LocalState& state, const at::Tensor& v) {
    if (dispatch_key_ != state.apply(v.key_set()).raw_repr() ||
        dtype_ != v.dtype().toScalarType() ||
        device_index_ != v.device().index() ||
        requires_grad_ != (state.grad_mode_enabled && v.requires_grad())) {
      return false;
    }
    auto ndim = static_cast<size_t>(v.ndimension());
    if (ndim != sizes_.size()) {
      return false;
    }
    if (!dynamic_shapes_) {
      const auto& sizes = v.sizes();
      const auto& strides = v.strides();
      for (auto i : c10::irange(ndim)) {
        if (sizes_[i] != sizes[i] || strides_[i] != strides[i]) {
          return false;
        }
      }
    }
    return true;
  }
简单来说会检查以下几个内容:
- 数据类型是否发生变化,例如原来数据类型为 float32,第二次输入时类型变成 float16,返回 False
- 数据所在设备是否发生变化,例如原来是在 GPU 0 上的,第二次输入变成在 GPU 1 上了,返回 False
- 数据的梯度属性是否发生变化,例如原来是需要计算梯度的,第二次却不再要求计算梯度,返回 False
- (Dynamic shape=Flase 时)数据的形状以及内存排布是否发生变化
此外,Tensor 以外的变量通常采取一个变量,一个 Guard 的检查策略,而 Tensor 类型的数据则会进行集中检查,即所有 Tensor 变量只会生成一个检查函数:___check_tensors,该函数会遍历并检查所有 Tensor。
对于上例来说,其最终生成的检查代码 check_fn 的过程等价于:
import torch

TensorGuards = torch._C._dynamo.guards.TensorGuards
check_obj_id = torch._C._dynamo.guards.check_obj_id

def gen_check_fn(self, x):
    tensor_guards = TensorGuards(x, dynamic_shapes=False)
    id_self = id(self)

    def check_fn(self, x):
        # 返回 True 表示不需要重新编译,反之则需要重新编译
        # tensor_guards.check 允许同时检查多个 tensor
        return (check_obj_id(self, id_self) and
                tensor_guards.check(*(x, )))
    return check_fn

if __name__ == '__main__':
    self = nn.Linear(1, 1)
    x = torch.rand(1, 1)
    func = gen_check_fn(self, x)
    print(f'Should recompiled: {not func(self, x)}')
    print(f'Should recompiled: {not func(nn.Linear(1, 1), x)}')
回到第一节编译与执行流程的第四步,其中提到的 check_fn 等价于上例中返回的 check_fn,如果 self 的 id 发生变化,亦或是 x 无法通过 TensorGuards.check,均会触发重新编译。
编译子图
Guard 一节提到,check_fn 只会检查模型的输入,而不是实际运行一遍代码后,再判断是否应该重新编译一遍函数。这也是合情合理的,因为执行一遍代码才能完成代码检查,这样的开销是不可接受的。然而这样也会引入其他问题,真的能够仅仅根据输入去判断是否需要重新编译模型么?
对于比较简单的函数:
class Model(nn.Module):
    def __init__(self):
        super().__init__()
        self.linear1 = nn.Linear(1, 1)
        self.linear2 = nn.Linear(1, 1)
        self.x = 1

    def forward(self, x):
        a = self.linear1(x)
        b = self.linear2(x)
        if len(a.shape) == 2:
            return a + b
        else:
            return a - b
Dynamo 并不需要为 a 和 b 生成 Guard 和 check_fn,因为只要 x 的形状不变,a.shape 就不会发生变化(假设 len 是 builtin func,且 linear1 保持不变),因此只需要对 x 构建 guard 并生成 check_fn 就足够了。
那如果换一种写法:
class Model(nn.Module):
    def __init__(self):
        super().__init__()
        self.linear1 = nn.Linear(1, 1)
        self.linear2 = nn.Linear(1, 1)
        self.x = 1

    def forward(self, x):
        a = self.linear1(x)
        b = self.linear2(x)
        if x.sum() >= 1:
            return a + b
        else:
            return a - b
这里的 x.sum() 会返回一个 Tensor,此时无论如何都没有办法仅凭输入去判断会走哪个分支。对于这种情况,Dynamo 的做法是:编译子图。
细心的同学可能会发现,编译与执行流程一节提到的执行顺序,是有漏洞的。因为在执行完第一步,将默认的执行函数替换成 _custom_eval_frame 后,这意味着 callback 执行过程中产生的函数栈,也会触发 _custom_eval_frame,这是不符合期望的。我们只希望执行被编译的函数时,能够触发 _custom_eval_frame,因此完整的执行流程如下:
1. 在 eval_frame.py 中,将帧执行函数替换 Dynamo 自定义的执行函数 _custom_eval_frame
2. 进入 _custom_eval_frame 后,将帧执行函数替换回默认的执行函数
3. 第一次执行待编译的函数时 调用 callback 函数,对帧进行解析
4. 将 result 缓存到 extra,其中 extra 是一个链表,每执行一次编译链表都会新增一个元素。往后每次执行函数时都会根据当前帧的状态和 extra 中的往期编译结果来判断是否需要进行重新编译
5. 将默认的帧执行函数重新替换成 _custom_eval_frame
6. 用默认的帧执行函数执行编译后的字节码,并返回结果
7. 第 2 次执行时,加载上次生成的 extra,进行查表操作(lookup)。遍历 extra 中的每个元素,执行 GuardedCode.check_fn
- 如果某个元素的 check_fn 返回 True,则把该元素放到链表的最前端,执行该元素之前编译好的代码。
- 如果所有的 check_fn 均返回 Fasle,则重复执行 1~3 步骤。需要注意的是,每执行一轮 1-3 步骤,callback 传入的 cache_size 参数就会递增,当其值大于 torch._dynamo.config.cache_size_limit 时,就会认为该函数过于动态,不再对其进行编译,而以函数原有的逻辑去执行代码。
8. 编译完整个函数后,在 eval_frame.py 中,将帧执行函数替换回默认的执行函数
第六步,划重点!在第五步我们将帧执行函数替换成 _custom_eval_frame 后,如果我们直接执行编译后的字节码,这就意味着会触发无限递归,因此需要调用默认的帧执行函数执行字节码。那既然如此,为什么还需要在第五步把帧执行函数替换成 _custom_eval_rame 呢?答案是,编译子图。
编译后的字节码中还会存在 CALL_FUNCTION 字节码,在执行时会进入 _custom_eval_frame,进而触发对子图的编译。
回到上面的例子,函数在第一次编译 Model.forward 时,会生成这样的字节码(生成过程详见 generic_jump(https://github.com/pytorch/pytorch/blob/141a2ebcf199c3f20b08e090b7e2a0527c5d9da5/torch/_dynamo/symbolic_convert.py#L234):
22           0 LOAD_GLOBAL              3 (__compiled_fn_0)
              2 LOAD_FAST                1 (x)
              4 CALL_FUNCTION            1
              6 UNPACK_SEQUENCE          3
              8 STORE_FAST               3 (b)
             10 STORE_FAST               2 (a)
             12 POP_JUMP_IF_FALSE       12 (to 24)
             14 LOAD_GLOBAL              4 (__resume_at_32_1)
             16 LOAD_FAST                2 (a)
             18 LOAD_FAST                3 (b)
             20 CALL_FUNCTION            2
             22 RETURN_VALUE
        >>   24 LOAD_GLOBAL              5 (__resume_at_40_2)
             26 LOAD_FAST                2 (a)
             28 LOAD_FAST                3 (b)
             30 CALL_FUNCTION            2
             32 RETURN_VALUE
等价 Python 代码如下:
def compiled_fn(x):
    a, b, is_true = __compiled_fn_0(x)
    if is is_true:
        return __resume_at_32_1(a, b)
    else:
        return __resume_at_40_2(a, b)
Dynamo 在解析到 x.sum() >= 1 时发现,该函数无法通过 Guard 来判断是否需要重新编译,于是就退而求次的把一个函数编译成三个子图,编译的结果如等价 Python 代码所示,相信大家一看就懂。
这里提到的字节码也正是第一次编译走到第六步时,其执行的字节码。字节码中三次 CALL_FUNCTION,对应示例 Python 代码中的 __compiled_fn_0,__resume_at_32_1 和 __resume_at_40_2。其中在执行 __resume_at_32_1 和 __resume_at_40_2 时,会再次触发 _custom_eval_frame,对二者进行编译。因此,在执行上述代码时会显示生成了两次 Guard,第一次发生在编译原始函数,生成 compiled_fn,第二次发生在编译 compiled_fn,分别对 __resume_at_32_1 和 __resume_at_40_2 进行编译。
细心的你可能会发现,这样 __compiled_fn_0 不是也会触发二次编译么。Dynamo 自然也考虑到了这一点,编译后的函数会经过 disable(https://github.com/pytorch/pytorch/blob/e9050ef74e9facb4a5464756a7b6b187dedab89d/torch/_dynamo/output_graph.py#L652) 处理,保证后续的调用不会再走 _custom_eval_frame 的逻辑。
第一次,解析 forward 时生成的 guard:
local 'x' TENSOR_MATCH
            {
                'guard_types': ['TENSOR_MATCH'],
                'code': None,
                'obj_weakref': <weakref at 0x7f24b16ad6c0; to 'Tensor' at 0x7f2412371670>
                'guarded_class': <weakref at 0x7f24147b41d0; to 'torch._C._TensorMeta' at 0x51aba60 (Tensor)>
            }

 -
            local 'self' NN_MODULE
            {
                'guard_types': ['ID_MATCH'],
                'code': ['___check_obj_id(self, 139798240864976)'],
                'obj_weakref': <weakref at 0x7f24b16afc40; to 'Model' at 0x7f25507caad0>
                'guarded_class': <weakref at 0x7f241223e3e0; to 'type' at 0x6a2d470 (Model)>
            }

 -
            local_nn_module 'self.linear1' NN_MODULE
            {
                'guard_types': None,
                'code': None,
                'obj_weakref': None
                'guarded_class': None
            }

 -
            local_nn_module 'self.linear2' NN_MODULE
            {
                'guard_types': None,
                'code': None,
                'obj_weakref': None
                'guarded_class': None
            }
第二次,执行 forward 编译后的函数 compiled_fn,生成的字节码:
local 'a' TENSOR_MATCH
            {
                'guard_types': ['TENSOR_MATCH'],
                'code': None,
                'obj_weakref': <weakref at 0x7f24b1567c40; to 'Tensor' at 0x7f24114e1490>
                'guarded_class': <weakref at 0x7f24147b41d0; to 'torch._C._TensorMeta' at 0x51aba60 (Tensor)>
            }

 -
            local 'b' TENSOR_MATCH
            {
                'guard_types': ['TENSOR_MATCH'],
                'code': None,
                'obj_weakref': <weakref at 0x7f24b1567dd0; to 'Tensor' at 0x7f24114e1a80>
                'guarded_class': <weakref at 0x7f24147b41d0; to 'torch._C._TensorMeta' at 0x51aba60 (Tensor)>
            }
动手试一试,相信你会理解的更加深刻,对于更加复杂的情况,子图中还会递归地执行 2-7 步,生成更细粒度的子图。
InliningInstructionTranslator
如果编译的函数涉及比较复杂的函数调用,例如:
import logging

import torch
import torch._dynamo.config
import torch.nn as nn

TensorGuards = torch._C._dynamo.guards.TensorGuards
check_obj_id = torch._C._dynamo.guards.check_obj_id

torch._dynamo.config.log_level = logging.INFO
torch._dynamo.config.output_code = True


def add1(x, y):
    return x + y

def add2(x, y):
    return x + y

def add(x, y, z):
    return add1(add2(x, y), z)


if __name__ == '__main__':
    compiled_model = torch.compile(add)
    # 使用 Tensor 输入作为输入方便输出 Guard 和字节码
    compiled_model(torch.Tensor(1), torch.Tensor(1), torch.Tensor(1))
InstructionTranslator 会在解析 CALL_FUNCTIONS 时,构建一个 InliningInstructionTranslator,获取函数的字节码,在解析字节码的过程中继续完成 graph trace。与编译子图不同的是,InliningInstructionTranslator 会进入函数,“连续”的解析字节码。函数中的字节码可以和之前解析的字节码一起进行编译优化,而编译子图意则是函数内外分开编译。此外, InliningInstructionTranslator 解析的函数也可以触发编译子图的逻辑。
至此我们梳理完了 Dynamo trace graph 的主体逻辑,Dynamo 从字节码入手,首先实现了 Python 版的虚拟机,用于解析函数的字节码,以实现 Graph trace 的功能;在此基础上,为了能够根据输入信息实现动态的 Graph trace,Dynamo 引入了 VariableTracker 以及 Guard 的概念,能够根据模型输入信息去判断是否需要触发重新编译;最后,Dynamo 通过动态地调整帧评估函数,递归地去编译在上一次编译中,重新划分的子图,实现更加灵活地 Graph trace。
四、PyTorchの可视化工具
今天搬个工具来啊 其实也很少用~~ 不知道大伙用吗
网络结构可视化和训练过程可视化
1、网络结构的可视化
我们训练神经网络时,除了随着step或者epoch观察损失函数的走势,从而建立对目前网络优化的基本认知外,也可以通过一些额外的可视化库来可视化我们的神经网络结构图。这将更加地高效地向读者展现目前的网络结构。
为了可视化神经网络,我们先建立一个简单的卷积层神经网络:
import torch
 import torch.nn as nn

 class ConvNet(nn.Module):
     def __init__(self):
         super(ConvNet, self).__init__()

         self.conv1 = nn.Sequential(
             nn.Conv2d(1, 16, 3, 1, 1),
             nn.ReLU(),
             nn.AvgPool2d(2, 2)
         )

         self.conv2 = nn.Sequential(
             nn.Conv2d(16, 32, 3, 1, 1),
             nn.ReLU(),
             nn.MaxPool2d(2, 2)
         )

         self.fc = nn.Sequential(
             nn.Linear(32 * 7 * 7, 128),
             nn.ReLU(),
             nn.Linear(128, 64),
             nn.ReLU()
         )

         self.out = nn.Linear(64, 10)

     def forward(self, x):
         x = self.conv1(x)
         x = self.conv2(x)
         x = x.view(x.size(0), -1)
         x = self.fc(x)
         output = self.out(x)
         return output
输出网络结构:
MyConvNet = ConvNet()
 print(MyConvNet)
输出结果:
ConvNet(
   (conv1): Sequential(
     (0): Conv2d(1, 16, kernel_size=(3, 3), stride=(1, 1), padding=(1, 1))
     (1): ReLU()
     (2): AvgPool2d(kernel_size=2, stride=2, padding=0)
   )
   (conv2): Sequential(
     (0): Conv2d(16, 32, kernel_size=(3, 3), stride=(1, 1), padding=(1, 1))
     (1): ReLU()
     (2): MaxPool2d(kernel_size=2, stride=2, padding=0, dilation=1, ceil_mode=False)
   )
   (fc): Sequential(
     (0): Linear(in_features=1568, out_features=128, bias=True)
     (1): ReLU()
     (2): Linear(in_features=128, out_features=64, bias=True)
     (3): ReLU()
   )
   (out): Linear(in_features=64, out_features=10, bias=True)
)有了基本的神经网络后,我们分别通过HiddenLayer和PyTorchViz库来可视化上述的卷积层神经网络。
需要说明的是,这两个库都是基于Graphviz开发的,因此倘若你的电脑上没有安装并且没有添加环境变量,请自行安装Graphviz工具,安装教程
1.1 通过HiddenLayer可视化网络
首先当然是安装库啦,打开cmd,输入:
pip install hiddenlayer绘制的基本程序如下:
import hiddenlayer as h
 vis_graph = h.build_graph(MyConvNet, torch.zeros([1 ,1, 28, 28]))   # 获取绘制图像的对象
 vis_graph.theme = h.graph.THEMES["blue"].copy()     # 指定主题颜色
 vis_graph.save("./demo1.png")   # 保存图像的路径
效果如下:

1.2 通过PyTorchViz可视化网络
先安装库:
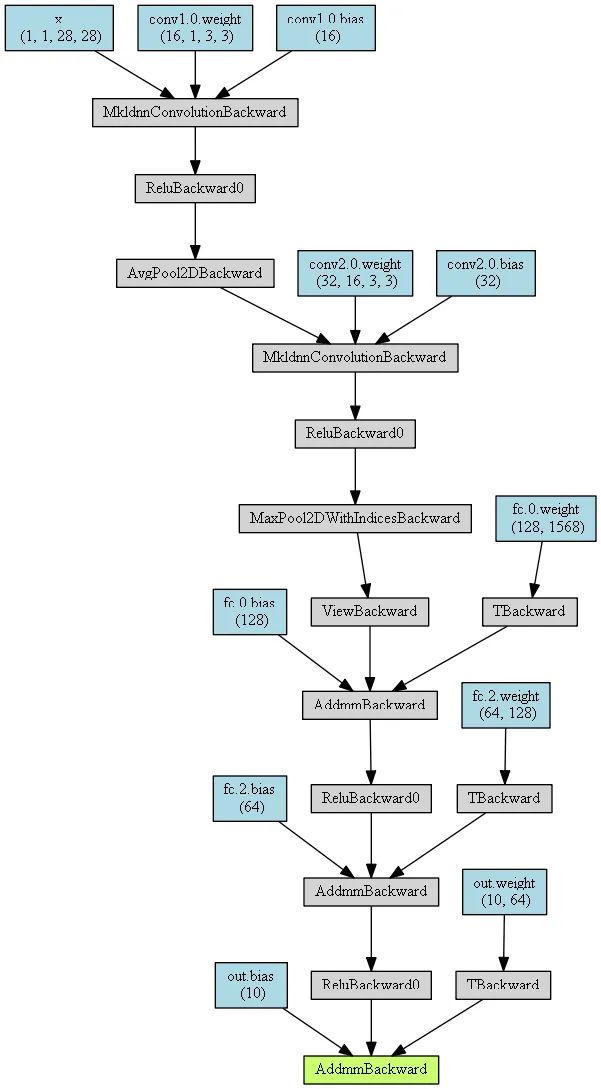
pip install torchviz这里我们只使用可视化函数make_dot()来获取绘图对象,基本使用和HiddenLayer差不多,不同的地方在于PyTorch绘图之前可以指定一个网络的输入值和预测值。
from torchviz import make_dot
 x = torch.randn(1, 1, 28, 28).requires_grad_(True)  # 定义一个网络的输入值
 y = MyConvNet(x)    # 获取网络的预测值

 MyConvNetVis = make_dot(y, params=dict(list(MyConvNet.named_parameters()) + [('x', x)]))
 MyConvNetVis.format = "png"
 # 指定文件生成的文件夹
 MyConvNetVis.directory = "data"
 # 生成文件
MyConvNetVis.view()打开与上述代码相同根目录下的data文件夹,里面会有一个.gv文件和一个.png文件,其中的.gv文件是Graphviz工具生成图片的脚本代码,.png是.gv文件编译生成的图片,直接打开.png文件就行。
默认情况下,上述程序运行后会自动打开.png文件
生成图片:
2、训练过程可视化
观察我们的网络的每一步的损失函数或准确率的变化可以有效地帮助我们判断当前训练过程的优劣。如果能将这些过程可视化,那么我们判断的准确性和舒适性都会有所增加。
此处主要讲通过可视化神器tensorboardX和刚刚用到的HiddenLayer来实现训练过程的可视化。
为了训练网络,我们先导入训练网络需要的数据,此处就导入MNIST数据集,并做训练前的一些基本的数据处理。
import torchvision
 import torch.utils.data as Data
 # 准备训练用的MNIST数据集
 train_data = torchvision.datasets.MNIST(
     root = "./data/MNIST",  # 提取数据的路径
     train=True, # 使用MNIST内的训练数据
     transform=torchvision.transforms.ToTensor(),    # 转换成torch.tensor
     download=False   # 如果是第一次运行的话,置为True,表示下载数据集到root目录
 )

 # 定义loader
 train_loader = Data.DataLoader(
     dataset=train_data,
     batch_size=128,
     shuffle=True,
     num_workers=0
 )

 test_data = torchvision.datasets.MNIST(
     root="./data/MNIST",
     train=False,    # 使用测试数据
     download=False
 )

 # 将测试数据压缩到0-1
 test_data_x = test_data.data.type(torch.FloatTensor) / 255.0
 test_data_x = torch.unsqueeze(test_data_x, dim=1)
 test_data_y = test_data.targets

 # 打印一下测试数据和训练数据的shape
 print("test_data_x.shape:", test_data_x.shape)
 print("test_data_y.shape:", test_data_y.shape)

 for x, y in train_loader:
     print(x.shape)
     print(y.shape)
     break
结果:
test_data_x.shape: torch.Size([10000, 1, 28, 28])
 test_data_y.shape: torch.Size([10000])
 torch.Size([128, 1, 28, 28])
 torch.Size([128])
2.1 通过tensorboardX可视化训练过程
tensorboard是谷歌开发的深度学习框架tensorflow的一套深度学习可视化神器,在pytorch团队的努力下,他们开发出了tensorboardX来让pytorch的玩家也能享受tensorboard的福利。
先安装相关的库:
pip install tensorboardX
pip install tensorboard并将tensorboard.exe所在的文件夹路径加入环境变量path中(比如我的tensorboard.exe的路径为D:\Python376\Scripts\tensorboard.exe,那么就在path中加入D:\Python376\Scripts)
下面是tensorboardX的使用过程。基本使用为,先通过tensorboardX下的SummaryWriter类获取一个日志编写器对象。然后通过这个对象的一组方法往日志中添加事件,即生成相应的图片,最后启动前端服务器,在localhost中就可以看到最终的结果了。
训练网络,并可视化网络训练过程的代码如下:
from tensorboardX import SummaryWriter
 logger = SummaryWriter(log_dir="data/log")

 # 获取优化器和损失函数
 optimizer = torch.optim.Adam(MyConvNet.parameters(), lr=3e-4)
 loss_func = nn.CrossEntropyLoss()
 log_step_interval = 100      # 记录的步数间隔

 for epoch in range(5):
     print("epoch:", epoch)
     # 每一轮都遍历一遍数据加载器
     for step, (x, y) in enumerate(train_loader):
         # 前向计算->计算损失函数->(从损失函数)反向传播->更新网络
         predict = MyConvNet(x)
         loss = loss_func(predict, y)
         optimizer.zero_grad()   # 清空梯度(可以不写)
         loss.backward()     # 反向传播计算梯度
         optimizer.step()    # 更新网络
         global_iter_num = epoch * len(train_loader) + step + 1  # 计算当前是从训练开始时的第几步(全局迭代次数)
         if global_iter_num % log_step_interval == 0:
             # 控制台输出一下
             print("global_step:{}, loss:{:.2}".format(global_iter_num, loss.item()))
             # 添加的第一条日志:损失函数-全局迭代次数
             logger.add_scalar("train loss", loss.item() ,global_step=global_iter_num)
             # 在测试集上预测并计算正确率
             test_predict = MyConvNet(test_data_x)
             _, predict_idx = torch.max(test_predict, 1)     # 计算softmax后的最大值的索引,即预测结果
             acc = accuracy_score(test_data_y, predict_idx)
             # 添加第二条日志:正确率-全局迭代次数
             logger.add_scalar("test accuary", acc.item(), global_step=global_iter_num)
             # 添加第三条日志:这个batch下的128张图像
             img = vutils.make_grid(x, nrow=12)
             logger.add_image("train image sample", img, global_step=global_iter_num)
             # 添加第三条日志:网络中的参数分布直方图
             for name, param in MyConvNet.named_parameters():
logger.add_histogram(name, param.data.numpy(), global_step=global_iter_num)运行完后,我们通过cmd来到与代码同一级的目录(如果你使用的是pycharm,可以通过pycharm中的终端)输入指令tensorboard --logdir="./data/log",启动服务器。
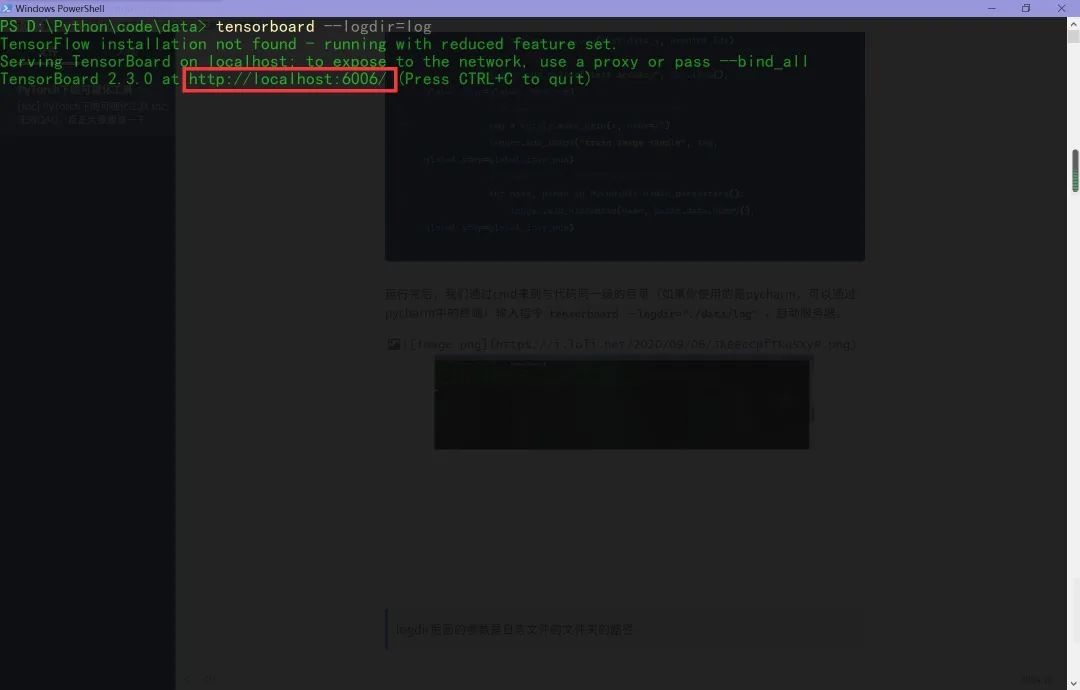
logdir后面的参数是日志文件的文件夹的路径
然后在谷歌浏览器中访问红框框中的url,便可得到可视化界面,点击上面的页面控件,可以查看我们通过add_scalar、add_image和add_histogram得到的图像,而且各方面做得都很丝滑。
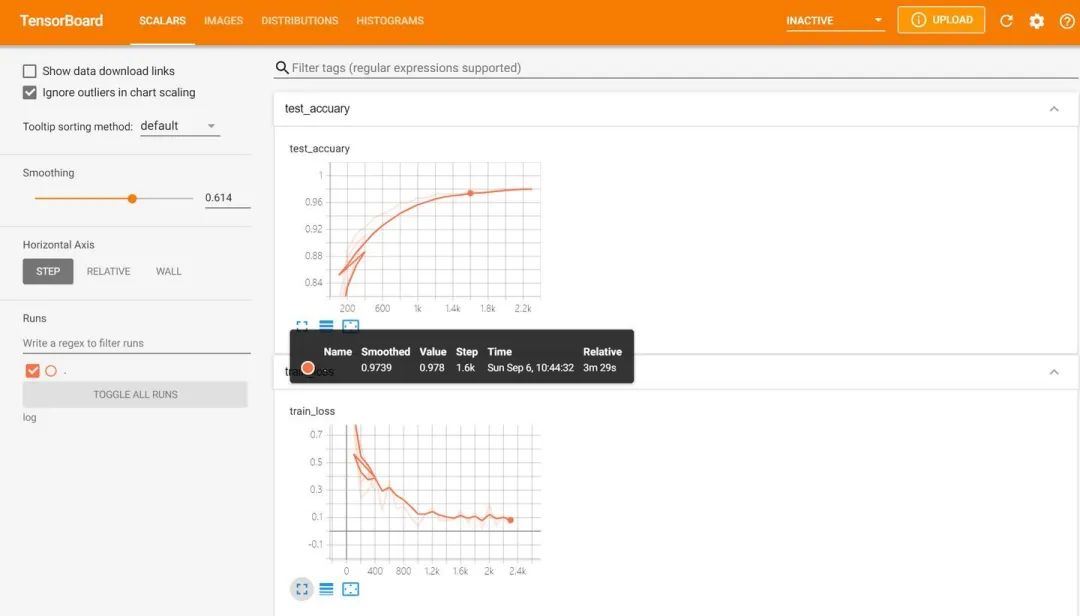
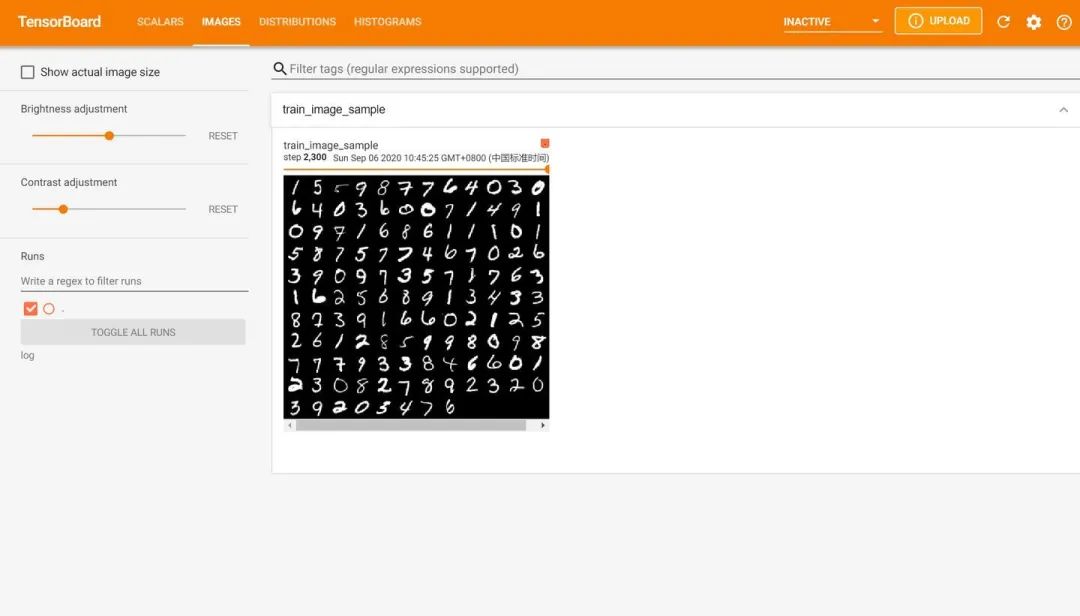
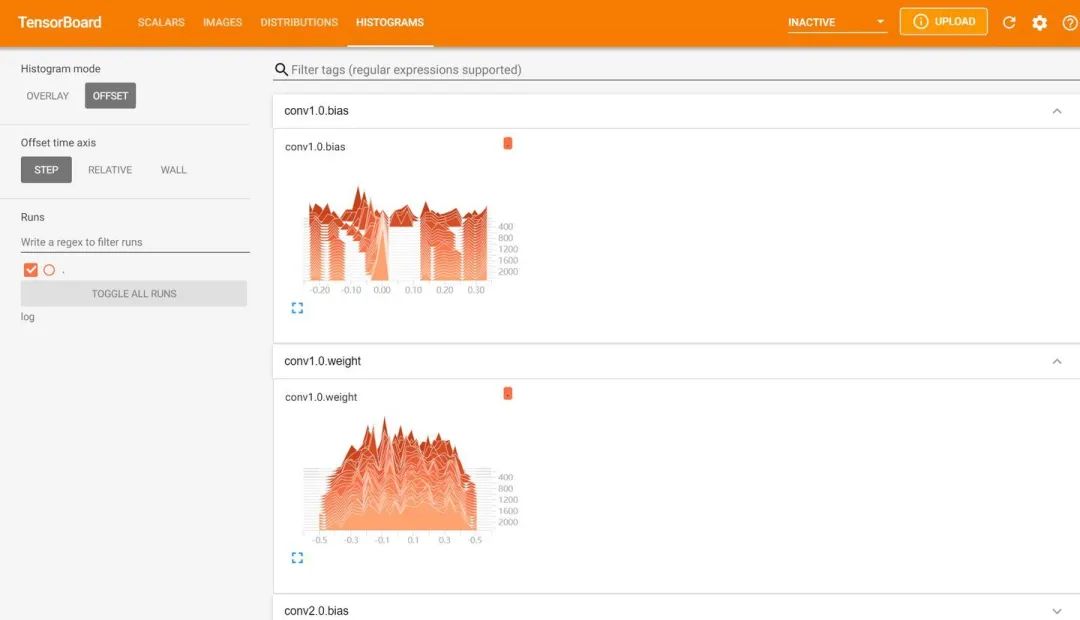
以下是笔者安装使用tensorboard时遇到的一些错误。
好,作为一名没有装过TensorFlow的windows玩家,笔者下面开始踩坑。踩完后,直接把几个可能的错误呈上。
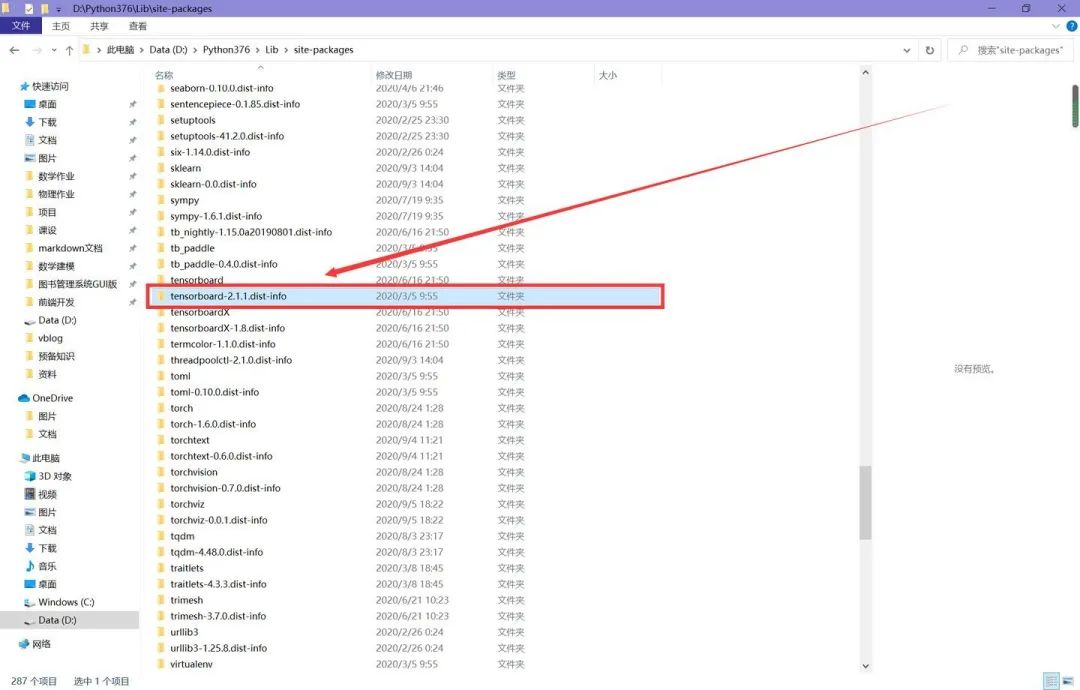
第一个错误,运行tensorboard --logdir="./data/log",遇到报错,内容为有重复的tensorboard的包。
解决方法:找到site-packages(如果你是像我一样全局安装的,那么找到解释器那一级目录的site-packages,如果是在项目虚拟环境中安装的,那么找到项目中的site-packages),删去下图中红框框标出来的文件夹。
第二个错误,在解决第一个错误后,再次运行命令,还是报错,内容为编码出错。由于笔者做过一点前端,在学习webpack项目时,曾经被告知项目路径不能含有中文,否则会有编码错误,而刚才的报错中涉及到了前端服务器的启动,因此,笔者想到从文件名入手。
解决方法:确保命令涉及的文件路径、所有程序涉及到文件不含中文。笔者是计算机名字含有中文,然后tensorboard的日志文件是以本地计算机名为后缀的,所以笔者将计算机名修改成了英文,重启后再输入指令就ok了。
2.2 HiddenLayer可视化训练过程
tensorboard的图像很华丽,但是使用过程相较于其他的工具包较为繁琐,所以小网络一般没必要使用tensorboard。
import hiddenlayer as hl
 import time

 # 记录训练过程的指标
 history = hl.History()
 # 使用canvas进行可视化
 canvas = hl.Canvas()

 # 获取优化器和损失函数
 optimizer = torch.optim.Adam(MyConvNet.parameters(), lr=3e-4)
 loss_func = nn.CrossEntropyLoss()
 log_step_interval = 100      # 记录的步数间隔

 for epoch in range(5):
     print("epoch:", epoch)
     # 每一轮都遍历一遍数据加载器
     for step, (x, y) in enumerate(train_loader):
         # 前向计算->计算损失函数->(从损失函数)反向传播->更新网络
         predict = MyConvNet(x)
         loss = loss_func(predict, y)
         optimizer.zero_grad()   # 清空梯度(可以不写)
         loss.backward()     # 反向传播计算梯度
         optimizer.step()    # 更新网络
         global_iter_num = epoch * len(train_loader) + step + 1  # 计算当前是从训练开始时的第几步(全局迭代次数)
         if global_iter_num % log_step_interval == 0:
             # 控制台输出一下
             print("global_step:{}, loss:{:.2}".format(global_iter_num, loss.item()))
             # 在测试集上预测并计算正确率
             test_predict = MyConvNet(test_data_x)
             _, predict_idx = torch.max(test_predict, 1)  # 计算softmax后的最大值的索引,即预测结果
             acc = accuracy_score(test_data_y, predict_idx)

             # 以epoch和step为索引,创建日志字典
             history.log((epoch, step),
                         train_loss=loss,
                         test_acc=acc,
                         hidden_weight=MyConvNet.fc[2].weight)

             # 可视化
             with canvas:
                 canvas.draw_plot(history["train_loss"])
                 canvas.draw_plot(history["test_acc"])
                 canvas.draw_image(history["hidden_weight"])
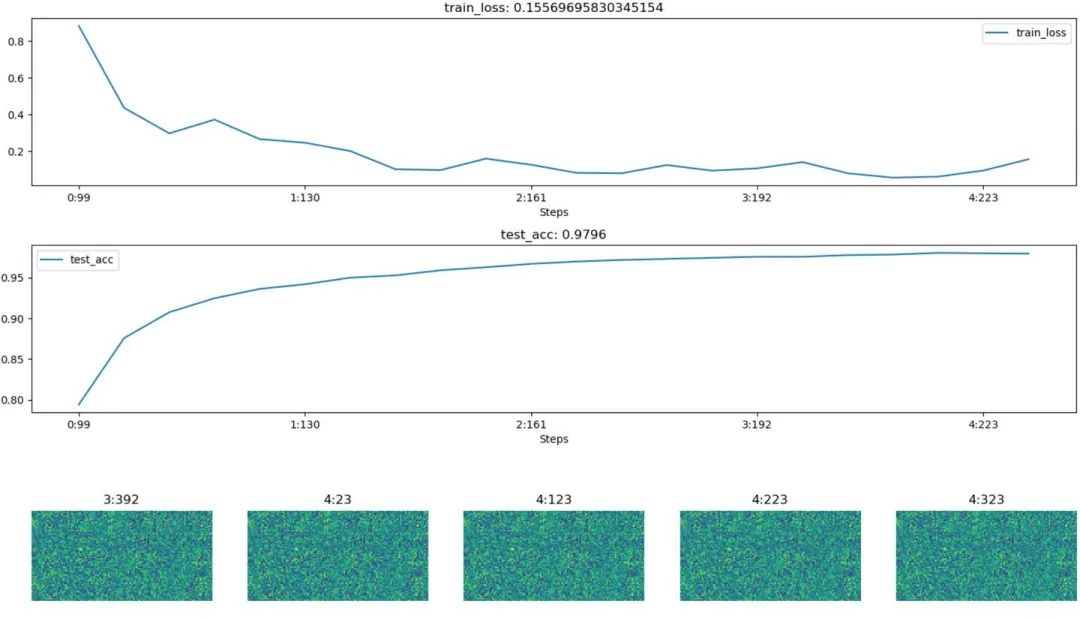
不同于tensorboard,hiddenlayer会在程序运行的过程中动态生成图像,而不是模型训练完后
下面为模型训练的某一时刻的截图:
3、使用Visdom进行可视化
Visdom是Facebook为pytorch开发的一块可视化工具。类似于tensorboard,visdom也是通过在本地启动前端服务器来实现可视化的,而在具体操作上,visdom又类似于matplotlib.pyplot。所以使用起来很灵活。
首先先安装visdom库,然后补坑。由于启动前端服务器需要大量依赖项,所以在第一次启动时可能会很慢(需要下载前端三板斧的依赖项),解决方法请见这里。
先导入需要的第三方库:
from visdom import Visdom
 from sklearn.datasets import  load_iris
 import torch
 import numpy as np
from PIL import Imagematplotlib里,用户绘图可以通过plt这个对象来绘图,在visdom中,同样需要一个绘图对象,我们通过vis = Visdom()来获取。具体绘制时,由于我们会一次画好几张图,所以visdom要求用户在绘制时指定当前绘制图像的窗口名字(也就是win这个参数);除此之外,为了到时候显示的分块,用户还需要指定绘图环境env,这个参数相同的图像,最后会显示在同一张页面上。
绘制线图(相当于matplotlib中的plt.plot)
# 绘制图像需要的数据
 iris_x, iris_y = load_iris(return_X_y=True)

 # 获取绘图对象,相当于plt
 vis = Visdom()

 # 添加折线图
 x = torch.linspace(-6, 6, 100).view([-1, 1])
 sigmoid = torch.nn.Sigmoid()
 sigmoid_y = sigmoid(x)
 tanh = torch.nn.Tanh()
 tanh_y = tanh(x)
 relu = torch.nn.ReLU()
 relu_y = relu(x)
 # 连接三个张量
 plot_x = torch.cat([x, x, x], dim=1)
 plot_y = torch.cat([sigmoid_y, tanh_y, relu_y], dim=1)
 # 绘制线性图
 vis.line(X=plot_x, Y=plot_y, win="line plot", env="main",
          opts={
              "dash" : np.array(["solid", "dash", "dashdot"]),
              "legend" : ["Sigmoid", "Tanh", "ReLU"]
          })
绘制散点图:
# 绘制2D和3D散点图
 # 参数Y用来指定点的分布,win指定图像的窗口名称,env指定图像所在的环境,opts通过字典来指定一些样式
 vis.scatter(iris_x[ : , 0 : 2], Y=iris_y+1, win="windows1", env="main")
 vis.scatter(iris_x[ : , 0 : 3], Y=iris_y+1, win="3D scatter", env="main",
             opts={
                 "markersize" : 4,   # 点的大小
                 "xlabel" : "特征1",
                 "ylabel" : "特征2"
             })
绘制茎叶图:
# 添加茎叶图
 x = torch.linspace(-6, 6, 100).view([-1, 1])
 y1 = torch.sin(x)
 y2 = torch.cos(x)

 # 连接张量
 plot_x = torch.cat([x, x], dim=1)
 plot_y = torch.cat([y1, y2], dim=1)
 # 绘制茎叶图
 vis.stem(X=plot_x, Y=plot_y, win="stem plot", env="main",
          opts={
              "legend" : ["sin", "cos"],
              "title" : "茎叶图"
          })
绘制热力图:
# 计算鸢尾花数据集特征向量的相关系数矩阵
 iris_corr = torch.from_numpy(np.corrcoef(iris_x, rowvar=False))
 # 绘制热力图
 vis.heatmap(iris_corr, win="heatmap", env="main",
             opts={
                 "rownames" : ["x1", "x2", "x3", "x4"],
                 "columnnames" : ["x1", "x2", "x3", "x4"],
                 "title" : "热力图"
             })
可视化图片,这里我们使用自定义的env名MyPlotEnv
# 可视化图片
 img_Image = Image.open("./example.jpg")
 img_array = np.array(img_Image.convert("L"), dtype=np.float32)
 img_tensor = torch.from_numpy(img_array)
 print(img_tensor.shape)

 # 这次env自定义
 vis.image(img_tensor, win="one image", env="MyPlotEnv",
           opts={
               "title" : "一张图像"
           })
可视化文本,同样在MyPlotEnv中绘制:
# 可视化文本
 text = "hello world"
 vis.text(text=text, win="text plot", env="MyPlotEnv",
          opts={
              "title" : "可视化文本"
})运行上述代码,再通过在终端中输入python3 -m visdom.server启动服务器,然后根据终端返回的URL,在谷歌浏览器中访问这个URL,就可以看到图像了。
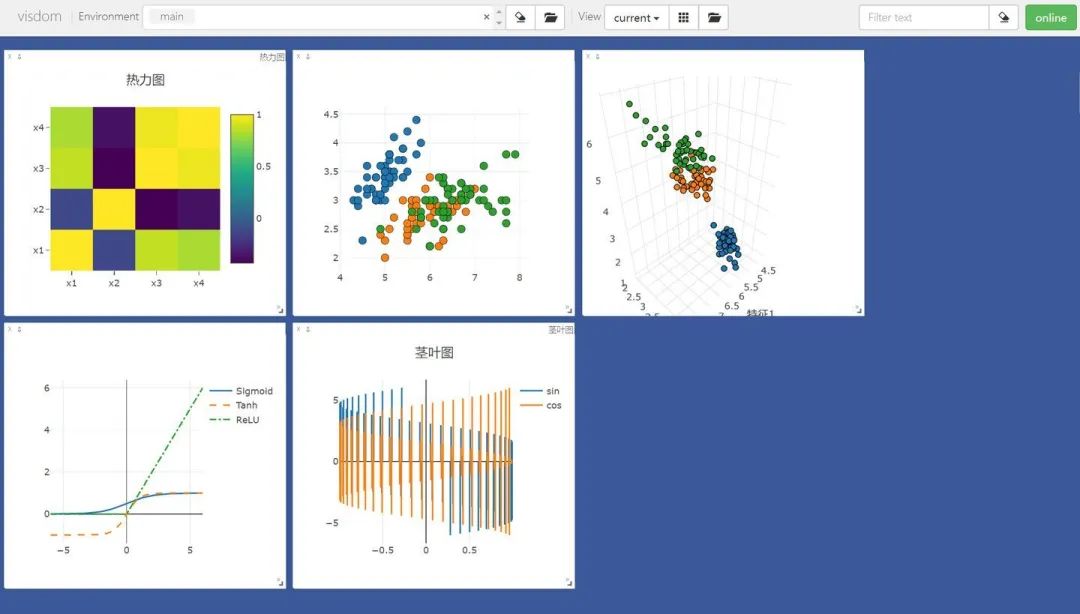

在Environment中输入不同的env参数可以看到我们在不同环境下绘制的图片。对于分类图集特别有用。
在终端中按下Ctrl+C可以终止前端服务器。
进一步
需要注意,如果你的前端服务器停掉了,那么所有的图片都会丢失,因为此时的图像的数据都是驻留在内存中,而并没有dump到本地磁盘。那么如何保存当前visdom中的可视化结果,并在将来复用呢?其实很简单,比如我现在有一堆来之不易的Mel频谱图:
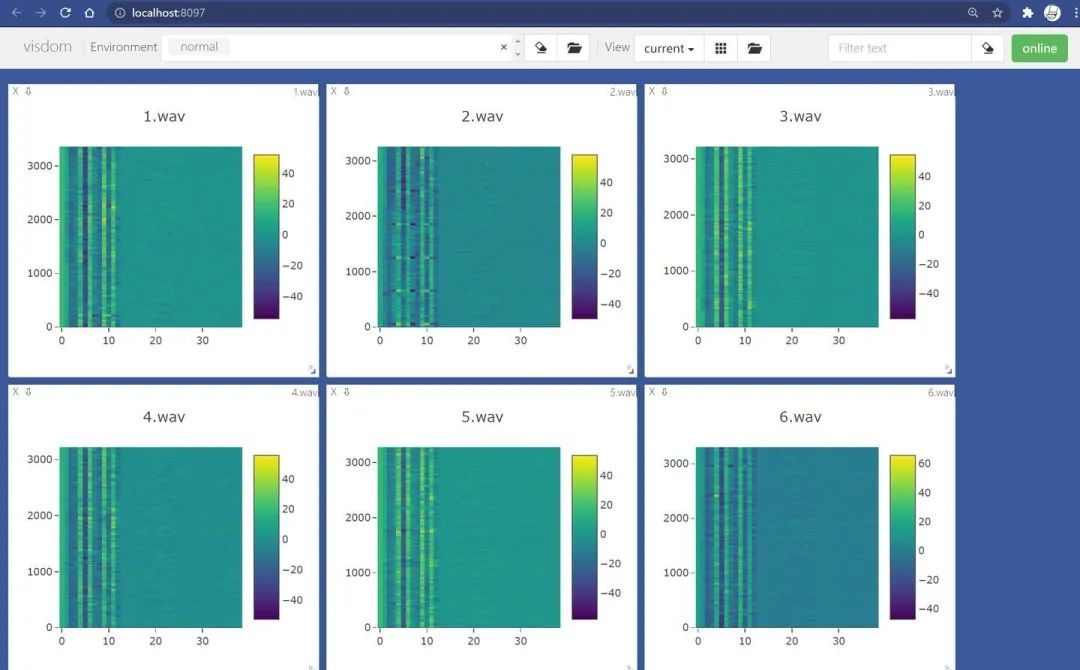
点击Manage Views
![]()
点击fork->save:(此处我只保存名为normal的env)

接着,在你的User目录下(Windows是C:\Users\账户.visdom文件夹,Linux是在~.visdom文件夹下),可以看到保存好的env:
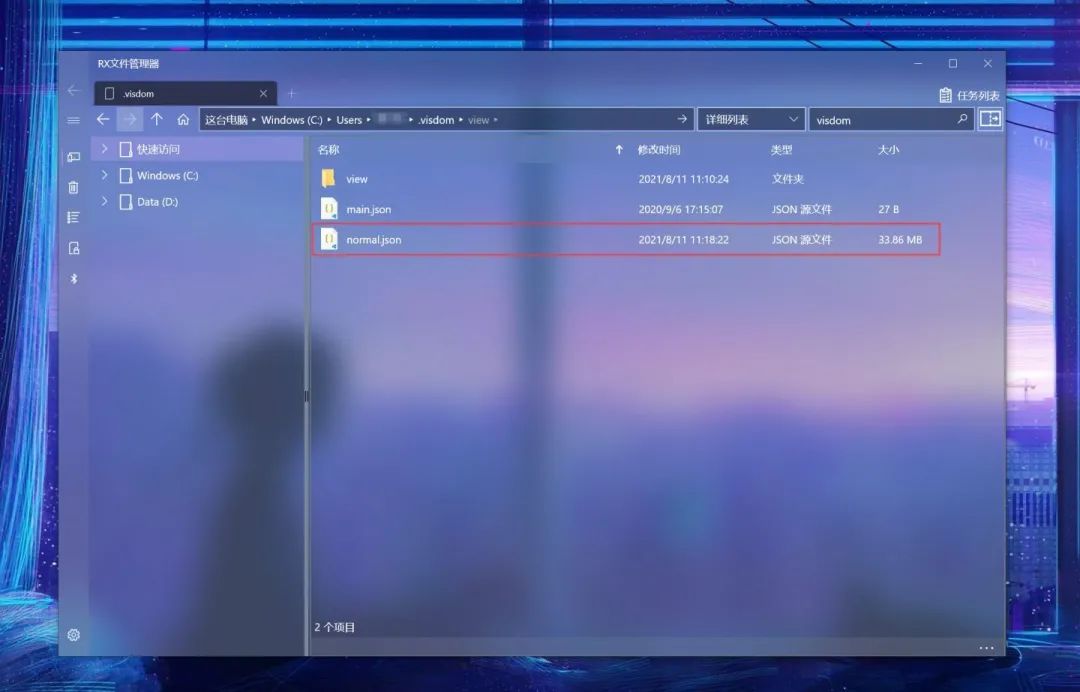
它是以json文件格式保存的,那么如果你保存完后再shut down当前的前端服务器,图像数据便不会丢失。
好的,现在在保存完你珍贵的数据后,请关闭你的visdom前端服务器。然后再启动它。
如何查看保存的数据呢?很简答,下次打开visdom前端后,visdom会在.visdom文件夹下读取所有的保存数据完成初始化,这意味着,你直接启动visdom,其他什么也不用做就可以看到之前保存的数据啦!
那么如何服用保存的数据呢?既然你都知道了visdom保存的数据在哪里,那么直接通过python的json包来读取这个数据文件,然后做解析就可以了,这是方法一,演示如下:
import json

with open(r"...\.visdom\normal.json", "r", encoding="utf-8") as f:
    dataset : dict = json.load(f)

jsons : dict = dataset["jsons"]      # 这里存着你想要恢复的数据
reload : dict = dataset["reload"]    # 这里存着有关窗口尺寸的数据

print(jsons.keys())     # 查看所有的win
out:
dict_keys(['jsons', 'reload'])
dict_keys(['1.wav', '2.wav', '3.wav', '4.wav', '5.wav', '6.wav', '7.wav', '8.wav', '9.wav', '10.wav', '11.wav', '12.wav', '13.wav', '14.wav'])
但这么做不是很优雅,所以visdom封装了第二种方法。你当然可以通过访问文件夹.visdom来查看当前可用的env,但是也可以这么做:
from visdom import Visdom

vis = Visdom()
print(vis.get_env_list())
out:
Setting up a new session...
['main', 'normal']
在获取了可用的环境名后,你可以通过get_window_data方法来获取指定env、指定win下的图像数据。请注意,该方法返回str,故需要通过json来解析:
from visdom import Visdom
import json

vis = Visdom()

window = vis.get_window_data(win="1.wav", env="normal")
window = json.loads(window)         # window 是 str,需要解析为字典

content = window["content"]
data = content["data"][0]
print(data.keys())
out:
Setting up a new session...
dict_keys(['z', 'x', 'y', 'zmin', 'zmax', 'type', 'colorscale'])
通过索引这些keys,相信想复用原本的图像数据并不困难。
五、Pytorch~MRI脑扫描图像分割
图像分割是医学图像分析中最重要的任务之一,在许多临床应用中往往是第一步也是最关键的一步。在脑MRI分析中,图像分割通常用于测量和可视化解剖结构,分析大脑变化,描绘病理区域以及手术计划和图像引导干预,分割是大多数形态学分析的先决条件。
本文我们将介绍如何使用QuickNAT对人脑的图像进行分割。使用MONAI, PyTorch和用于数据可视化和计算的常见Python库,如NumPy, TorchIO和matplotlib。
本文将主要设计以下几个方面:
- 设置数据集和探索数据
- 处理和准备数据集适当的模型训练
- 创建一个训练循环
- 评估模型并分析结果
完整的代码会在本文最后提供。
设置数据目录
使用MONAI的第一步是设置MONAI_DATA_DIRECTORY环境变量指定目录,如果未指定将使用临时目录。
directory \= os.environ.get\("MONAI\_DATA\_DIRECTORY"\)
 root\_dir \= tempfile.mkdtemp\(\) if directory is None else directory
 print\(root\_dir\)
设置数据集
将CNN模型扩展到大脑分割的主要挑战之一是人工注释的训练数据的有限性。作者引入了一种新的训练策略,利用没有手动标签的大型数据集和有手动标签的小型数据集。
首先,使用现有的软件工具(例如FreeSurfer)从大型未标记数据集中获得自动生成的分割,然后使用这些工具对网络进行预训练。在第二步中,使用更小的手动注释数据[2]对网络进行微调。

IXI数据集由581个健康受试者的未标记MRI T1扫描组成。这些数据是从伦敦3家不同的医院收集来的。使用该数据集的主要缺点是标签不是公开可用的,因此为了遵循与研究论文中相同的方法,本文将使用FreeSurfer为这些MRI T1扫描生成分割。
FreeSurfer是一个用于分析和可视化结构的软件包。下载和安装说明可以在这里找到。可以直接使用了“recon-all”命令来执行所有皮层重建过程。
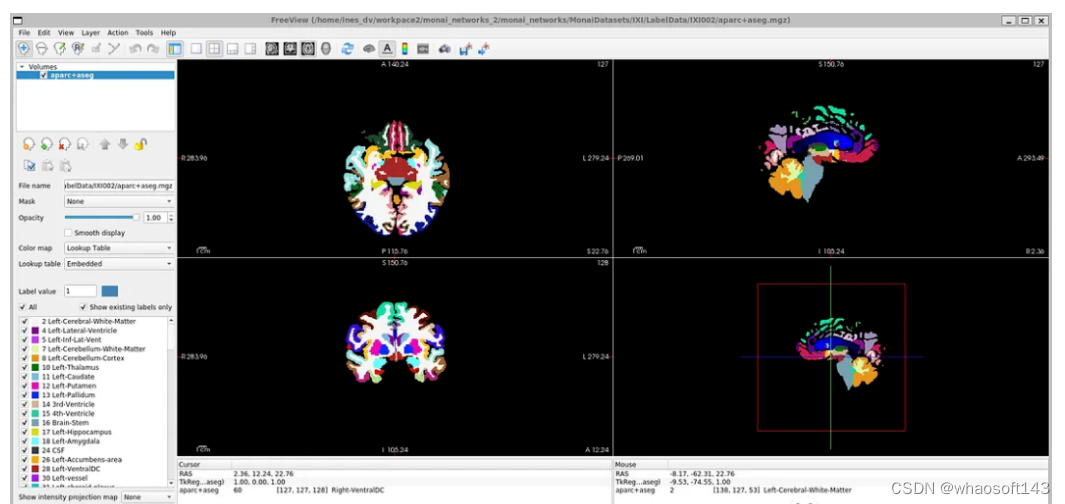
尽管FreeSurfer是一个非常有用的工具,可以利用大量未标记的数据,并以监督的方式训练网络,但是扫描生成这些标签需要长达5个小时,所以我们这里直接使用OASIS数据集来训练模型,
OASIS数据集是一个较小的数据集,具有公开可用的手动注释。OASIS是一个向科学界免费提供大脑神经成像数据集的项目。OASIS-1是由39个受试者的横断面组成的数据集,获取方式如下:
resource \= "https://download.nrg.wustl.edu/data/oasis\_cross-sectional\_disc1.tar.gz"
 md5 \= "c83e216ef8654a7cc9e2a30a4cdbe0cc"

 compressed\_file \= os.path.join\(root\_dir, "oasis\_cross-sectional\_disc1.tar.gz"\)
 data\_dir \= os.path.join\(root\_dir, "Oasis\_Data"\)
 if not os.path.exists\(data\_dir\):
  download\_and\_extract\(resource, compressed\_file, data\_dir, md5\)
数据探索
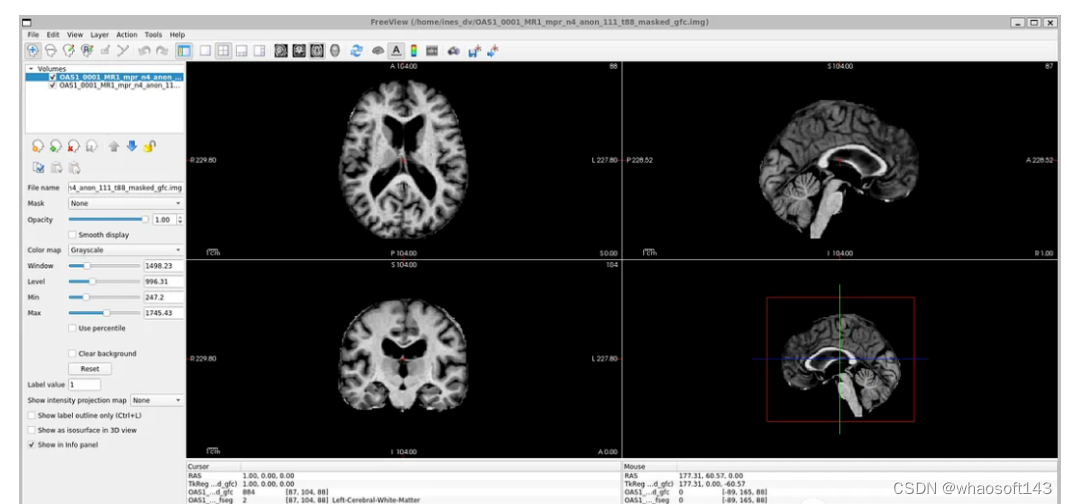
如果你打开' oasis_crosssectional_disc1 .tar.gz ',你会发现每个主题都有不同的文件夹。例如,对于主题OAS1_0001_MR1,是这样的:
镜像数据文件路径:disc1\OAS1_0001_MR1\PROCESSED\MPRAGE\T88_111\ oas1_0001_mr1_mpr_n4_anon_111_t88_masked_ggc .img
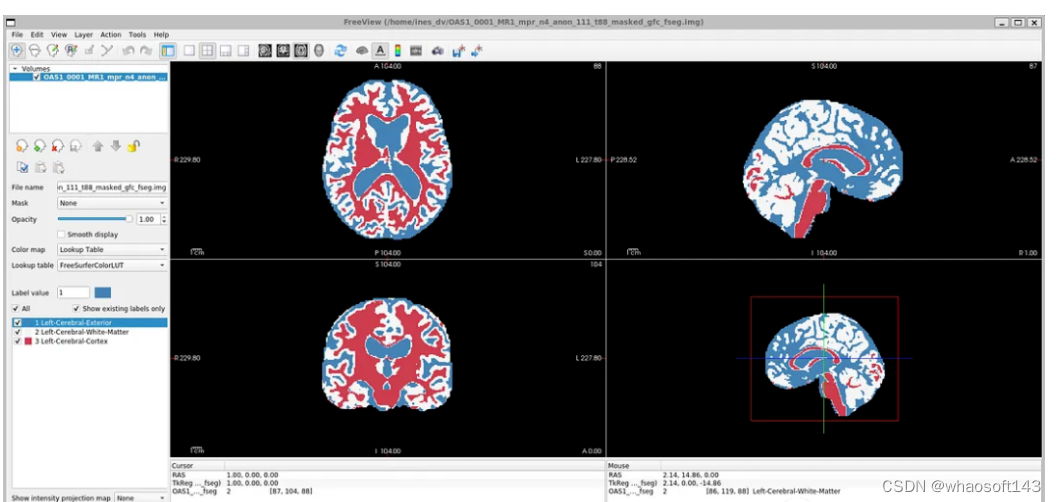
标签文件:disc1\OAS1_0001_MR1\FSL_SEG\OAS1_0001_MR1_mpr_n4_anon_111_t88_masked_gfc_fseg.img
数据加载和预处理
下载数据集并将其提取到临时目录后,需要对其进行重构,我们希望我们的目录看起来像这样:
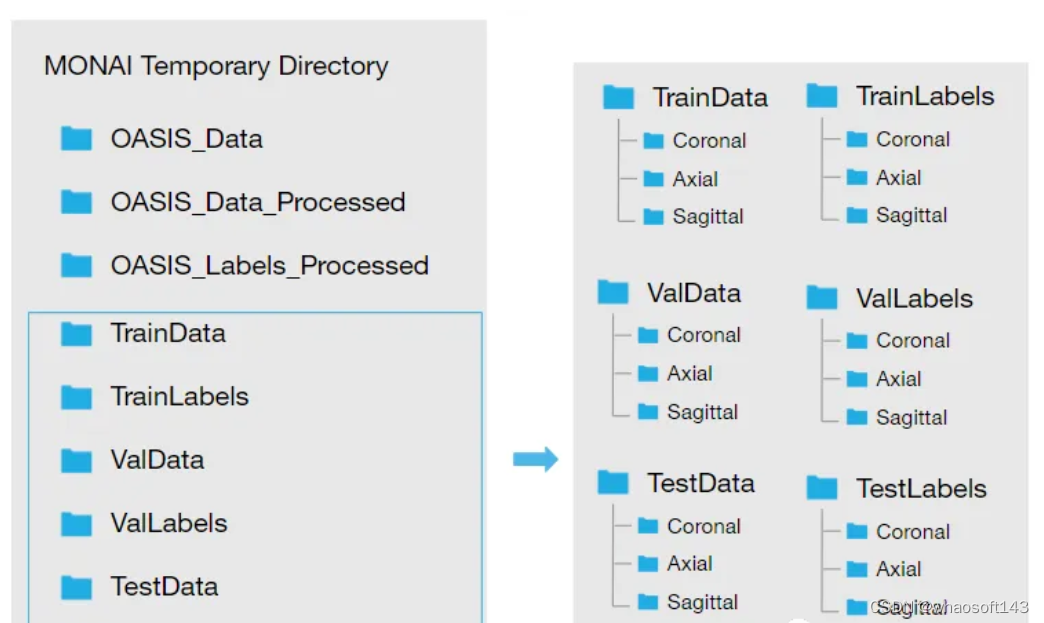
所以需要按照下面的步骤加载数据:
将img文件转换为nii文件并保存到新文件夹中:创建两个新文件夹。Oasis_Data_Processed包括每个受试者的处理过的MRI T1扫描,Oasis_Labels_Processed包括相应的标签。
new\_path\_data\= root\_dir + '/Oasis\_Data\_Processed/'
 if not os.path.exists\(new\_path\_data\):
  os.makedirs\(new\_path\_data\)

 new\_path\_labels\= root\_dir + '/Oasis\_Labels\_Processed/'
 if not os.path.exists\(new\_path\_labels\):
  os.makedirs\(new\_path\_labels\)
然后就是对其进行操作:
for i in \[x for x in range\(1, 43\) if x \!= 8 and x \!= 24 and x \!= 36\]:
  if i \< 7 or i \== 9:
  filename \= root\_dir + '/Oasis\_Data/disc1/OAS1\_000'+ str\(i\) + '\_MR1/PROCESSED/MPRAGE/T88\_111/OAS1\_000' + str\(i\) + '\_MR1\_mpr\_n4\_anon\_111\_t88\_masked\_gfc.img'
  elif i \== 7:
  filename \= root\_dir + '/Oasis\_Data/disc1/OAS1\_000'+ str\(i\) + '\_MR1/PROCESSED/MPRAGE/T88\_111/OAS1\_000' + str\(i\) + '\_MR1\_mpr\_n3\_anon\_111\_t88\_masked\_gfc.img'
  elif i\==15 or i\==16 or i\==20 or i\==24 or i\==26 or i\==34 or i\==38 or i\==39:
  filename \= root\_dir + '/Oasis\_Data/disc1/OAS1\_00'+ str\(i\) + '\_MR1/PROCESSED/MPRAGE/T88\_111/OAS1\_00' + str\(i\) + '\_MR1\_mpr\_n3\_anon\_111\_t88\_masked\_gfc.img'
  else:
  filename \= root\_dir + '/Oasis\_Data/disc1/OAS1\_00'+ str\(i\) + '\_MR1/PROCESSED/MPRAGE/T88\_111/OAS1\_00' + str\(i\) + '\_MR1\_mpr\_n4\_anon\_111\_t88\_masked\_gfc.img'
  img \= nib.load\(filename\)
  nib.save\(img, filename.replace\('.img', '.nii'\)\)
  i \= i+1
具体代码就不再粘贴了,有兴趣的看看最后的完整代码。下一步就是读取图像和标签文件名
image\_files \= sorted\(glob\(os.path.join\(root\_dir + '/Oasis\_Data\_Processed', '\*.nii'\)\)\)
 label\_files \= sorted\(glob\(os.path.join\(root\_dir + '/Oasis\_Labels\_Processed', '\*.nii'\)\)\)
 files \= \[\{'image': image\_name, 'label': label\_name\} for image\_name, label\_name in zip\(image\_files, label\_files\)\]
为了可视化带有相应标签的图像,可以使用TorchIO,这是一个Python库,用于深度学习中多维医学图像的加载、预处理、增强和采样。
image\_filename \= root\_dir + '/Oasis\_Data\_Processed/OAS1\_0001\_MR1\_mpr\_n4\_anon\_111\_t88\_masked\_gfc.nii'
 label\_filename \= root\_dir + '/Oasis\_Labels\_Processed/OAS1\_0001\_MR1\_mpr\_n4\_anon\_111\_t88\_masked\_gfc\_fseg.nii'
 subject \= torchio.Subject\(image\=torchio.ScalarImage\(image\_filename\), label\=torchio.LabelMap\(label\_filename\)\)
 subject.plot\(\)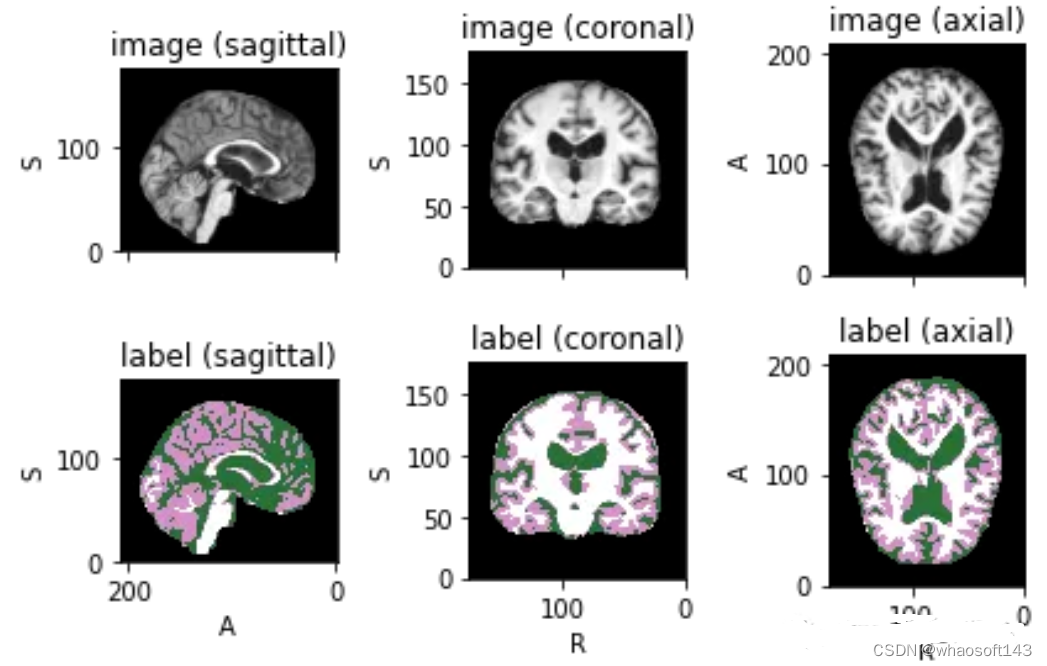
下面就是将数据分成3部分——训练、验证和测试。将数据分成三个不同的类别的目的是建立一个可靠的机器学习模型,避免过拟合。
我们将整个数据集分成三个部分:
Train: 80\%,Validation: 10\%,Test: 10\%

 train\_inds, val\_inds, test\_inds \= partition\_dataset\(data \= np.arange\(len\(files\)\), ratios \= \[8, 1, 1\], shuffle \= True\)

 train \= \[files\[i\] for i in sorted\(train\_inds\)\]
 val \= \[files\[i\] for i in sorted\(val\_inds\)\]
 test \= \[files\[i\] for i in sorted\(test\_inds\)\]

 print\(f"Training count: \{len\(train\)\}, Validation count: \{len\(val\)\}, Test count: \{len\(test\)\}"\)
因为模型需要的是二维切片,所以将每个切片保存在不同的文件夹中,如下图所示。这两个代码单元将训练集的每个MRI体积的切片保存为“.png”格式。
Save coronal slices for training images
 dir \= root\_dir + '/TrainData'
 os.makedirs\(os.path.join\(dir, "Coronal"\)\)
 path \= root\_dir + '/TrainData/Coronal/'

 for file in sorted\(glob\(os.path.join\(root\_dir + '/TrainData', '\*.nii'\)\)\):
  image\=torchio.ScalarImage\(file\)
  data \= image.data
  filename \= os.path.basename\(file\)
  filename \= os.path.splitext\(filename\)
  for i in range\(0, 208\):
  slice \= data\[0, :, i\]
  array \= slice.numpy\(\)
  data\_dir \= root\_dir + '/TrainData/Coronal/' + filename\[0\] + '\_slice' + str\(i\) + '.png'
  plt.imsave\(fname \= data\_dir, arr \= array, format \= 'png', cmap \= plt.cm.gray\)
同理,下面是保存标签:
dir \= root\_dir + '/TrainLabels'
 os.makedirs\(os.path.join\(dir, "Coronal"\)\)
 path \= root\_dir + '/TrainLabels/Coronal/'

 for file in sorted\(glob\(os.path.join\(root\_dir + '/TrainLabels', '\*.nii'\)\)\):
  label \= torchio.LabelMap\(file\)
  data \= label.data
  filename \= os.path.basename\(file\)
  filename \= os.path.splitext\(filename\)
  for i in range\(0, 208\):
  slice \= data\[0, :, i\]
  array \= slice.numpy\(\)
  data\_dir \= root\_dir + '/TrainLabels/Coronal/' + filename\[0\] + '\_slice' + str\(i\) + '.png'
  plt.imsave\(fname \= data\_dir, arr \= array, format \= 'png'\)
为训练和验证定义图像的变换处理
在本例中,我们将使用Dictionary Transforms,其中数据是Python字典。
train\_images\_coronal \= \[\]
 for file in sorted\(glob\(os.path.join\(root\_dir + '/TrainData/Coronal', '\*.png'\)\)\):
  train\_images\_coronal.append\(file\)
 train\_images\_coronal \= natsort.natsorted\(train\_images\_coronal\)

 train\_labels\_coronal \= \[\]
 for file in sorted\(glob\(os.path.join\(root\_dir + '/TrainLabels/Coronal', '\*.png'\)\)\):
  train\_labels\_coronal.append\(file\)
 train\_labels\_coronal\= natsort.natsorted\(train\_labels\_coronal\)

 val\_images\_coronal \= \[\]
 for file in sorted\(glob\(os.path.join\(root\_dir + '/ValData/Coronal', '\*.png'\)\)\):
  val\_images\_coronal.append\(file\)
 val\_images\_coronal \= natsort.natsorted\(val\_images\_coronal\)

 val\_labels\_coronal \= \[\]
 for file in sorted\(glob\(os.path.join\(root\_dir + '/ValLabels/Coronal', '\*.png'\)\)\):
  val\_labels\_coronal.append\(file\)
 val\_labels\_coronal \= natsort.natsorted\(val\_labels\_coronal\)

 train\_files\_coronal \= \[\{'image': image\_name, 'label': label\_name\} for image\_name, label\_name in zip\(train\_images\_coronal, train\_labels\_coronal\)\]
 val\_files\_coronal \= \[\{'image': image\_name, 'label': label\_name\} for image\_name, label\_name in zip\(val\_images\_coronal, val\_labels\_coronal\)\]
现在我们将应用以下变换:
LoadImaged:加载图像数据和元数据。我们使用' PILReader '来加载图像和标签文件。ensure_channel_first设置为True,将图像数组形状转换为通道优先。
Rotate90d:我们将图像和标签旋转90度,因为当我们下载它们时,它们方向是不正确的。
ToTensord:将输入的图像和标签转换为张量。
NormalizeIntensityd:对输入进行规范化。
train\_transforms \= Compose\(
  \[
  LoadImaged\(keys \= \['image', 'label'\], reader\=PILReader\(converter\=lambda image: image.convert\("L"\)\), ensure\_channel\_first \= True\),
  Rotate90d\(keys \= \['image', 'label'\], k \= 2\),
  ToTensord\(keys \= \['image', 'label'\]\),
  NormalizeIntensityd\(keys \= \['image'\]\)
  \]
  \)

 val\_transforms \= Compose\(
  \[
  LoadImaged\(keys \= \['image', 'label'\], reader\=PILReader\(converter\=lambda image: image.convert\("L"\)\), ensure\_channel\_first \= True\),
  Rotate90d\(keys \= \['image', 'label'\], k \= 2\),
  ToTensord\(keys \= \['image', 'label'\]\),
  NormalizeIntensityd\(keys \= \['image'\]\)
  \]
  \)
MaskColorMap将我们定义了一个新的转换,将相应的像素值以一种格式映射为多个标签。这种转换在语义分割中是必不可少的,因为我们必须为每个可能的类别提供二元特征。One-Hot Encoding将对应于原始类别的每个样本的特征赋值为1。
因为OASIS-1数据集只有3个大脑结构标签,对于更详细的分割,理想的情况是像他们在研究论文中那样对28个皮质结构进行注释。在OASIS-1下载说明中,可以找到使用FreeSurfer获得的更多大脑结构的标签。
所以本文将分割更多的神经解剖结构。我们要将模型的参数num_classes修改为相应的标签数量,以便模型的输出是具有N个通道的特征映射,等于num_classes。
为了简化本教程,我们将使用以下标签,比OASIS-1但是要比FreeSurfer的少:
- Label 0: Background
- Label 1: LeftCerebralExterior
- Label 2: LeftWhiteMatter
- Label 3: LeftCerebralCortex
所以MaskColorMap的代码如下:
class MaskColorMap\(Enum\):
  Background = \(30\)
  LeftCerebralExterior = \(91\)
  LeftWhiteMatter = \(137\)
  LeftCerebralCortex = \(215\)
数据集和数据加载
数据集和数据加载器从存储中提取数据,并将其分批发送给训练循环。这里我们使用monai.data.Dataset加载之前定义的训练和验证字典,并对输入数据应用相应的转换。dataloader用于将数据集加载到内存中。我们将为训练和验证以及每个视图定义一个数据集和数据加载器。
为了方便演示,我们使用通过使用torch.utils.data.Subset,在指定的索引处创建一个子集,只是用部分数据训练加快演示速度。
train\_dataset\_coronal \= Dataset\(data\=train\_files\_coronal, transform \= train\_transforms\)
 train\_loader\_coronal \= DataLoader\(train\_dataset\_coronal, batch\_size \= 1, shuffle \= True\)

 val\_dataset\_coronal \= Dataset\(data \= val\_files\_coronal, transform \= val\_transforms\)
 val\_loader\_coronal \= DataLoader\(val\_dataset\_coronal, batch\_size \= 1, shuffle \= False\)

 \# We will use a subset of the dataset
 subset\_train \= list\(range\(90, len\(train\_dataset\_coronal\), 120\)\)
 train\_dataset\_coronal\_subset \= torch.utils.data.Subset\(train\_dataset\_coronal, subset\_train\)
 train\_loader\_coronal\_subset \= DataLoader\(train\_dataset\_coronal\_subset, batch\_size \= 1, shuffle \= True\)

 subset\_val \= list\(range\(90, len\(val\_dataset\_coronal\), 50\)\)
 val\_dataset\_coronal\_subset \= torch.utils.data.Subset\(val\_dataset\_coronal, subset\_val\)
 val\_loader\_coronal\_subset \= DataLoader\(val\_dataset\_coronal\_subset, batch\_size \= 1, shuffle \= False\)
定义模型
给定一组MRI脑扫描I = {I1,…In}及其对应的分割S = {S1,…Sn},我们想要学习一个函数fseg: I -> S。我们将这个函数表示为F-CNN模型,称为QuickNAT:

QuickNAT由三个二维f - cnn组成,分别在coronal, axial, sagittal视图上操作,然后通过聚合步骤推断最终的分割结果,该分割结果由三个网络的概率图组合而成。每个F-CNN都有一个编码器/解码器架构,其中有4个编码器和4个解码器,并由瓶颈层分隔。最后一层是带有softmax的分类器块。该架构还包括每个编码器/解码器块内的残差链接。
class QuickNat\(nn.Module\):
  """
  A PyTorch implementation of QuickNAT

  """

  def \_\_init\_\_\(self, params\):
  """
  :param params: \{'num\_channels':1,
  'num\_filters':64,
  'kernel\_h':5,
  'kernel\_w':5,
  'stride\_conv':1,
  'pool':2,
  'stride\_pool':2,
  'num\_classes':28
  'se\_block': False,
  'drop\_out':0.2\}
  """
  super\(QuickNat, self\).\_\_init\_\_\(\)

  \# from monai.networks.blocks import squeeze\_and\_excitation as se
  \# self.cSE = ChannelSELayer\(num\_channels, reduction\_ratio\)

  \# self.encode1 = sm.EncoderBlock\(params, se\_block\_type=se.SELayer.CSSE\)
  \# params\["num\_channels"\] = params\["num\_filters"\]
  \# self.encode2 = sm.EncoderBlock\(params, se\_block\_type=se.SELayer.CSSE\)
  \# self.encode3 = sm.EncoderBlock\(params, se\_block\_type=se.SELayer.CSSE\)
  \# self.encode4 = sm.EncoderBlock\(params, se\_block\_type=se.SELayer.CSSE\)
  \# self.bottleneck = sm.DenseBlock\(params, se\_block\_type=se.SELayer.CSSE\)
  \# params\["num\_channels"\] = params\["num\_filters"\] \* 2
  \# self.decode1 = sm.DecoderBlock\(params, se\_block\_type=se.SELayer.CSSE\)
  \# self.decode2 = sm.DecoderBlock\(params, se\_block\_type=se.SELayer.CSSE\)
  \# self.decode3 = sm.DecoderBlock\(params, se\_block\_type=se.SELayer.CSSE\)
  \# self.decode4 = sm.DecoderBlock\(params, se\_block\_type=se.SELayer.CSSE\)

  \# self.encode1 = EncoderBlock\(params, se\_block\_type=se.ChannelSELayer\)
  self.encode1 \= EncoderBlock\(params, se\_block\_type\=se.SELayer.CSSE\)
  params\["num\_channels"\] \= params\["num\_filters"\]
  self.encode2 \= EncoderBlock\(params, se\_block\_type\=se.SELayer.CSSE\)
  self.encode3 \= EncoderBlock\(params, se\_block\_type\=se.SELayer.CSSE\)
  self.encode4 \= EncoderBlock\(params, se\_block\_type\=se.SELayer.CSSE\)
  self.bottleneck \= DenseBlock\(params, se\_block\_type\=se.SELayer.CSSE\)
  params\["num\_channels"\] \= params\["num\_filters"\] \* 2
  self.decode1 \= DecoderBlock\(params, se\_block\_type\=se.SELayer.CSSE\)
  self.decode2 \= DecoderBlock\(params, se\_block\_type\=se.SELayer.CSSE\)
  self.decode3 \= DecoderBlock\(params, se\_block\_type\=se.SELayer.CSSE\)
  self.decode4 \= DecoderBlock\(params, se\_block\_type\=se.SELayer.CSSE\)
  params\["num\_channels"\] \= params\["num\_filters"\]
  self.classifier \= ClassifierBlock\(params\)

  def forward\(self, input\):
  """
  :param input: X
  :return: probabiliy map

  """

  e1, out1, ind1 \= self.encode1.forward\(input\)
  e2, out2, ind2 \= self.encode2.forward\(e1\)
  e3, out3, ind3 \= self.encode3.forward\(e2\)
  e4, out4, ind4 \= self.encode4.forward\(e3\)

  bn \= self.bottleneck.forward\(e4\)

  d4 \= self.decode4.forward\(bn, out4, ind4\)
  d3 \= self.decode1.forward\(d4, out3, ind3\)
  d2 \= self.decode2.forward\(d3, out2, ind2\)
  d1 \= self.decode3.forward\(d2, out1, ind1\)
  prob \= self.classifier.forward\(d1\)

  return prob

  def enable\_test\_dropout\(self\):
  """
  Enables test time drop out for uncertainity
  :return:
  """
  attr\_dict \= self.\_\_dict\_\_\["\_modules"\]
  for i in range\(1, 5\):
  encode\_block, decode\_block \= \(
  attr\_dict\["encode" + str\(i\)\],
  attr\_dict\["decode" + str\(i\)\],
  \)
  encode\_block.drop\_out \= encode\_block.drop\_out.apply\(nn.Module.train\)
  decode\_block.drop\_out \= decode\_block.drop\_out.apply\(nn.Module.train\)

  \@property
  def is\_cuda\(self\):
  """
  Check if model parameters are allocated on the GPU.
  """
  return next\(self.parameters\(\)\).is\_cuda

  def save\(self, path\):
  """
  Save model with its parameters to the given path. Conventionally the
  path should end with '\*.model'.

  Inputs:
  - path: path string
  """
  print\("Saving model... \%s" \% path\)
  torch.save\(self.state\_dict\(\), path\)

  def predict\(self, X, device\=0, enable\_dropout\=False\):
  """
  Predicts the output after the model is trained.
  Inputs:
  - X: Volume to be predicted
  """
  self.eval\(\)
  print\("tensor size before transformation", X.shape\)

  if type\(X\) is np.ndarray:
  \# X = torch.tensor\(X, requires\_grad=False\).type\(torch.FloatTensor\)
  X \= \(
  torch.tensor\(X, requires\_grad\=False\)
  .type\(torch.FloatTensor\)
  .cuda\(device, non\_blocking\=True\)
  \)
  elif type\(X\) is torch.Tensor and not X.is\_cuda:
  X \= X.type\(torch.FloatTensor\).cuda\(device, non\_blocking\=True\)

  print\("tensor size ", X.shape\)

  if enable\_dropout:
  self.enable\_test\_dropout\(\)

  with torch.no\_grad\(\):
  out \= self.forward\(X\)

  max\_val, idx \= torch.max\(out, 1\)
  idx \= idx.data.cpu\(\).numpy\(\)
  prediction \= np.squeeze\(idx\)
  print\("prediction shape", prediction.shape\)
  del X, out, idx, max\_val
  return prediction
损失函数
神经网络的训练需要一个损失函数来计算模型误差。训练的目标是最小化预测输出和目标输出之间的损失。我们的模型使用Dice Loss 和Weighted Logistic Loss的联合损失函数进行优化,其中权重补偿数据中的高类不平衡,并鼓励正确分割解剖边界。

优化器
优化算法允许我们继续更新模型的参数并最小化损失函数的值,我们设置了以下的超参数:
学习率:初始设置为0.1,10次后降低1阶。这可以通过学习率调度器来实现。
权重衰减:0.0001。
批量大小:1。
动量:设置为0.95的高值,以补偿由于小批量大小而产生的噪声梯度。
训练网络
现在可以训练模型了。对于QuickNAT需要在3个(coronal, axial, sagittal)2d切片上训练3个模型。然后再聚合步骤中组合三个模型的概率生成最终结果,但是本文中只演示在coronal视图的2D切片上训练一个F-CNN模型,因为其他两个与之类似。
num\_epochs \= 20
 start\_epoch \= 1

 val\_interval \= 1

 train\_loss\_epoch\_values \= \[\]
 val\_loss\_epoch\_values \= \[\]

 best\_ds\_mean \= \-1
 best\_ds\_mean\_epoch \= \-1

 ds\_mean\_train\_values \= \[\]
 ds\_mean\_val\_values \= \[\]
 \# ds\_LCE\_values = \[\]
 \# ds\_LWM\_values = \[\]
 \# ds\_LCC\_values = \[\]

 print\("START TRAINING. : model name = ", "quicknat"\)

 for epoch in range\(start\_epoch, num\_epochs\):
  print\("==== Epoch \["+ str\(epoch\) + " / "+ str\(num\_epochs\)+ "\] DONE ===="\)

  checkpoint\_name \= CHECKPOINT\_DIR + "/checkpoint\_epoch\_" + str\(epoch\) + "." + CHECKPOINT\_EXTENSION
  print\(checkpoint\_name\)
  state \= \{
  "epoch": epoch,
  "arch": "quicknat",
  "state\_dict": model\_coronal.state\_dict\(\),
  "optimizer": optimizer.state\_dict\(\),
  "scheduler": scheduler.state\_dict\(\),
  \}
  save\_checkpoint\(state \= state, filename \= checkpoint\_name\)

  print\("\\n==== Epoch \[ \%d  /  \%d \] START ====" \% \(epoch, num\_epochs\)\)

  steps\_per\_epoch \= len\(train\_dataset\_coronal\_subset\) / train\_loader\_coronal\_subset.batch\_size

  model\_coronal.train\(\)
  train\_loss\_epoch \= 0
  val\_loss\_epoch \= 0
  step \= 0

  predictions\_train \= \[\]
  labels\_train \= \[\]

  predictions\_val \= \[\]
  labels\_val \= \[\]

  for i\_batch, sample\_batched in enumerate\(train\_loader\_coronal\_subset\):
  inputs \= sample\_batched\['image'\].type\(torch.FloatTensor\)
  labels \= sample\_batched\['label'\].type\(torch.LongTensor\)

  \# print\(f"Train Input Shape: \{inputs.shape\}"\)

  labels \= labels.squeeze\(1\)
  \_img\_channels, \_img\_height, \_img\_width \= labels.shape
  encoded\_label\= np.zeros\(\(\_img\_height, \_img\_width, 1\)\).astype\(int\)

  for j, cls in enumerate\(MaskColorMap\):
  encoded\_label\[np.all\(labels \== cls.value, axis \= 0\)\] \= j

  labels \= encoded\_label
  labels \= torch.from\_numpy\(labels\)
  labels \= torch.permute\(labels, \(2, 1, 0\)\)

  \# print\(f"Train Label Shape: \{labels.shape\}"\)
  \# plt.title\("Train Label"\)
  \# plt.imshow\(labels\[0, :, :\]\)
  \# plt.show\(\)

  optimizer.zero\_grad\(\)
  outputs \= model\_coronal\(inputs\)
  loss \= loss\_function\(outputs, labels\)

  loss.backward\(\)
  optimizer.step\(\)
  scheduler.step\(\)

  with torch.no\_grad\(\):
  \_, batch\_output \= torch.max\(outputs, dim \= 1\)
  \# print\(f"Train Prediction Shape: \{batch\_output.shape\}"\)
  \# plt.title\("Train Prediction"\)
  \# plt.imshow\(batch\_output\[0, :, :\]\)
  \# plt.show\(\)

  predictions\_train.append\(batch\_output.cpu\(\)\)
  labels\_train.append\(labels.cpu\(\)\)
  train\_loss\_epoch += loss.item\(\)
  print\(f"\{step\}/\{len\(train\_dataset\_coronal\_subset\) // train\_loader\_coronal\_subset.batch\_size\}, Training\_loss: \{loss.item\(\):.4f\}"\)
  step += 1

  predictions\_train\_arr, labels\_train\_arr \= torch.cat\(predictions\_train\), torch.cat\(labels\_train\)

  \#  print\(predictions\_train\_arr.shape\)

  dice\_metric\(predictions\_train\_arr, labels\_train\_arr\)

  ds\_mean\_train \= dice\_metric.aggregate\(\).item\(\)
  ds\_mean\_train\_values.append\(ds\_mean\_train\)
  dice\_metric.reset\(\)

  train\_loss\_epoch /= step
  train\_loss\_epoch\_values.append\(train\_loss\_epoch\)
  print\(f"Epoch \{epoch + 1\} Train Average Loss: \{train\_loss\_epoch:.4f\}"\)

  if \(epoch + 1\) \% val\_interval \== 0:

  model\_coronal.eval\(\)
  step \= 0

  with torch.no\_grad\(\):

  for i\_batch, sample\_batched in enumerate\(val\_loader\_coronal\_subset\):
  inputs \= sample\_batched\['image'\].type\(torch.FloatTensor\)
  labels \= sample\_batched\['label'\].type\(torch.LongTensor\)

  \# print\(f"Val Input Shape: \{inputs.shape\}"\)

  labels \= labels.squeeze\(1\)
  integer\_encoded\_labels \= \[\]
  \_img\_channels, \_img\_height, \_img\_width \= labels.shape
  encoded\_label\= np.zeros\(\(\_img\_height, \_img\_width, 1\)\).astype\(int\)

  for j, cls in enumerate\(MaskColorMap\):
  encoded\_label\[np.all\(labels \== cls.value, axis \= 0\)\] \= j

  labels \= encoded\_label
  labels \= torch.from\_numpy\(labels\)
  labels \= torch.permute\(labels, \(2, 1, 0\)\)

  \# print\(f"Val Label Shape: \{labels.shape\}"\)
  \# plt.title\("Val Label"\)
  \# plt.imshow\(labels\[0, :, :\]\)
  \# plt.show\(\)

  val\_outputs \= model\_coronal\(inputs\)

  val\_loss \= loss\_function\(val\_outputs, labels\)

  predicted \= torch.argmax\(val\_outputs, dim \= 1\)

  \# print\(f"Val Prediction Shape: \{predicted.shape\}"\)
  \# plt.title\("Val Prediction"\)
  \# plt.imshow\(predicted\[0, :, :\]\)
  \# plt.show\(\)

  predictions\_val.append\(predicted\)
  labels\_val.append\(labels\)

  val\_loss\_epoch += val\_loss.item\(\)
  print\(f"\{step\}/\{len\(val\_dataset\_coronal\_subset\) // val\_loader\_coronal\_subset.batch\_size\}, Validation\_loss: \{val\_loss.item\(\):.4f\}"\)
  step += 1

  predictions\_val\_arr, labels\_val\_arr \= torch.cat\(predictions\_val\), torch.cat\(labels\_val\)

  dice\_metric\(predictions\_val\_arr, labels\_val\_arr\)
  \# dice\_metric\_batch\(predictions\_val\_arr, labels\_val\_arr\)

  ds\_mean\_val \= dice\_metric.aggregate\(\).item\(\)
  ds\_mean\_val\_values.append\(ds\_mean\_val\)
  \# ds\_mean\_val\_batch = dice\_metric\_batch.aggregate\(\)
  \# ds\_LCE = ds\_mean\_val\_batch\[0\].item\(\)
  \# ds\_LCE\_values.append\(ds\_LCE\)
  \# ds\_LWM = ds\_mean\_val\_batch\[1\].item\(\)
  \# ds\_LWM\_values.append\(ds\_LWM\)
  \# ds\_LCC = ds\_mean\_val\_batch\[2\].item\(\)
  \# ds\_LCC\_values.append\(ds\_LCC\)

  dice\_metric.reset\(\)
  \# dice\_metric\_batch.reset\(\)

  if ds\_mean\_val \> best\_ds\_mean:
  best\_ds\_mean \= ds\_mean\_val
  best\_ds\_mean\_epoch \= epoch + 1
  torch.save\(model\_coronal.state\_dict\(\), os.path.join\(BESTMODEL\_DIR, "best\_metric\_model\_coronal.pth"\)\)
  print\("Saved new best metric model coronal"\)

  print\(
  f"Current Epoch: \{epoch + 1\} Current Mean Dice score is: \{ds\_mean\_val:.4f\}"
  f"\\nBest Mean Dice score: \{best\_ds\_mean:.4f\} "
  \# f"\\nMean Dice score Left Cerebral Exterior: \{ds\_LCE:.4f\} Mean Dice score Left White Matter: \{ds\_LWM:.4f\} Mean Dice score Left Cerebral Cortex: \{ds\_LCC:.4f\} "
  f"at Epoch: \{best\_ds\_mean\_epoch\}"
  \)

  val\_loss\_epoch /= step
  val\_loss\_epoch\_values.append\(val\_loss\_epoch\)
  print\(f"Epoch \{epoch + 1\} Average Validation Loss: \{val\_loss\_epoch:.4f\}"\)

 print\("FINISH."\)
代码也是传统的Pytorch的训练步骤,就不详细解释了
绘制损失和精度曲线
训练曲线表示模型的学习情况,验证曲线表示模型泛化到未见实例的情况。我们使用matplotlib来绘制图形。还可以使用TensorBoard,它使理解和调试深度学习程序变得更容易,并且是实时的。
epoch \= range\(1, num\_epochs + 1\)

 \# Plot Loss Curves
 plt.figure\(figsize\=\(18, 6\)\)
 plt.subplot\(1, 3, 1\)
 plt.plot\(epoch, train\_loss\_epoch\_values, label\='Training Loss'\)
 plt.plot\(epoch, val\_loss\_epoch\_values, label\='Validation Loss'\)
 plt.title\('Training and Validation Loss'\)
 plt.xlabel\('Epoch'\)
 plt.legend\(\)
 plt.figure\(\)
 plt.show\(\)

 \# Plot Train Dice Coefficient Curve
 plt.figure\(figsize\=\(18, 6\)\)
 plt.subplot\(1, 3, 2\)
 x \= \[\(i + 1\) for i in range\(len\(ds\_mean\_train\_values\)\)\]
 plt.plot\(x, ds\_mean\_train\_values, 'blue', label \= 'Train Mean Dice Score'\)
 plt.title\("Training Mean Dice Coefficient"\)
 plt.xlabel\('Epoch'\)
 plt.ylabel\('Mean Dice Score'\)
 plt.show\(\)

 \# Plot Validation Dice Coefficient Curve
 plt.figure\(figsize\=\(18, 6\)\)
 plt.subplot\(1, 3, 3\)
 x \= \[\(i + 1\) for i in range\(len\(ds\_mean\_val\_values\)\)\]
 plt.plot\(x, ds\_mean\_val\_values, 'orange', label \= 'Validation Mean Dice Score'\)
 plt.title\("Validation Mean Dice Coefficient"\)
 plt.xlabel\('Epoch'\)
 plt.ylabel\('Mean Dice Score'\)
 plt.show\(\)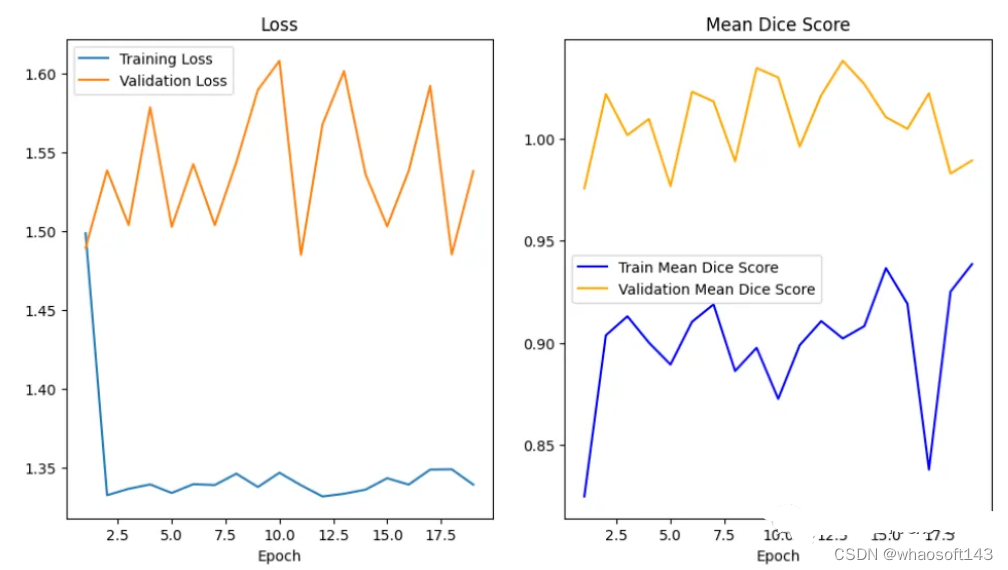
在曲线中,我们可以看到模型是过拟合的,因为验证损失上升而训练损失下降。这是深度学习算法中一个常见的陷阱,其中模型最终会记住训练数据,而无法对未见过的数据进行泛化。
避免过度拟合的技巧:
- 用更多的数据进行训练:更大的数据集可以减少过拟合。
- 数据增强:如果我们不能收集更多的数据,我们可以应用数据增强来人为地增加数据集的大小。
- 添加正则化:正则化是一种限制我们的网络学习过于复杂的模型的技术,因此可能会过度拟合。
评估网络
我们如何度量模型的性能?一个成功的预测是一个最大限度地扩大预测和真实之间的重叠。
这一目标的两个相关但不同的指标是Dice和Intersection / Union (IoU)系数,后者也被称为Jaccard系数。两个指标都在0(无重叠)和1(完全重叠)之间。

这两种指标都可以用于类似的情况,但是区别在于Dice Score倾向于平均表现,而IoU则帮助你理解最坏情况下的表现。

我们可以逐个类地检查度量标准,或者取所有类的平均值。这里将使用monai.metrics.DiceMetric来计算分数。一个更通用的方法是使用torchmetrics,但是因为这里使用了monai框架,所以就直接使用它内置的函数了。
我们可以看到Dice得分曲线的行为相当不寻常。主要是因为验证平均Dice得分高于1,这是不可能的,因为这个度量是在0和1之间。我们无法确定这种行为的主要原因,但我们建议在多类问题中为每个类单独提供度量计算,并始终提供可视化示例以进行可视化评估。
结果分析
最后我们要看看模型是如何推广到未知数据的这个模型预测的几乎所有东西都是左脑白质,一些像素是左脑皮层。尽管它的预测似乎是正确的,但仍有很大的改进空间,因为我们的模型太小了,可以选择更深的模型获得更好的效果。
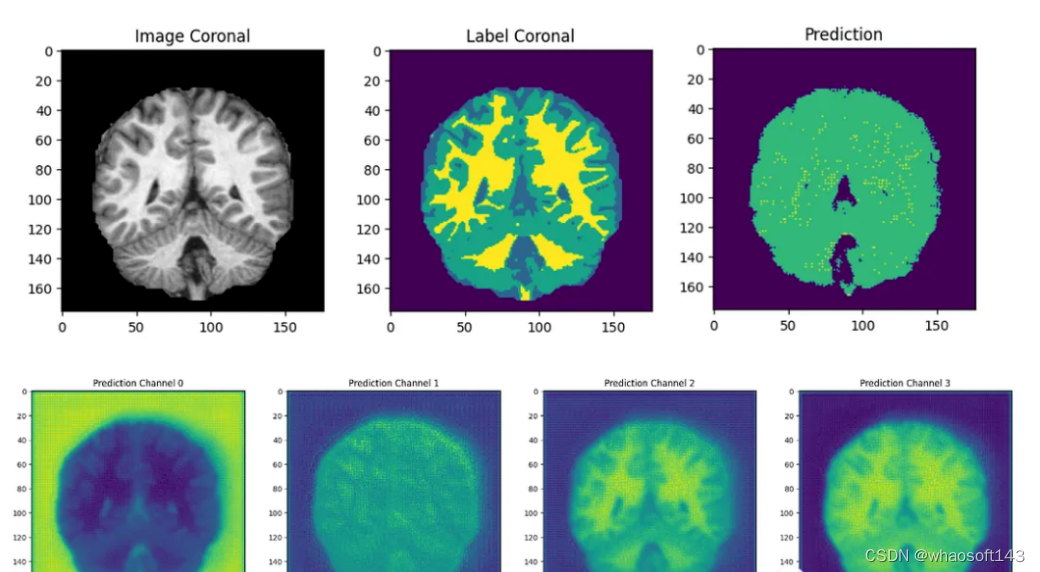
总结
在本文中,我们介绍了如何训练QuickNAT来完成具有挑战性的大脑分割任务。我们尽可能遵循作者在他们的研究论文中解释的学习策略,这是本教程为了方便演示只在最简单的步骤上进行了演示,文本的完整代码:https://github.com/inesdv26/Brain-Segmentation
六、PyTorch与torch-xlaの桥接
文章从XLATensor开始的溯源、注册PyTorch库实现、从PyTorch调用到torch_xla三个方面来介绍PyTorch与torch-xla的桥接
XLA (Accelerated Linear Algebra)是一个开源的机器学习编译器,对PyTorch、Tensorflow、JAX等多个深度学习框架都有支持。最初XLA实际上是跟Tensorflow深度结合的,很好地服务了Tensorflow和TPU,而与XLA的结合主要依赖于社区的支持,即torch-xla。
torch-xla在支持XLA编译的基础上,较大限度地保持了PyTorch的易用性,贴一个官方的DDP训练的例子:
import torch.distributed as dist
-import torch.multiprocessing as mp
+import torch_xla.core.xla_model as xm
+import torch_xla.distributed.parallel_loader as pl
+import torch_xla.distributed.xla_multiprocessing as xmp
+import torch_xla.distributed.xla_backend

 def _mp_fn(rank, world_size):
   ...

-  os.environ['MASTER_ADDR'] = 'localhost'
-  os.environ['MASTER_PORT'] = '12355'
-  dist.init_process_group("gloo", rank=rank, world_size=world_size)
+  # Rank and world size are inferred from the XLA device runtime
+  dist.init_process_group("xla", init_method='xla://')
+
+  model.to(xm.xla_device())
+  # `gradient_as_bucket_view=True` required for XLA
+  ddp_model = DDP(model, gradient_as_bucket_view=True)

-  model = model.to(rank)
-  ddp_model = DDP(model, device_ids=[rank])
+  xla_train_loader = pl.MpDeviceLoader(train_loader, xm.xla_device())

-  for inputs, labels in train_loader:
+  for inputs, labels in xla_train_loader:
     optimizer.zero_grad()
     outputs = ddp_model(inputs)
     loss = loss_fn(outputs, labels)
     loss.backward()
     optimizer.step()

 if __name__ == '__main__':
-  mp.spawn(_mp_fn, args=(), nprocs=world_size)
+  xmp.spawn(_mp_fn, args=())
将一段PyTorch代码改写为torch-xla代码,主要就是三个方面:
- 将模型和数据放到xla device上
- 适当的时候调用
xm.mark_step - 某些组件该用pytorchx-xla提供的,比如amp和spawn
其中第二条并没有在上面的代码中体现,原因是为了让用户少改代码,torch-xla将mark_step封装到了dataloader中,实际上不考虑DDP的完整训练的过程可以简写如下:
device = xm.xla_device()
model = model.to(device)
for data, label in enumerate(dataloader):
    data, label = data.to(device), label.to(device)
    output = model(data)
    loss = func(output, label)
    loss.backward()
    optimizer.step()
xm.mark_step()xm.mark_step的作用就是"告诉"框架:现在对图的定义告一段落了,可以编译并执行计算了。既然如此,那么mark_step之前的内容是做了什么呢?因为要在mark_step之后才编译并计算,那么前面肯定不能执行实际的运算。这就引出了Trace和LazyTensor的概念。
其实到了这里,如果对tensorflow或者torch.fx等比较熟悉,就已经很容易理解了,在mark_step之前,torch-xla将torch Tensor换成了LazyTensor,进而将原本是PyTorch中eager computation的过程替换成了trace的过程,最后生成一张计算图来优化和执行。简而言之这个过程是PyTorch Tensor -> XLATensor -> HLO IR,其中HLO就是XLA所使用的IR。在每次调用到torch op的时候,会调用一次GetIrValue,这时候就意味着一个节点被写入了图中。更具体的信息可以参考XLA Tensor Deep Dive这部分文档。需要注意的是,trace这个过程是独立于mark_step的,即便你的每个循环都不写mark_step,这个循环也可以一直持续下去,只不过在这种情况下,永远都不会发生图的编译和执行,除非在某一步trace的时候,发现图的大小已经超出了pytorch-xla允许的上限。
PyTorch与torch-xla的桥接
知晓了Trace过程之后,就会好奇一个问题:当用户执行一个PyTorch函数调用的时候,torch-xla怎么将这个函数记录下来的?
最容易想到的答案是“torch-xla作为PyTorch的一个编译选项,打开的时候就会使得二者建立起映射关系”,但很可惜,这个答案是错误的,仔细看PyTorch的CMake文件以及torch-xla的编译方式就会明白,torch-xla是几乎单向依赖于PyTorch的(为什么不是全部后面会讲)。既然PyTorch本身在编译期间并不知道torch-xla的存在,那么当用户使用一个xla device上的Tensor作为一个torch function的输入的时候,又经历了怎样一个过程调用到pytorch-xla中的东西呢?
从XLATensor开始的溯源
尽管我们现在并不知道怎么调用到torch-xla中的,但我们知道PyTorch Tensor一定要转换成XLATensor(参考tensor.h),那么我们只需要在关键的转换之处打印出调用堆栈,自然就可以找到调用方,这样虽然不能保证找到PyTorch中的位置,但是能够找到torch-xla中最上层的调用。注意到XLATensor只有下面这一个创建函数接受at::Tensor作为输入,因此就在这里面打印调用栈。
XLATensor XLATensor::Create(const at::Tensor& tensor, const Device& device)测试的用例很简单,我们让两个xla device上的Tensor相乘:
import torch_xla.core.xla_model as xm
import torch

device = xm.xla_device()
a = torch.normal(0, 1, (2, 3)).to(device)
b = torch.normal(0, 1, (2, 3)).to(device)

c = a * b
在上述位置插入堆栈打印代码并重新编译、安装后运行用例,可以看到以下输出(截取部分):
usr/local/lib/python3.8/dist-packages/_XLAC.cpython-38-x86_64-linux-gnu.so(_ZN9torch_xla15TensorToXlaDataERKN2at6TensorERKNS_6DeviceEb+0x64d) [0x7f086098b9ed]
/usr/local/lib/python3.8/dist-packages/_XLAC.cpython-38-x86_64-linux-gnu.so(_ZNK9torch_xla9XLATensor19GetIrValueForTensorERKN2at6TensorERKNS_6DeviceE+0xa5) [0x7f0860853955]
/usr/local/lib/python3.8/dist-packages/_XLAC.cpython-38-x86_64-linux-gnu.so(_ZNK9torch_xla9XLATensor10GetIrValueEv+0x19b) [0x7f0860853d5b]
/usr/local/lib/python3.8/dist-packages/_XLAC.cpython-38-x86_64-linux-gnu.so(_ZN9torch_xla9XLATensor3mulERKS0_S2_N3c108optionalINS3_10ScalarTypeEEE+0x3f) [0x7f086087631f]
/usr/local/lib/python3.8/dist-packages/_XLAC.cpython-38-x86_64-linux-gnu.so(_ZN9torch_xla18XLANativeFunctions3mulERKN2at6TensorES4_+0xc4) [0x7f08606d4da4]
/usr/local/lib/python3.8/dist-packages/_XLAC.cpython-38-x86_64-linux-gnu.so(+0x19d158) [0x7f08605f7158]
/usr/local/lib/python3.8/dist-packages/torch/lib/libtorch_cpu.so(_ZN2at4_ops10mul_Tensor10redispatchEN3c1014DispatchKeySetERKNS_6TensorES6_+0xc5) [0x7f0945c9d055]
/usr/local/lib/python3.8/dist-packages/torch/lib/libtorch_cpu.so(+0x2b8986c) [0x7f094705986c]
/usr/local/lib/python3.8/dist-packages/torch/lib/libtorch_cpu.so(+0x2b8a37b) [0x7f094705a37b]
/usr/local/lib/python3.8/dist-packages/torch/lib/libtorch_cpu.so(_ZN2at4_ops10mul_Tensor4callERKNS_6TensorES4_+0x157) [0x7f0945cee717]
/usr/local/lib/python3.8/dist-packages/torch/lib/libtorch_python.so(+0x3ee91f) [0x7f094e4b391f]
/usr/local/lib/python3.8/dist-packages/torch/lib/libtorch_python.so(+0x3eeafb) [0x7f094e4b3afb]
python() [0x5042f9]明显可以看到是从python的堆栈调用过来的,分析一下可以得知_ZN2at4_ops10mul_Tensor10redispatchEN3c1014DispatchKeySetERKNS_6TensorES6_+0xc5对应的定义是at::_ops::mul_Tensor::redispatch(c10::DispatchKeySet, at::Tensor const&, at::Tensor const&)+0xc5
虽然这里意义仍有些不明,但我们已经可以做出推测了:redistpatch函数是根据DispatchKeySet来决定将操作dispatch到某个backend上,xla的device信息就被包含在其中。而后面两个输入的const at::Tensor&就是乘法操作的两个输入。
根据上面的关键字redispatch来寻找,我们可以找到这样一个文件gen.py,其中的codegen函数很多,但最显眼的是下面的OperatorGen:
@dataclass(frozen=True)
class ComputeOperators:
    target: Union[
        Literal[Target.DECLARATION],
        Literal[Target.DEFINITION]
    ]

    @method_with_native_function
    def __call__(self, f: NativeFunction) -> str:
        sig = DispatcherSignature.from_schema(f.func)
        name = f.func.name.unambiguous_name()
        call_method_name = 'call'
        redispatch_method_name = 'redispatch'

        if self.target is Target.DECLARATION:
            return f"""
struct TORCH_API {name} {{
  using schema = {sig.type()};
  using ptr_schema = schema*;
  // See Note [static constexpr char* members for windows NVCC]
  STATIC_CONSTEXPR_STR_INL_EXCEPT_WIN_CUDA(name, "aten::{f.func.name.name}")
  STATIC_CONSTEXPR_STR_INL_EXCEPT_WIN_CUDA(overload_name, "{f.func.name.overload_name}")
  STATIC_CONSTEXPR_STR_INL_EXCEPT_WIN_CUDA(schema_str, {cpp_string(str(f.func))})
  static {sig.defn(name=call_method_name, is_redispatching_fn=False)};
  static {sig.defn(name=redispatch_method_name, is_redispatching_fn=True)};
}};"""
        elif self.target is Target.DEFINITION:
            defns = f"""
STATIC_CONST_STR_OUT_OF_LINE_FOR_WIN_CUDA({name}, name, "aten::{f.func.name.name}")
STATIC_CONST_STR_OUT_OF_LINE_FOR_WIN_CUDA({name}, overload_name, "{f.func.name.overload_name}")
STATIC_CONST_STR_OUT_OF_LINE_FOR_WIN_CUDA({name}, schema_str, {cpp_string(str(f.func))})

// aten::{f.func}
static C10_NOINLINE c10::TypedOperatorHandle<{name}::schema> create_{name}_typed_handle() {{
  return c10::Dispatcher::singleton()
      .findSchemaOrThrow({name}::name, {name}::overload_name)
      .typed<{name}::schema>();
}}
"""

            for is_redispatching_fn in [False, True]:
                if is_redispatching_fn:
                    dispatcher_exprs_str = ', '.join(['dispatchKeySet'] + [a.name for a in sig.arguments()])
                    dispatcher_call = 'redispatch'
                    method_name = f'{name}::{redispatch_method_name}'
                else:
                    dispatcher_exprs_str = ', '.join([a.name for a in sig.arguments()])
                    dispatcher_call = 'call'
                    method_name = f'{name}::{call_method_name}'

                defns += f"""
// aten::{f.func}
{sig.defn(name=method_name, is_redispatching_fn=is_redispatching_fn)} {{
    static auto op = create_{name}_typed_handle();
    return op.{dispatcher_call}({dispatcher_exprs_str});
}}
"""
            return defns
        else:
assert_never(self.target)对于每个算子,PyTorch会(在编译前)在这里生成许多类,这些类会有静态成员call或者redispatch,其中redispatch负责分发具体的实现。这里的codegen比较繁琐,这里就不再细讲。
注册PyTorch库实现
即便我们找到了上面redispatch和codegen的线索,看起来仍然不足以解释PyTorch到torch-xla的桥接,因为PyTorch和torch-xla两个库之间的调用,必须要有符号的映射才可以,而不是一些函数形式上的相同。PyTorch中是有Dispatcher机制的,这个机制很常见于很多框架,比如oneflow也是有一套类似的Dispatcher机制。这套机制最大的好处就是在尽可能减少侵入式修改的前提下保证了较高的可扩展性。简而言之,我们的op有一种定义,但可以有多种实现方式,并且这个实现的代码可以不在框架内部,这样就使得框架在保持通用性的同时,易于在特定环境下做针对性的扩展。这套机制本质上就是建立了一个字典,将op映射到函数指针,那么每次调用一个op的时候,我们可以根据一些标识(比如tensor.device)来判断应该调用哪一种实现。
PyTorch中提供了一个宏用来将实现注册,从而让dispatcher可以调用:
#define _TORCH_LIBRARY_IMPL(ns, k, m, uid)                             \
  static void C10_CONCATENATE(                                         \
      TORCH_LIBRARY_IMPL_init_##ns##_##k##_, uid)(torch::Library&);    \
  static const torch::detail::TorchLibraryInit C10_CONCATENATE(        \
      TORCH_LIBRARY_IMPL_static_init_##ns##_##k##_, uid)(              \
      torch::Library::IMPL,                                            \
      c10::guts::if_constexpr<c10::impl::dispatch_key_allowlist_check( \
          c10::DispatchKey::k)>(                                       \
          []() {                                                       \
            return &C10_CONCATENATE(                                   \
                TORCH_LIBRARY_IMPL_init_##ns##_##k##_, uid);           \
          },                                                           \
          []() { return [](torch::Library&) -> void {}; }),            \
      #ns,                                                             \
      c10::make_optional(c10::DispatchKey::k),                         \
      __FILE__,                                                        \
      __LINE__);                                                       \
  void C10_CONCATENATE(                                                \
      TORCH_LIBRARY_IMPL_init_##ns##_##k##_, uid)(torch::Library & m)
这个宏如果完全展开会是下面这样:
static void TORCH_LIBRARY_IMPL_init_aten_CPU_0(torch::Library&);
static const torch::detail::TorchLibraryInit TORCH_LIBRARY_IMPL_static_init_aten_CPU_0(
      torch::Library::IMPL,
      (c10::impl::dispatch_key_allowlist_check(c10::DispatchKey::CPU)
           ? &TORCH_LIBRARY_IMPL_init_aten_CPU_0
           : [](torch::Library&) -> void {}),
      "aten",
      c10::make_optional(c10::DispatchKey::CPU),
      __FILE__,
      __LINE__);
void TORCH_LIBRARY_IMPL_init_aten_CPU_0(torch::Library & m)这里比较需要注意的是第二行的TORCH_LIBRARY_IMPL_static_init_aten_CPU_0并不是一个函数,而是一个静态变量,它的作用就是在torch_xla库初始化的时候,将xla定义的op注册到PyTorch中。
从PyTorch调用到torch_xla
xla调用上面所说的宏进行注册的位置在RegisterXLA.cpp这个文件中(codegen的结果),如下:
ORCH_LIBRARY_IMPL(aten, XLA, m) {
  m.impl("abs",
  TORCH_FN(wrapper__abs));

  ...
}
其中,wrapper__abs的定义如下:
at::Tensor wrapper__abs(const at::Tensor & self) {
  return torch_xla::XLANativeFunctions::abs(self);
}显然,这个定义和PyTorch框架内部的算子是完全一致的,只是修改了实现。而XLANativeFunctions::abs的实现可以在aten_xla_type.cpp中找到,如下所示:
at::Tensor XLANativeFunctions::abs(const at::Tensor& self) {
  XLA_FN_COUNTER("xla::");
  return bridge::AtenFromXlaTensor(XLATensor::abs(bridge::GetXlaTensor(self)));
}
到这里已经比较明朗了,注册之后,PyTorch上对于op的调用最终会进入torch_xla的native function中调用对应的op实现,而这些实现的根本都是对XLATensor进行操作,在最终操作执行完成之后,会将作为结果的XLATensor重新转换为torch Tensor,但要注意,这里的结果不一定被实际计算了,也可能只是记录了一下IR,将节点加入图中,这取决于具体的实现。
总结
其实torch-xla官方的文档里是有关于代码生成和算子注册这个过程的描述的,只不过一开始我没找到这个文档,走了一点弯路,但是自己探索也会觉得更明了这个过程。官方文档中的描述如下(节选):
All file mentioned below lives under the xla/torch_xla/csrc folder, with the exception of codegen/xla_native_functions.yaml
1.xla_native_functions.yaml contains the list of all operators that are lowered. Each operator name must directly match a pytorch operator listed in native_functions.yaml. This file serves as the interface to adding new xla operators, and is an input to PyTorch's codegen machinery. It generates the below 3 files: XLANativeFunctions.h, RegisterXLA.cpp, and RegisterAutogradXLA.cpp
2.XLANativeFunctions.h and aten_xla_type.cpp are entry points of PyTorch to the pytorch_xla world, and contain the manually written lowerings to XLA for each operator. XLANativeFunctions.h is auto-generated through a combination of xla_native_functions.yaml and the PyTorch core native_functions.yaml file, and contains declarations for kernels that need to be defined in aten_xla_type.cpp. The kernels written here need to construct 'XLATensor' using the input at::Tensor and other parameters. The resulting XLATensor needs to be converted back to the at::Tensor before returning to the PyTorch world
3.RegisterXLA.cpp and RegisterAutogradXLA.cpp are auto-generated files that register all lowerings to the PyTorch Dispatcher. They also include auto-generated wrapper implementations of out= and inplace operators.
大概意思就是实际上torch-xla就是根据xla_native_functions.yaml这个文件来生成算子的定义,然后再生成对应的RegisterXLA.cpp中的注册代码,这也跟PyTorch的codegen方式一致。
综合这一整个过程可以看出,PyTorch是保持了高度的可扩展性的,不需要多少侵入式的修改就可以将所有的算子全部替换成自己的,这样的方式也可以让开发者不用去关注dispatcher及其上层的实现,专注于算子本身的逻辑。
七、PyTorch 原生FP8训练进展
本文介绍了PyTorch在FP8训练方面的最新进展,展示了如何通过FSDP2、DTensor和torch.compile等技术实现FP8训练,从而在保持模型质量的同时显著提升训练吞吐量。
博客来源:https://pytorch.org/blog/training-using-float8-fsdp2/ 。by IBM and Meta 。这里主要是汇总一下FSDP2和FP8训练相关的内容,目前的实践主要集中在TorchTitan(DTensor,Async Tensor Parallelism,FP8 Allgather等等)和torchao上面,包括torch.compile编译器也在做对应的支持,PyTorch对于这个工作其实还没做到很稳定,和Meagtron-LM的FP8类似处于半成品阶段,例如API接口变动就很大,这里可以先简单了解一下他们的进展。以下是PyTorch关于FP8训练最新进展的博客翻译。
使用float8和FSDP2加速训练
作者:IBM: Tuan Hoang Trong, Alexei Karve, Yan Koyfman, Linsong Chu, Divya Kumari, Shweta Salaria, Robert Walkup, Praneet Adusumilli, Nirmit Desai, Raghu Ganti, Seetharami Seelam Meta: Less Wright, Wei Feng, Vasiliy Kuznetsov, Driss Guesseous
在本博客中,我们将展示如何在保持损失和评估基准一致性的同时,相比FSDP1 bf16训练实现高达50%的吞吐量提升。我们通过利用FSDP2、DTensor和torch.compile与torchao的float8线性层更新(计算)以及float8 all_gathers进行权重通信来实现这一提升。我们展示了这些改进在Meta LLaMa模型架构的不同规模上的效果,从1.8B小型模型一直到405B大型模型,使训练速度比以往更快。
我们使用Meta Llama3架构展示这些改进,并在两个规模上进行模型质量研究:8B模型规模的100B tokens训练和70B模型规模的50B tokens训练,这提供了float8和bf16训练损失曲线的精确比较。我们证明了与bf16相比,这些模型训练运行的损失曲线达到了相同的损失收敛。此外,我们使用FineWeb-edu数据集训练了一个3B模型到1T tokens,并运行标准评估基准以确保模型质量完整且与bf16运行相当。
在IBM研究院,我们计划采用这些功能进行数据消融实验,以提高在给定GPU预算内可以执行的实验数量。从长远来看,我们将通过更大规模的模型运行来展示float8训练的端到端可行性。
什么是Float8?
float8训练格式是由NVIDIA、ARM和Intel在2022年的一篇论文(https://arxiv.org/abs/2209.05433)中提出的,该论文证明了使用更低精度float8进行训练的可行性,且不会牺牲模型质量。随着NVIDIA Hopper系列等新型GPU的推出,由于原生float8张量核心支持,FP8训练变得可行,有望实现超过2倍的训练吞吐量提升。实现这一承诺面临一些挑战:(i) 在float8中启用核心模型操作如matmul和attention, (ii) 在分布式框架中启用float8训练, (iii) 在float8中启用GPU之间的权重通信。虽然NVIDIA库启用了float8 matmul,但后两项是在FSDP2和torchao的最新更新中提供的。
在本博客中,我们使用torchtitan(https://github.com/pytorch/torchtitan)作为训练入口点,使用IBM的确定性数据加载器,来自torchao的float8线性层实现,以及最新PyTorch nightly版本中的float8 all gather与FSDP2结合。对于这次训练,我们使用的是float8每张量(tensorwise)缩放粒度而不是行级。我们利用torch.compile确保获得最大性能提升。我们使用SDPA在bf16中计算attention,目前正在努力将其也迁移到float8。
实验
我们进行了各种实验来展示float8训练的优势。首先是确保不会牺牲模型质量。为了验证这一点,我们训练了一个8B模型和70B模型几千步,并比较float8和bf16训练运行之间的损失曲线。我们的实验在三个不同的H100集群上进行,分别配置了128、256和512个H100 GPU,环境各不相同,以证明可重复性。第一个集群是Meta的Grand Teton(https://engineering.fb.com/2024/03/12/data-center-engineering/building-metas-genai-infrastructure/)上的定制集群,具有400Gbps定制互连;第二个是IBM研究集群,具有3.2Tbps Infiniband互连;第三个是IBM Cloud集群,具有3.2Tbps RoCE互连用于GPU到GPU通信。
首先,我们在下面的图中绘制了这两个模型的损失曲线比较,以展示几千步的损失一致性。


图1:(a) 8B模型2k步损失一致性,(b) 70B模型1k步损失一致性
我们观察到,在这些不同的模型和不同的环境中,我们在小规模tokens训练中获得了损失一致性。接下来,我们对从1.8B到405B的四种不同模型规模的吞吐量增益进行了表征。我们探索了float8和bf16训练运行的最佳批量大小和激活检查点方案,以确定每GPU每秒的tokens数(wps)指标并报告性能增益。对于405B模型,我们利用DTensor进行张量并行训练与FSDP2。我们所有的测量都使用8K的序列长度。

表1:相对于bf16的性能增益(bf16和float8都使用torch.compile)
从表1中我们观察到,较大模型(70B和405B)的增益达到50%,较小模型的增益在20%到30%之间。在进一步的实验中,我们观察到float8 all_gather的添加使性能在float8计算本身的基础上提升了约5%,这与这篇博客(https://aws.amazon.com/cn/blogs/machine-learning/efficient-pre-training-of-llama-3-like-model-architectures-using-torchtitan-on-amazon-sagemaker/)中的观察结果一致。
其次,为了展示FP8模型的有效性,我们使用来自Hugging Face的FineWeb-edu数据集训练了一个遵循Llama3架构的3B模型,训练量达到1T tokens。我们使用lm-eval-harness框架进行评估,并在下表中展示了部分结果。我们观察到bf16的性能略优于float8分数(约一个百分点)。虽然某些分数在bf16下明显更好(例如,MMLU高出3分),但我们预计当选择正确的超参数和进行更大规模的训练运行时,这些差距会消失(例如,bf16运行的批量大小是一半,众所周知较小的批量大小运行可以提高评估分数)。

表2:float8训练模型在FP16下进行评估的基准分数(在FineWeb预训练的1T tokens处)。
最后,我们将实验扩展到IBM Cloud集群的512个H100 GPU上。我们能够在512 GPU规模上重现我们观察到的结果和加速。我们在下表中仅总结了大型模型(70B和405B)的这些结果。

表3:512 GPU规模下相对于bf16的性能增益(bf16和float8都使用torch.compile)
未来工作
我们还在研究其他形式的并行性,如上下文并行性。我们计划评估所有这些特性,以展示可组合性和为大规模模型训练做出选择的能力。
八、PyTorch 2.0
在PyTorch Conference 2022上,研发团队介绍了 PyTorch 2.0,并宣布稳定版本将在今年 3 月正式发布,现在 PyTorch 2.0 正式版如期而至。

GitHub地址:https://github.com/pytorch/pytorch/releases
PyTorch 2.0 延续了之前的 eager 模式,同时从根本上改进了 PyTorch 在编译器级别的运行方式。PyTorch 2.0 能为「Dynamic Shapes」和分布式运行提供更快的性能和更好的支持。
PyTorch 2.0 的稳定功能包括 Accelerated Transformers(以前称为 Better Transformers)。Beta 功能包括:
- 使用 torch.compile 作为 PyTorch 2.0 的主要 API;
- scaled_dot_product_attention 函数作为 torch.nn.functional 的一部分;
- MPS 后端;
- torch.func 模块中的 functorch API。
另外,PyTorch 2.0 还提供了一些关于 GPU 和 CPU 上推理、性能和训练的 Beta/Prototype 改进。
除了 2.0,研发团队这次还发布了 PyTorch 域库的一系列 beta 更新,包括 in-tree 的库和 TorchAudio、TorchVision、TorchText 等独立库。此外,TorchX 转向社区支持模式。
具体来说,PyTorch 2.0 的功能包括:
- torch.compile 是 PyTorch 2.0 的主要 API,它能包装并返回编译后的模型。这个是一个完全附加(和可选)的功能,PyTorch 2.0 根据定义是 100% 向后兼容的。
- 作为 torch.compile 的基础技术,带有 Nvidia 和 AMD GPU 的 TorchInductor 将依赖 OpenAI Triton 深度学习编译器来生成高性能代码并隐藏低级硬件细节。OpenAI Triton 生成内核实现了与手写内核和 cublas 等专用 cuda 库相当的性能。
- Accelerated Transformers 引入了对训练和推理的高性能支持,使用自定义内核架构实现缩放点积注意力 (SPDA)。API 与 torch.compile () 集成,模型开发人员也可以通过调用新的 scaled_dot_product_attention () 运算符直接使用缩放点积注意力内核。
- Metal Performance Shaders (MPS) 后端能在 Mac 平台上提供 GPU 加速的 PyTorch 训练,并增加了对前 60 个最常用运算符的支持,覆盖 300 多个运算符。
- Amazon AWS 优化了 AWS Graviton3 上的 PyTorch CPU 推理。与之前的版本相比,PyTorch 2.0 提高了 Graviton 的推理性能,包括针对 ResNet-50 和 BERT 的改进。
- 其他一些跨 TensorParallel、DTensor、2D parallel、TorchDynamo、AOTAutograd、PrimTorch 和 TorchInductor 的新 prototype 功能和方法。
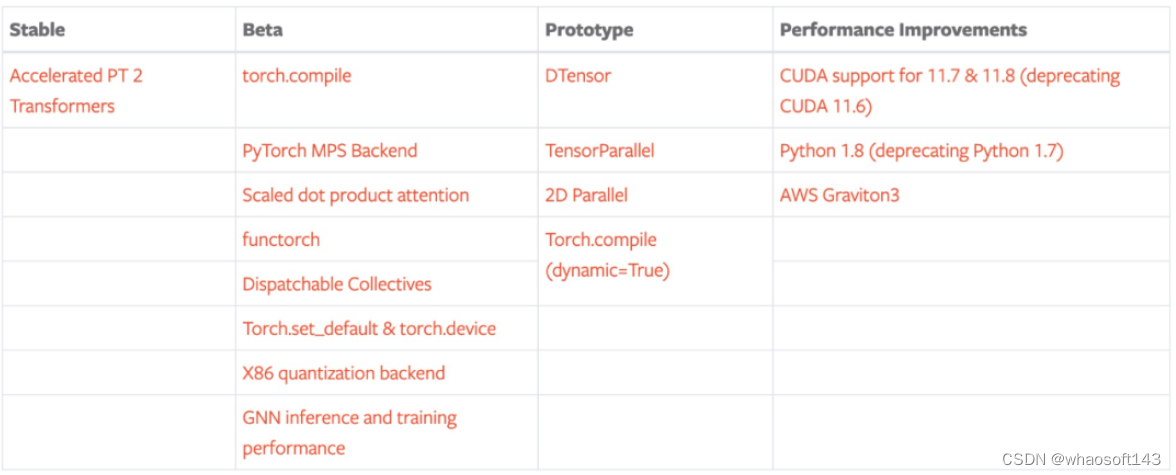
稳定功能
PyTorch 2.0 版本包括 PyTorch Transformer API 新的高性能实现,以前称为「Better Transformer API」,现在更名为 「Accelerated PyTorch 2 Transformers」。研发团队表示他们希望整个行业都能负担得起训练和部署 SOTA Transformer 模型的成本。新版本引入了对训练和推理的高性能支持,使用自定义内核架构实现缩放点积注意力 (SPDA)。
与「快速路径(fastpath)」架构类似,自定义内核完全集成到 PyTorch Transformer API 中 —— 因此,使用 Transformer 和 MultiHeadAttention API 将使用户能够:
- 显著提升模型速度;
- 支持更多用例,包括使用交叉注意力模型、Transformer 解码器,并且可以用于训练模型;
- 继续对固定和可变的序列长度 Transformer 编码器和自注意力用例使用 fastpath 推理。
为了充分利用不同的硬件模型和 Transformer 用例,PyTorch 2.0 支持多个 SDPA 自定义内核,自定义内核选择逻辑是为给定模型和硬件类型选择最高性能的内核。除了现有的 Transformer API 之外,模型开发人员还可以通过调用新的 scaled_dot_product_attention () 运算来直接使用缩放点积注意力内核。
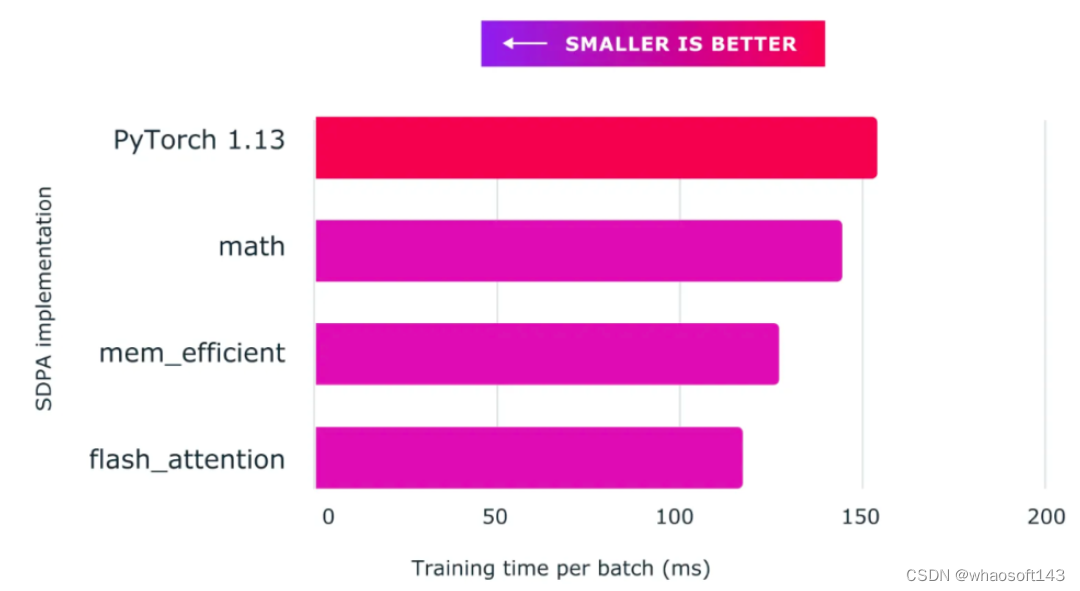
将缩放点积注意力与自定义内核和 torch.compile 结合使用可为训练大型语言模型(上图以 nanoGPT 为例)提供显著加速。
Beta 功能
torch.compile
torch.compile 是 PyTorch 2.0 的主要 API,它包装并返回编译后的模型。torch.compile 的背后是 PyTorch 团队研发的新技术 ——TorchDynamo、AOTAutograd、PrimTorch 和 TorchInductor。
借助这些新技术,torch.compile 能够在 165 个开源模型上运行,并且在 float32 精度下平均运行速度提高 20%,在 AMP 精度下平均运行速度提高 36%。
PyTorch MPS 后端
MPS 后端在 Mac 平台上提供 GPU 加速的 PyTorch 训练。PyTorch 2.0 在正确性、稳定性和运算符覆盖率方面比之前的版本有所改进。
缩放点积注意力 2.0
PyTorch 2.0 引入了一个强大的缩放点积注意力函数。该函数包括多种实现,可以根据使用的输入和硬件无缝应用。
functorch → torch.func
functorch API 现在可以在 torch.func 模块中使用。其中,函数转换 API 与以前相同,但与 NN 模块交互的方式有所改变。
此外,PyTorch 2.0 还添加了对 torch.autograd.Function 的支持:现在可以在 torch.autograd.Function 上应用函数转换。
Dispatchable Collectives
Dispatchable Collectives 是对之前 init_process_group () API 的改进,其中将后端更改为可选参数。对于用户来说,这个特性的主要优势在于,它将允许用户编写可以在 GPU 和 CPU 机器上运行的代码,而无需更改后端规范。
PyTorch 2.0 还将 torch.set_default_device 和 torch.device 作为语境管理器(context manager),将「X86」作为 x86 CPU 的新默认量化后端。
新的 X86 量化后端利用 FBGEMM 和 oneDNN 内核库,提供比原始 FBGEMM 后端更高的 INT8 推理性能。新后端在功能上与原始 FBGEMM 后端兼容。

此外,PyTorch 2.0 还包括多项关键优化,以提高 CPU 上 GNN 推理和训练的性能,并利用 oneDNN Graph 加速推理。
最后,PyTorch 2.0 还包含一些 Prototype 功能,包括:
- [Prototype] DTensor
- [Prototype] TensorParallel
- [Prototype] 2D Parallel
- [Prototype] torch.compile (dynamic=True)
