17.2 图形绘制6
版权声明:本文为博主原创文章,转载请在显著位置标明本文出处以及作者网名,未经作者允许不得用于商业目的。
17.2.7 Screen类
Screen类从字面上看就知道是与屏幕显示相关的,表示单个系统上的一个或多个显示设备。
Screen常用属性:
- AllScreens:获取系统上所有屏幕的数组。
- BitsPerPixel:获取与数据的一个像素相关联的内存位数。
- Bounds:一个Rectangle值,屏幕高度和宽度的像素
- DeviceName:获取与屏幕关联的设备名称。
- Primary:指示某个屏幕是否为主显示屏
- PrimaryScreen:获取主屏幕。
- WorkingArea:一个Rectangle值,屏幕工作区的高度和宽度。这里所说的工作区是屏幕显示的桌面区域,不包括任务栏、停靠窗口和停靠工具栏。
【例 17.17】【项目:code17-017】获取显示器信息。
private void button1_Click(object sender, EventArgs e)
{
Screen[] scr = Screen.AllScreens;
textBox1.Text = "显示器数量:" + scr.Length + "\r\n";
for (int i = 0; i< scr.Length; i++)
{
textBox1.Text += "显示器" + (i + 1) + "信息:" + "\r\n";
textBox1.Text += (scr[i].Primary ? "主显示器":"非主显示器") + "\r\n";
textBox1.Text += "显示设备:" + scr[i].DeviceName + "\r\n";
textBox1.Text += "屏幕区域:" + scr[i].Bounds.X + "," + scr[i].Bounds.Y + "," + scr[i].Bounds.Width + "," + scr[i].Bounds.Height + "\r\n";
textBox1.Text += "工作区域:" + scr[i].WorkingArea.X + "," + scr[i].WorkingArea.Y + "," + scr[i].WorkingArea.Width + "," + scr[i].WorkingArea.Height;
}
}
运行结果如下图所示:
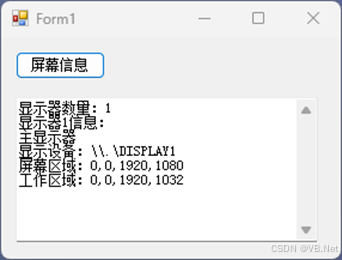
图17-21 获取显示器信息
【例 17.18】【项目:code17-018】屏幕截图。
屏幕截图先是通过Screen类的Bounds属性获得屏幕区域的Rectangle,从而获得屏幕的高度和宽度;然后可以通过Graphics对象的CopyFromScreen方法获得屏幕截图。
CopyFromScreen方法常用的一个重载版本:
public void CopyFromScreen( Point upperLeftSource, Point upperLeftDestination, Size blockRegionSize )
参数说明:
- upperLeftSource:位于显示器左上角的点。
- upperLeftDestination:位于目标图像左上角的点。
- blockRegionSize:要复制的显示器区域。
具体代码如下:
private void button1_Click(object sender, EventArgs e)
{
string imgfile;
SaveFileDialog sfd = new SaveFileDialog();
sfd.Filter = "图片文件|*.jpg";
if (sfd.ShowDialog() != DialogResult.OK)
return;
imgfile = sfd.FileName;
//隐藏窗体
this.Visible = false;
//休息200毫秒,防止窗体还没有完全隐藏就截图
System.Threading.Thread.Sleep(200);
//获得主显示器
Screen scr1 = Screen.PrimaryScreen;
//获得窗体区域
Rectangle rec = scr1.Bounds;
Bitmap bmp =new Bitmap(rec.Width, rec.Height);
Graphics g = Graphics.FromImage(bmp);
//调用CopyFromScreen复制屏幕
g.CopyFromScreen(new Point(0, 0), new Point(0, 0), new Size(rec.Width, rec.Height));
g.Dispose();
//保存图片
bmp.Save(imgfile, System.Drawing.Imaging.ImageFormat.Jpeg);
bmp.Dispose();
//显示窗体
this.Visible = true;
label1.Text = "截屏保存到 " + imgfile;
}
注意:通常家里的电脑只有一个显示器,所以只需要获得主显示器即可。
【例 17.19】【项目:code17-019】屏幕取色。
//标识是否开始取色
bool isPick;
//不可见的bitmap,保存了当前屏幕的截图
Bitmap bmp;
//当释放鼠标键时
private void btnPick_MouseUp(object sender, MouseEventArgs e)
{
//停止取色
isPick = false;
//还原鼠标形状
this.Cursor = Cursors.Default;
}
//按下鼠标时
private void btnPick_MouseDown(object sender, MouseEventArgs e)
{
//如果按下鼠标左键
if( e.Button == MouseButtons.Left)
{
//开始取色
isPick = true;
//获取了屏幕的截图,并保存在bmp里面
Screen Scr = Screen.PrimaryScreen;
Rectangle recSc = Scr.Bounds;
bmp = new Bitmap(recSc.Width, recSc.Height);
Graphics g = Graphics.FromImage(bmp);
g.CopyFromScreen(new Point(0, 0), new Point(0, 0), new Size(recSc.Width, recSc.Height));
//设置鼠标为十字形
this.Cursor = Cursors.Cross;
}
}
//当鼠标移动时开始取色
private void btnPick_MouseMove(object sender, MouseEventArgs e)
{
int x, y;
Point p = new Point(e.X, e.Y);
Color colorPoint;
//如果此时开始取色
if( isPick )
{
//使用PointToScreen方法,将指定工作区点的位置计算成屏幕坐标
x = btnPick.PointToScreen(p).X;
y = btnPick.PointToScreen(p).Y;
lblLocation.Text = "x:" + x + " y:" + y;
//使用GetPixel方法在bmp对应坐标取色
colorPoint = bmp.GetPixel(x, y);
picPalette.BackColor = colorPoint;
//获得颜色RGB分量
lblRed.Text = colorPoint.R.ToString();
lblGreen.Text = colorPoint.G.ToString();
lblBlue.Text = colorPoint.B.ToString();
}
}
当鼠标左键在“取色”按钮上按下不放时,移动鼠标就可以在屏幕上取色了。
运行结果如下图所示:
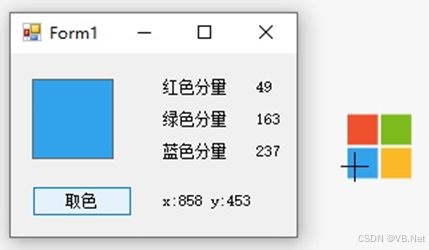
图17-22 屏幕取色
17.2.8 坐标系变换
Graphics提供了几个特别的方法:
- TranslateTransform:平移坐标系统。常用的重载版本:
public void TranslateTransform( float dx, float dy )
参数说明:
- dx:平移的x坐标。
- dy:平移的y坐标。
将现有坐标系原点(或者理解为画布)平移到坐标(dx,dy)处。
- RotateTransform:旋转坐标系统。常用的重载版本:
public void RotateTransform ( float angle )
参数说明:
- angle:旋转的角度(以度为单位)。
将现有坐标系旋转相应角度,注意:这是顺时针旋转。
- ScaleTransform:缩放坐标系统。常用的重载版本:
public void ScaleTransform ( float sx, float sy )
参数说明:
- sx:x 方向的缩放比例。
- sy:y 方向的缩放比例。
将现有坐标系横坐标乘以sx,纵坐标乘以sy,如果sx或sy为负数,那么将坐标轴方向反向。注意:如果坐标轴反向,使用DrawString方法绘制文字,文字将会翻转。
- Save:保存当前坐标系统。
- Restore:还原保存的坐标系统。注意:Restore方法配合Save方法使用,使用后,Save保存的状态将会被移除,再次使用Restore将不会起作用。
【例 17.20】【项目:code17-020】坐标系变换。
Graphics g;
LineCap endCap;
GraphicsState gs;
private void Form1_Load(object sender, EventArgs e)
{
g = this.CreateGraphics();
endCap = LineCap.ArrowAnchor;
}
//绘制C#坐标系坐标轴
private void button1_Click(object sender, EventArgs e)
{
//保存当前Graphics状态
gs = g.Save();
Pen mypen =new Pen(Color.Red, 4);
LineCap endCap = LineCap.ArrowAnchor;
mypen.EndCap = endCap;
//绘制(0, 0)-(0, 150)的直线作为参考横坐标轴
g.DrawLine(mypen, new Point(0, 0), new Point(0, 150));
//绘制(0, 0)-(150,0)的直线作为参考纵坐标轴
g.DrawLine(mypen, new Point(0, 0), new Point(150, 0));
}
//绘制直角坐标系坐标轴
private void button2_Click(object sender, EventArgs e)
{
变换成常见的平面直角坐标系:
//1、将坐标轴移动到1/2窗体宽度和1/2窗体高度处
g.TranslateTransform(this.Width / 2, this.Height / 2);
//2、缩放坐标轴,这里使用的是(1,-1)
//表示横坐标轴不变,纵坐标轴反向
g.ScaleTransform(1, -1);
//定义宽度2的蓝色画笔
Pen mypen =new Pen(Color.Blue, 2);
mypen.EndCap = endCap;
//绘制(0, 0)-(0, 150)的直线作为参考横坐标轴
g.DrawLine(mypen, new Point(0, 0), new Point(0, 150));
//绘制(0, 0)-(150,0)的直线作为参考纵坐标轴
g.DrawLine(mypen, new Point(0, 0), new Point(150, 0));
}
//在平面直角坐标系下画矩形
private void button3_Click(object sender, EventArgs e)
{
Pen mypen =new Pen(Color.Black, 2);
g.DrawRectangle(mypen, new Rectangle(-50, -50, 100, 100));
}
//在C#坐标系下画矩形
private void button4_Click(object sender, EventArgs e)
{
//还原Graphics状态
g.Restore(gs);
Pen mypen = new Pen(Color.Black, 2);
g.DrawRectangle(mypen, new Rectangle(-50, -50, 100, 100));
}
运行结果如下图所示:
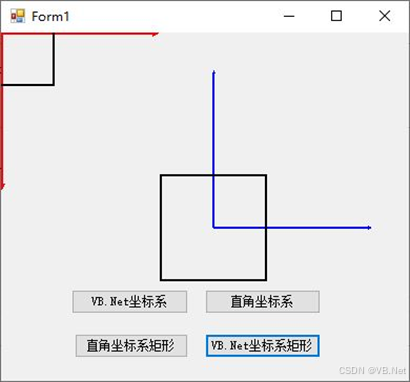
图17-23 C#坐标系和平面直角坐标系对比
【例 17.21】【项目:code17-021】绘制旋转的图形。
private void button1_Click(object sender, EventArgs e)
{
Graphics g = this.CreateGraphics();
//创建一个画笔
Pen p = new Pen(Color.Blue, 1);
//画个十字线坐标, 中间点为了看清, 用了一个4 * 4的矩形标出
g.DrawLine(p, new Point(0, this.ClientRectangle.Height / 2), new Point(this.ClientRectangle.Width, this.ClientRectangle.Height / 2));
g.DrawLine(p, new Point(this.ClientRectangle.Width / 2, 0), new Point(this.ClientRectangle.Width / 2, this.ClientRectangle.Height));
g.DrawRectangle(new Pen(Color.Red, 2), new Rectangle(this.ClientRectangle.Width / 2, this.ClientRectangle.Height / 2, 2, 2));
//将坐标轴原点平移到窗口中间
g.TranslateTransform(this.ClientRectangle.Width / 2, this.ClientRectangle.Height / 2);
//绘制10个正方形
for(int i = 1;i<= 10;i++)
{
//以现在的坐标轴原点为中心绘制正方形
g.DrawRectangle(new Pen(Color.Red, 2), new Rectangle(-50, -50, 100, 100));
//旋转9度
g.RotateTransform(9);
}
}
运行结果如下图所示:
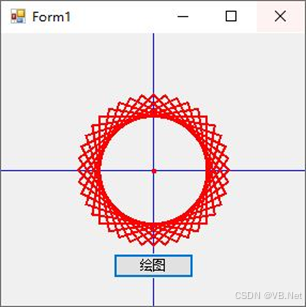
图17-24 旋转的图形
学习更多vb.net知识,请参看vb.net 教程 目录
学习更多C#知识,请参看C#教程 目录