使用Uni-app实现语音视频聊天(Android、iOS)
使用Uni-app开发手机端APP已经变得很普遍,同一套代码就可以打包成Android App 和 iOS App,相比原生开发,可以节省客观的人力成本。那么如何使用Uni-app来开发视频聊天软件或视频会议软件了?本文将详细介绍在Uni-app中,如何基于OMCS来快速搭建视频聊天程序。
一、准备工作
1.在Uni-app项目的根目录下新建如下目录结构,用来存储Android和iOS原生插件。

2.插件目录说明
android:在插件android目录下新建libs目录,将OMCS原生插件中使用的OMCS非托管库及jar包放入该目录下。将OMCS原生插件arr包放入android目录下
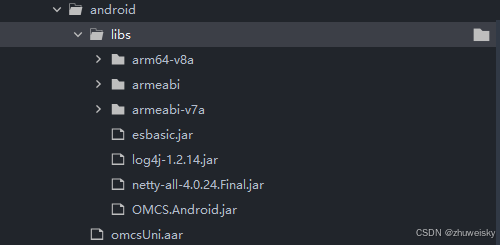
ios:将OMCS原生插件中使用的OMCSFramework.framework及OMCS原生插件OMCSPlugin.framework放到ios目录下

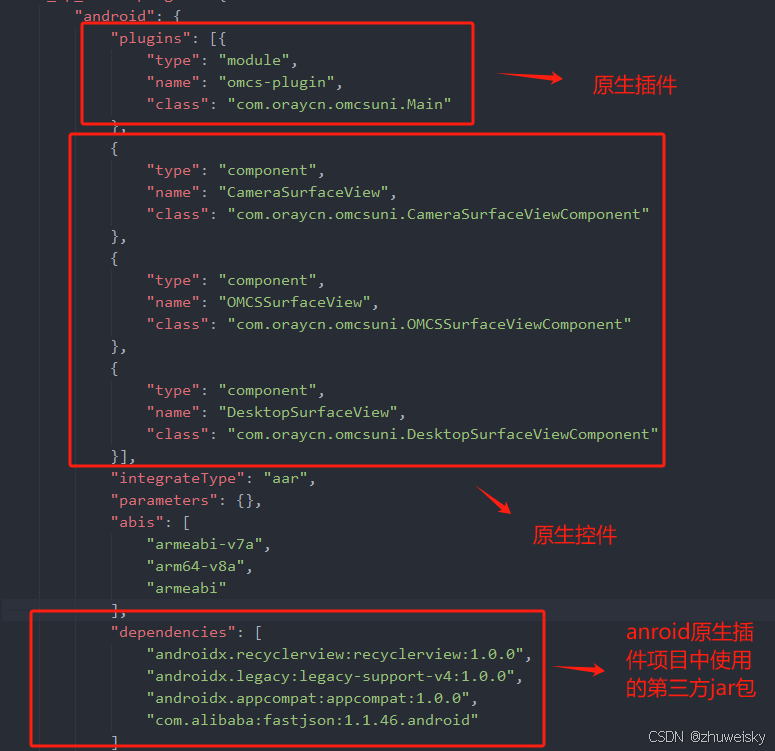
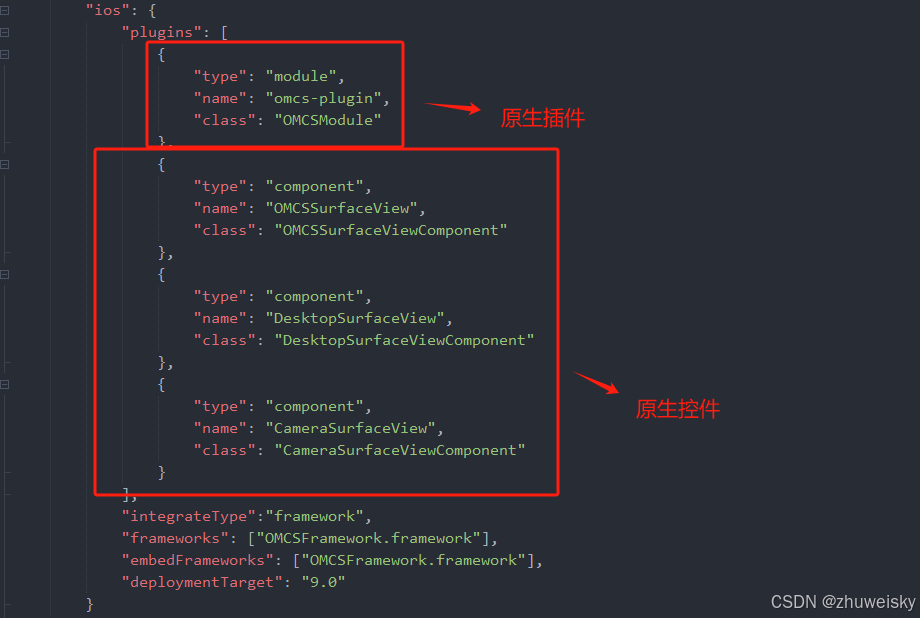
3.插件配置文件:nativeplugins根目录下新建package.json文件,详细配置说明及模版请参考uni官网uni小程序SDK
(1)修改package.json配置文件中插件的name及id为omcs-plugin

(2)android插件配置
(3)ios插件配置
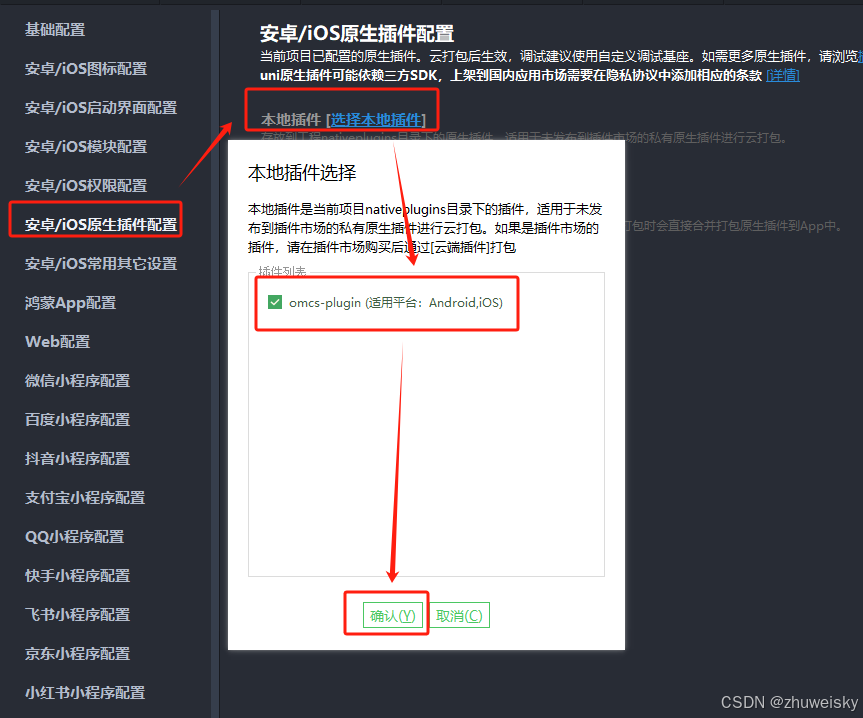
4.在uni-app项目配置文件manifest.json中将OMCS原生插件加入项目中
注意:修改配置后,需要重新打包app基座才能生效
二、正式开发
首先,我们在uni-app项目中引入OMCS-Uni.js文件,然后在依照如下步骤操作。
1.构造并初始化OMCS多媒体设备管理器。如果要设置一些配置参数,可以在调用初始化方法之前通过设置 multimediaManager 的相关属性来完成。
const multimediaManager = MultimediaManagerFactory.GetSingleton();
multimediaManager.initialize(
    this.userID,
    this.password,
    this.serverIP,
    this.serverPort,
    (res)=>{
        if(res == 'OMCS登录成功' || res == '登录成功'){}
    }
);2.本demo中,我们定义了一个简单的客户端home页面:home.vue ,用于展示OMCS提供的各个功能。在home页面的onLoad方法中,我们请求了android音视频权限:
onLoad(options) {
    this.query = options;
    this.loginId = this.query.loginid;
    MultimediaManagerFactory.GetSingleton().checkPermission();
},在home页面的onUnload方法中,我们主动断开了OMCS的连接:
onUnload() {
    MultimediaManagerFactory.GetSingleton().close();
},
home页界面如下所示:
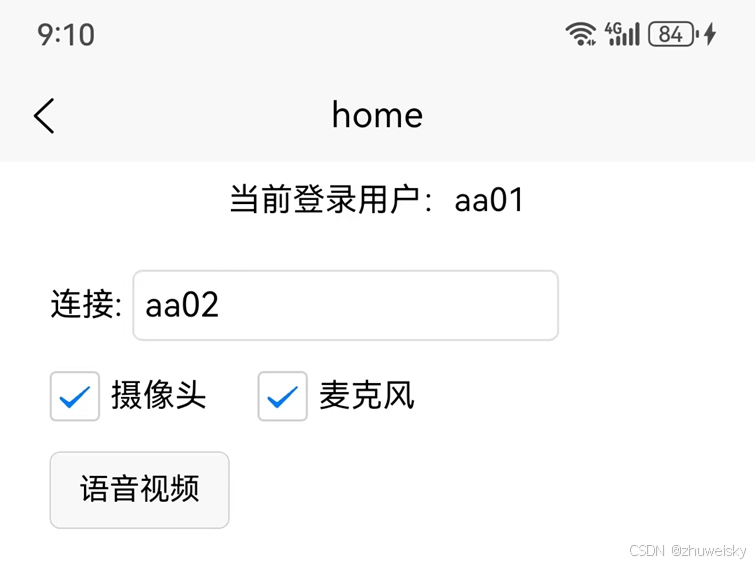
页面上的各个按钮,用于演示OMCS提供的各个多媒体连接器的功能。我们以视讯功能为例,当摄像头和话筒的checkbox都勾选上时,表示连接到目标用户的摄像头和麦克风设备。点击“语音视频”按钮,将跳转至video页面:
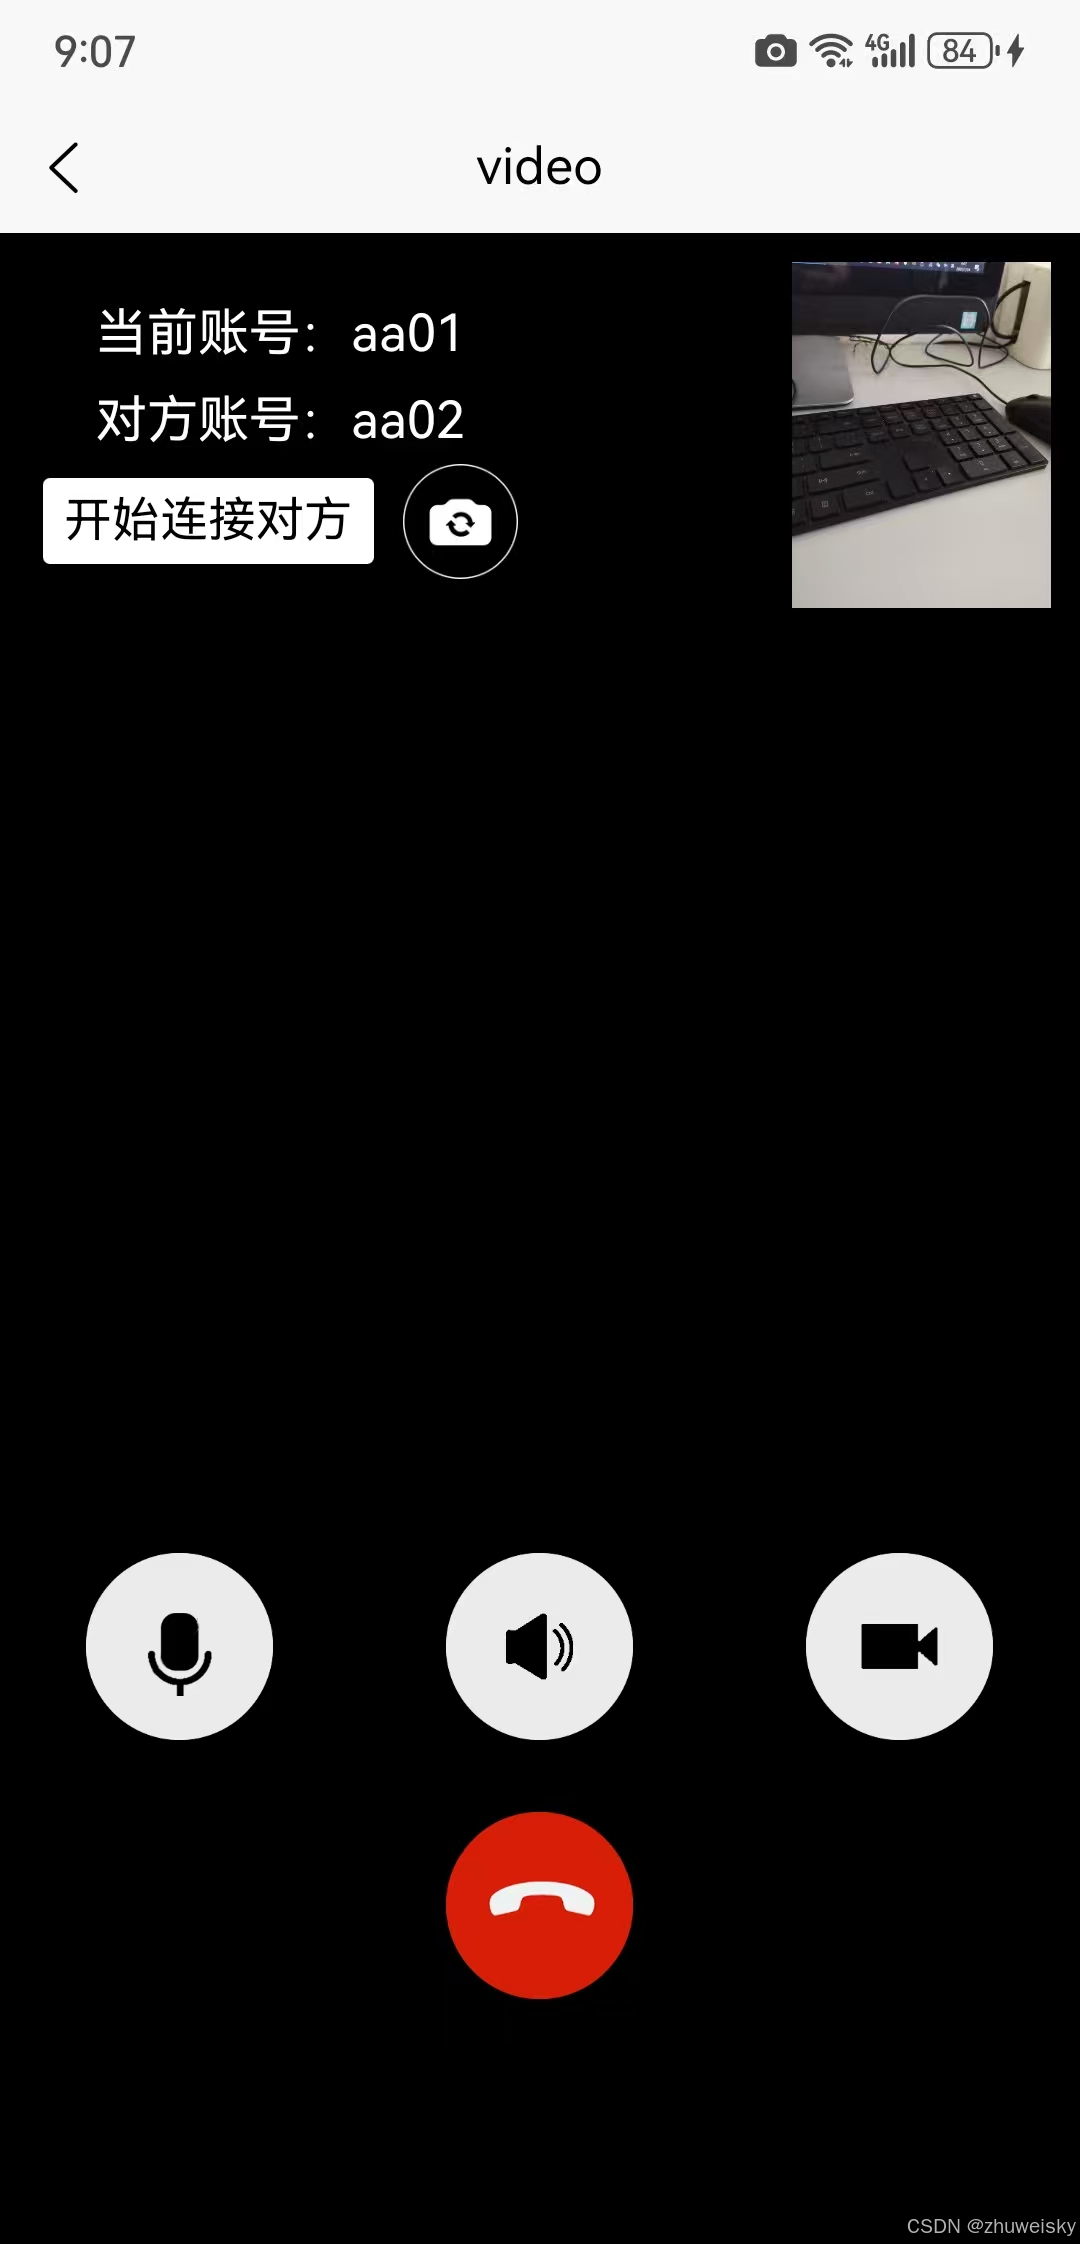
注意:必须勾选摄像头,并进入video页面后(此时将看到自己摄像头的预览画面),其他人才可以连接到自己的摄像头。
3.开始连接
(1)当点击【开始连接对方】按钮时,将连接到对方摄像头和麦克风
(2)我们封装了一个组件UniCameraPanel.nvue,其中使用了OMCS原生控件OMCSSurfaceView作为存放对方视频图像的容器,OMCS原生控件CameraSurfaceView作为存放自己视频预览的容器:
<template>
	<CameraSurfaceView
		ref="camera_self_panel_view"
		v-if="isSelf"
		class="selfVideoView"
		></CameraSurfaceView>
	<OMCSSurfaceView
		ref="camera_other_panel_view"
		v-if="!isSelf"
		class="otherVideoView"
		></OMCSSurfaceView>
</template>(3)video页面使用了UniCameraPanel.nvue控件,根据isSelf属性判断是否为自己预览的摄像头:
<div class="otherView" v-if="isVideo"  @click.stop="changeShowIcon">
    <UniCameraPanelVue
        :isSelf="false"
        ref="otherCameraPanel"
        class="otherVideoView"
    ></UniCameraPanelVue>
</div>
<div class="selfView"  v-if="isVideo" >
    <UniCameraPanelVue
        :isSelf="true"
        ref="selfVideoView"
        class="selfVideoView"
    ></UniCameraPanelVue>
</div>
注意:video页面必须为nvue页面才能使用UniCameraPanel.nvue控件
(4)在video页面OnLoad初始化方法中,我们分别定义了CameraConnector和MicrophoneConnector连接器用于连接目标用户的摄像头和话筒,并通过setConnectorEventListener预定了CameraConnector和MicrophoneConnector的连接结束事件和连接断开事件
onLoad(options) {
    this.query = options;
    this.othername = this.query.destUserID;
    this.username = this.query.username;
    this.isAndroid = uni.getSystemInfoSync().platform == 'android';
    this.isVideo = Boolean(Number(this.query.openCamera));
    if(this.isVideo){
        this.cameraConnector = new CameraConnector(this.query.destUserID);
        this.cameraConnector.setConnectorEventListener(
            this.CameraConnector_ConnectEnded,
            this.CameraConnector_DisConnected
        );
        this.cameraConnector.setVideoDrawMode(VideoDrawMode.Scale);
    };
    if(Boolean(Number(this.query.openMic))){
        this.microphoneConnector = new MicrophoneConnector(this.query.destUserID);
        this.microphoneConnector.setConnectorEventListener(
            this.MicrophoneConnector_ConnectEnded,
            this.MicrophoneConnector_DisConnected
        );
    };
}
注意:CameraConnector连接器需要在OnLoad初始化时创建
(5)在video页面【开始连接对方】按钮点击事件中调用了CameraConnector和MicrophoneConnector连接器的beginConnect方法:
contentOtherBtnClick(){
    if(Boolean(Number(this.query.openCamera))){
        this.cameraConnector.beginConnect();
    };
    if(Boolean(Number(this.query.openMic))){
        this.microphoneConnector.beginConnect();
    };
}
注意:
在调用CameraConnector连接器的beginConnect方法之前需要执行UniCameraPanel控件的SetVideo方法:
SetVideo(_cameraConnector){
    try{
        if(_cameraConnector){
            if(this.isSelf){
                this.$refs.camera_self_panel_view.setVideo();
            }else{
                this.cameraConnector = _cameraConnector;
                const userID = this.cameraConnector.destUserID;
                this.videoDrawMode = this.cameraConnector.videoDrawMode;
                this.$refs.camera_other_panel_view.setVideo({destUserID:userID});
            }
        }
    }catch(e){
        console.log(e)
    }
}4.当退出video页面或者主动断开连接时,需要调用CameraConnector连接器和MicrophoneConnector连接器的disconnect方法,并且通过removeConnectorEventListener方法取消预定的事件,最后还需要调用多媒体管理器的closeCamera方法断开自己的预览摄像头
closeVideo(){
    if(this.cameraConnector){
        this.cameraConnector.disconnect();
        this.cameraConnector.removeConnectorEventListener();
        this.cameraConnector = null;
    }
    if(this.microphoneConnector){
        this.microphoneConnector.disconnect();
        this.microphoneConnector.removeConnectorEventListener();
        this.microphoneConnector = null;
    }
    this.isShowVideo = false;
    MultimediaManagerFactory.GetSingleton().closeCamera();
},
三、源码下载
该Demo的源码下载地址如下:OMCS.UniappDemo.rar (Android、iOS)
至于服务端,我们已经打包好了exe文件,可以下载后直接双击运行:
OMCS 服务端可执行程序(解压后,双击exe即可运行)
Uniapp版本的Demo还可以与PC版本(Windows、银河麒麟、统信UOS)的Demo进行音视频通话,PC版可以转到此处下载。
