HarmonyOs学习 实验六:tabs标签与Swiper轮播图页面设计
在HarmonyOS的开发生态中,构建用户友好的界面是提升应用体验的关键。本次实验将聚焦于使用Tabs标签切换组件与Swiper轮播图组件,打造一个高效且视觉吸引人的多页面应用,并着重讲解模块引入和router页面切换的区别。
一、实验环境
-
开发软件:DevEco Studio
-
操作系统:HarmonyOS
-
API版本:API9
二、实验目的
-
掌握HarmonyOS下Tabs标签切换组件的使用方法,实现多页面的平滑切换。
-
掌握在Tabs标签下,引入其他页面的方式,如模块引入。
-
学会集成Swiper轮播图组件,展示动态内容,增强页面吸引力。
-
理解组件间的数据传递与状态管理,构建完整的应用流程。
三、实现步骤
1.项目初始化
点击Creat Project创建一个项目

按图示步骤点击
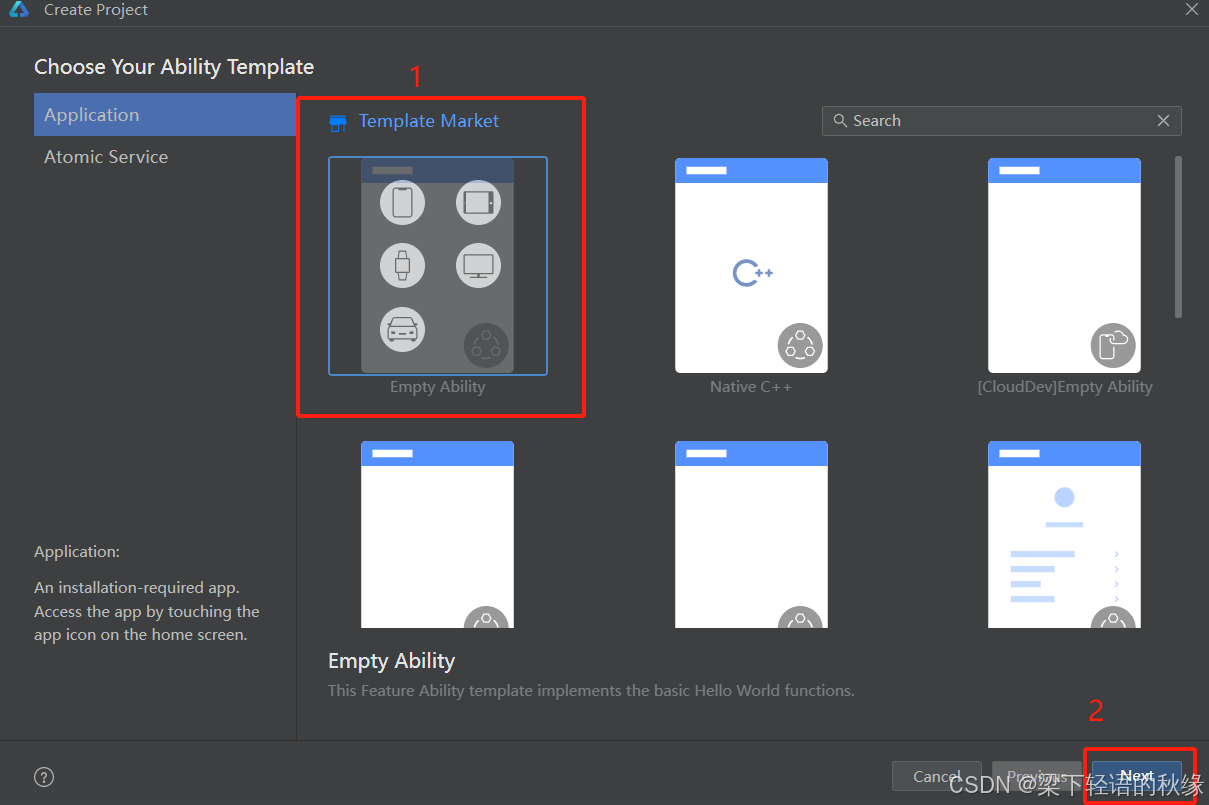
填写项目名、api版本、Model和Node

2.代码编写
1.创建资源文件
在entry/src/main/resources目录下,创建以下资源文件,media的图片需要自己添加,文件名一样即可

下面是color.json
{
  "color": [
    {
      "name": "start_window_background",
      "value": "#FFFFFF"
    },
    {
      "name": "title_color",
      "value": "#333333"
    },
    {
      "name": "subtitle_color",
      "value": "#666666"
    },
    {
      "name": "input_textColor",
      "value": "#333333"
    },
    {
      "name": "input_backgroundColor",
      "value": "#F5F5F5"
    },
    {
      "name": "button_textColor",
      "value": "#FFFFFF"
    },
    {
      "name": "button_backgroundColor",
      "value": "#1890ff"
    },
    {
      "name": "link_color",
      "value": "#1890ff"
    },
    {
      "name": "divider_color",
      "value": "#EEEEEE"
    },
    {
      "name": "other_login_color",
      "value": "#666666"
    },
    {
      "name": "background_color",
      "value": "#FFFFFF"
    },
    {
      "name": "error_color",
      "value": "#FF4444"
    }
  ]
}
下面是string.json
{
  "string": [
    {
      "name": "module_desc",
      "value": "module description"
    },
    {
      "name": "EntryAbility_desc",
      "value": "description"
    },
    {
      "name": "EntryAbility_label",
      "value": "label"
    },
    {
      "name": "login_title",
      "value": "登录界面"
    },
    {
      "name": "login_subtitle",
      "value": "登录帐号以使用更多服务"
    },
    {
      "name": "account_placeholder",
      "value": "请输入账号"
    },
    {
      "name": "password_placeholder",
      "value": "请输入密码"
    },
    {
      "name": "sms_login",
      "value": "短信验证码登录"
    },
    {
      "name": "forget_password",
      "value": "忘记密码"
    },
    {
      "name": "login_button",
      "value": "登录"
    },
    {
      "name": "register",
      "value": "注册帐号"
    },
    {
      "name": "other_login_methods",
      "value": "其他方式登录"
    },
    {
      "name": "method_one",
      "value": "方式一"
    },
    {
      "name": "method_two",
      "value": "方式二"
    },
    {
      "name": "method_three",
      "value": "方式三"
    }
  ]
}
下面是float.json
{
  "float": [
    {
      "name": "title_fontSize",
      "value": "24fp"
    },
    {
      "name": "subtitle_fontSize",
      "value": "14fp"
    },
    {
      "name": "input_height",
      "value": "48vp"
    },
    {
      "name": "input_fontSize",
      "value": "16fp"
    },
    {
      "name": "input_borderRadius",
      "value": "24vp"
    },
    {
      "name": "button_height",
      "value": "48vp"
    },
    {
      "name": "button_fontSize",
      "value": "18fp"
    },
    {
      "name": "button_borderRadius",
      "value": "24vp"
    },
    {
      "name": "link_fontSize",
      "value": "14fp"
    },
    {
      "name": "other_login_fontSize",
      "value": "14fp"
    }
  ]
}
2.页面编辑
创建以下文件,要在同一目录

下面是Index.ets文件,在项目的主页面布局中引入Tabs组件,定义多个标签项,每个标签项对应一个页面内容。通过设置Tabs的属性,如标签文本、初始选中项等,来定制导航栏的外观和行为。通过import { SwpierPage } from './Second'导入其他页面的模块,再在子标签TabContent下调用模块SwpierPage(),实现跳转页面的效果,注意要导入模块
import { SwpierPage } from './Second';
import { LoginPage } from './Third';

@Entry
@Component
struct NavigationExample {

  build() {
    Column() {
      Tabs({ barPosition: BarPosition.End }) {
        TabContent() {
          Text('首页的内容')
            .fontSize(30)
        }
        .tabBar('首页')

        TabContent() {
          SwpierPage();
        }
        .tabBar('推荐')

        TabContent() {
          LoginPage()
        }
        .tabBar("登录")
      }
    }
    .height('100%')
    .width('100%')
    .backgroundColor('#F1F3F5')
  }
}下面是Second.ets文件,在推荐页面的组件中,引入Swiper组件,并配置自动轮播、循环播放等参数。设置合适的轮播间隔时间,确保用户体验流畅,代码export { SwpierPage }导出模块,供Index.ets页面调用,注意导出的模块名称要和结构体相同,如struct SwpierPage{},导出则是export { SwpierPage }
export { SwpierPage };
@Entry
@Component
struct SwpierPage {
  private swiperController: SwiperController = new SwiperController()

  build() {
    Column() {
      //题
      Text('自动轮播图')
        .fontSize(20)
        .fontColor('#000000')
        .margin({ top: 20, bottom: 10 })
        .alignSelf(ItemAlign.Center)

      // 轮播图
      Swiper(this.swiperController) {
        Image($r('app.media.one'))
          .width('90%')
          .height(200)
        Image($r('app.media.two'))
          .width('90%')
          .height(200)
        Image($r('app.media.three'))
          .width('90%')
          .height(200)
        Image($r('app.media.four'))
          .width('90%')
          .height(200)
      }
      .loop(true) // 循环播放
      .autoPlay(true) // 自动轮播
      .interval(3000) // 设置轮播间隔时间,单位毫秒,默认3000
    }
    .width('100%')
    .alignItems(HorizontalAlign.Center) // 设置子元素在水平方向上的对齐方式                                                                 // 设置子元素在水平方向上的对齐方式
  }
}

// 导出组件
下面是Third.ets文件,导出规则如上面的Second.ets文件。构建登录页面,包含账号和密码输入框、登录按钮、以及辅助链接(如短信登录、忘记密码)等元素。具体可以去我的分栏的实验四,点击链接
// LoginPage.ets
export { LoginPage };
@Entry
@Component
struct LoginPage {
  // 定义状态变量
  @State account: string = '' // 账号输入框内容
  @State password: string = '' // 密码输入框内容
  @State isPasswordVisible: boolean = false // 是否显示密码
  @State isLoading: boolean = false // 是否正在加载
  @State errorMessage: string = '' // 提示信息

  // 处理登录按钮点击事件
  handleLogin() {
    if (this.account.trim() === '' || this.password.trim() === '') {
      // 账号或密码为空,提示用户
      this.errorMessage = '请输入账号和密码';
      return;
    }
    // 清空提示信息
    this.errorMessage = '';
    // 模拟登录加载
    this.isLoading = true;
    setTimeout(() => {
      console.log('登录成功');
      this.isLoading = false;
    }, 2000);
  }

  // 切换密码可见性
  togglePasswordVisibility() {
    this.isPasswordVisible = !this.isPasswordVisible;
  }

  build() {
    Column() {
      // Logo 图片
      Image($r('app.media.startIcon'))
        .width('100vp')
        .height('100vp')
        .margin({ top: '50vp' })

      // 标题文本
      Text($r('app.string.login_title'))
        .fontSize($r('app.float.title_fontSize'))
        .fontColor($r('app.color.title_color'))
        .margin({ top: '20vp' })

      // 副标题文本
      Text($r('app.string.login_subtitle'))
        .fontSize($r('app.float.subtitle_fontSize'))
        .fontColor($r('app.color.subtitle_color'))
        .margin({ top: '10vp' })

      // 账号输入框
      TextInput({ placeholder: $r('app.string.account_placeholder') })
        .width('90%')
        .height($r('app.float.input_height'))
        .margin({ top: '30vp' })
        .fontColor($r('app.color.input_textColor'))
        .fontSize($r('app.float.input_fontSize'))
        .borderRadius($r('app.float.input_borderRadius'))
        .backgroundColor($r('app.color.input_backgroundColor'))
        .onChange((value) => {
          this.account = value;
        })

      // 密码输入框
      TextInput({ placeholder: $r('app.string.password_placeholder') })
        .width('90%')
        .height($r('app.float.input_height'))
        .margin({ top: '20vp' })
        .fontColor($r('app.color.input_textColor'))
        .fontSize($r('app.float.input_fontSize'))
        .borderRadius($r('app.float.input_borderRadius'))
        .backgroundColor($r('app.color.input_backgroundColor'))
        .type(this.isPasswordVisible ? InputType.Normal : InputType.Password)
        .onChange((value) => {
          this.password = value;
        })

      // 密码可见性切换按钮
      Button() {
        Text('切换可见性')
          .width('200vp')
          .height('20vp')
          .fontColor($r('app.color.button_textColor')) // 设置字体颜色
          .textAlign(TextAlign.Center)
      }
      .width('200vp')
      .height('50vp')
      //.margin({ left: '75%' })
      .margin({ top: '20vp' })
      .onClick(() => {
        this.togglePasswordVisibility();
      })

      // 辅助链接行
      Row() {
        Text($r('app.string.sms_login'))
          .fontSize($r('app.float.link_fontSize'))
          .fontColor($r('app.color.link_color'))
        Text($r('app.string.forget_password'))
          .fontSize($r('app.float.link_fontSize'))
          .fontColor($r('app.color.link_color'))
      }
      .justifyContent(FlexAlign.SpaceBetween)
      .width('100%')
      .margin({ top: '20vp' })

      // 提示信息
      if (this.errorMessage) {
        Text(this.errorMessage)
          .fontSize($r('app.float.link_fontSize'))
          .fontColor($r('app.color.error_color'))
          .margin({ top: '10vp' })
      }

      // 登录按钮
      Button($r('app.string.login_button'))
        .width('90%')
        .height($r('app.float.button_height'))
        .margin({ top: '30vp' })
        .fontColor($r('app.color.button_textColor'))
        .fontSize($r('app.float.button_fontSize'))
        .borderRadius($r('app.float.button_borderRadius'))
        .backgroundColor($r('app.color.button_backgroundColor'))
        .onClick(() => {
          this.handleLogin();
        })

      // 注册账号链接
      Text($r('app.string.register'))
        .fontSize($r('app.float.link_fontSize'))
        .fontColor($r('app.color.link_color'))
        .margin({ top: '20vp' })

      // 底部分割线
      Divider()
        .strokeWidth(1)
        .color($r('app.color.divider_color'))
        .margin({ top: '40vp' })

      // 其他登录方式文本
      Text($r('app.string.other_login_methods'))
        .fontSize($r('app.float.other_login_fontSize'))
        .fontColor($r('app.color.other_login_color'))
        .margin({ top: '20vp' })

      // 其他登录方式按钮行
      Row() {
        Button($r('app.string.method_one'))
          .width('25vp')
          .height('25vp')
          .borderRadius('12.5vp')
        Button($r('app.string.method_two'))
          .width('25vp')
          .height('25vp')
          .borderRadius('12.5vp')
          .margin({ left: '20vp' })
        Button($r('app.string.method_three'))
          .width('25vp')
          .height('25vp')
          .borderRadius('12.5vp')
          .margin({ left: '20vp' })
      }
      .justifyContent(FlexAlign.Center)
      .width('100%')
      .margin({ top: '20vp' })
    }
    .width('100%')
    .height('100%')
    .padding({ left: '20vp', right: '20vp' })
    .backgroundColor($r('app.color.background_color'))
  }
}
3.效果展示
首页

推荐页,自动轮播图功能

登录页面

通过本次实验,成功实现了三个主要页面的切换和展示:
-
首页:简洁展示“首页的内容”文字信息,作为基础页面的示例。
-
推荐页面:顶部显示“自动轮播图”标题,下方呈现循环自动播放的轮播图,吸引用户目光。
-
登录页面:包含完整的登录表单和辅助选项,界面友好且功能完备。
4.模块引入和Router路由页面切换比较
- 模块引入页面切换,简单来说就是将一个以及编辑好的页面文件XXX.ets封装成一个模块,供其他页面调用,如本实验已经编辑好的页面可以给tabs标签的子组件TabContent调用,这样的好处是可以保留Tabs标签的下栏,即TabBar,在画面上更加柔美。

- Router路由页面切换,就是通过触发事件,来实现页面的跳转,事实上,Router跟本实验的Tabs标签并不是很契合,如果使用Router来作为各个标签TabContent的切换方法,会有以下两个缺点。
缺点一:需要额外点击按钮实现跳转
某个标签的TabContent内容,用Router表示如下

效果如下,点击Next按钮后跳转

缺点二:切换的页面没有保留tabs标签下栏

- 总之,对于 tabs 标签页面切换场景,模块引入方式明显更优。它不仅能保留标签下栏,保持界面美观,而且代码更简洁,实现更高效。相比之下,Router 路由方式在该场景下显得繁琐,且会导致界面不完整,影响用户体验。
四、实验总结
本次实验让我深入理解了HarmonyOS下Tabs标签切换和Swiper轮播图组件的使用方法和应用场景。通过合理运用这些组件,能够显著提升HarmonyOS应用的用户体验和信息展示效果。