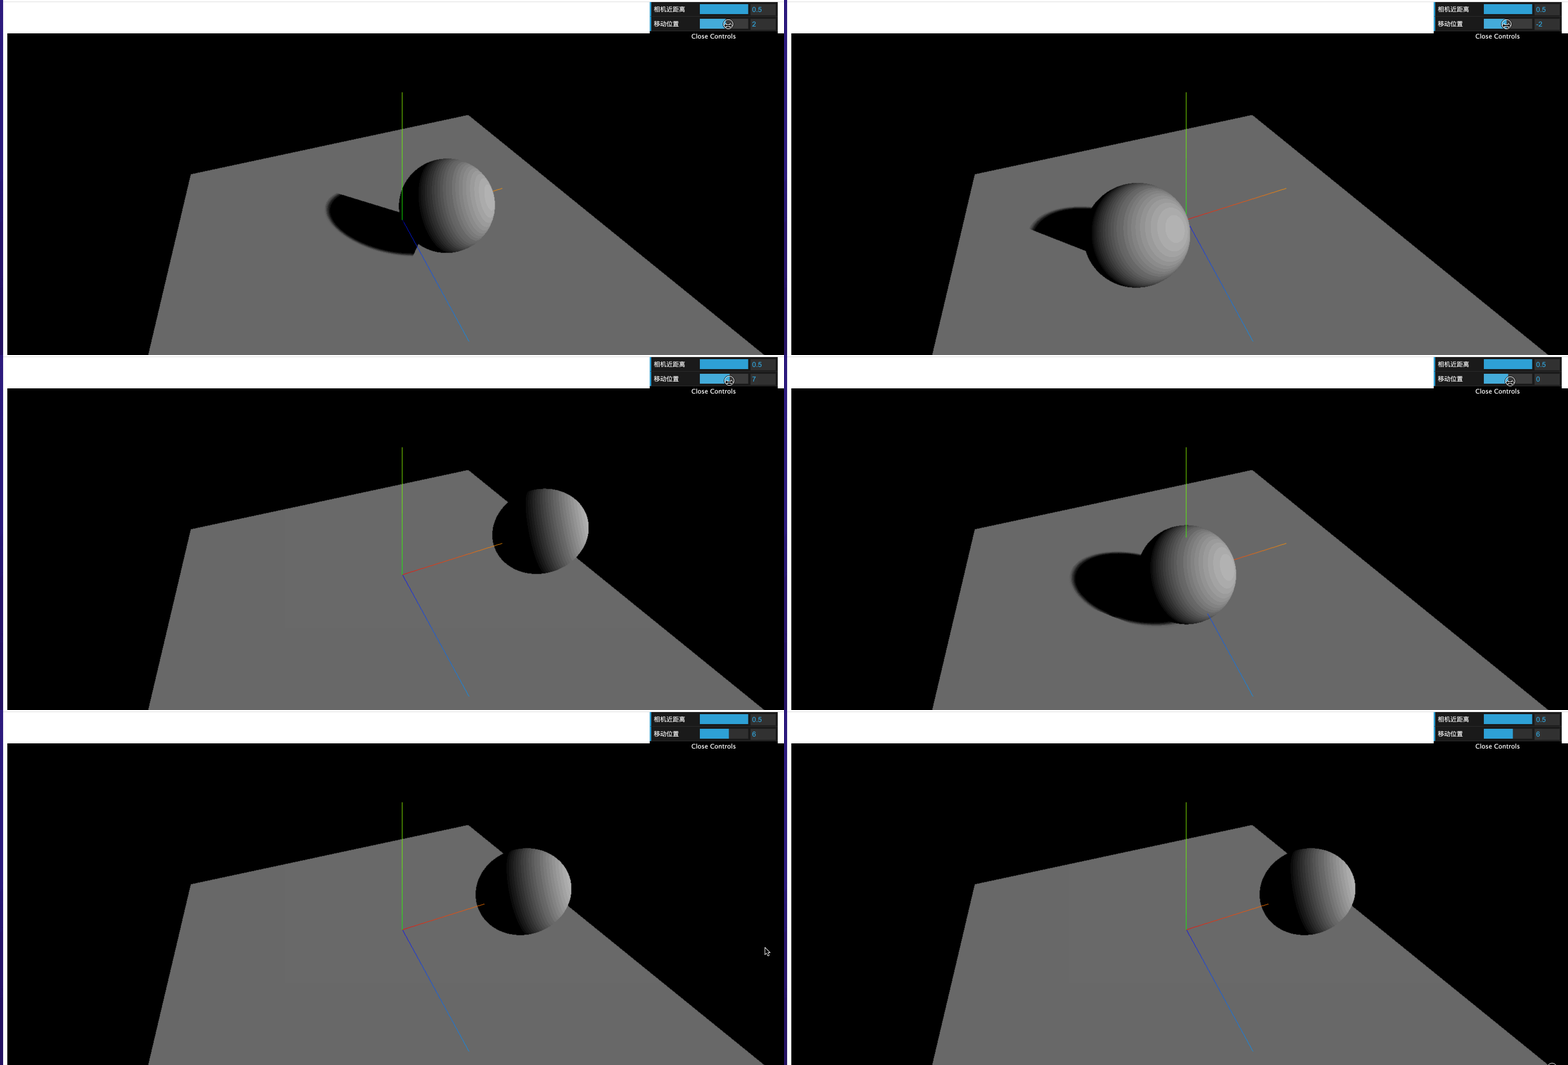
ThreeJS-平行光物体投影(十九)
平行光源(太阳光)
关键代码:
//平行光投射相机的属性
// directionalLight.shadow.camera.near= 0.5;
directionalLight.shadow.camera.far= 500;
directionalLight.shadow.camera.top= 3;
directionalLight.shadow.camera.bottom= -2;
directionalLight.shadow.camera.left= -2;
directionalLight.shadow.camera.right= 2;
//创建gui
const gui = new dat.GUI();
gui.add(directionalLight.shadow.camera, 'near').min(1).max(25).step(1).name("相机近距离").onChange( () => {
directionalLight.shadow.camera.updateProjectionMatrix();
})
gui.add(mesh.position, 'x').min(-30).max(30).step(1).name("移动位置");
完整代码:
<template>
<div id="three_div"></div>
</template><script>
import * as dat from 'dat.gui' //界面控制
import * as THREE from "three";
import {
OrbitControls
} from "three/examples/jsm/controls/OrbitControls";
import {
RGBELoader
} from "three/examples/jsm/loaders/RGBELoader"
export default {
name: "HOME",
components: {
// vueQr,
// glHome,
},
data() {
return {};
},
mounted() {
//使用控制器控制3D拖动旋转OrbitControls
//控制3D物体移动//1.创建场景
const scene = new THREE.Scene();
console.log(scene);//2.创建相机
const camera = new THREE.PerspectiveCamera(
75,
window.innerWidth / window.innerHeight,
0.1,
1000
);
//设置相机位置
camera.position.set(0, 0, 10);
//将相机添加到场景
scene.add(camera);
//添加物体
//创建一个半径为1,经纬度分段数位20的球
const cubeGeometry = new THREE.SphereBufferGeometry(2, 100, 100);
//纹理加载器加载图片
const cubeMaterial = new THREE.MeshStandardMaterial({
//side: THREE.DoubleSide,
});
//根据几何体和材质创建物体
const mesh = new THREE.Mesh(cubeGeometry, cubeMaterial);
//将物体加入到场景
scene.add(mesh);//创建平面几何体
const planeGeometry = new THREE.PlaneBufferGeometry(20, 20);
//创建平面物体
const planeMesh = new THREE.Mesh(planeGeometry, cubeMaterial);
planeMesh.position.set(0, -2, 0);
planeMesh.rotation.x = -Math.PI / 2;
//场景添加平面物体
scene.add(planeMesh);//给场景所有的物体添加默认的环境贴图
//添加坐标轴辅助器
const axesHepler = new THREE.AxesHelper(5);
scene.add(axesHepler);
//标准材质需要借助灯光//添加周围环境灯光(由物体发出的灯光)参数(灯色,强度0-1)
// const light = new THREE.AmbientLight(0xFFFFFF, 0.7);
// scene.add(light);
//直线光(由光源发出的灯光)
const directionalLight = new THREE.DirectionalLight(0xFFFFFF, 0.7);
directionalLight.position.set(10, 10, 10);
scene.add(directionalLight);//添加平面
// const planeGeometry = new THREE.PlaneBufferGeometry(1, 1);
// const mesh2 = new THREE.Mesh(planeGeometry, cubeMaterial);
// mesh2.position.set(0, 0, 3);// scene.add(mesh2);
//初始化渲染器
const render = new THREE.WebGLRenderer();
//设置渲染器的尺寸
render.setSize(window.innerWidth, window.innerHeight);
//使用渲染器,通过相机将场景渲染进来//创建轨道控制器,可以拖动,控制的是摄像头
const controls = new OrbitControls(camera, render.domElement);
//设置控制阻尼,让控制器有更真实的效果
controls.enableDamping = true;
//开启投影
//开启渲染器投影
render.shadowMap.enabled = true;
//开启灯光动态投影
directionalLight.castShadow = true;
//开启物体投影
mesh.castShadow = true;
//开启平面接受投影
planeMesh.receiveShadow = true;
//投影模糊度
directionalLight.shadow.radius = 20;
//设置投影的宽度和高度
directionalLight.shadow.mapSize.set(1024, 1024);//平行光投射相机的属性
// directionalLight.shadow.camera.near= 0.5;
directionalLight.shadow.camera.far= 500;
directionalLight.shadow.camera.top= 3;
directionalLight.shadow.camera.bottom= -2;
directionalLight.shadow.camera.left= -2;
directionalLight.shadow.camera.right= 2;
//创建gui
const gui = new dat.GUI();
gui.add(directionalLight.shadow.camera, 'near').min(1).max(25).step(1).name("相机近距离").onChange( () => {
directionalLight.shadow.camera.updateProjectionMatrix();
})
gui.add(mesh.position, 'x').min(-30).max(30).step(1).name("移动位置");
//将webgl渲染的canvas内容添加到body上
document.getElementById("three_div").appendChild(render.domElement);//渲染下一帧的时候就会调用回调函数
let renderFun = () => {
//更新阻尼数据
controls.update();
//需要重新绘制canvas画布
render.render(scene, camera);
//监听屏幕刷新(60HZ,120HZ),每次刷新触发一次requestAnimationFrame回调函数
//但是requestAnimationFrame的回调函数注册生命只有一次,因此需要循环注册,才能达到一直调用的效果
window.requestAnimationFrame(renderFun);
};
// window.requestAnimationFrame(renderFun);
renderFun();//画布全屏
window.addEventListener("dblclick", () => {
if (document.fullscreenElement) {
document.exitFullscreen();
} else {
//document.documentElement.requestFullscreen();
render.domElement.requestFullscreen();
}
});//监听画面变化,更新渲染画面,(自适应的大小)
window.addEventListener("resize", () => {
//更新摄像机的宽高比
camera.aspect = window.innerWidth / window.innerHeight;
//更新摄像机的投影矩阵
camera.updateProjectionMatrix();
//更新渲染器宽度和高度
render.setSize(window.innerWidth, window.innerHeight);
//设置渲染器的像素比
render.setPixelRatio(window.devicePixelRatio);
console.log("画面变化了");
});
},
methods: {
paush(animate) {
animate.pause();
},
},
};
</script><style scoped lang="scss">
</style>
效果图:

