Android如何做出带有复杂水印的图片
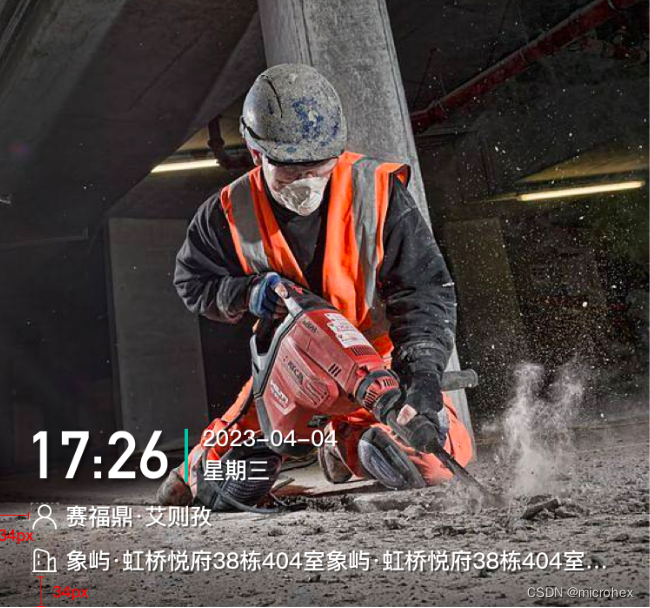
最近项目中存在图片加水印效果的需求,具体效果如下:

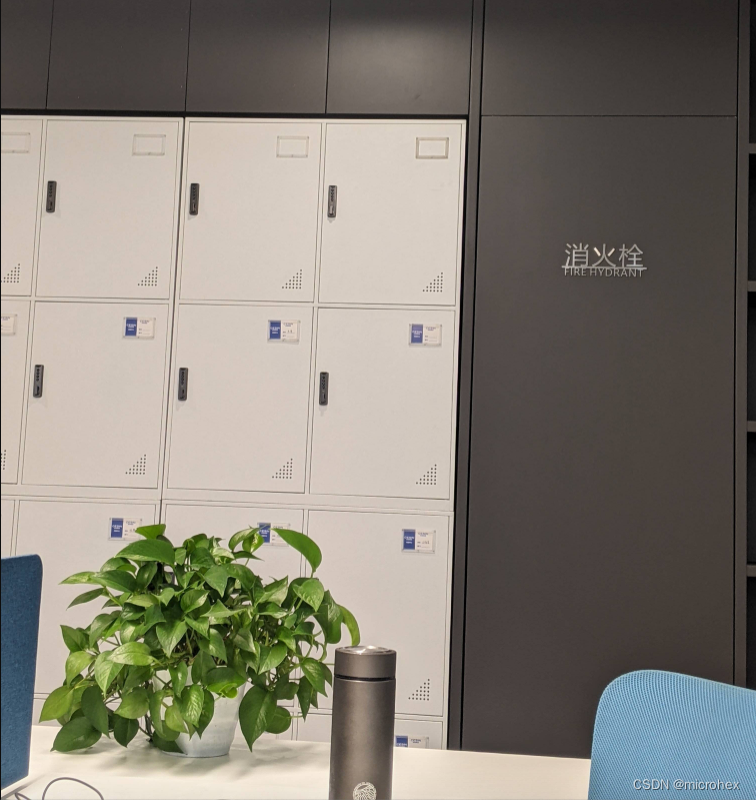
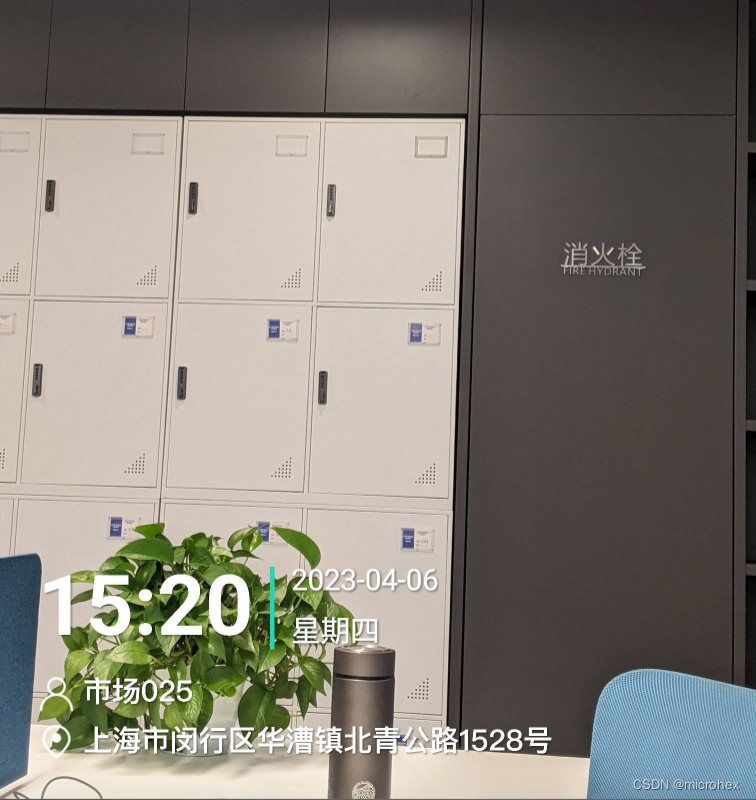
然后做出来的效果如下:
| 原图 | 水印图 |
|---|---|
 |  |
点击可以查看大图:大图
那么针对这种比较复杂的水印图片,应该如何去做呢?下面我分享一下自己的思路。
如果没有使用到NDK,单纯的使用Android提供的Canvas画布,那么就有一下几个步骤:
- 获取原始的图片地址,转化成为 sourceBitmap;
- 获取水印图片的Bitmap;
- 使用Canvas,将sourceBitmap作为底片,然后将水印Bitmap画上去;
- 然后将二者合并的Bitmap,保存成文件即可。
那么按照这个步骤来:
1. 原始图片赚Bitmap
这个一般很简单,用代码表示为:
Bitmap sourceBitmap = BitmapFactory.decodeFile(sourcePath);
2. 获取水印图片的Bitmap
对于复杂的水印图片,我现在的做法是,把水印图片转化成一个View,然后把View转成Bitmap。
比如上图的复杂水印图片,我们可以先画一个XML:
<androidx.constraintlayout.widget.ConstraintLayout xmlns:android="http://schemas.android.com/apk/res/android"
    xmlns:app="http://schemas.android.com/apk/res-auto"
    android:layout_width="match_parent"
    android:layout_height="wrap_content"
    android:padding="@dimen/dp_18">

    <TextView
        android:id="@+id/id_tv_time"
        android:layout_width="wrap_content"
        android:layout_height="wrap_content"
        android:textSize="40sp"
        style="@style/phone_water_mark_text_style"
        android:textStyle="bold"
        app:layout_constraintStart_toStartOf="parent"
        app:layout_constraintTop_toTopOf="parent" />

    <View
        android:layout_width="@dimen/dp_2"
        app:layout_constraintTop_toTopOf="@id/id_tv_time"
        app:layout_constraintBottom_toBottomOf="@id/id_tv_time"
        app:layout_constraintStart_toEndOf="@id/id_tv_time"
        android:layout_marginStart="@dimen/dp_8"
        android:background="@color/app_theme_color"
        android:id="@+id/id_center_view"
        android:layout_marginTop="@dimen/dp_10"
        android:layout_marginBottom="@dimen/dp_4"
        android:layout_height="0dp"/>

    <TextView
        android:layout_width="wrap_content"
        app:layout_constraintTop_toTopOf="@id/id_tv_time"
        app:layout_constraintStart_toEndOf="@id/id_center_view"
        android:layout_marginStart="@dimen/dp_8"
        android:textSize="14sp"
        style="@style/phone_water_mark_text_style"
        android:layout_marginTop="@dimen/dp_6"
        android:id="@+id/id_tv_date"
        android:layout_height="wrap_content"/>

    <TextView
        android:layout_width="wrap_content"
        app:layout_constraintBottom_toBottomOf="@id/id_tv_time"
        app:layout_constraintStart_toStartOf="@id/id_tv_date"
        style="@style/phone_water_mark_text_style"
        android:textSize="14sp"
        android:id="@+id/id_tv_week"
        android:layout_marginBottom="@dimen/dp_4"
        android:layout_height="wrap_content"/>

    <LinearLayout
        android:layout_width="0dp"
        android:orientation="vertical"
        app:layout_constraintTop_toBottomOf="@id/id_tv_time"
        android:layout_marginTop="@dimen/dp_8"
        app:layout_constraintStart_toStartOf="@id/id_tv_time"
        app:layout_constraintEnd_toEndOf="parent"
        android:id="@+id/id_external_info_layout"
        android:layout_height="wrap_content">

		<TextView
		android:layout_width="wrap_content"
        android:layout_height="wrap_content"
        android:id="@+id/id_tv_user_name"
		/>

		<TextView
		android:layout_width="wrap_content"
        android:layout_height="wrap_content"
        android:id="@+id/id_tv_user_location"		/>

	</LinearLayout>

</androidx.constraintlayout.widget.ConstraintLayout>
XML解析之后,大致的轮廓我们可以看到:

我们可以看到,XML渲染的大致轮廓就出来了,那么应该如果将View转成Bitmap呢?其实Android早就提供了类似的方法:
    fun getCurrentBitmap(): Bitmap? {
        invalidate()

        val density = resources.displayMetrics.density
        BaseLog.d("density = $density")

        val bitmapWidth = (width * density).toInt()
        val bitmapHeight = (height * density).toInt()

        val resultBitmap = Bitmap.createBitmap(bitmapWidth, bitmapHeight, Bitmap.Config.ARGB_8888)
        val canvas = Canvas(resultBitmap)
        canvas.scale(density, density)
        draw(canvas)

        return  resultBitmap
    }
代码中我新增了 density,这是为了防止不同屏幕密度下UI效果不同做的一个缩放。
3.4. Bitmap上面画水印Bitmap, 然后保存
还是先上代码吧,注释也比较清晰:
/**
     * 添加水印
     *
     * @param sourcePath 原始图片地址
     * @param watermarkBitmap 图片水印
     * @return 添加水印后的图片地址
     */
    public String addWaterMarkLayout(String sourcePath, Bitmap watermarkBitmap) {
        // 检查文件是否存在
        if (!BaseFileUtils.isFileExist(sourcePath)) {
            return sourcePath;
        }

        // 检查水印图片是否存在
        if (null == watermarkBitmap){
            BaseLog.e("watermark bitmap is null");
            return sourcePath ;
        }

        int[] bitmapWidthHeight = BaseImageUtils.getBitmapWidthHeight(sourcePath);
        if (bitmapWidthHeight[0] <= 0 || bitmapWidthHeight[1] <= 0) {
            return sourcePath;
        }

        Bitmap sourceBitmap = BitmapFactory.decodeFile(sourcePath);
        if (null == sourceBitmap){
            BaseLog.e("source bitmap is null : " + sourcePath);
            return sourcePath;
        }

		//创建一个底仓Bitmap
        Bitmap copiedBitmap = Bitmap.createBitmap(sourceBitmap.getWidth(), sourceBitmap.getHeight(), Bitmap.Config.ARGB_8888);

        Canvas targetCanvas = new Canvas(copiedBitmap);

        targetCanvas.setDrawFilter(new PaintFlagsDrawFilter(0, Paint.ANTI_ALIAS_FLAG | Paint.FILTER_BITMAP_FLAG));

        targetCanvas.drawBitmap(sourceBitmap, 0,0,null);

		// 获取watermarkBitmap 和 sourceBitmap之间的比例,好进行缩放
        int[] getSample          = checkSample(sourceBitmap, watermarkBitmap, BaseImageUtils.getOrientation(sourcePath));

        float scaleWidth =  getSample[0] * 1.0f  / watermarkBitmap.getWidth();
        float scaleHeight = getSample[1] * 1.0f / watermarkBitmap.getHeight();

        // CREATE A MATRIX FOR THE MANIPULATION
        Matrix matrix = new Matrix();
        // RESIZE THE BIT MAP
        matrix.postScale(scaleWidth, scaleHeight);

        //true : 以启用双线性过滤 为了就是不产生锯齿
        Bitmap scaledBitmap  = Bitmap.createBitmap(watermarkBitmap,0,0,watermarkBitmap.getWidth(),watermarkBitmap.getHeight(),matrix,true);

        Paint canvasPaint = new Paint();
        //抗锯齿
        canvasPaint.setAntiAlias(true);
        //双线性过滤
        canvasPaint.setFilterBitmap(true);

		// 画目标水印Bitmap
		// 因为是画的位置是 左下角,因此x为0,y为底座Bitmap的高度 - 缩放之后的水印Bitmap的高度
        targetCanvas.drawBitmap(scaledBitmap, 0, copiedBitmap.getHeight() - getSample[1], canvasPaint);

		//创建一个新的临时地址,请来保存合并之后的Bitmap
        String newWaterMarkPath = BaseIOUtils.getTempImageFilePath(context);

		//保存合并之后的Bitmap到临时文件
        LzMarkBitmapUtils.saveBitmapToFile(copiedBitmap, newWaterMarkPath,85);

        bitmapWidthHeight = BaseImageUtils.getBitmapWidthHeight(newWaterMarkPath);

        if (bitmapWidthHeight[0] > 0 && bitmapWidthHeight[1] > 0) {
            //不能删除原始图片,因为Android系统会拦截
            BaseIOUtils.renameUnusedFileData(sourcePath);
            return newWaterMarkPath;
        }

        BaseLog.e("bitmapWidthHeight error");
        return sourcePath;
    }

    private int[] checkSample(Bitmap sourceBitmap, Bitmap waterMarkBitmap, int getOrientation) {
        int sourceBitmapWidth  = sourceBitmap.getWidth();
        int sourceBitmapHeight = sourceBitmap.getHeight();

        int waterMarkWidth     = waterMarkBitmap.getWidth();
        int waterMarkHeight    = waterMarkBitmap.getHeight();

        BaseLog.i("sample:" + sourceBitmapWidth + "," + sourceBitmapHeight+ "," + waterMarkWidth + "," + waterMarkHeight + "," + getOrientation);

        if (getOrientation == 90 || getOrientation == 270){ //横向
            sourceBitmapWidth = sourceBitmap.getHeight();

            if (waterMarkWidth > sourceBitmapWidth * 0.5f){
                waterMarkWidth = (int) (sourceBitmapWidth * 0.65f);
                waterMarkHeight = waterMarkBitmap.getHeight() * waterMarkWidth / waterMarkBitmap.getWidth();
            }

        } else  {

            if (waterMarkWidth > sourceBitmapWidth * 0.8f) {
                waterMarkWidth = (int) (sourceBitmapWidth * 0.8f);
                waterMarkHeight = waterMarkBitmap.getHeight() * waterMarkWidth / waterMarkBitmap.getWidth();
            }
        }


        BaseLog.i("show the water mark width :" + waterMarkWidth + "," + waterMarkHeight);

        return new int[]{(int) (waterMarkWidth * 1.3f), (int) (waterMarkHeight * 1.3f)};
    }
使用过程中出现的问题
1. 压缩问题
生成的水印图片需要上传到服务器的,为了节省带宽和流量,因此压缩是必不可少少的。我在很长一段时间内,采取的步骤为:
原始Bitmap + 水印Bitmap -> 生成带有水印的图片 -> 压缩 -> 上传
发现效果比较差,水印比较模糊,尝试了很多种方法,比如使用Paint防锯齿,先放大水印图片等等,但是效果不是很好,后来采取了另外一种思路:
原始Bitmap -> 压缩 -> 保存成文件 -> 转化成新的Bitmap + 水印Bitmap -> 合成新的Bitmap -> 保存成JPG文件 -> 上传
和上面的思路换了之后,我只合成压缩之后的Bitmap,对水印的Bitmap不进行压缩,发现效果很好。
2. 字体比较小的TextView比较模糊
对于View上的TextView如果设置字体比较小,生成的Bitmap合并之后会发现比较模糊,这可能是因为View的分辨率和最终生成的Bitmap分辨率不一致所导致的。为了解决这个问题,可以从以下几个点考虑:
- 调整View的分辨率
当创建水印Bitmap时,确保View的尺寸与水印Bitmap的尺寸一致。你可以通过设置View的LayoutParams来调整View的尺寸
- 使用高质量的缩放方法
在使用Bitmap.createBitmap()时,确保使用高质量的缩放方法来生成带有水印的图片。使用Bitmap.createScaledBitmap()方法可以实现这一目的。
Bitmap originalBitmap = ...; // 原始图片
Bitmap watermarkBitmap = ...; // 水印图片
int watermarkWidth = watermarkBitmap.getWidth();
int watermarkHeight = watermarkBitmap.getHeight();

// 缩放水印图片
int newWatermarkWidth = ...; // 新的水印宽度
int newWatermarkHeight = ...; // 新的水印高度
Bitmap scaledWatermarkBitmap = Bitmap.createScaledBitmap(watermarkBitmap, newWatermarkWidth, newWatermarkHeight, true);
- 使用适当的质量参数进行Bitmap保存
在将Bitmap保存为JPEG或PNG格式的图片时,确保使用适当的质量参数。一般情况下,JPEG的质量参数范围是0-100,PNG是无损压缩,质量参数对其没有影响。
Bitmap finalBitmap = ...; // 最终生成的带有水印的图片
FileOutputStream outputStream = ...; // 输出流
int quality = 100; // 质量参数

finalBitmap.compress(Bitmap.CompressFormat.JPEG, quality, outputStream);
基本上一个稍微负责的水印图片,我们基本上就成功了,如果有什么疑问或者有什么错误,请及时指出,或者可以联系我wx:javainstalling,备注:水印 即可。
