深度学习——图像分类(CIFAR-10)
深度学习——图像分类(CIFAR-10)
文章目录
- 前言
- 一、实现图像分类
- 1.1. 获取并组织数据集
- 1.2. 划分训练集、验证集
- 1.3. 图像增广
- 1.4. 引入数据集
- 1.5. 定义模型
- 1.6. 定义训练函数
- 1.7. 训练模型并保存模型参数
- 二、生成一个桌面小程序
- 2.1. 使用QT设计师设计界面
- 2.2. 代码实现
- 总结
前言
CIFAR-10数据集是一个常用的图像分类数据集,数据集的类别包括:飞机、汽车、鸟类、猫、鹿、狗、青蛙、马、船和卡车。
本章将使用Resnet18模型来对图像进行分类,并形成一个小的exe程序。
参考书:
《动手学深度学习》
参考文章
一、实现图像分类
以下模型训练皆在kaggle中
1.1. 获取并组织数据集
直接在kaggle官网的CIFAR-10竞赛中下载压缩包,得到图像数据集(图像为png格式)。
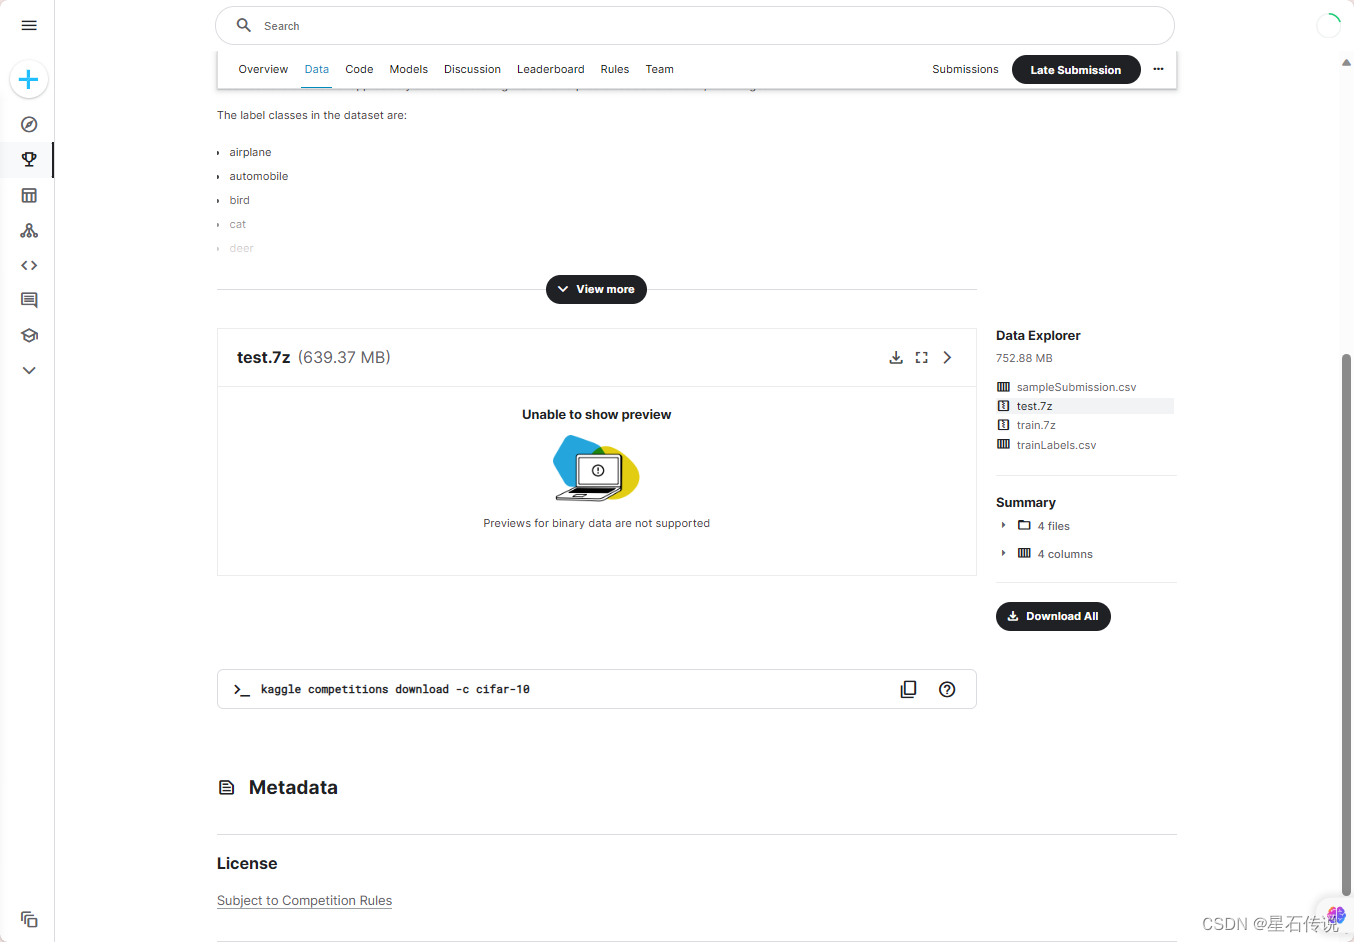
将下载后的压缩包导入kaggle中的自己的notebook中
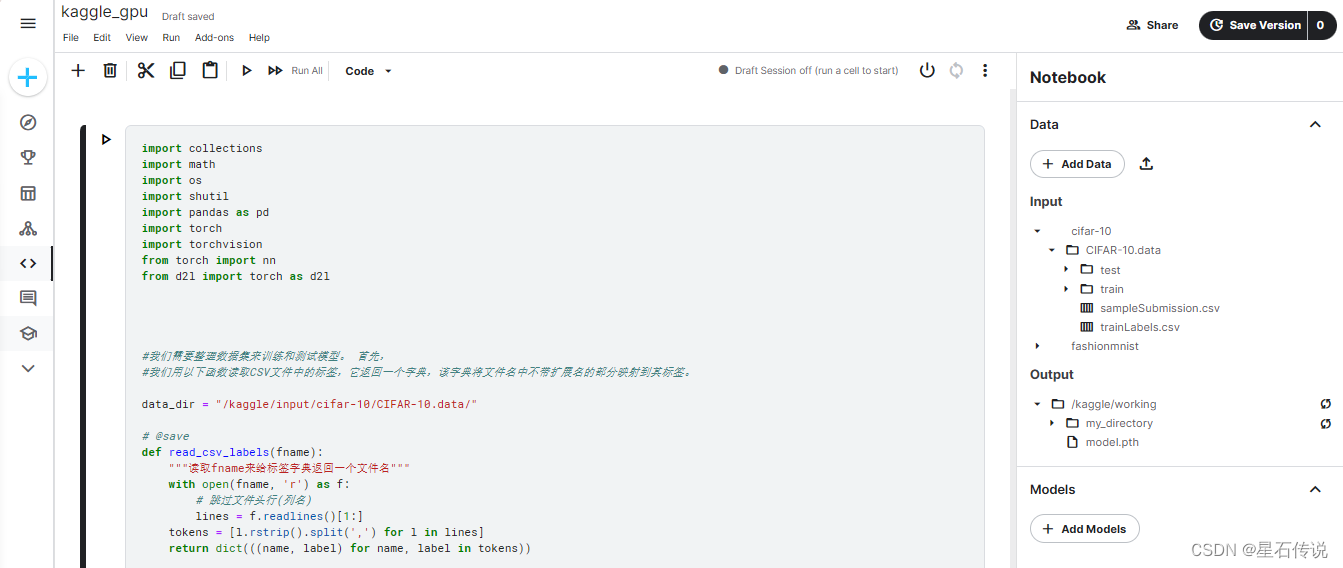
将train文件夹中的图像与其对应的标签文件trainLabels.csv对应,形成字典格式
import collections
import math
import os
import shutil
import pandas as pd
import torch
import torchvision
from torch import nn
from d2l import torch as d2l


#我们用以下函数读取CSV文件中的标签,它返回一个字典,该字典将文件名中不带扩展名的部分映射到其标签。

data_dir = "/kaggle/input/cifar-10/CIFAR-10.data/"

# @save
def read_csv_labels(fname):
    """读取fname来给标签字典返回一个文件名"""
    with open(fname, 'r') as f:
        # 跳过文件头行(列名)
        lines = f.readlines()[1:]
    tokens = [l.rstrip().split(',') for l in lines]
    return dict(((name, label) for name, label in tokens))

labels = read_csv_labels(os.path.join(data_dir, 'trainLabels.csv'))
print('# 训练样本 :', len(labels))
print('# 类别 :', len(set(labels.values())))
1.2. 划分训练集、验证集
为了确保验证集是从原始训练集中的每一类的10%,我们将原始的文件复制到新的目录,再来划分。
target_dir = '/kaggle/working/my_directory'

#我们定义reorg_train_valid函数来将验证集从原始的训练集中拆分出来。
#此函数中的参数valid_ratio是验证集中的样本数与原始训练集中的样本数之比。

def copyfile(filename, target_dir):
    """将文件复制到目标目录"""
    os.makedirs(target_dir, exist_ok=True)
    shutil.copy(filename, target_dir)

def reorg_train_valid(data_dir, labels, valid_ratio):
    """将验证集从原始的训练集中拆分出来"""
    # 训练数据集中样本最少的类别中的样本数
    n = collections.Counter(labels.values()).most_common()[-1][1]
    # 验证集中每个类别的样本数
    n_valid_per_label = max(1, math.floor(n * valid_ratio))
    label_count = {}
    for train_file in os.listdir(os.path.join(data_dir, 'train')):
        label = labels[train_file.split('.')[0]]
        fname = os.path.join(data_dir, 'train', train_file)
        copyfile(fname, os.path.join(target_dir, 'train_valid_test',
                                     'train_valid', label))
        if label not in label_count or label_count[label] < n_valid_per_label:
            copyfile(fname, os.path.join(target_dir, 'train_valid_test',
                                         'valid', label))
            label_count[label] = label_count.get(label, 0) + 1
        else:
            copyfile(fname, os.path.join(target_dir, 'train_valid_test',
                                         'train', label))
    return n_valid_per_label


#下面的reorg_test函数用来在预测期间整理测试集,以方便读取。
def reorg_test(data_dir):
    """在预测期间整理测试集,以方便读取"""
    for test_file in os.listdir(os.path.join(data_dir, 'test')):
        copyfile(os.path.join(data_dir, 'test', test_file),
                 os.path.join(target_dir, 'train_valid_test', 'test',
                              'unknown'))

#最后,我们使用一个函数来调用前面定义的函数read_csv_labels、reorg_train_valid和reorg_test
def reorg_cifar10_data(data_dir, valid_ratio):
    labels = read_csv_labels(os.path.join(data_dir, 'trainLabels.csv'))
    reorg_train_valid(data_dir, labels, valid_ratio)
    reorg_test(data_dir)

#我们将10%的训练样本作为调整超参数的验证集
batch_size = 128
valid_ratio = 0.1
reorg_cifar10_data(data_dir, valid_ratio)
1.3. 图像增广
使用图像增广来解决过拟合的问题。例如在训练中,
我们可以随机水平翻转图像。 我们还可以对彩色图像的三个RGB通道执行标准化
#图像增广
transform_train = torchvision.transforms.Compose([
    # 在高度和宽度上将图像放大到40像素的正方形
    torchvision.transforms.Resize(40),
    # 随机裁剪出一个高度和宽度均为40像素的正方形图像,
    # 生成一个面积为原始图像面积0.64~1倍的小正方形,
    # 然后将其缩放为高度和宽度均为32像素的正方形
    torchvision.transforms.RandomResizedCrop(32, scale=(0.64, 1.0),
                                                   ratio=(1.0, 1.0)),
    torchvision.transforms.RandomHorizontalFlip(),
    torchvision.transforms.ToTensor(),
    # 标准化图像的每个通道
    torchvision.transforms.Normalize([0.4914, 0.4822, 0.4465],
                                     [0.2023, 0.1994, 0.2010])])


#在测试期间,我们只对图像执行标准化,以消除评估结果中的随机性。
transform_test = torchvision.transforms.Compose([
    torchvision.transforms.ToTensor(),
    torchvision.transforms.Normalize([0.4914, 0.4822, 0.4465],
                                     [0.2023, 0.1994, 0.2010])])
1.4. 引入数据集
#接下来,我们[读取由原始图像组成的数据集],每个样本都包括一张图片和一个标签。
train_ds, train_valid_ds = [torchvision.datasets.ImageFolder(
    os.path.join(target_dir, 'train_valid_test', folder),
    transform=transform_train) for folder in ['train', 'train_valid']]


valid_ds, test_ds = [torchvision.datasets.ImageFolder(
    os.path.join(target_dir, 'train_valid_test', folder),
    transform=transform_test) for folder in ['valid', 'test']]


"""
在训练期间,我们需要[指定上面定义的所有图像增广操作]。 当验证集在超参数调整过程中用于模型评估时,不应引入图像增广的随机性。
在最终预测之前,我们根据训练集和验证集组合而成的训练模型进行训练,以充分利用所有标记的数据。
"""
train_iter, train_valid_iter = [torch.utils.data.DataLoader(
    dataset, batch_size, shuffle=True, drop_last=True)
    for dataset in (train_ds, train_valid_ds)]

valid_iter = torch.utils.data.DataLoader(valid_ds, batch_size, shuffle=False,
                                         drop_last=True)

test_iter = torch.utils.data.DataLoader(test_ds, batch_size, shuffle=False,
                                        drop_last=False)
1.5. 定义模型
以Resnet-18模型为例
#定义模型,定义了Resnet-18模型
def get_net():
    num_classes = 10
    net = d2l.resnet18(num_classes, 3)
    return net

loss = nn.CrossEntropyLoss(reduction="none")
1.6. 定义训练函数
#我们将根据模型在验证集上的表现来选择模型并调整超参数。 下面我们定义了模型训练函数train
def train(net, train_iter, valid_iter, num_epochs, lr, wd, devices, lr_period,
          lr_decay):
    trainer = torch.optim.SGD(net.parameters(), lr=lr, momentum=0.9,
                              weight_decay=wd)
    scheduler = torch.optim.lr_scheduler.StepLR(trainer, lr_period, lr_decay)
    num_batches, timer = len(train_iter), d2l.Timer()
    legend = ['train loss', 'train acc']
    if valid_iter is not None:
        legend.append('valid acc')
    animator = d2l.Animator(xlabel='epoch', xlim=[1, num_epochs],
                            legend=legend)
    net = nn.DataParallel(net, device_ids=devices).to(devices[0])
    for epoch in range(num_epochs):
        net.train()
        metric = d2l.Accumulator(3)
        for i, (features, labels) in enumerate(train_iter):
            timer.start()
            l, acc = d2l.train_batch_ch13(net, features, labels,
                                          loss, trainer, devices)
            metric.add(l, acc, labels.shape[0])
            timer.stop()
            if (i + 1) % (num_batches // 5) == 0 or i == num_batches - 1:
                animator.add(epoch + (i + 1) / num_batches,
                             (metric[0] / metric[2], metric[1] / metric[2],
                              None))
        if valid_iter is not None:
            valid_acc = d2l.evaluate_accuracy_gpu(net, valid_iter)
            animator.add(epoch + 1, (None, None, valid_acc))
        scheduler.step()
    measures = (f'train loss {metric[0] / metric[2]:.3f}, '
                f'train acc {metric[1] / metric[2]:.3f}')
    if valid_iter is not None:
        measures += f', valid acc {valid_acc:.3f}'
    print(measures + f'\n{metric[2] * num_epochs / timer.sum():.1f}'
          f' examples/sec on {str(devices)}')
1.7. 训练模型并保存模型参数
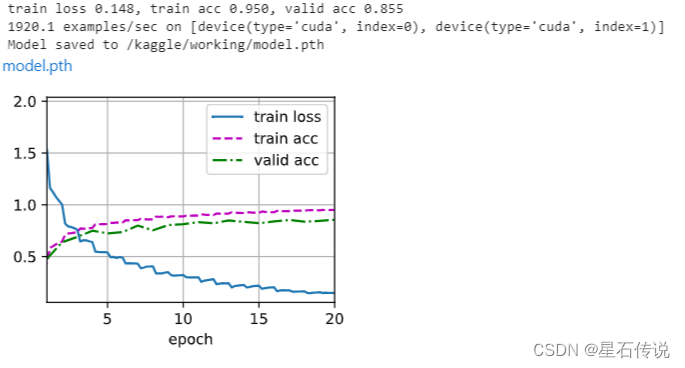
通过对超参数的不断调整,获得满意的模型后保存
devices, num_epochs, lr, wd = d2l.try_all_gpus(), 20, 2e-4, 5e-4
lr_period, lr_decay, net = 4, 0.9, get_net()

dummy_input = torch.zeros((batch_size, 3, 32, 32))  # 虚拟的输入数据
net.forward(dummy_input)  # 初始化模型参数


train(net, train_iter, valid_iter, num_epochs, lr, wd, devices, lr_period,
      lr_decay)

#保存在notebook中
import os
model_path = '/kaggle/working/model.pth'
torch.save(net.state_dict(), model_path)
print(f"Model saved to {model_path}")

#形成一个下载链接
from IPython.display import FileLink
FileLink(r'model.pth')


"""
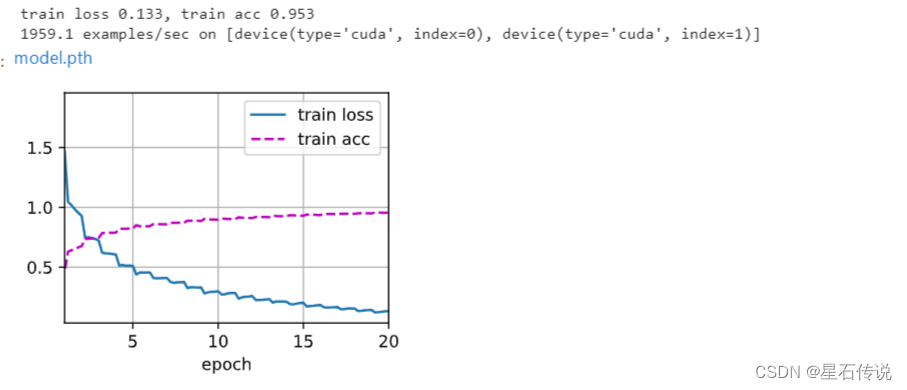
当我们确定了最终的超参数设置后,我们可以使用所有标记的数据重新训练模型,并使用测试集来评估其性能。
"""

net, preds = get_net(), []

dummy_input = torch.zeros((batch_size, 3, 32, 32))  # 虚拟的输入数据
net.forward(dummy_input)  # 初始化模型参数

train(net, train_valid_iter, None, num_epochs, lr, wd, devices, lr_period,
      lr_decay)

try:
    for X, _ in test_iter:
        y_hat = net(X.to(devices[0]))
        preds.extend(y_hat.argmax(dim=1).type(torch.int32).cpu().numpy())
    sorted_ids = list(range(1, len(test_ds) + 1))
    sorted_ids.sort(key=lambda x: str(x))
    df = pd.DataFrame({'id': sorted_ids, 'label': preds})
    df['label'] = df['label'].apply(lambda x: train_valid_ds.classes[x])
    df.to_csv('submission.csv', index=False)
except Exception as e:
    print(f"识别过程中出现错误{e}")


#形成一个下载链接
from IPython.display import FileLink
FileLink(r'model.pth')
二、生成一个桌面小程序
之前也学习了一些有关pyqt的知识,试着将模型部署到桌面小程序中,起一个交互式的作用
2.1. 使用QT设计师设计界面
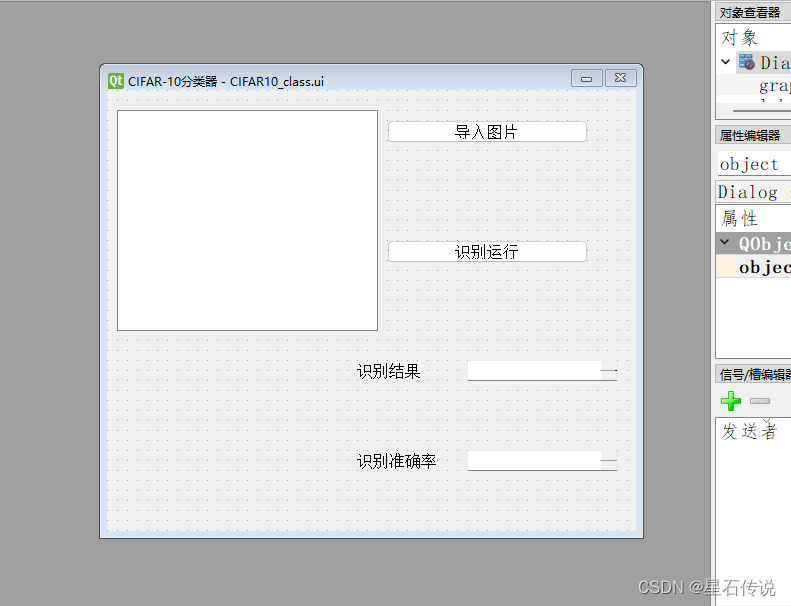
保存为ui文件,再转为py文件,具体方法请看:
python GUI编程——PyQt学习一
2.2. 代码实现
import sys
from PyQt6.QtWidgets import (QApplication, QDialog, QFileDialog,QMessageBox,
                             QGraphicsScene,QGraphicsPixmapItem)
from PyQt6.QtGui import QPixmap
import CIFAR10_class
from CIFAR10_pred import predict_
from PIL import Image

class CIFAR10_classApp(QDialog, CIFAR10_class.Ui_Dialog):
    def __init__(self):
        super().__init__()
        self.setupUi(self)
        self.show()
        self.pushButton_input.clicked.connect(self.input_images)
        self.pushButton_run.clicked.connect(self.run_model)
        # 创建标签部件
        self.graphicsView_input.setScene(QGraphicsScene(self))  # 创建场景对象并设置为graphicsView_input的场景

    def input_images(self):
        try:
            global fname
            imgName, imgType = QFileDialog.getOpenFileName(self, "导入图片", "", "*.jpg;;*.png;;All Files(*)")
            pixmap = QPixmap(imgName).scaled(self.graphicsView_input.width(), self.graphicsView_input.height())
            pixmap_item = QGraphicsPixmapItem(pixmap)
            scene = self.graphicsView_input.scene()  # 获取graphicsView_input的场景
            scene.clear()  # 清空场景
            scene.addItem(pixmap_item)  # 添加图像
            fname = imgName


            # 显示导入成功的消息框
            QMessageBox.information(self, "信息提示", "导入成功")
        except Exception as e:
            QMessageBox.critical(self, "错误提示", f"识别过程中出现错误:{str(e)}")

    def run_model(self):
        global fname
        file_name = str(fname)
        img = Image.open(file_name)

        try:
            a, b = predict_(img)
            self.plainTextEdit_result.setPlainText(a)
            self.plainTextEdit_pred.setPlainText(str(b))
            QMessageBox.information(self, "信息提示", "识别成功")


        except Exception as e:

            QMessageBox.critical(self, "错误提示", f"识别过程中出现错误:{str(e)}")


if __name__ == "__main__":
    app = QApplication(sys.argv)
    window = CIFAR10_classApp()
    sys.exit(app.exec())
对照片进行分类的预测
import torch
import torchvision.transforms as transforms
from d2l import torch as d2l


def predict_(img):
    """定义了数据转换的操作。通过transforms.ToTensor()将图像转换为张量,
        transforms.Normalize()对图像进行归一化处理"""

    data_transform = transforms.Compose([
        transforms.ToTensor(),
        transforms.Normalize((0.4914, 0.4822, 0.4465), (0.2023, 0.1994, 0.2010)),

    ])

    img = data_transform(img) #将输入图像应用数据转换操作
    img = torch.unsqueeze(img, dim=0) #在第0维度上添加一个维度,用于适配网络输入

    num_classes = 10
    model = d2l.resnet18(num_classes, 3)
    model_weight_pth = "model.pth"
    # model.load_state_dict(torch.load(model_weight_pth)) #指定了模型权重文件路径,并加载权重到模型中

    # 使用torch.load加载模型,同时将模型映射到CPU上
    model.load_state_dict(torch.load(model_weight_pth, map_location=torch.device('cpu')))
    model.eval() #将模型设置为评估模式,即关闭Dropout和Batch Normalization的随机性
    classes = {'0': '飞机', '1': '汽车', '2': '鸟', '3': '猫', '4': '鹿', '5': '狗', '6': '青蛙', '7': '马', '8': '船', '9': '卡车'}
    #将输入图像输入模型中进行推理
    with torch.no_grad():
        output = torch.squeeze(model(img))
        print(output)
        predict = torch.softmax(output, dim=0)

        predict_cla = torch.argmax(predict).numpy()

    return classes[str(predict_cla)], round(predict[predict_cla].item(),5)
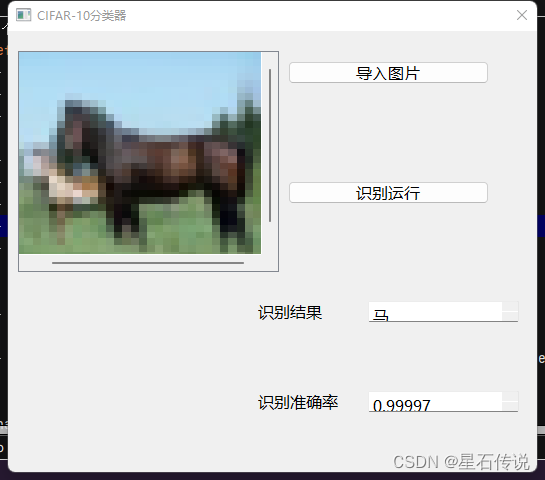
额外:从网上找一张图片来试试
因为这个模型使用低像素的图片集训练而来,所以对高像素的照片的分类效果不是很好。所以训练模型的时候,如果想预测高像素的图片,建议使用高像素的训练数据来训练模型,以获得更好的预测性能。
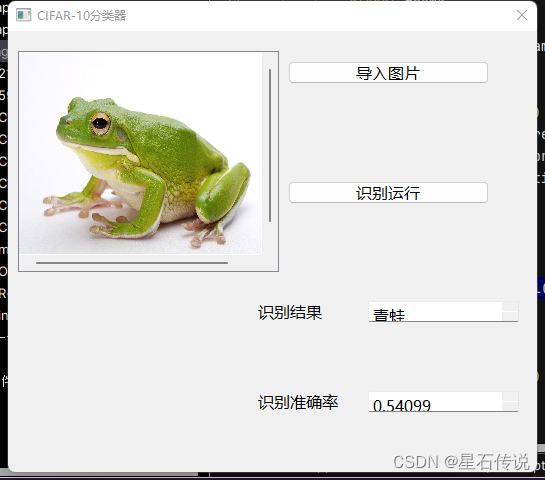
总结
本章主要是对一个常见的图像数据集:CIFAR-10,用Resnet18模型来进行图像分类,然后形成一个桌面小程序用来更好的交互和展示。其中最重要的还是模型的建立,通过对不同模型的测试以及超参数的调整来找到”最优解“。
明日复明日,明日何其多,我生待明日,万事成蹉跎。
–2023-10-24 进阶篇
