轻量级仿 Spring Boot=嵌入式 Tomcat+Spring MVC
啥?Spring Boot 不用?——对。就只是使用 Spring MVC + Embedded Tomcat,而不用 Boot。为啥?——因为 Boot 太重了:)
那是反智吗?Spring Boot 好好的就只是因为太重就不用?——稍安勿躁,这里并非说重新写代替 Spring 的轮子,而是继续使用原装的 Spring MVC,进而对其加强升级,——请听我跟你说, 优化后的 Spring MVC 几乎能做到 Spring Boot 的事情,是一个近乎 99% 完成度的平替,而且它更轻量级,何乐不为呢?Yes,让我们试试:Spring Framework without Spring Boot!
为了说明如何打造轻量级的 Spring Boot,本文分为“嵌入式 Tomcat”、“增强 Spring MVC”和“打包/部署”三个小节来介绍。
嵌入式 Tomcat
目的是通过执行main()函数即可启动 Web 程序。在上一篇文章《嵌入式 Tomcat 调校》中已经讨论了如何制定化 Tomcat,但仍未与 Spring 结合。
实际上,从 Spring MVC 时代起就支持通过 Java 注解来配置,代替古老的 XML 方式。笔者在两年之前的文章《Spring MVC 用起来还是很香的》已经介绍过。那时还未摆脱标准 Tomcat 的运行模式,而目前要做的,就是结合嵌入式 Tomcat 与 Spring MVC 两者。
因为是纯手动编码(Programmatically)达成的,所以要了解 Tomcat 加载的生命周期。当为LifecycleState.STARTING_PREP之时,才能有关键的ServletContext ctx对象,以便 Spring 绑定。
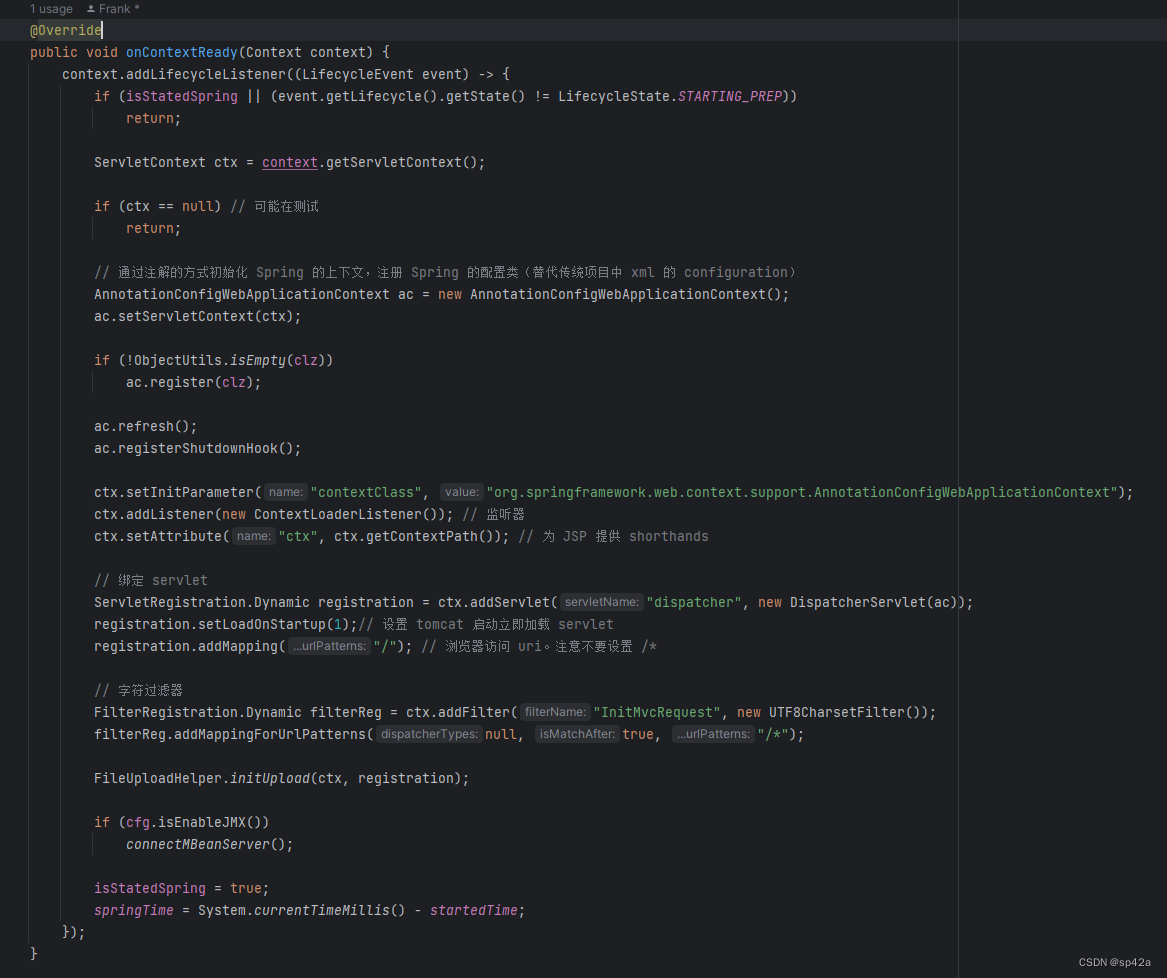
完整代码在这里。
调用例子
一般情况下,要指定的只有 Tomcat 端口和 Context 目录,甚至 Context 目录都可以不传。所以多数情况下你调用 EmbeddedTomcatStarter 的静态方法即可。
另外start() 有 class… 的参数列表,它是个可变长度的数组,表示 Java 配置类,如下例的DemoApp.class、DemoConfig.class,第一个 class 是 main 函数的那个类,第二个、第三……第 n 个是带有@Configuration注解的配置类。
import com.ajaxjs.data.sql_controller.ServiceBeanDefinitionRegistry;
import com.ajaxjs.framework.spring.BaseWebMvcConfigure;
import com.ajaxjs.framework.spring.EmbeddedTomcatStarter;
import org.springframework.context.annotation.Bean;
import org.springframework.context.annotation.ComponentScan;
import org.springframework.context.annotation.Configuration;
import org.springframework.web.servlet.config.annotation.EnableWebMvc;

@Configuration
@EnableWebMvc
@ComponentScan("com.ajaxjs.demo")
public class DemoApp extends BaseWebMvcConfigure {
    public static void main(String[] args) {
        EmbeddedTomcatStarter.start(8300, DemoApp.class, DemoConfig.class);
    }
}
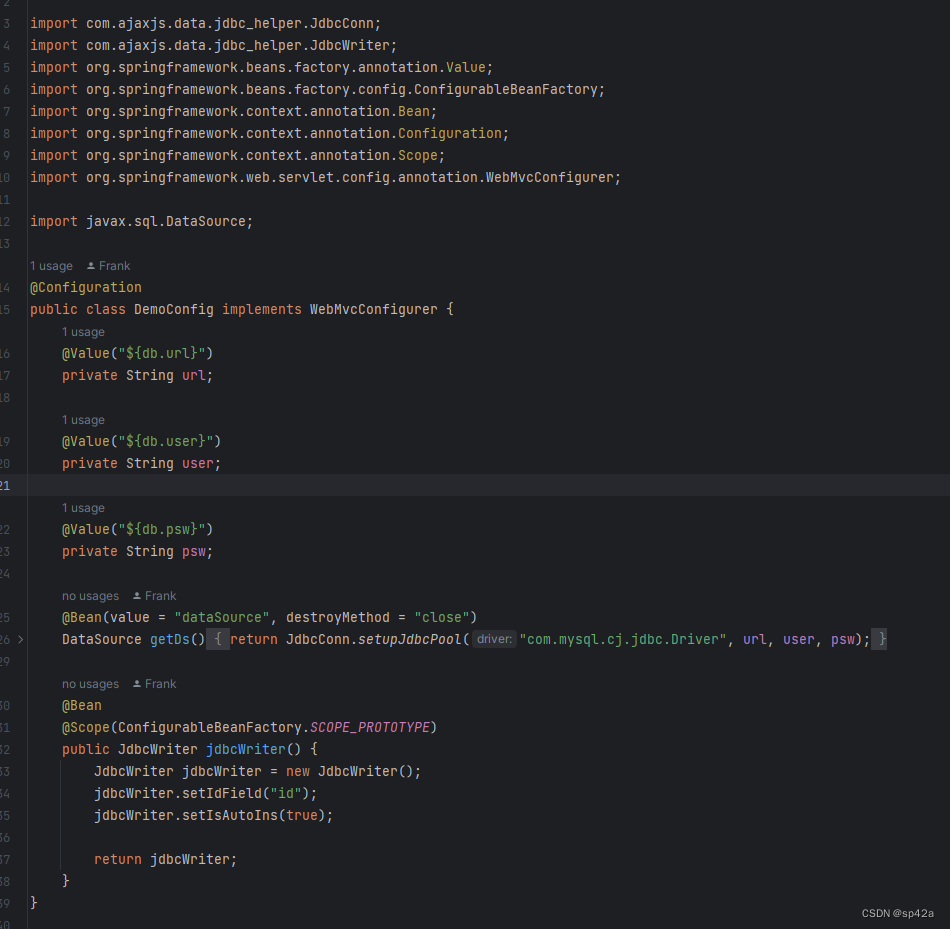
配置类是这样的,与 Spring Boot 的无异,还是熟悉的配方。
增强 SpringMVC
YAML 配置
主流采用 YAML 作为配置文件,properties/xml 文件则不考虑了。在 Spring MVC 中支持 YAML 配置文件,首先引入 yaml 依赖。
<!-- YAML 配置文件 -->
<dependency>
	<groupId>org.yaml</groupId>
	<artifactId>snakeyaml</artifactId>
	<version>1.33</version>
</dependency>
然后初始化加载 YAML。这是封装到框架里面的,位于BaseWebMvcConfigure。
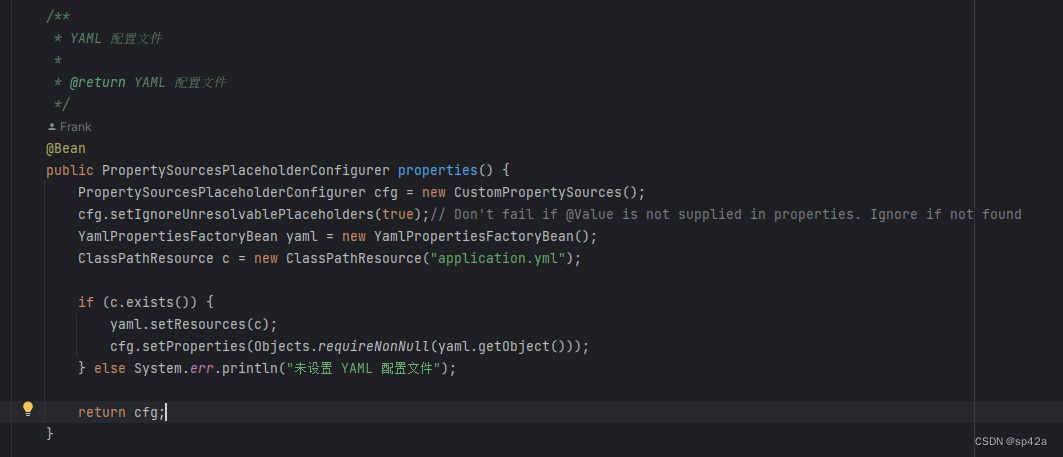
YAML 有个问题,就是没有直接提供静态方法的手段,于是重写PropertySourcesPlaceholderConfigurer.postProcessBeanFactory()方法,获取内部的 Key/Value 结构Properties localProperties,暴露出来给外界获取,传入 key 即可得到的配置 value。源码如下:
package com.ajaxjs.framework.spring;

import com.ajaxjs.util.convert.ConvertBasicValue;
import org.springframework.beans.factory.config.ConfigurableListableBeanFactory;
import org.springframework.context.support.PropertySourcesPlaceholderConfigurer;

import java.io.IOException;
import java.util.Properties;

/**
 * PropertySourcesPlaceholderConfigurer 是一个由 Spring 提供的用于解析属性占位符的配置类,
 * 它没有提供直接获取私有属性 localProperties 的公开方法。但是,可以通过以下步骤获取 localProperties 的值
 */
public class CustomPropertySources extends PropertySourcesPlaceholderConfigurer {
    private Properties localProperties;

    @Override
    public void postProcessBeanFactory(ConfigurableListableBeanFactory beanFactory) {
        super.postProcessBeanFactory(beanFactory);

        try {
            localProperties = mergeProperties();
        } catch (IOException e) {
            throw new RuntimeException(e);
        }
    }

    public Properties getLocalProperties() {
        return localProperties;
    }

    /**
     * 获取配置值
     *
     * @param key 配置 key
     * @return 配置值
     */
    public static String getConfig(String key) {
        CustomPropertySources bean = DiContextUtil.getBean(CustomPropertySources.class);
        assert bean != null;
        Object o = bean.getLocalProperties().get(key);

        if (o != null)
            return o.toString();
        else {
            System.err.println("找不到 " + key + "配置");

            return null;
        }
    }

    public static <T> T getConfig(String key, Class<T> clz) {
        String value = getConfig(key);

        return ConvertBasicValue.basicCast(value, clz);
    }
}
上述静态的方法就是获取配置的手段。
用户配置
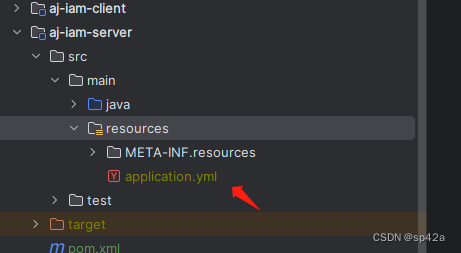
用户来说,具体操作就是在 resources 目录下设置application.yml文件。
其他
另外,这里有个大神开源的作品 spring-config-ext,也是在 MVC 中实现类似 Boot 的配置,号称“spring mvc config simple extension, make it have the same config abilities as spring boot does.”,大家有兴趣的可去看看。
运行 Web 页面
尽管打包为 JAR 包了,都是弄 API 接口了,也就没什么理由存放那些 Web 页面了。但某些情况下,作为一个前-前端人员,还是觉得有必要打开 JSP 渲染的,可以访问一下 html/css/js/jsp 资源。
按照 Servlet 3.0 规范,有一块地方是专门存放 html/css/js 甚至 JSP 的,即META-INF\resources,在工程的资源目录下,即\src\main\resources\META-INF\resources。所以,以前是在src\main\webapp下面的所有文件,移动到\src\main\resources\META-INF\resources目录下。
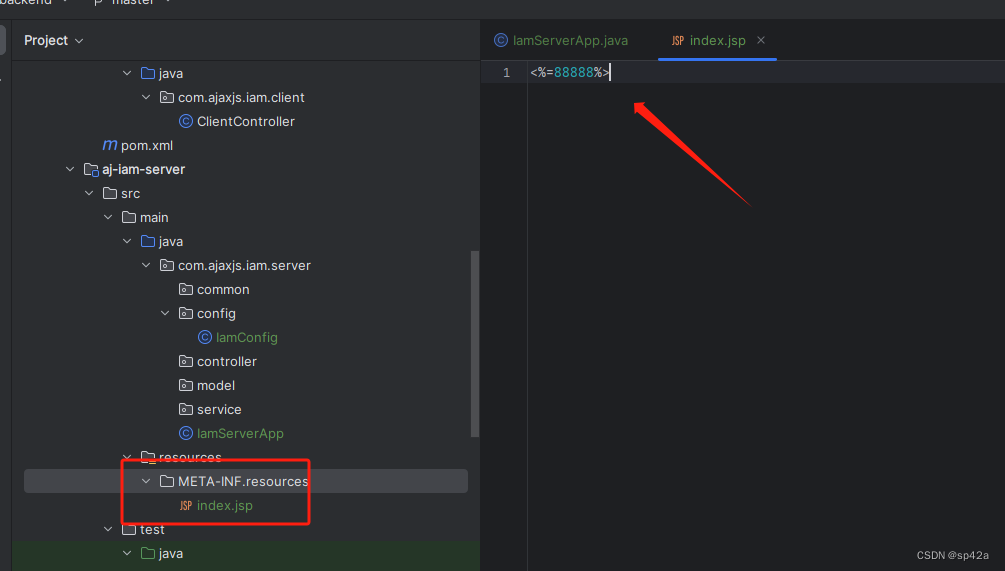
新建一个 index.jsp 设置内容<%=88888%>即可测试之。
存在问题:这个不像以前在 Eclipse 下可以修改了 JSP 重新编译,在 IDEA 下没法那样子玩了,所以每次修改后要手动重启服务器,非常麻烦。如果有懂行的朋友知道怎么搞自动重启,请多告知!
单元测试
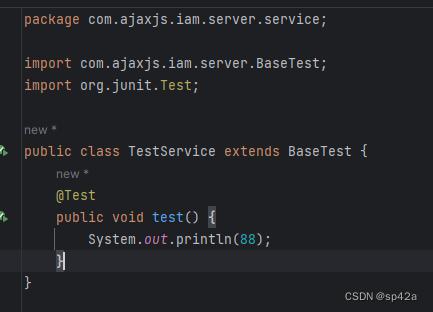
单元测试一般都有这两个类,一个是配置,一个是基类。
配置很简单,但是你要修改扫描的包名,@ComponentScan那里的。
package com.ajaxjs.iam.server;

import org.springframework.context.annotation.ComponentScan;
import org.springframework.context.annotation.Configuration;

@Configuration
@ComponentScan("com.ajaxjs.iam.server")
public class TestConfig {

}
基类是个抽象类,主要是绑定配置类和数据库连接跟关闭,方便你不用每次都手动连接数据库。
package com.ajaxjs.iam.server;

import com.ajaxjs.data.jdbc_helper.JdbcConn;
import com.ajaxjs.framework.spring.filter.dbconnection.DataBaseConnection;
import org.junit.After;
import org.junit.Before;
import org.junit.runner.RunWith;
import org.springframework.test.context.ContextConfiguration;
import org.springframework.test.context.junit4.SpringJUnit4ClassRunner;
import org.springframework.test.context.web.WebAppConfiguration;

@ContextConfiguration(classes = TestConfig.class)
@RunWith(SpringJUnit4ClassRunner.class)
@WebAppConfiguration
public abstract class BaseTest {
    @Before
    public void initDb() {
        DataBaseConnection.initDb();
    }

    @After
    public void closeDb() {
        JdbcConn.closeDb();
    }
}
一个例子。
打包与部署
Maven 打包
我们希望打出哪个环境的包,就只需要包含这个环境的配置文件即可,不想包含其他环境的配置文件,这时候可以直接在 maven 中使用 profiles 和 resources 来配置,打包时使用mvn package -P dev即可。
<profiles>
    <!--开发环境-->
    <profile>
        <id>dev</id>
        <properties>
            <spring.profiles.active>dev</spring.profiles.active>
        </properties>
        <activation>
            <activeByDefault>true</activeByDefault>
        </activation>
    </profile>
    <!--测试环境-->
    <profile>
        <id>test</id>
        <properties>
            <spring.profiles.active>test</spring.profiles.active>
        </properties>
    </profile>
    <!--生产环境-->
    <profile>
        <id>prod</id>
        <properties>
            <spring.profiles.active>prod</spring.profiles.active>
        </properties>
    </profile>
</profiles>
<build>
    <resources>
        <resource>
            <directory>src/main/resources</directory>
            <filtering>false</filtering>
        </resource>
        <resource>
            <directory>src/main/resources.${spring.profiles.active}</directory>
            <filtering>false</filtering>
        </resource>
    </resources>
</build>
原理如下:
maven 在构建项目时,默认是把
main/resoures目录作为资源文件所在目录的,现在我们在main/conf目录下也存放了资源文件(即application.properites文件),因此需要告诉 maven 资源文件所在的目录有哪些,通过 build 元素中增加 resources 元素就可以达到这一目的。这里告诉 maven 有两个地方存在资源文件,一个是默认的 resources 目录,另一个是在src/main/conf/${env}目录下,而${env}引用的是上面 properties 元素中定义的 env 的值,而它的值引用的又是spring.profiles.active的值(其值为 dev、test 和 online 中的一个),因此,目录要么是src/main/conf/dev,要么是src/main/conf/test,要么是main/conf/online,这最终取决于参数spring.profiles.active的值。因此,根据参数spring.profiles.active的值的不同,在构建打包时最终会选择 dev、test 和 online 这三个目录中的一个中的application.properties打包到项目中来。
将应用打成一个 Fat Jar 的方式,可以用 Spring 的:
<plugin>
  <groupId>org.springframework.boot</groupId>
  <artifactId>spring-boot-maven-plugin</artifactId>
  <version>1.3.3.RELEASE</version>
  <configuration>
    <mainClass>com.demo.proj.Main</mainClass>
  </configuration>
  <executions>
    <execution>
      <phase>package</phase>
      <goals>
        <goal>repackage</goal>
      </goals>
    </execution>
  </executions>
</plugin>
Profiles
在实际使用环境中,我们同一个应用环境可能需要在不同环境运行(开发、测试、生产等),每个环境的参数都有可能不同(连接参数、日志级别等),使用 Profiles 可以将不同环境下的参数进行拆分,并指定加载。
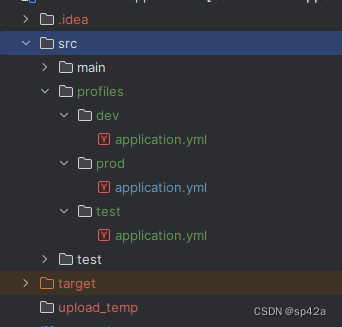
IDEA 配置,在 src 目录下创建 profiles 目录,安排如下图的配置文件。
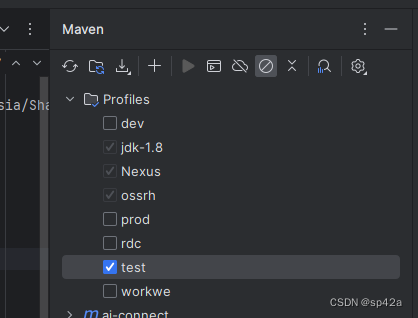
然后 Maven Profile 打勾即可。
启动参数
开始以为要 run 配置中加入--spring.profiles.active=dev参数,其实不用,还是在 IDEA 里面选 profile 打勾即可。
小结
参考
- SpringMVC 纯注解配置
