Mac运行Docker报错
Mac运行Docker报错
📔 千寻简笔记介绍
千寻简笔记已开源,Gitee与GitHub搜索chihiro-notes,包含笔记源文件.md,以及PDF版本方便阅读,且是用了精美主题,阅读体验更佳,如果文章对你有帮助请帮我点一个Star~
更新:支持在线阅读文章,根据发布日期分类。
文章目录
- Mac运行Docker报错
- 📔 千寻简笔记介绍
- 简介
- 本文关键词
- 实现步骤
- 1. 启动docker报错
- 1.1 systemctl status docker.service查看docker服务的状态
- 1.2 journalctl -xe 查看报错信息
简介
本文关键词
Job for docker.service failed because the control process exited with error code. See "systemctl status docker.service" and "journalctl -xeu docker.service" for details.、Job for docker.service failed because the control process exited with error code、systemctl status docker.service" and "journalctl -xeu docker.service
实现步骤
1. 启动docker报错
root@primary:/service/java/docker# systemctl start docker.service
Job for docker.service failed because the control process exited with error code.
See "systemctl status docker.service" and "journalctl -xeu docker.service" for details.
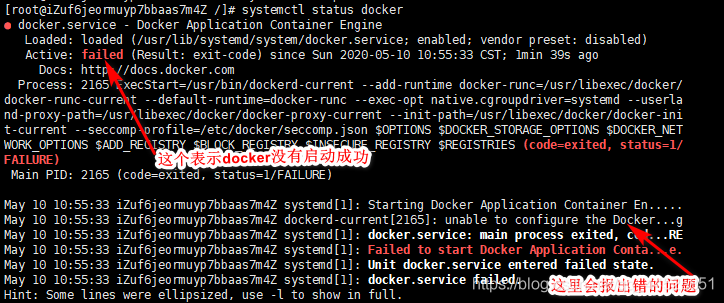
1.1 systemctl status docker.service查看docker服务的状态
- 使用docker时,遇到 docker.service的作业失败,因为控制进程已退出,并返回错误代码。
- 有关详细信息,请参阅“systemctl status docker.service”和“journalctl -xe”时,不一定要重装 docker。
systemctl status docker.service
# 报错信息
× docker.service - Docker Application Container Engine
     Loaded: loaded (/lib/systemd/system/docker.service; enabled; vendor preset: enabled)
     Active: failed (Result: exit-code) since Tue 2023-05-30 23:04:30 CST; 5min ago
TriggeredBy: × docker.socket
       Docs: https://docs.docker.com
    Process: 925 ExecStart=/usr/bin/dockerd -H fd:// --containerd=/run/containerd/containerd.sock (code=exited, status>
   Main PID: 925 (code=exited, status=1/FAILURE)
        CPU: 60ms

May 30 23:04:27 primary systemd[1]: docker.service: Main process exited, code=exited, status=1/FAILURE
May 30 23:04:27 primary systemd[1]: docker.service: Failed with result 'exit-code'.
May 30 23:04:27 primary systemd[1]: Failed to start Docker Application Container Engine.
May 30 23:04:30 primary systemd[1]: docker.service: Scheduled restart job, restart counter is at 3.
May 30 23:04:30 primary systemd[1]: Stopped Docker Application Container Engine.
May 30 23:04:30 primary systemd[1]: docker.service: Start request repeated too quickly.
May 30 23:04:30 primary systemd[1]: docker.service: Failed with result 'exit-code'.
May 30 23:04:30 primary systemd[1]: Failed to start Docker Application Container Engine.
1.2 journalctl -xe 查看报错信息
root@primary:/etc/docker# journalctl -xe
Journal file /var/log/journal/8c1bf4cc93844889a4cf1a8b67be1748/user-1000@0005fa7b9a7766ed-645e5933b08e3d15.journal~ is truncated, ignoring file.
May 30 23:24:03 primary rsyslogd[594]: action 'action-3-builtin:omfile' (module 'builtin:omfile') message lost, could not be processed. Check for additional error messages before>
分析错误: No space left on devic> 设备上没有剩余空间,在错误日志中我们发现是docker安装目录满了。
解决方案:
- 查看目录下剩余空间
df -hl /var/lib/docker
# 显示的信息:使用已经百分百
Filesystem      Size  Used Avail Use% Mounted on
/dev/sda1       4.7G  4.7G     0 100% /
- 查看分区容量
df -h
# 显示的信息
Filesystem      Size  Used Avail Use% Mounted on
tmpfs            97M   11M   86M  12% /run
/dev/sda1       4.7G  4.7G     0 100% /
tmpfs           482M     0  482M   0% /dev/shm
tmpfs           5.0M     0  5.0M   0% /run/lock
/dev/sda15       98M  6.3M   92M   7% /boot/efi
tmpfs            97M  4.0K   97M   1% /run/user/1000
- 知道是磁盘不足,由于我们现在docker启动不了,星辰推荐先扩容,后面在对容器和镜像进行优化。
我是在Mac虚拟机(multipass)上运行的docker,默认磁盘5G,所以我们调整一下磁盘大小就可以,下面有我找到的一个博主的参考。
# 打开终端
xingchen@star-2 ~ % multipass ls
Name                    State             IPv4             Image
primary                 Stopped           --               Ubuntu 22.04 LTS

# 扩容命令,等号左右不能有空格
# 要修改其中一个属性,请先停止实例,然后发出命令set。例如:
multipass set local.primary.disk=10G

xingchen@star-2 ~ % multipass set local.primary.disk=10G
xingchen@star-2 ~ %
# 可以使用命令查询这些属性get。不必为此停止实例。例如:
multipass get local.primary.disk


# 扩容完毕我们启动虚拟机在查看容量
df -h
root@primary:/home/ubuntu# df -h
# 显示的信息
Filesystem      Size  Used Avail Use% Mounted on
tmpfs            97M   11M   86M  12% /run
/dev/sda1       4.7G  4.7G     0 100% /
tmpfs           482M     0  482M   0% /dev/shm
tmpfs           5.0M     0  5.0M   0% /run/lock
/dev/sda15       98M  6.3M   92M   7% /boot/efi
tmpfs            97M  4.0K   97M   1% /run/user/1000

# 发现一个问题,multipass 扩容以后系统磁盘不变
# 扩展完磁盘后使用lsblk查看的结果变了而使用df -h结果大小却没变,这是因为前者查看的是磁盘的大小而后者查看的是文件系统的大小。磁盘和文件系统在不严格区分时可视为同一个东西,但追究起来确实是两样东西。
root@primary:/home/ubuntu# fdisk -l
Disk /dev/loop0: 43.18 MiB, 45277184 bytes, 88432 sectors
Units: sectors of 1 * 512 = 512 bytes
Sector size (logical/physical): 512 bytes / 512 bytes
I/O size (minimum/optimal): 512 bytes / 512 bytes


Disk /dev/loop1: 59.12 MiB, 61988864 bytes, 121072 sectors
Units: sectors of 1 * 512 = 512 bytes
Sector size (logical/physical): 512 bytes / 512 bytes
I/O size (minimum/optimal): 512 bytes / 512 bytes


Disk /dev/loop2: 868 KiB, 888832 bytes, 1736 sectors
Units: sectors of 1 * 512 = 512 bytes
Sector size (logical/physical): 512 bytes / 512 bytes
I/O size (minimum/optimal): 512 bytes / 512 bytes


Disk /dev/loop3: 43.19 MiB, 45289472 bytes, 88456 sectors
Units: sectors of 1 * 512 = 512 bytes
Sector size (logical/physical): 512 bytes / 512 bytes
I/O size (minimum/optimal): 512 bytes / 512 bytes


Disk /dev/loop4: 4 KiB, 4096 bytes, 8 sectors
Units: sectors of 1 * 512 = 512 bytes
Sector size (logical/physical): 512 bytes / 512 bytes
I/O size (minimum/optimal): 512 bytes / 512 bytes


Disk /dev/loop5: 59.09 MiB, 61960192 bytes, 121016 sectors
Units: sectors of 1 * 512 = 512 bytes
Sector size (logical/physical): 512 bytes / 512 bytes
I/O size (minimum/optimal): 512 bytes / 512 bytes


Disk /dev/loop6: 109.61 MiB, 114929664 bytes, 224472 sectors
Units: sectors of 1 * 512 = 512 bytes
Sector size (logical/physical): 512 bytes / 512 bytes
I/O size (minimum/optimal): 512 bytes / 512 bytes


Disk /dev/vda: 52 KiB, 53248 bytes, 104 sectors
Units: sectors of 1 * 512 = 512 bytes
Sector size (logical/physical): 512 bytes / 512 bytes
I/O size (minimum/optimal): 512 bytes / 512 bytes
GPT PMBR size mismatch (10485759 != 20971519) will be corrected by write.
The backup GPT table is not on the end of the device.


Disk /dev/sda: 10 GiB, 10737418240 bytes, 20971520 sectors
Disk model: QEMU HARDDISK
Units: sectors of 1 * 512 = 512 bytes
Sector size (logical/physical): 512 bytes / 512 bytes
I/O size (minimum/optimal): 512 bytes / 512 bytes
Disklabel type: gpt
Disk identifier: 377B9709-DEFE-4067-8E1D-220FD9F66D56

Device      Start      End  Sectors  Size Type
/dev/sda1  206848 10485726 10278879  4.9G Linux filesystem
/dev/sda15   2048   204800   202753   99M EFI System

Partition table entries are not in disk order.
root@primary:/home/ubuntu#


# 关于“linux磁盘扩容成功文件系统大小却没变化”问题详细解决方案
https://blog.csdn.net/qq_41999034/article/details/111030811