多线程(初阶)
文章目录
- 一、认识线程(Thread)
- 1.1 概念
- 1.1.1 什么是线程
- 1.1.2 为什么要有线程
- 1.1.3 进程和线程的区别(重要)
- 1.1.4 Java的线程和操作系统线程的关系
- 1.2 第一个多线程 程序
- 1.3 创建线程(重要)
- 1.3.1 继承 Tread 类
- 1.3.2 实现 Runnable 接口
- 1.3.3 匿名内部类 创建Thread 子类对象
- 1.3.4 匿名内部类 创建实现 Runnable 接口的Thread子类对象
- 1.3.5 lambda 表达式创建实现 Runnable 接口的Thread 的⼦类对象
- 二、Thread 类及常用方法
- 2.1 Thread 常见的构造方法
- 2.2 Thread 的几个常见属性
- 2.3 启动线程 - start() (面试题)
- 2.4 中断一个线程
- 2.5 等待一个线程- join()
- 2.6 获取当前线程引用
- 2.7 休眠当前线程
- 三、线程的状态
- 3.1 观察线程的所有状态
- 四、多线程带来的风险-线程安全(重点)
- 4.1 观察线程不安全
- 4.2 什么是线程安全
- 4.3 线程不安全的原因
- 4.4 解决上述的线程不安全问题
- 五 synchronized 关键字(监视器锁 monitor lock)
- 5.1 synchronized 的特性
- 5.2 synchronized 的使用
- 5.2.1 修饰代码块 :明确指明锁的哪个对象
- 5.2.2 修饰方法
- 5.3 Java 标准库中的线程安全类
- 六、volatile 关键字
- 6.1 volatile 保证内存可见性
- 6.2 volatile 不保证原子性
- 七、wait 和 notify
- 7.1 wait()方法
- 7.2 notify()方法
- 7.3 notifyAll()方法
- 7.4 wait 和 sleep 的对比(重要)
- 八、多线程案例
- 8.1 单例模式
- 8.1.1 饿汉模式
- 8.1.2 懒汉模式
- 8.2 阻塞队列
- 8.2.1 阻塞队列的定义
- 8.2.2 消费者模型
- 8.2.3 标准库中的阻塞队列
- 8.2.4 阻塞队列的模拟实现
- 8.3 定时器
- 8.3.1 什么是定时器
- 8.3.2 标准库中的定时器
- 8.3.3 模拟实现定时器
- 8.4 线程池
- 8.4.1 什么是线程
- 8.4.2 标准库中的线程(重要)
- 8.4.3 模拟实现线程池
- 九、对比线程和进程
- 9.1 线程的优点
- 9.2 线程和进程的区别
一、认识线程(Thread)
1.1 概念
1.1.1 什么是线程
⼀个线程就是⼀个"执⾏流",每个线程之间都可以按照顺序执⾏⾃⼰的代码,多个线程之间"同时"执⾏着多份代码。
1.1.2 为什么要有线程
- 并发编程成为“刚需”。
- 单核 CPU 的发展遇到了瓶颈,要想提⾼算⼒,就需要多核 CPU,⽽并发编程能更充分利⽤多核 CPU 资源。
- 有些任务场景需要 “等待 IO”,为了让等待 IO 的时间能够去做⼀些其他的⼯作,也需要⽤到并发编程。
- 虽然多进程也能实现 并发编程,但是线程⽐进程更轻量。
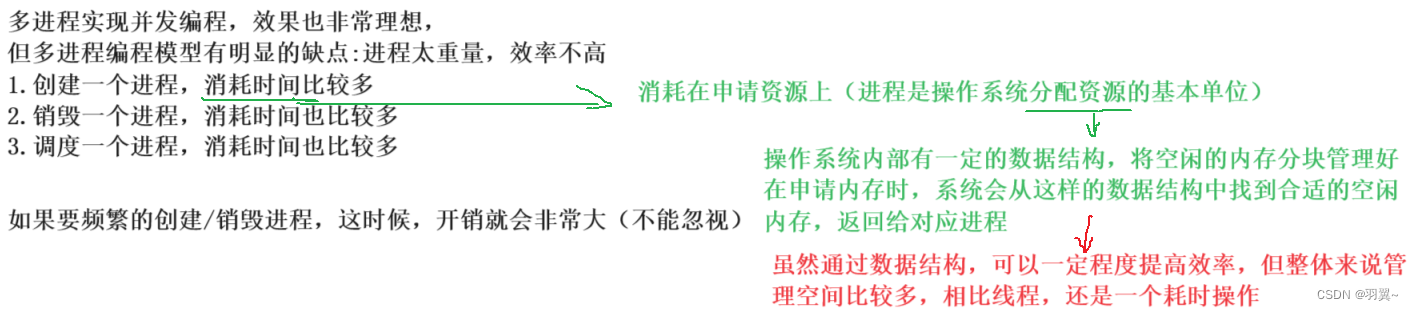
- 创建线程比创建进程更块
- 销毁线程比销毁进程更快
- 调度线程比调度进程更快
- 线程虽然⽐进程轻量,但还不满⾜,于是⼜有了 “线程池”(ThreadPool) 和 “协程”(Coroutine)
1.1.3 进程和线程的区别(重要)
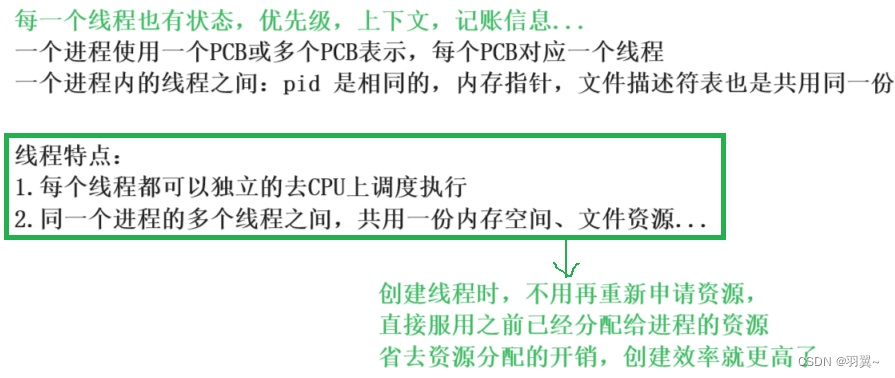
- 进程包含线程(线程不能独立存在,要依附于进程),每个进程⾄少有⼀个线程存在,即主线程
- 进程和线程 都是用来实现并发编程场景的,但线程比进程更轻量,更高效
- 进程和进程之间不共享资源,同⼀个进程的线程之间共享资源(内存和硬盘)
- 进程是系统分配资源的最⼩单位,线程是系统调度的最⼩单位
- 进程之间是独立的,⼀个进程挂了⼀般不会影响到其他进程,但⼀个线程挂了,很大可能影响同进程内的其他线程(整个进程崩溃)
1.1.4 Java的线程和操作系统线程的关系
线程是操作系统中的概念,操作系统内核实现了线程这样的机制,并且对⽤户层提供了⼀些 API 供⽤⼾使⽤。
Java 标准库中 Thread 类可以视为是对操作系统提供的 API 进⾏了进⼀步的抽象和封装。
1.2 第一个多线程 程序
感受多线程程序和普通程序的区别:
- 每个线程都是⼀个独⽴的执⾏流
- 多个线程之间 “并发” 执⾏
/**
 * 通过创建一个 继承 thread类 的类 的方式创建线程,重写run方法
 */
class MyThread extends Thread{
    @Override
    public void run() {
        //这个方法是线程的入口方法
        while(true){
            System.out.println("hello thread");
 //重写父类的 run方法 并没有声明异常,子类重写这个方法也不能声明异常,只能采用捕获异常的方式
            try {
                //设置当前线程暂停执行指定的时间间隔(1秒),然后再恢复执行
                Thread.sleep(1000);
            } catch (InterruptedException e) {
                e.printStackTrace();
            }
        }
    }
}
public class demo1 {
    public static void main(String[] args) throws InterruptedException {
        Thread thread = new MyThread();
        //start 和 run 都是Thread 的成员
        // run 只描述线程的入口(线程要做什么)
        //start 是真正调用了系统API,在系统中创建线程,让线程再调用 run
        thread.start();
        while (true){
            System.out.println("hello main");
            // sleep方法可能抛出异常(受查异常---显示处理---声明或捕获异常)
            //设置当前线程暂停执行指定的时间间隔(1秒),然后再恢复执行
            Thread.sleep(1000);
        }
    }
}


1.3 创建线程(重要)
1.3.1 继承 Tread 类
继承 Thread 来创建⼀个线程类,重写run方法
具体实现参考上述 1.2.
1.3.2 实现 Runnable 接口
/**
 * 实现 Runnable接口,重写run
 */
class MyRunnable implements Runnable{
    @Override
    public void run() {
        while(true){
            System.out.println("hello thread");
            try {
                Thread.sleep(1000);
            } catch (InterruptedException e) {
                e.printStackTrace();
            }
        }
    }
}
public class demo2 {
    public static void main(String[] args) {
        Runnable runnable = new MyRunnable();
        Thread thread = new Thread(runnable);
        thread.start();
        while(true){
            System.out.println("hello main");
            try {
                Thread.sleep(1000);
            } catch (InterruptedException e) {
                e.printStackTrace();
            }
        }
    }
}

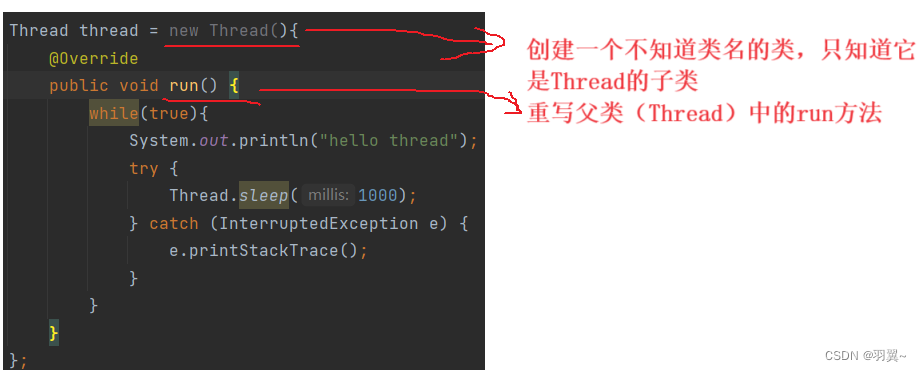
1.3.3 匿名内部类 创建Thread 子类对象

/**
 * 使用匿名内部类创建 Thread 子类对象
 */
public static void main(String[] args) {
    Thread thread = new Thread(){
        @Override
        public void run() {
            while(true){
                System.out.println("hello thread");
                try {
                    Thread.sleep(1000);
                } catch (InterruptedException e) {
                    e.printStackTrace();
                }
            }
        }
    };
    thread.start();
    while(true){
        System.out.println("hello main");
        try {
            Thread.sleep(1000);
        } catch (InterruptedException e) {
            e.printStackTrace();
        }
    }
}
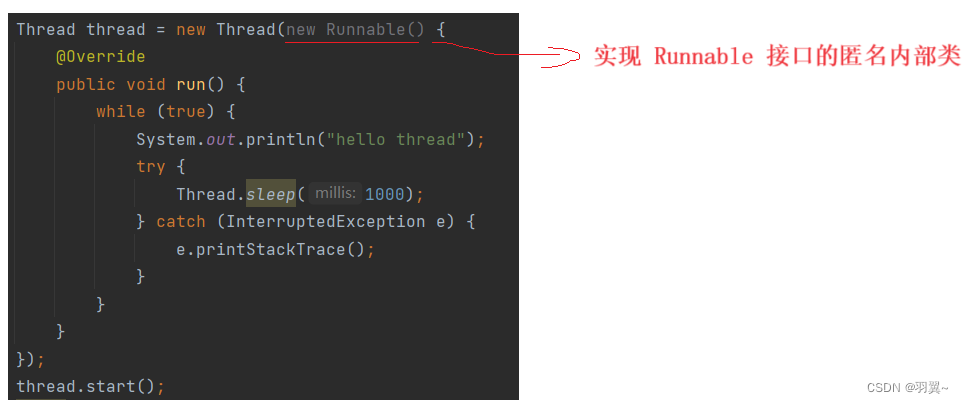
1.3.4 匿名内部类 创建实现 Runnable 接口的Thread子类对象
/**
 * 使用匿名内部类创建 Runnable 的子类对象
 */
public static void main(String[] args) {
    Thread thread = new Thread(new Runnable() {
            @Override
            public void run() {
                while (true) {
                    System.out.println("hello thread");
                    try {
                        Thread.sleep(1000);
                    } catch (InterruptedException e) {
                        e.printStackTrace();
                    }
                }
            }
        });
        thread.start();
        while (true){
            System.out.println("hello main");
            try {
                Thread.sleep(1000);
            } catch (InterruptedException e) {
                e.printStackTrace();
            }
        }
    }
}
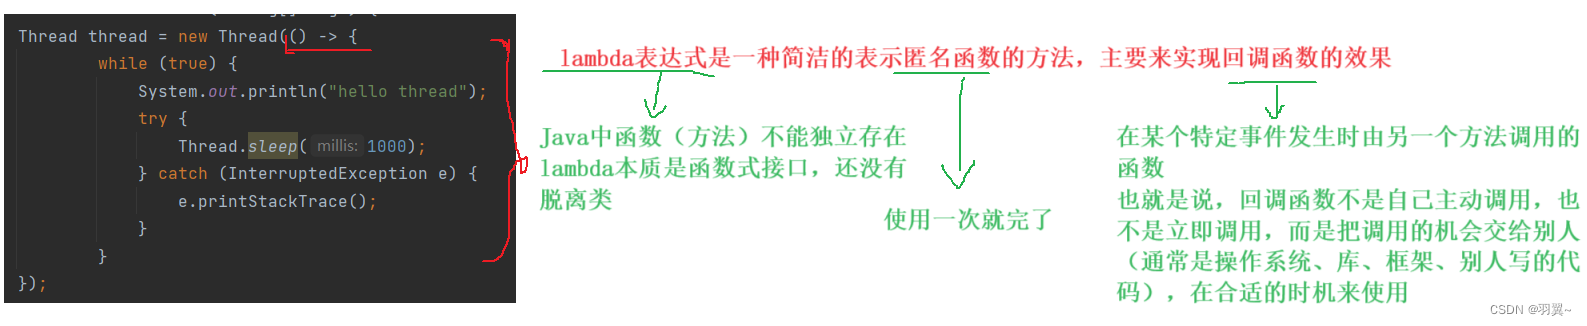
1.3.5 lambda 表达式创建实现 Runnable 接口的Thread 的⼦类对象
/**
 * 使用 lambda 表达式创建 Runnable子类对象
 */
public static void main(String[] args) {
    Thread thread = new Thread(() -> {
            while (true) {
                System.out.println("hello thread");
                try {
                    Thread.sleep(1000);
                } catch (InterruptedException e) {
                    e.printStackTrace();
                }
            }
    });
    thread.start();
    while (true){
        System.out.println("hello main");
        try {
            Thread.sleep(1000);
        } catch (InterruptedException e) {
            e.printStackTrace();
        }
    }
}
二、Thread 类及常用方法
Thread 类是 JVM ⽤来管理线程的⼀个类,换句话说,每个线程都有⼀个唯⼀的 Thread 对象与之关联。Thread 类的对象就是⽤来描述⼀个线程执⾏流的,JVM 会将这些 Thread 对象组织起来,⽤于线程调度,线程管理。
2.1 Thread 常见的构造方法
| 方法 | 说明 |
|---|---|
| Thread() | 创建线程对象 |
| Thread(Runnable target) | 使用 Runnable 对象创建线程对象 |
| Thread(String name) | 创建线程对象,并命名 |
| Thread(Runnable target,String name) | 使用Runnable 对象创建线程对象,并命名 |
| Thread(ThreadGroup group,Runnable target(了解)) | 线程可以被用来分组管理,分好的组为线程组 |
Thread t1 = new Thread();
Thread t2 = new Thread(new MyRunnable());
Thread t3 = new Thread("这是新线程的名字");
Thread t4 = new Thread(new MyRunnable(), "这是新线程的名字");
/**
 *  给线程起名字 这是新线程
 */
public static void main(String[] args) {
    Thread thread = new Thread(() -> {
        while (true){
            System.out.println("hello thread");
            try {
                Thread.sleep(1000);
            } catch (InterruptedException e) {
                e.printStackTrace();
            }
        }
    },"这是新的线程");
    // 创建线程
    thread.start();

}

2.2 Thread 的几个常见属性

- ID 是线程的身份标识,不同的线程不会重复。(id 是 Java 给这个线程分配的,不是系统API提供的线程 id,也不是PCB中的 id)
- 名称是线程的名字,明确知道是哪一个线程
- 状态,描述线程当前所处状态,是就绪状态,还是运行状态,又或者是阻塞状态等
- 优先级,影响系统在微观上进行的调度 ,图中的方法提供API可以设置/获取优先级,但在应用程序的角度,很难察觉出优先级带来的差异
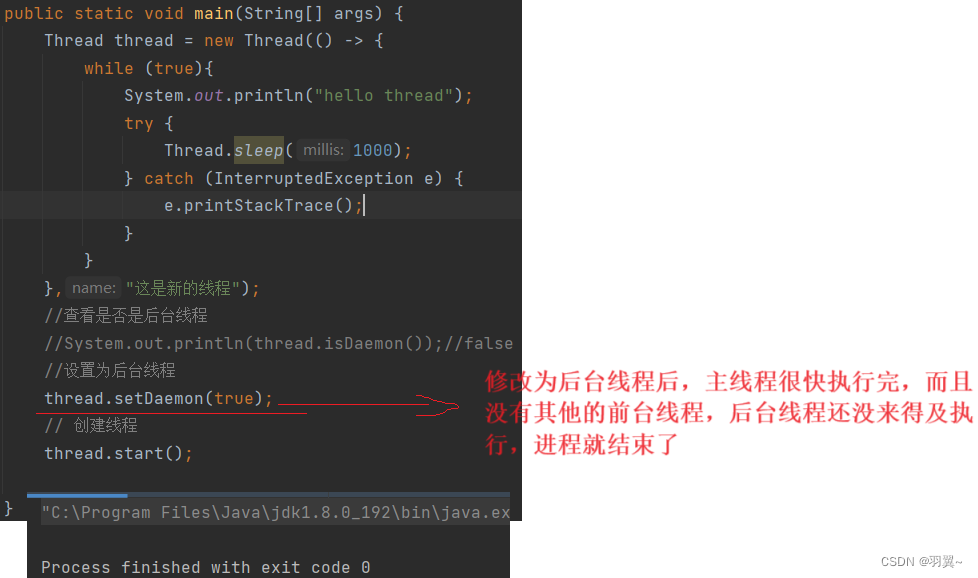
- 后台线程(守护线程),不结束,并不影响整个进程的结束;前台线程,一个Java进程中,如果前台线程没有结束,整个进程一定不会结束。默认情况下一个线程是前台线程。
- 是否存活,Thread 对象的生命周期比系统内核中的线程更长一些,就会导致Thread 对象还存在,内核中的线程已经销毁了的情况,使用 isAliva 判定内核线程是否已经销毁
- 线程中断,参考下文
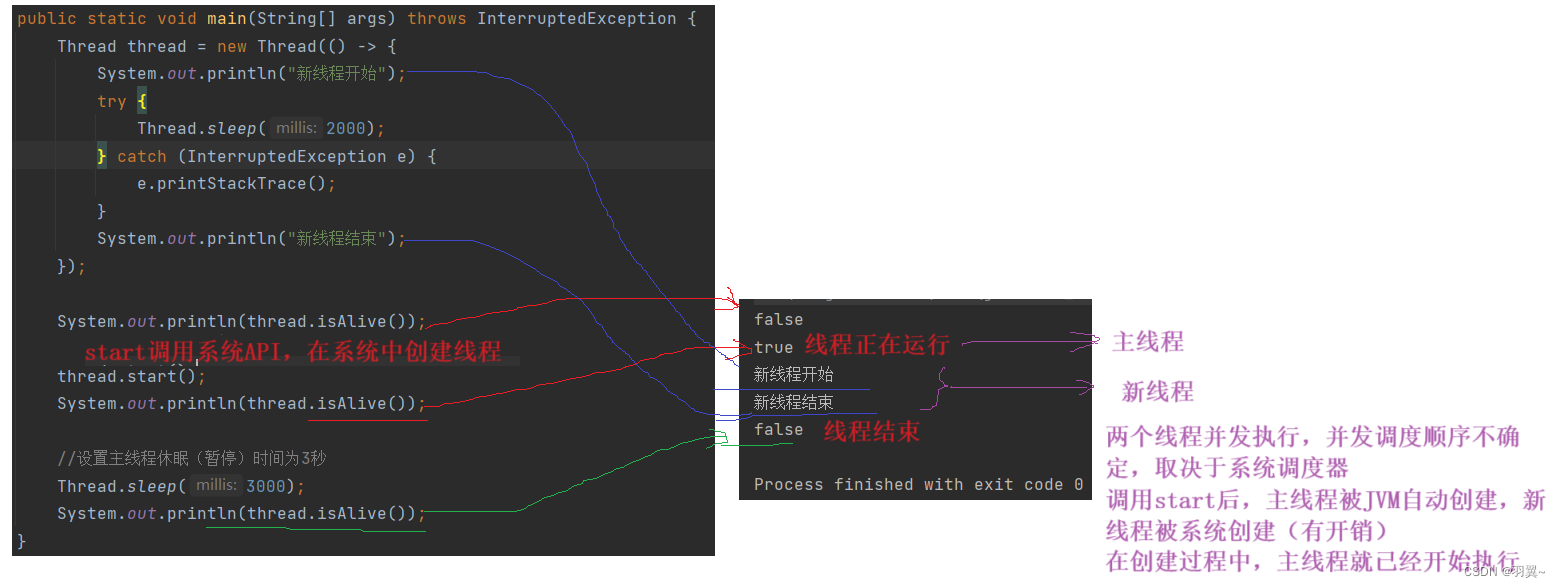
2.3 启动线程 - start() (面试题)
之前我们已经看到了 通过重写 run ⽅法创建⼀个线程对象,但线程对象被创建出来并不意味着线程就开始运⾏。
重写 run ⽅法是描述线程要做的事情,调⽤ start() ⽅法,线程才真的在操作系统的底层创建出⼀个线程
start 和 run 的区别:
- strat 方法内部,会调用系统API,在系统内核中创建线程
- run 方法,只是单纯的描述该线程要执行的内容(会在start 创建好线程后自动被调用)
start 和 run 方法的本质区别就是 start 会在系统内部创建出新线程,而 run 不会。
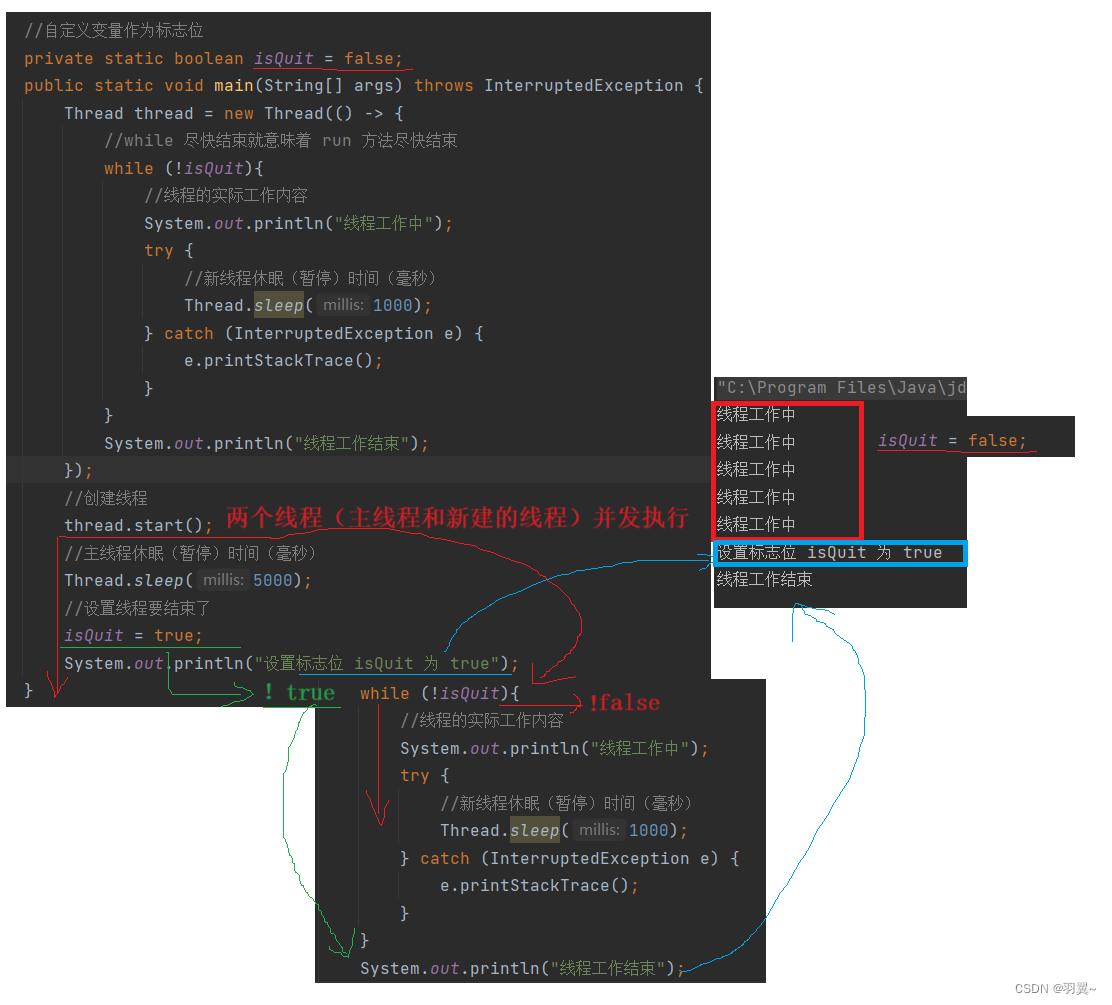
2.4 中断一个线程
中断一个线程,其实就是终止或打断线程,意思就是让一个线程停止运行(销毁)。在Java中,要销毁或者说终止线程,做法比较唯一,就是让 run 方法尽快执行结束。
常见方式:
- 通过共享标记进行沟通
public class demo8 {
    //自定义变量作为标志位
    private static boolean isQuit = false;
    public static void main(String[] args) throws InterruptedException {
        Thread thread = new Thread(() -> {
            //while 尽快结束就意味着 run 方法尽快结束
            while (!isQuit){
                //线程的实际工作内容
                System.out.println("线程工作中");
                try {
                    //新线程休眠(暂停)时间(毫秒)
                    Thread.sleep(1000);
                } catch (InterruptedException e) {
                    e.printStackTrace();
                }
            }
            System.out.println("线程工作结束");
        });
        //创建线程
        thread.start();
        //主线程休眠(暂停)时间(毫秒)
        Thread.sleep(5000);
        //设置线程要结束了
        isQuit = true;
        System.out.println("设置标志位 isQuit 为 true");
    }
}
2. 调用 Thread 内部提供的 interrupt 或 isInterrupted 方法
使⽤ Thread.interrupted() 或者 Thread.currentThread().isInterrupted() 代替⾃定义标志位,Thread 内部包含了⼀个 boolean 类型的变量作为线程是否被中断的标记。
| 方法 | 说明 |
|---|---|
| public void interrupt() | 终止线程,将线程的终止标志设置为 true。如果线程正在阻塞(sleep、wait、join等),调用 interrupt 终止将抛异常,否则只是设置终止标志,不会终止线程执行 |
| public static boolean interrupted() | 静态方法,判断当前线程是否已被终止,并清除终止状态(多次调用只有第一次返回 true),如果线程终止,返回 true,否则返回 false |
| public boolean isInterrupted() | 判断线程是否已被终止,但不清除终止状态,如果线程终止,返回 true,否则返回 false |
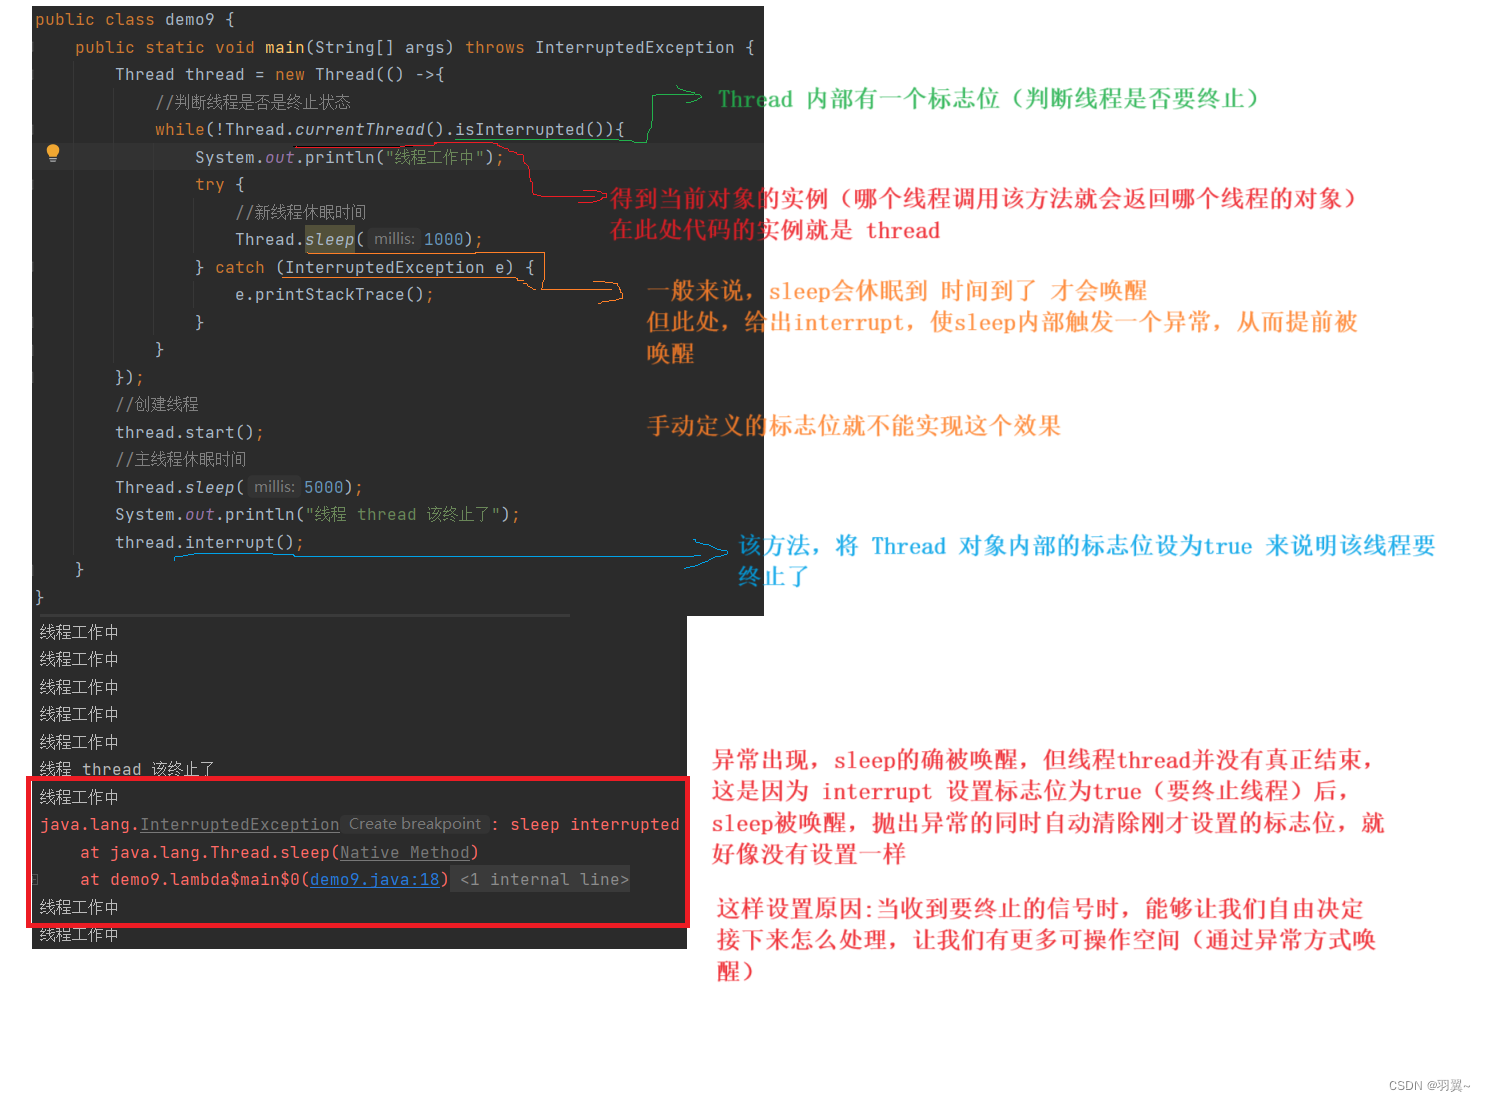
public class demo9 {
    public static void main(String[] args) throws InterruptedException {
        Thread thread = new Thread(() ->{
            //判断线程是否是终止状态
            while(!Thread.currentThread().isInterrupted()){
                System.out.println("线程工作中");
                try {
                    //新线程休眠时间
                    Thread.sleep(1000);
                } catch (InterruptedException e) {
                    //抛出异常,循环继续进行(假装没听到)
                    e.printStackTrace();
                    // 1.可以在结束前,做一些其他工作,完成后再结束
                    // 将其他工作的代码放在这里
                     System.out.println("做一些其他工作");
                    // 2. 使用 break 手动结束循环(即结束线程)
                    break;
                }
            }
        });
        //创建线程
        thread.start();
        //主线程休眠时间
        Thread.sleep(5000);
        System.out.println("线程 thread 该终止了");
        thread.interrupt();
    }
}

注意:
- 如果线程因为调⽤ wait/join/sleep 等⽅法⽽阻塞挂起,则以 InterruptedException 异常的形式通知,清除终止标志
- 当出现 InterruptedException 的时候,要不要结束线程取决于 catch 中代码的写法,可以选择忽略这个异常,也可以跳出循环结束线程
- 否则,只是内部的⼀个中断标志被设置,thread 可以通过
- Thread.currentThread().isInterrupted() 判断指定线程的中断标志被设置,不清除中断标志这种⽅式通知收到的更及时,即使线程正在 sleep 也可以⻢上收到
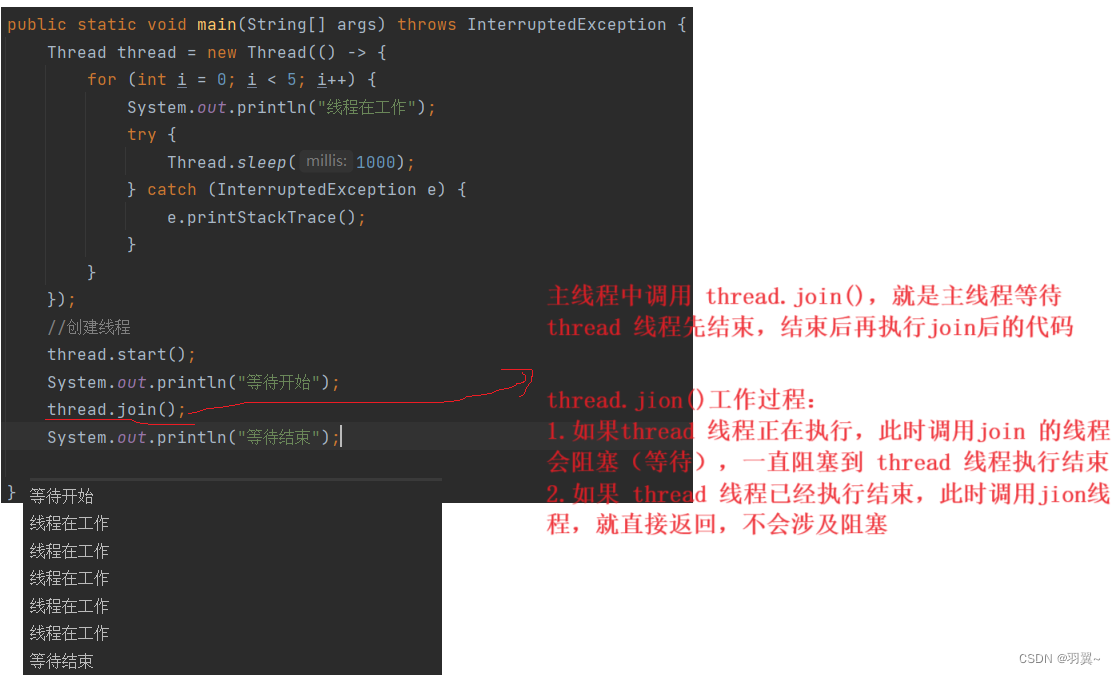
2.5 等待一个线程- join()
有时,我们需要等待⼀个线程完成它的⼯作后,才能进⾏⾃⼰的下⼀步⼯作,也即是说,让一个线程等待另一个线程执行结束再继续执行,本质上就是在控制线程结束的顺序。
| 方法 | 说明 |
|---|---|
| public void join() | 等待线程结束 |
| public void join(long millis) | 等待线程结束, 最多等待 millis 毫秒 |
| public void join(long millis, int nanos) | 同理,但可以更高精度 |
public class demo10 {
    public static void main(String[] args) throws InterruptedException {
        Thread thread = new Thread(() -> {
            for (int i = 0; i < 5; i++) {
                System.out.println("线程在工作");
                try {
                    Thread.sleep(1000);
                } catch (InterruptedException e) {
                    e.printStackTrace();
                }
            }
        });
        //创建线程
        thread.start();
        System.out.println("等待开始");
        thread.join();
        System.out.println("等待结束");

    }
}
2.6 获取当前线程引用
| 方法 | 说明 |
|---|---|
| public static Thread currentThread() | 返回当前线程对象引用 |
public class demo11 {
    public static void main(String[] args) {
        Thread thread = Thread.currentThread();
        System.out.println(thread.getName());
    }
}
2.7 休眠当前线程
线程的调度是不可控的,这个⽅法只能保证实际休眠时间是⼤于等于参数设置的休眠时间的。
| 方法 | 说明 |
|---|---|
| public static void sleep(long millis) throws InterruptedException | 休眠当前线程 millis 毫秒 |
| public static void sleep(long millis,int nanos) throws InterruptedException | 更高精度休眠当前线程 millis 毫秒 |
public static void main2(String[] args) throws InterruptedException {
     long start = System.currentTimeMillis();
     Thread.sleep(3000);
     long end = System.currentTimeMillis();
     // 每次进程休眠时间不确定,但是一个大于等于3000的数,例如 3014
     System.out.println("start - end = "+(end-start));
}
三、线程的状态
3.1 观察线程的所有状态
线程的状态是一个枚举类型Thread.State
public static void main(String[] args) {
    for (Thread.State state : Thread.State.values()) {
        System.out.println(state);
    }
}
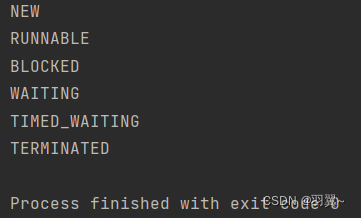
- NEW:安排了工作(确定了线程工作的内容/已经重写了run 方法),还没有开始执行
- RUNNABLE:线程是可以执行的,换句话说,线程是正在执行或已经准备就绪,时刻可以开始执行
- TERMINATED(终结的意思):Thread 对象还在,但内核中的线程已经销毁了或者说线程已经执行完了
- TIMED_WAITING:阻塞,由于 sleep 固定时间(设置休眠时间)的方式产生的阻塞
- WAITING:阻塞,由于 weit 不固定时间(不确定到底要等待多长时间)的方式产生的阻塞
- BLOCKED:阻塞,由于锁竞争而产生的阻塞
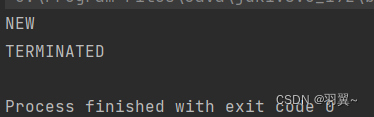
public static void main(String[] args) throws InterruptedException {
    Thread thread = new Thread(()->{

    });
    // 在调用 start 创建线程前 获取状态--此时就是 NEW 状态
    System.out.println(thread.getState());

    thread.start();
    // 主线程等待 thread 线程结束后再执行
    thread.join();

    // 获取 thread 线程 结束后的状态--TERMINATED
    System.out.println(thread.getState());
}
public static void main(String[] args) throws InterruptedException {
    Thread thread = new Thread(()->{
       while (true){

       }
    });
    // 在调用 start 创建线程前 获取状态--此时就是 NEW 状态
    System.out.println(thread.getState());

    thread.start();

    for (int i = 0; i < 5; i++) {
        // 获取 创建线程后的状态--RUNNABLE
        System.out.println(thread.getState());
        Thread.sleep(1000);
    }
    // 主线程等待 thread 线程结束后再执行
    thread.join();

    // 获取 thread 线程 结束后的状态--TERMINATED
    System.out.println(thread.getState());
}

public static void main(String[] args) throws InterruptedException {
    Thread thread = new Thread(()->{
       while (true){
           try {
               Thread.sleep(1000);
           } catch (InterruptedException e) {
               e.printStackTrace();
           }
       }
    });
    // 在调用 start 创建线程前 获取状态--此时就是 NEW 状态
    System.out.println(thread.getState());

    thread.start();

    for (int i = 0; i < 5; i++) {
        // 获取 创建线程后的状态--RUNNABLE
        System.out.println(thread.getState());
        Thread.sleep(1000);
    }
    // 主线程等待 thread 线程结束后再执行
    thread.join();

    // 获取 thread 线程 结束后的状态--TERMINATED
    System.out.println(thread.getState());
}

四、多线程带来的风险-线程安全(重点)
4.1 观察线程不安全
private  static int count = 0;
// 使用两个线程实现 count 在每个线程自增 5w ---多个线程修改同一个变量
public static void main(String[] args) throws InterruptedException {
    Thread thread1 = new Thread(()->{
        // count 自增 5w 次
        for (int i = 0; i < 50000; i++) {
            count++;
        }
    });
    Thread thread2 = new Thread(()->{
        // count 自增 5w 次
        for (int i = 0; i < 50000; i++) {
            count++;
        }
    });
    //两个线程同时执行
    thread1.start();
    thread2.start();

    //等待两个线程都结束,再打印 count 的值
    thread1.join();
    thread2.join();

    //预期的 count 是10w
    System.out.println("count: "+count);
}

4.2 什么是线程安全
在多线程环境下代码的运行结果和在单线程环境下运行的结果相同,就说这个(多)线程(程序)是安全的。
4.3 线程不安全的原因
-
操作系统中,线程的调度是随机的(是在系统内核中实现的),我们无法改变,但是我们必须要保证,在任何执行顺序下,代码都能正常工作
-
两个线程对同一个变量 进行修改。一个线程修改一个变量、两个线程修改不同变量 或者 两个线程对同一个变量读取,都不会有(安全)问题。
-
修改操作不是原子的

-
内存可见性问题
-
指令重排序问题
4.4 解决上述的线程不安全问题


public class demo14 {
    private  static int count = 0;
    public static void main(String[] args) throws InterruptedException {
        Object lock = new Object();
        Thread thread1 = new Thread(()->{
            // count 自增 5w 次
            for (int i = 0; i < 50000; i++) {
                //加锁
                synchronized (lock){
                    count++;
                }
            }
        });
        Thread thread2 = new Thread(()->{
            // count 自增 5w 次
            for (int i = 0; i < 50000; i++) {
                //加锁
                synchronized (lock){
                    count++;
                }
            }
        });
        thread1.start();
        thread2.start();

        //等待两个线程都结束,再打印 count 的值
        thread1.join();
        thread2.join();

        //预期的 count 是10w
        System.out.println("count: "+count);
    }
}


五 synchronized 关键字(监视器锁 monitor lock)
5.1 synchronized 的特性
- 互斥
synchronized 会起到互斥效果,某个线程执行到某个对象的 synchronized 中时,其他线程 执行了同一个对象的synchronized 就会阻塞等待- 进入 synchronized 修饰的代码块,就是加锁
- 出 synchronized 修饰的代码块,就是 解锁
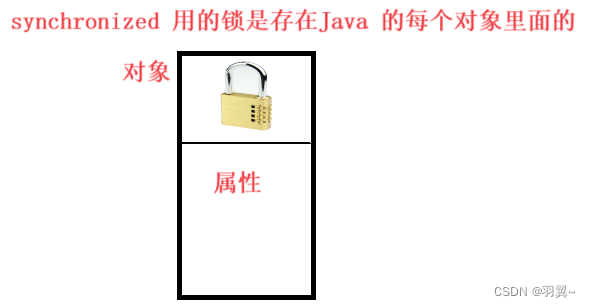
synchronised 底层是用操作系统的 mutex lock 来实现
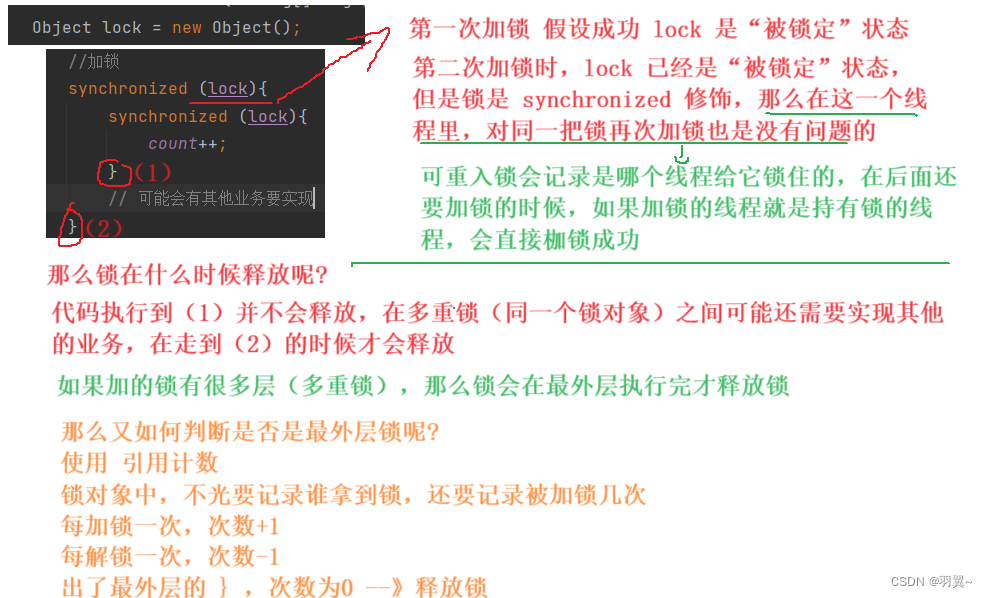
- 可重入
一个线程,连续对 一把锁 / 同一个锁对象 加锁两次,不会出现死锁的情况,就是可重入锁


5.2 synchronized 的使用
5.2.1 修饰代码块 :明确指明锁的哪个对象
- 锁任意对象
public static void main(String[] args) {
    Object lock = new Object();
    Thread thread1 = new Thread(()->{
       synchronized (lock){

       }
    });
}
- 锁当前对象
class SynchronizedDemo{
    public void  method(){
        synchronized (this){

        }
    }
}

5.2.2 修饰方法
- 修饰普通方法(实例方法)
class SynchronizedDemo{
    int count;
    public void  method(){
        synchronized (this){
            count++;
        }
    }
    synchronized public void method2(){
        count++;
    }
}
- 修饰静态方法(相当于对类对象加锁)
class SynchronizedDemo{
    int count;
    public void  method(){
        synchronized (this){
            count++;
        }
    }
    synchronized public void method2(){
        count++;
    }
     synchronized public static void method3(){

    }
}
使用实例
public static void main(String[] args) throws InterruptedException {
    SynchronizedDemo synchronizedDemo = new SynchronizedDemo();
    Thread thread1 = new Thread(()->{
        for (int i = 0; i < 50000; i++) {
            //synchronizedDemo.method();
            synchronizedDemo.method2();
        }
    });
    Thread thread2 = new Thread(()->{
        for (int i = 0; i < 50000; i++) {
            //synchronizedDemo.method();
            synchronizedDemo.method2();
        }
    });
    thread1.start();
    thread2.start();
    thread1.join();
    thread2.join();
    System.out.println(synchronizedDemo.count);//100000
}
5.3 Java 标准库中的线程安全类
Java 标准库中有很多都是线程不安全的,这些类可能会涉及多线程修改共享数据,又没有加锁措施
- ArrayList
- LinkedList
- HashMap
- TreeMap
- HashSet
- TreeSet
- String Builder
也有一些线程安全的类,使用一些锁机制来控制
- Vector(不推荐使用)
- HashTable
- ConcurrentHashMap
- StringBuffer
还有的虽然没有加锁,但不涉及修改,也是线程安全的
- String
六、volatile 关键字
6.1 volatile 保证内存可见性
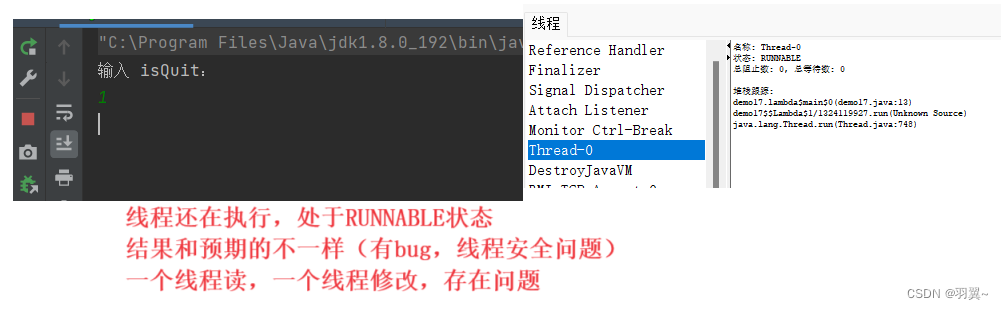
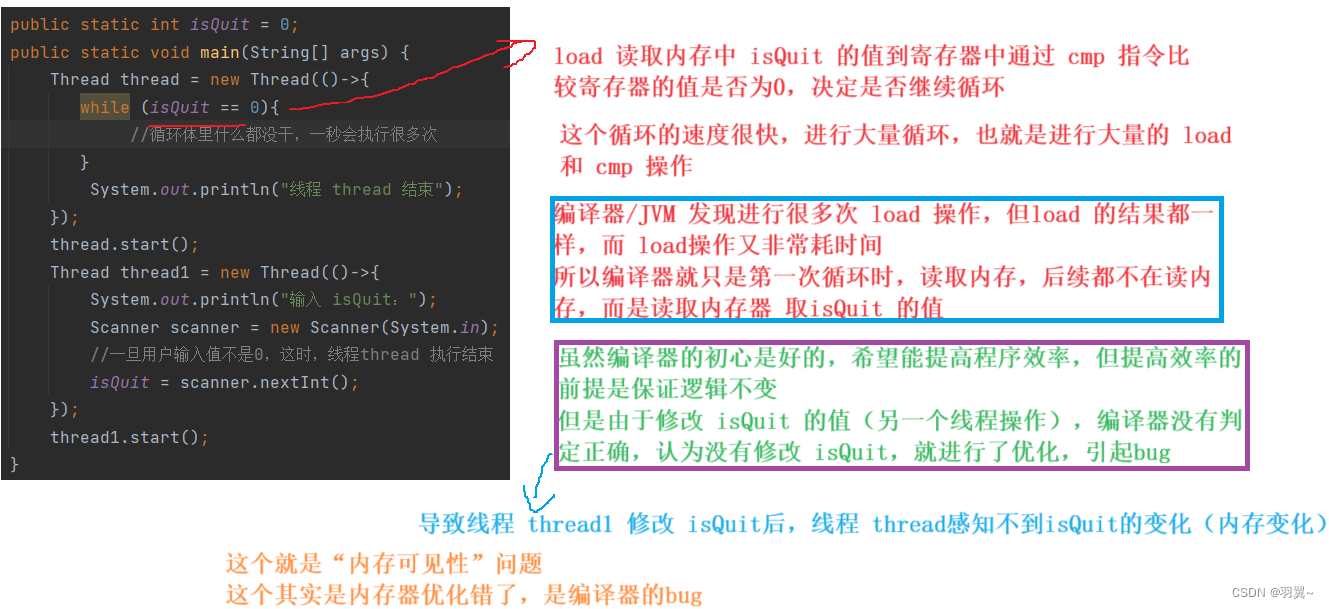
写代码实现用户输入线程结束条件(isQuit > 0),线程可以立刻执行结束
public static int isQuit = 0;
public static void main(String[] args) {
    Thread thread = new Thread(()->{
       while (isQuit == 0){
            //循环体里什么都没干,一秒会执行很多次
       }
        System.out.println("线程 thread 结束");
    });
    thread.start();
    Thread thread1 = new Thread(()->{
        System.out.println("输入 isQuit:");
        Scanner scanner = new Scanner(System.in);
        //一旦用户输入值不是0,这时,线程thread 执行结束
        isQuit = scanner.nextInt();
    });
    thread1.start();
}
运行后发现

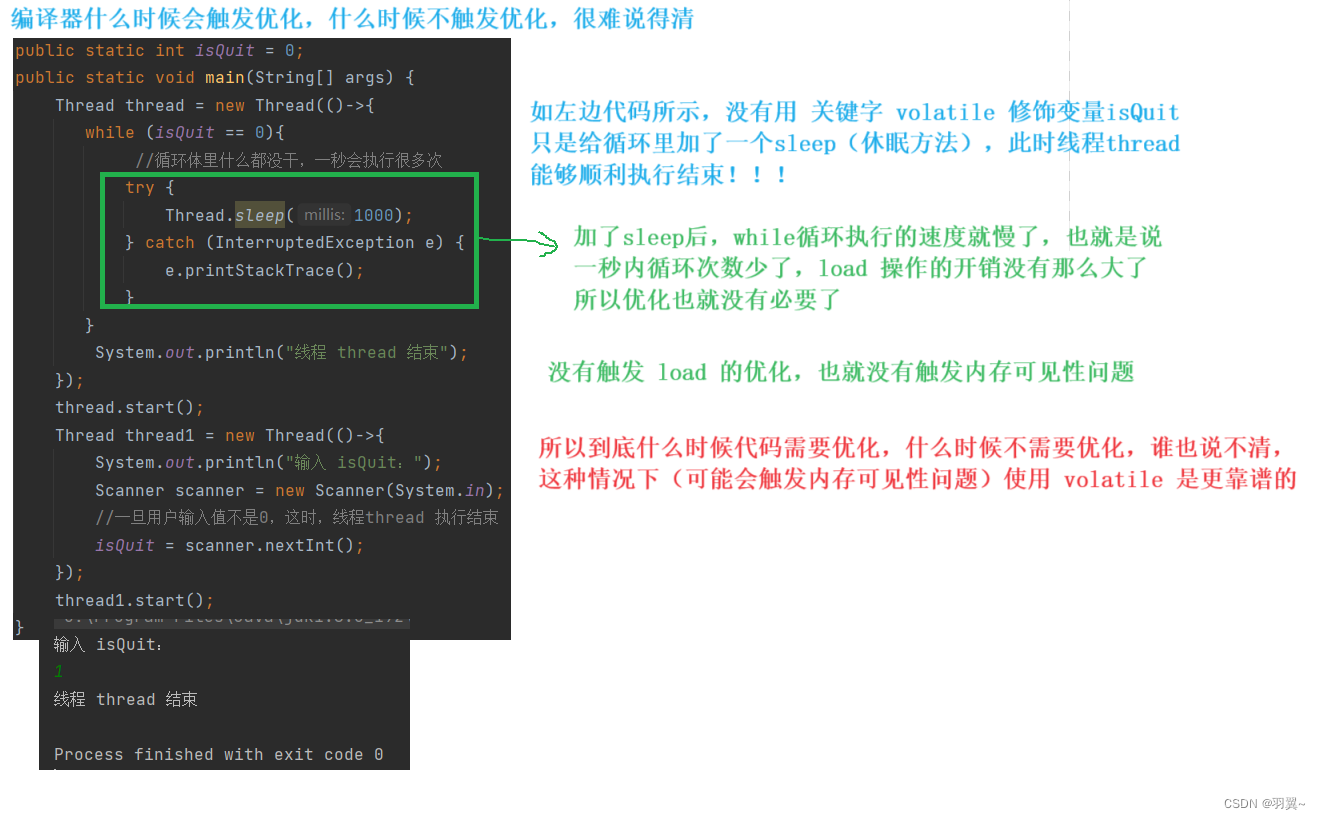
修改后的代码:
public class demo17 {
    public static volatile int isQuit = 0;
    public static void main(String[] args) {
        Thread thread = new Thread(()->{
           while (isQuit == 0){
                //循环体里什么都没干,一秒会执行很多次
           }
            System.out.println("线程 thread 结束");
        });
        thread.start();
        Thread thread1 = new Thread(()->{
            System.out.println("输入 isQuit:");
            Scanner scanner = new Scanner(System.in);
            //一旦用户输入值不是0,这时,线程thread 执行结束
            isQuit = scanner.nextInt();
        });
        thread1.start();
    }
}
6.2 volatile 不保证原子性
volatile 和 synchronized 有着本质的区别。synchronized 保证原⼦性, volatile 保证内存可⻅性。
示例:
多线程实现计数器 count
class Count{
    private static int count = 0;
    //自增成为原子性操作
    synchronized void increase(){
        count++;
    }
    public int getCount(){
        return count;
    }
}
public class demo18 {
    public static void main(String[] args) throws InterruptedException {
        Count count = new Count();
        Object lock = new Object();
        Thread thread1 = new Thread(() ->{
            for (int i = 0; i < 50000; i++) {
                    count.increase();
            }
        });
        Thread thread2 = new Thread(() ->{
            for (int i = 0; i < 50000; i++) {
                    count.increase();
            }
        });
        thread1.start();
        thread2.start();

        //两个线程都结束在继续执行主线程
        thread1.join();
        thread2.join();
        //预期结果 10w
        System.out.println(count.getCount());//10w
    }
}
现在去掉修饰 increase 方法的 synchronized(加锁),给 count 加 volatile 关键字进行修饰
class Count{
    private static volatile int count = 0;

    void increase(){
        count++;
    }
    public int getCount(){
        return count;
    }
}
public class demo18 {
    public static void main(String[] args) throws InterruptedException {
        Count count = new Count();
        Object lock = new Object();
        Thread thread1 = new Thread(() ->{
            for (int i = 0; i < 50000; i++) {
                    count.increase();
            }
        });
        Thread thread2 = new Thread(() ->{
            for (int i = 0; i < 50000; i++) {
                    count.increase();
            }
        });
        thread1.start();
        thread2.start();

        //两个线程都结束在继续执行主线程
        thread1.join();
        thread2.join();
        //预期结果 10w
        System.out.println(count.getCount());//结果却是一个不大于10w 的数
    }
}
上述代码运行结果证明 volatile 关键字并不能保证原子性
七、wait 和 notify

线程之间是抢占式执行,所以线程之间的执行先后顺序我们并不知道,但实际开发中,有时候希望合理的协调多个线程之间的执行先后顺序,就像 打一场篮球比赛

球场上的每个运动员都是一个独立的线程,而要完成进攻得分,需要多个运动员相互配合,按照一定的顺序执行一定的动作,即可认为有的线程要传球,有的线程要进球这样的动作
而要完成协调工作,就会涉及三个方法:
- wait() / wait(long timeout):使当前线程进入等待状态
- notify / notifyAll():唤醒当前对象上等待的线程
需要注意的是:wait、notify、notifyAll 都是 Object 类的方法
7.1 wait()方法
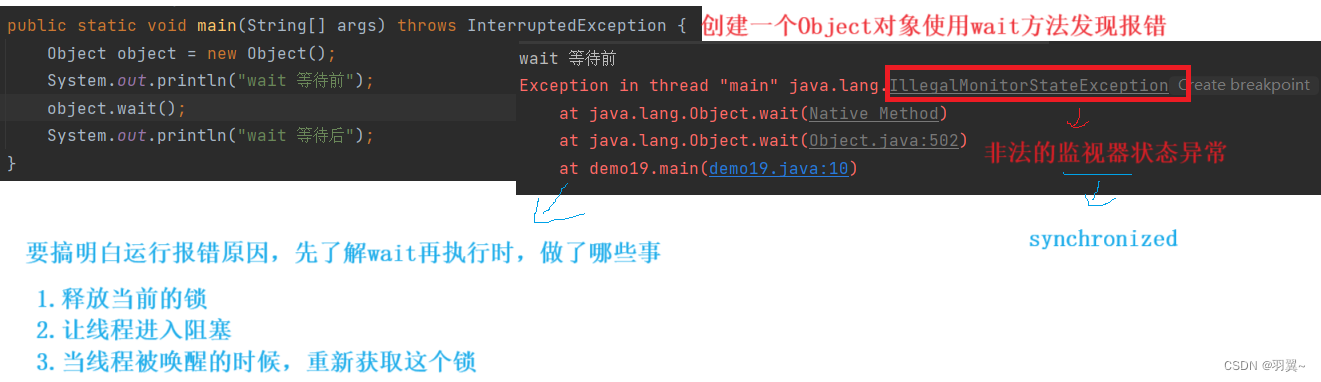
wait方法执行时做的事:
- 释放当前的锁
- 线程进入阻塞状态
- 当线程被唤醒时,重新获取这个锁
使用 wait 要搭配 synchronized , 确保在 wait 前获取到锁,脱离 synchronized 使用 wait 会抛出异常。

public static void main(String[] args) throws InterruptedException {
    Object object = new Object();
    synchronized (object){
        System.out.println("wait 等待前");
        // wait 放在 synchronized 来保证获取到锁
        object.wait();
        System.out.println("wait 等待后");
    }

}
调用 wait 不一定就只有一个线程调用,N个线程都可以调用 wait ,这N线程都调用后,都处于阻塞状态。
wait 结束等待的条件:
- 其他线程调用该对象的 notify方法(唤醒时,会有一个重新获取锁的过程)
- wait等待时间超时(在调用wait 方法时,就指定等待时间)
- 其他线程调用该等待线程的interrupted 方法,使wait抛出 InterruptedException 异常
7.2 notify()方法
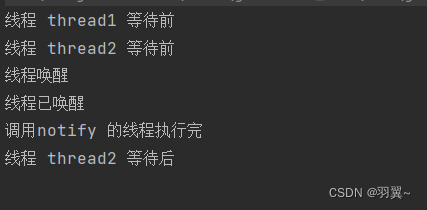
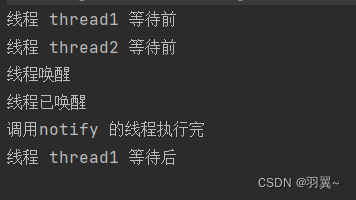
notify()方法是唤醒等待的线程
- notify()方法也要和 synchronized 搭配使用,因为在唤醒等待的线程的时候,要重新获取这个锁,否则也会抛出异常
- 如果有多个线程等待,线程程调度器就会随机挑选一个等待的线程
- notify()方法后,当前线程不会马上释放这个锁,要等到执行notify()方法的线程执行完后才会释放这个锁
代码实现创建两个线程,都会等待第三个线程创建后(手动)确定唤醒哪一个
public class demo21 {
    public static void main(String[] args) {
        Object object2 = new Object();
        Thread thread1 = new Thread(() ->{
            synchronized (object2){
                System.out.println("线程 thread1 等待前");
                try {
                    object2.wait();
                } catch (InterruptedException e) {
                    e.printStackTrace();
                }
                System.out.println("线程 thread1 等待后");
            }
        });
        Thread thread2 = new Thread(() ->{
           synchronized (object2){
               System.out.println("线程 thread2 等待前");
               try {
                   object2.wait();
               } catch (InterruptedException e) {
                   e.printStackTrace();
               }
               System.out.println("线程 thread2 等待后");
           }
        });
        Thread thread3 = new Thread(() ->{
        try {
                Thread.sleep(1000);
            } catch (InterruptedException e) {
                e.printStackTrace();
            }
           synchronized (object2){
               System.out.println("线程唤醒");
               object2.notify();
               System.out.println("线程已唤醒");
           }
            System.out.println("调用notify 的线程执行完");
        });
        thread1.start();
        thread2.start();
        thread3.start();
    }
}
7.3 notifyAll()方法
notify⽅法只是唤醒某⼀个等待线程,使⽤notifyAll⽅法可以⼀次唤醒所有等待的线程。
public class demo22 {
    public static void main(String[] args) {
        Object object1 = new Object();
        Thread thread1 = new Thread(() ->{
            synchronized (object1){
                System.out.println("线程 thread1 等待前");
                try {
                    object1.wait();
                } catch (InterruptedException e) {
                    e.printStackTrace();
                }
                System.out.println("线程 thread1 等待后");
            }
        });
        Thread thread2 = new Thread(() ->{
            synchronized (object1){
                System.out.println("线程 thread2 等待前");
                try {
                    object1.wait();
                } catch (InterruptedException e) {
                    e.printStackTrace();
                }
                System.out.println("线程 thread2 等待后");
            }
        });
        Thread thread3 = new Thread(() ->{
			try {
                Thread.sleep(1000);
            } catch (InterruptedException e) {
                e.printStackTrace();
            }
            synchronized (object1){
                System.out.println("线程唤醒");
                object1.notifyAll();
                System.out.println("线程唤醒后");
            }
            System.out.println("调用 notifyAll 的线程执行完");
        });
        thread1.start();
        thread2.start();
        thread3.start();
    }
}
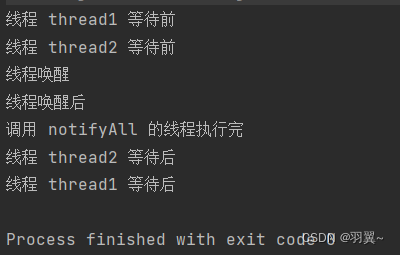
注意:虽然是同时唤醒使用同一个锁的 所有的线程,但唤醒的所有线程需要竞争锁,并不是同时执行,仍有先后执行。
7.4 wait 和 sleep 的对比(重要)
- 起源上,wait 是 Object 的普通方法,sleep 是 Thread 的静态方法
- 应用场景上,wait 用于实现线程间的协调,需要搭配监视器(synchronized)使用,而 sleep 用于让线程休眠一段时间,不需要搭配监视器
- 锁的释放上,在调用 wait 时,会释放对象锁,其他线程可以获取该锁,而调用 sleep 时不会释放对象锁,其他线程不能获取该锁
- 唤醒方式上,wait 通过其他线程调用相同锁对象的 notify 或 notifyAll 来唤醒,而 sleep 在指定休眠时间过后自动唤醒,或者通过其他线程中断它来提前唤醒
八、多线程案例
8.1 单例模式
单例模式是校招最常考的设计模式之一(另一个是工厂模式)。
设计模式:就好比象棋中的棋谱,红⽅当头炮,⿊⽅⻢来跳,针对红⽅的⼀些⾛法,⿊⽅应招的时候有⼀些固定的套路。按照套路来⾛,局势就不会吃亏。
开发过程中,针对特定的问题场景,大佬总结出固定的套路,按固定套路来实现代码,不会吃亏。
单例模式:一些场景中要求某个类只有一个实例(对象),不会再创建出多个实例。
单例模式实现方式有很多,最常见有 “饿汉” 和 “懒汉” 两种
8.1.1 饿汉模式
类加载时就创建实例。
class Singleton{
    //类加载时就创建实例
    private static Singleton instance = new Singleton();
    //保证没有其他的构造方法再创建实例
    private Singleton(){ };
    //只获取实例
    public static Singleton getInstance(){
        return instance;
    }
}
8.1.2 懒汉模式
类加载时不创建实例,第⼀次使⽤时才创建实例。
- 单线程版
class SingletonLazy{
    private static SingletonLazy instance = null;
    private SingletonLazy(){ };
    //在第一次使用时创建实例
    public static SingletonLazy getInstance(){
        if(instance == null){
            instance = new SingletonLazy();
        }
        return instance;
    }
}
- 多线程版
多线程版的就不安全了,线程安全问题发生在首次创建实例的时候,如果多个线程中同时调用 getInstance 方法,就可能创建出多个实例。(多线程,可能既会获取又会修改 Instance)
使用 synronized 对 创建实例的方法加锁。
class SingletonLazy{
    private static SingletonLazy instance = null;
    public synchronized static SingletonLazy getInstance(){
        if(instance == null){
            instance = new SingletonLazy();
        }
        return instance;
    }
}
也可以写成下面的代码,是同样效果
class SingletonLazy{
    private static SingletonLazy instance = null;
    public static SingletonLazy getInstance(){
        synchronized (SingletonLazy.class){
            if(instance == null){
                instance = new SingletonLazy();
            }
        }
        return instance;
    }
}
- 多线程版改进
一旦以上述代码形式执行多线程,每一次调用 getInstance 都会先加锁(加锁开销很大,一旦加锁,就很可能会引发锁冲突进而会引起阻塞),锁竞争的频率就会很高,但是实际上,发生线程安全问题,只是在最开始(对象还没有new )的时候,对象被 new 过后就不需要再修改,只有读操作
那么是否有办法让代码既线程安全又不会对执行效率有太多影响呢?
在加锁的外层进行判断是否需要加锁,如果已经有对象了,线程就安全了,不需要加锁,如果没有对象,就会有线程安全问题,需要加锁
class SingletonLazy{
    private static volatile SingletonLazy instance = null;
    public static SingletonLazy getInstance(){
        //判断是否需要加锁
        if(instance == null){
            synchronized(SingletonLazy.class){
                //判断是否需要new 对象
                if(instance == null){
                    instance = new SingletonLazy();

                }
            }
        }
        return instance;
    }
}

指令重排序 (编译器进行的优化—>在不改变逻辑的前提下调整代码执行顺序来提高执行效率)可能会对上述代码产生影响。

对于指令重排序问题,解决办法是 使用 volatile 关键字修饰 instance ,保证编译器不进行优化,也就不会出现指令重排序的问题。
class SingletonLazy{
    private static volatile SingletonLazy instance = null;
    public static SingletonLazy getInstance(){
        //判断是否需要加锁
        if(instance == null){
            synchronized(SingletonLazy.class){
                //判断是否需要new 对象
                if(instance == null){
                    instance = new SingletonLazy();

                }
            }
        }
        return instance;
    }
}
8.2 阻塞队列
8.2.1 阻塞队列的定义
阻塞队列是一种特殊的队列,也遵守先进先出的原则。
阻塞队列是一种线程安全的数据结构,有下面两个特性:
- 当队列元素满的时候,继续入队列就会阻塞,一直到其他线程从队列中取走元素
- 当队列为空的时候,继续出列也会阻塞,一直到其他线程向队列中插入元素
8.2.2 消费者模型
阻塞队列的经典应用场景就是 “生产者消费者模型”(一种典型的开发模式)。


8.2.3 标准库中的阻塞队列
在 Java 标准库中内置了阻塞队列,如果需要使⽤阻塞队列,直接使⽤标准库中的即可。
- BlockingQueue 是⼀个接口,继承自 Queue,实现的方法有两种:基于数组和基于链表,实现的类是 ArrayBlockingQueue 和 LinkedBlockingQueue
- put ⽅法⽤于阻塞式的⼊队列,take 方法⽤于阻塞式的出队列
- BlockingQueue 也有 offer,poll,peek 等⽅法,但这些⽅法不具有阻塞特性,不建议使用
//基于数组的实现  需要指定容量否则会报错
BlockingQueue<String> blockingQueue = new ArrayBlockingQueue<>(1000);
//基于链表的实现
BlockingQueue<String> queue = new LinkedBlockingQueue<>();
// ⼊队列,如果队列满就会阻塞,直到不再满
queue.put("abc");
// 出队列, 如果队列为空就会阻塞,直到不再为空.
String elem = queue.take();
8.2.4 阻塞队列的模拟实现
- 通过 “循环队列” 的⽅式来实现
- 使⽤ synchronized 进⾏加锁控制
- 使用 volatile 防止内存可见性问题(代码中涉及共享数据的修改时,编译器可能会优化)
- put 插⼊元素的时候,判定如果队列满了,就进⾏ wait。
注意:要在循环中进⾏ wait,被唤醒(有可能是因为使用 intrruput 终止线程时唤醒 wait,抛出异常,线程正常结束,但如果是捕获了异常,代码会向后走,但是不知道此时队列是否已满,还要进行判断)时可能队列也是满了。使用 wait 往往使用 while 作为条件判断方式,目的在于 让 wait 被唤醒后还能再确认一次是否仍满足条件。 - take 取出元素的时候,判定如果队列为空,就进⾏ wait (也是循环 wait) 。
class MyBlockQueue{
    //队列存储的数据,最大长度可以直接指定,也可以使用构造方法自定义指定
    private String[] elem = new String[1000];
    //队列的首位置
    private volatile int head;
    //队列的结束位置的下一位
    private volatile int rear;
    //记录队列元素个数
    private volatile int size;
    // 锁对象
    private Object locker = new Object();
    //入队
    public void push(String s) throws InterruptedException {
        // 由于方法中有很多数据可能会修改(可能会引起内存可见性问题),
        // 而又要尽量减少锁的使用(加锁,开销会很大),所以对整体加一个锁
        synchronized (locker){
            while (size == elem.length){
                //队列已满
                //进入阻塞状态
                locker.wait();
                //再次唤醒 wait 的时候还要判断队列是否满
            }
            elem[rear] = s;
            rear++;
            if(rear == elem.length){
                rear = 0;
            }
            size++;
            //唤醒的是 take方法中的 wait(由于空队引起的阻塞)
            locker.notify();
        }
    }
    //出队
    public String take() throws InterruptedException {
        // 由于方法中有很多数据可能会修改(可能会引起内存可见性问题),
        // 而又要尽量减少锁的使用(加锁,开销会很大),所以对整体加一个锁
        synchronized (locker){
            while (size == 0){
                //空队列
                //进入阻塞等待
                locker.wait();
                //再次唤醒 wait 的时候还要判断队列是否满
            }
            String ret = elem[head];
            head++;
            if(head == elem.length){
                head = 0;
            }
            size--;
            //唤醒的是 push 方法 中的 wait(由于队满而引起的阻塞)
            locker.notify();
            return ret;
        }
    }
}
生产者消费者模型
public static void main(String[] args) {
    BlockingQueue<String> blockingQueue = new ArrayBlockingQueue<>(1000);
    Thread threadProduct = new Thread(() ->{
        int num = 1;
        while (true){
            try {
                blockingQueue.put(num+"");
                System.out.println("生产元素:"+num);
                num++;
                //生产元素慢 0.5 秒
                Thread.sleep(500);
            } catch (InterruptedException e) {
                e.printStackTrace();
            }
        }
    },"生产者");
    Thread threadCustomer = new Thread(() ->{
       while (true){
           try {
               String date = blockingQueue.take();
               System.out.println("消费元素:"+date);
           } catch (InterruptedException e) {
               e.printStackTrace();
           }
       }
    },"消费者");
    threadCustomer.start();
    threadProduct.start();
}
8.3 定时器
8.3.1 什么是定时器
定时器是软件开发的一个重要组件,类似于闹钟,作用是设定一个时间,当达到这个时间后,就执行一个指定好的代码。

定时器作为实际开发中常用的组件,比如在网络通信中,如果对方在500毫秒内没有返回数据,就会断开连接尝试重新连接。

8.3.2 标准库中的定时器
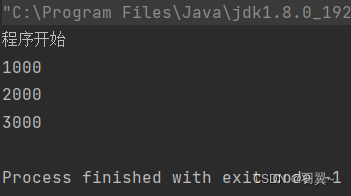
Java标准库中提供一个 Timer 类就是定时器的实现,Timer 类的核心方法是 schedule ,翻译成中文 有安排的意思。
schedule 包含两个参数,第一个参数是将要执行的任务代码,第二个参数是指定等待多长时间才执行(单位:毫秒)。
public static void main(String[] args) {
Timer timer = new Timer();
//给定时器安排一个任务---》预定在一个3秒后执行(起始时间是从schedule开始计算)
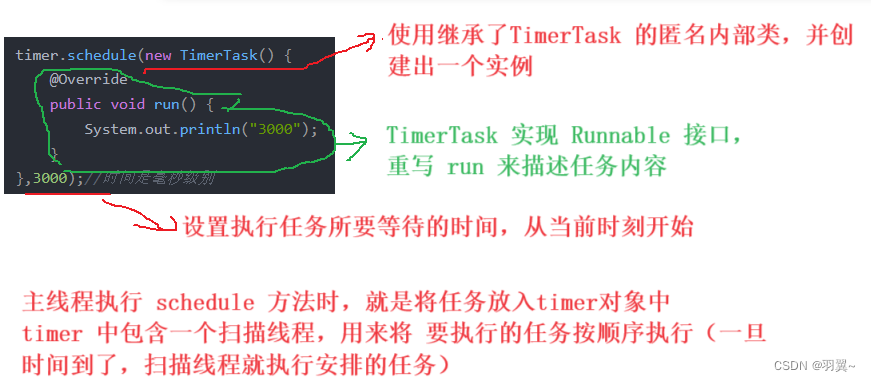
timer.schedule(new TimerTask() {
@Override
public void run() {
System.out.println("3000");
}
},3000);//时间是毫秒级别
timer.schedule(new TimerTask() {
@Override
public void run() {
System.out.println("1000");
}
},1000);
timer.schedule(new TimerTask() {
@Override
public void run() {
System.out.println("2000");
}
},2000);
System.out.println("程序开始");
}
8.3.3 模拟实现定时器
定时器构成
- 有一个类,用来描述任务(任务内容和执行时间)
- 有一个优先级队列,存放所有的任务(队首元素就是最先要执行的任务)
- 有一个扫描线程,判断任务是否到了要执行的时间
//定义一个类用来描述任务,包含任务内容和执行时间
//任务要放入优先级队列,必须是可比较的,要实现比较的接口重写方法
class MyTimeTask implements Comparable<MyTimeTask>{
    private Runnable runnable;
    private long time;

    @Override
    public int compareTo(MyTimeTask o) {
        //创建的优先级队列中,时间最小的放队首--先执行
        return (int) (this.time - o.time);
    }

    public MyTimeTask(Runnable runnable, long time) {
        this.runnable = runnable;
        //保存绝对时间(记录到什么时间才开始执行任务)
        this.time = System.currentTimeMillis() + time;
    }

    public long getTime() {
        return time;
    }

    public Runnable getRunnable() {
        return runnable;
    }
}
class MyTimer{
    //存储要执行的任务
    private PriorityQueue<MyTimeTask> priorityQueue = new PriorityQueue<>();

    //锁对象
    private Object locker = new Object();

    //安排任务
    public void schedule( Runnable runnable,long time){
        synchronized (locker){
            priorityQueue.offer(new MyTimeTask(runnable, time));
            //唤醒等待的线程
            locker.notify();
        }

    }
    //创一个扫描线程
    public MyTimer(){
        Thread thread = new Thread(() ->{
           //一直扫描队首的任务,查看是否达到执行的时间
           while (true){
               try {
                   synchronized (locker){
                       while (priorityQueue.isEmpty()){
                           //空的任务队列==》等待,直到队列不为空才被唤醒
                           locker.wait();
                       }
                       MyTimeTask myTimeTask = priorityQueue.peek();
                       //获取当前时间
                       long curTime = System.currentTimeMillis();
                       if (curTime >= myTimeTask.getTime()){
                           //任务时间已经达到-->执行任务
                           myTimeTask.getRunnable().run();
                           //从任务队列中删除
                           priorityQueue.poll();
                       }else {
                           // 没有达到任务时间,不执行任务,等到任务要开始执行
                           // wait 方法使线程阻塞,线程不会在cpu上调度,不占cpu资源
                           // 避免忙等(什么都不干,也没有休息,一直占用cpu资源)
                           locker.wait(myTimeTask.getTime() - curTime);

                       }
                   }
               }catch (InterruptedException e) {
                   e.printStackTrace();
               }
           }
        });
        thread.start();
    }
}
public class demo26 {
public static void main(String[] args) {
MyTimer myTimer = new MyTimer();
myTimer.schedule(new Runnable() {
@Override
public void run() {
System.out.println("3000");
}
},3000);
myTimer.schedule(new Runnable() {
@Override
public void run() {
System.out.println("1000");
}
},1000);
myTimer.schedule(new Runnable() {
@Override
public void run() {
System.out.println("2000");
}
},2000);
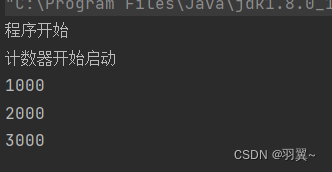
System.out.println("程序开始");
System.out.println("计数器开始启动");
}
}
8.4 线程池
8.4.1 什么是线程
线程诞生是因为进程的创建和销毁,太重量(开销比较大,效率就比较慢),而当线程的创建和销毁也频繁的时候,那么线程的开销也不能忽视,为了提高效率,Java 中有了线程池这个概念,用来减少创建和销毁线程的开销,当在创建第一个线程的时候,就把要使用的其他线程也提前创建好,放在池子里,后续使用的时候,直接从池子里取出来。

8.4.2 标准库中的线程(重要)
- 使用 Executors.newFixedThreadPool(10); 创建出固定线程数量(这里是10个)的线程池
- 返回值是 ExecutorService 类型
- 通过 ExecutorService.submit 方法,将一个任务提交到线程池中
ExecutorService service = Executors.newFixedThreadPool(10);
service.submit(new Runnable() {
    @Override
    public void run() {
        System.out.println("工程模式创建线程池");
    }
});


Executors 创建线程池的几种方式:
- newFixedThreadPool:创建固定数量的线程池
- newCachedThreadPool:创建线程数目动态增长(线程根据需要,自动被动的被创建出来)的线程池
- newSingleThreadExecutor:创建单个线程的线程池
- newScheduledThreadPool:设置多长时间后执行命令相当于定时器的进阶版,不是一个线程负责执行任务,而是有多个线程执行到时间的任务
Executors 本质上是 ThreadPoolExecutor 类的封装,ThreadPoolExecutor 类核心方法只有两个:构造和添加任务(submit)


8.4.3 模拟实现线程池
- 方法 submit ,将任务加入线程池中
- 使用 一个阻塞队列(BlockingQueue)组织所有的任务
- 指定线程池中线程的最大数目,当线程超过这个最大数目,不再创建线程
class MyThreadPool{
    //  阻塞队列---》 组织/存放 任务
    private BlockingQueue<Runnable> blockingQueue = new ArrayBlockingQueue<>(10);

    // 通过这个方法,将任务加入到队列中
    public void submit(Runnable runnable) throws InterruptedException {
        // 任务满了 ,就会阻塞等待
        blockingQueue.put(runnable);
    }
    //创建线程池时,创建好线程并执行任务
    public MyThreadPool(int n){
        // 创建 n 个线程
        for (int i = 0; i < n; i++) {
            // 描述 线程执行的任务
            Thread thread = new Thread(() ->{
                try {
                    //   获取并执行 任务
                    Runnable runnable = blockingQueue.take();
                    runnable.run();
                } catch (InterruptedException e) {
                    e.printStackTrace();
                }
            });
            thread.start();
        }
    }
}
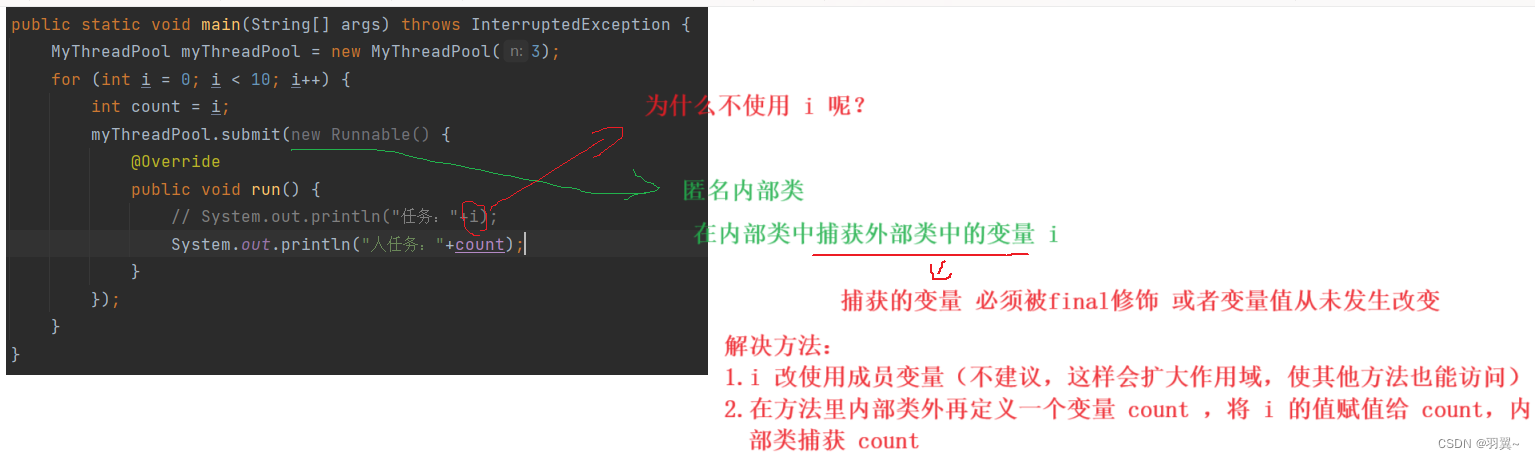
public static void main(String[] args) throws InterruptedException {
    MyThreadPool myThreadPool = new MyThreadPool(3);
    for (int i = 0; i < 10; i++) {
        int count = i;
        myThreadPool.submit(new Runnable() {
            @Override
            public void run() {
                // System.out.println("任务:"+i);
                System.out.println("人任务:"+count);
            }
        });
    }
}

九、对比线程和进程
9.1 线程的优点
- 线程比进程更轻量,创建一个线程的开销比创建一个进程的开销小
- 操作系统调度线程比调度进程的效率更高
- 线程占用的资源比进程更少
- 充分利用多处理器(cpu)可并行的数量
9.2 线程和进程的区别
- 进程包含线程(线程不能独立存在,要依附于进程),每个进程⾄少有⼀个线程存在,即主线程
- 进程和线程 都是用来实现并发编程场景的,但线程比进程更轻量,更高效
- 进程和进程之间不共享资源,同⼀个进程的线程之间共享资源(内存和硬盘)
- 进程是系统分配资源的最⼩单位,线程是系统调度的最⼩单位
- 进程之间是独立的,⼀个进程挂了⼀般不会影响到其他进程,但⼀个线程挂了,很大可能影响同进程内的其他线程(整个进程崩溃)