python之使用深度学习创建自己的表情符号
目录
- 部署项目
- 1、首先运行train.py训练模型
- 2、接下运行gui.py测试
- 一、使用 CNN 进行面部情绪识别
- 二、GUI 代码和表情符号映射
在这个深度学习项目中,我们将对人类面部表情进行分类,以过滤和映射相应的表情符号或头像。
数据集(面部表情识别)由48*48像素的灰度人脸图像组成。图像居中并占据相等的空间。该数据集由以下类别的面部情绪组成:
0:生气
1:厌恶
2:壮举
3:快乐
4:悲伤
5:惊喜
6:自然
下载项目代码:click or click
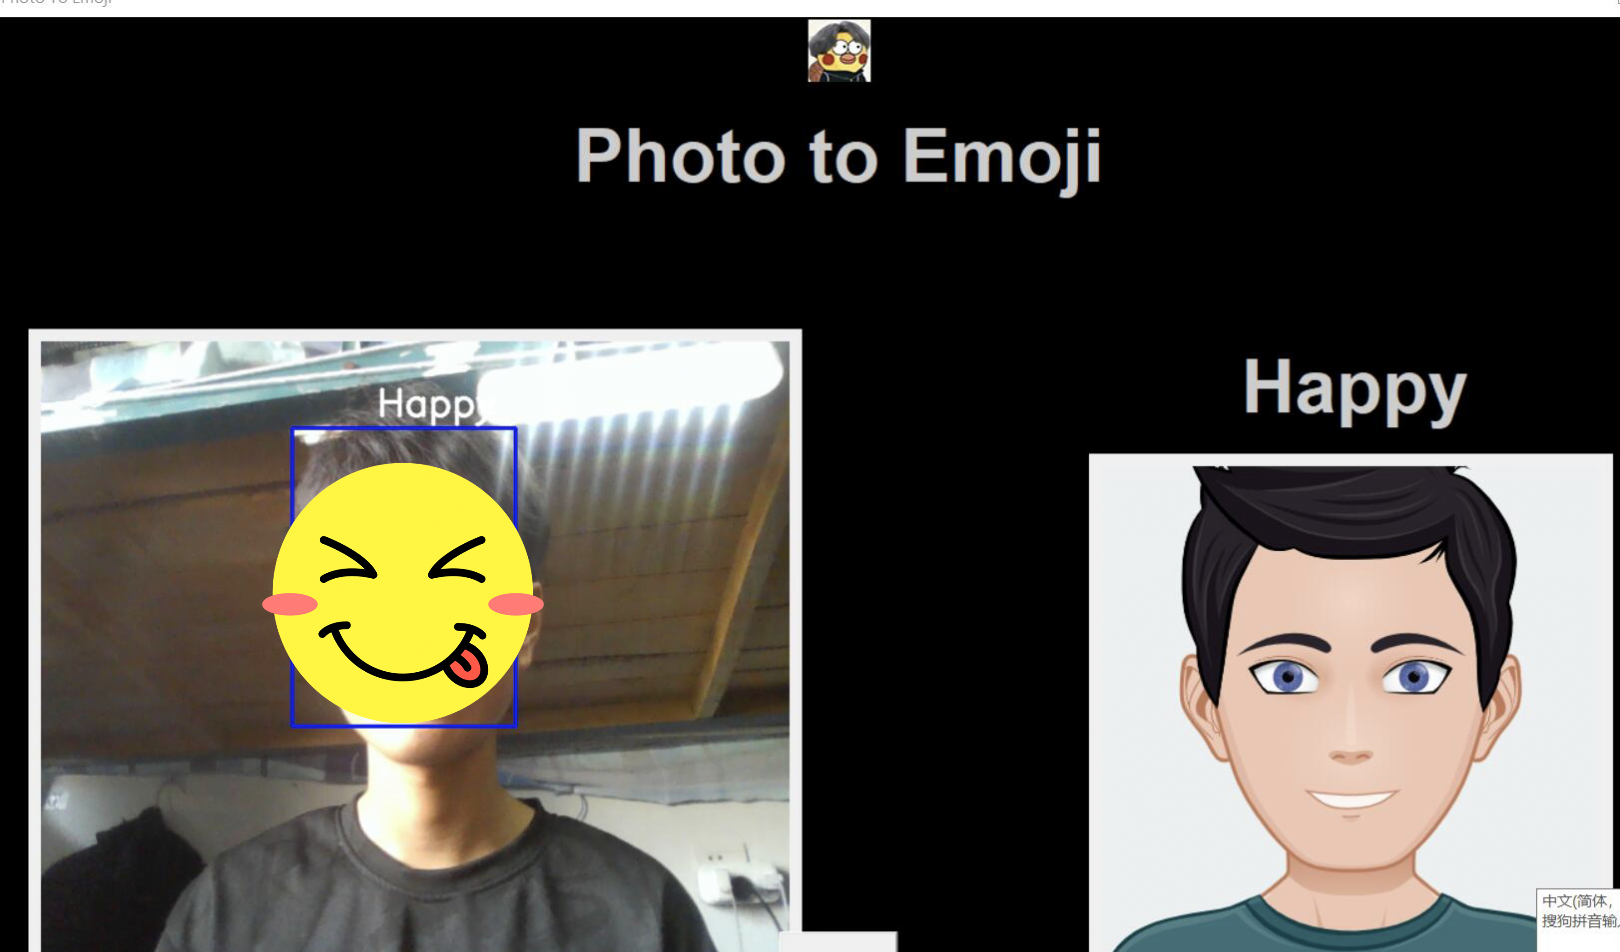
我们将构建一个深度学习模型,从图像中对面部表情进行分类。然后,我们将分类的情感映射到表情符号或头像。
部署项目
没有相应的模块自己pip安装吧

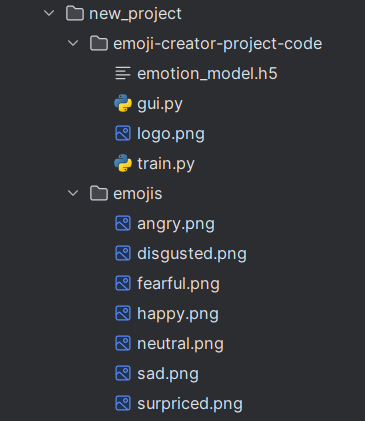
1、首先运行train.py训练模型
等待训练完成生成emotion_model.h5

2、接下运行gui.py测试

一、使用 CNN 进行面部情绪识别
在以下步骤中,将构建卷积神经网络架构,并在数据集上训练模型FER2013以便从图像中进行情感识别。从上面的链接下载数据集。将其提取到具有单独训练和测试目录的数据文件夹中。
1、import
import numpy as np
import cv2
from keras.models import Sequential
from keras.layers import Dense, Dropout, Flatten
from keras.layers import Conv2D
from keras.optimizers import Adam

from keras.layers import MaxPooling2D
from keras.preprocessing.image import ImageDataGenerator
2、初始化训练和验证生成器
train_dir = 'train'
val_dir = 'test'
train_datagen = ImageDataGenerator(rescale=1./255)
val_datagen = ImageDataGenerator(rescale=1./255)

train_generator = train_datagen.flow_from_directory(
        train_dir,
        target_size=(48,48),
        batch_size=64,
        color_mode="grayscale",
        class_mode='categorical')

validation_generator = val_datagen.flow_from_directory(
        val_dir,
        target_size=(48,48),
        batch_size=64,
        color_mode="grayscale",
        class_mode='categorical')
3、构建卷积网络架构
emotion_model = Sequential()

emotion_model.add(Conv2D(32, kernel_size=(3, 3), activation='relu', input_shape=(48,48,1)))
emotion_model.add(Conv2D(64, kernel_size=(3, 3), activation='relu'))
emotion_model.add(MaxPooling2D(pool_size=(2, 2)))
emotion_model.add(Dropout(0.25))

emotion_model.add(Conv2D(128, kernel_size=(3, 3), activation='relu'))
emotion_model.add(MaxPooling2D(pool_size=(2, 2)))
emotion_model.add(Conv2D(128, kernel_size=(3, 3), activation='relu'))
emotion_model.add(MaxPooling2D(pool_size=(2, 2)))
emotion_model.add(Dropout(0.25))

emotion_model.add(Flatten())
emotion_model.add(Dense(1024, activation='relu'))
emotion_model.add(Dropout(0.5))
emotion_model.add(Dense(7, activation='softmax'))
# emotion_model.load_weights('emotion_model.h5')
4、编译和训练模型
cv2.ocl.setUseOpenCL(False)

emotion_dict = {0: "Angry", 1: "Disgusted", 2: "Fearful", 3: "Happy", 4: "Neutral", 5: "Sad", 6: "Surprised"}


emotion_model.compile(loss='categorical_crossentropy',optimizer=Adam(learning_rate=0.0001),metrics=['accuracy'])
emotion_model_info = emotion_model.fit_generator(
        train_generator,
        steps_per_epoch=28709 // 64,
        epochs=50,
        validation_data=validation_generator,
        validation_steps=7178 // 64)
5、保存模型权重
emotion_model.save_weights('emotion_model.h5')
6、使用openCV haarcascade xml检测网络摄像头中面部的边界框并预测情绪
cap = cv2.VideoCapture(0)
while True:
    # 查找haar级联以在面部周围绘制边界框
    ret, frame = cap.read()
    if not ret:
        break
        # 此处为自己文件夹下的haarcascade_frontalface_default.xml需要自己修改
    bounding_box = cv2.CascadeClassifier('E:\pycharm_python\\venv\Lib\site-packages\cv2\data\haarcascade_frontalface_default.xml')
    gray_frame = cv2.cvtColor(frame, cv2.COLOR_BGR2gray_frame)
    num_faces = bounding_box.detectMultiScale(gray_frame,scaleFactor=1.3, minNeighbors=5)

    for (x, y, w, h) in num_faces:
        cv2.rectangle(frame, (x, y-50), (x+w, y+h+10), (255, 0, 0), 2)
        roi_gray_frame = gray_frame[y:y + h, x:x + w]
        cropped_img = np.expand_dims(np.expand_dims(cv2.resize(roi_gray_frame, (48, 48)), -1), 0)
        emotion_prediction = emotion_model.predict(cropped_img)
        maxindex = int(np.argmax(emotion_prediction))
        cv2.putText(frame, emotion_dict[maxindex], (x+20, y-60), cv2.FONT_HERSHEY_SIMPLEX, 1, (255, 255, 255), 2, cv2.LINE_AA)

    cv2.imshow('Video', cv2.resize(frame,(1200,860),interpolation = cv2.INTER_CUBIC))
    if cv2.waitKey(1) & 0xFF == ord('q'):
        break

cap.release()
cv2.destroyAllWindows()
二、GUI 代码和表情符号映射
创建一个名为 emojis 的文件夹,并将与数据集中七种情绪中的每一种对应的表情符号保存在一起
将以下代码粘贴到 gui.py 中并运行该文件
import tkinter as tk
from tkinter import *
import cv2
from PIL import Image, ImageTk
import numpy as np
from keras.models import Sequential
from keras.layers import Conv2D, MaxPooling2D
from keras.layers import Dense, Dropout, Flatten

cv2.ocl.setUseOpenCL(False)
emotion_dict = {0: "   Angry   ", 1: "Disgusted", 2: "  Fearful  ", 3: "   Happy   ", 4: "  Neutral  ",
                5: "    Sad    ", 6: "Surprised"}
#注意图片文件路径需要自己修改
emoji_dist = {0: "E:\\pycharm_python\\samil\\emojis\\angry.png", 1: "E:\\pycharm_python\\samil\\emojis\\disgusted.png",
              2: "E:\\pycharm_python\\samil\\emojis\\fearful.png", 3: "E:\\pycharm_python\\samil\\emojis\\happy.png",
              4: "E:\\pycharm_python\\samil\\emojis\\neutral.png", 5: "E:\\pycharm_python\\samil\\emojis\\sad.png",
              6: "E:\\pycharm_python\\samil\\emojis\\surpriced.png"}

emotion_model = Sequential()
emotion_model.add(Conv2D(32, kernel_size=(3, 3), activation='relu', input_shape=(48, 48, 1)))
emotion_model.add(Conv2D(64, kernel_size=(3, 3), activation='relu'))
emotion_model.add(MaxPooling2D(pool_size=(2, 2)))
emotion_model.add(Dropout(0.25))
emotion_model.add(Conv2D(128, kernel_size=(3, 3), activation='relu'))
emotion_model.add(MaxPooling2D(pool_size=(2, 2)))
emotion_model.add(Conv2D(128, kernel_size=(3, 3), activation='relu'))
emotion_model.add(MaxPooling2D(pool_size=(2, 2)))
emotion_model.add(Dropout(0.25))
emotion_model.add(Flatten())
emotion_model.add(Dense(1024, activation='relu'))
emotion_model.add(Dropout(0.5))
emotion_model.add(Dense(7, activation='softmax'))
emotion_model.load_weights('emotion_model.h5')

global last_frame1
last_frame1 = np.zeros((480, 640, 3), dtype=np.uint8)
global cap1
show_text = [0]

def show_vid_combined():
    cap1 = cv2.VideoCapture(0)
    if not cap1.isOpened():
        print("摄像头没打开")
        return
    else:
        print('摄像头已经打开')

    flag1, frame1 = cap1.read()
    frame1 = cv2.resize(frame1, (600, 500))

    bounding_box = cv2.CascadeClassifier(
        'E:\\pycharm_python\\venv\\Lib\\site-packages\\cv2\\data\\haarcascade_frontalface_default.xml')
    gray_frame = cv2.cvtColor(frame1, cv2.COLOR_BGR2GRAY)
    num_faces = bounding_box.detectMultiScale(gray_frame, scaleFactor=1.3, minNeighbors=5)

    for (x, y, w, h) in num_faces:
        cv2.rectangle(frame1, (x, y - 50), (x + w, y + h + 10), (255, 0, 0), 2)
        roi_gray_frame = gray_frame[y:y + h, x:x + w]
        cropped_img = np.expand_dims(np.expand_dims(cv2.resize(roi_gray_frame, (48, 48)), -1), 0)
        prediction = emotion_model.predict(cropped_img)

        maxindex = int(np.argmax(prediction))
        cv2.putText(frame1, emotion_dict[maxindex], (x + 20, y - 60), cv2.FONT_HERSHEY_SIMPLEX, 1, (255, 255, 255), 2,
                    cv2.LINE_AA)
        show_text[0] = maxindex

    if flag1 is not None:
        global last_frame1
        last_frame1 = frame1.copy()
        pic = cv2.cvtColor(last_frame1, cv2.COLOR_BGR2RGB)
        img = Image.fromarray(pic)
        imgtk = ImageTk.PhotoImage(image=img)
        lmain.imgtk = imgtk
        lmain.configure(image=imgtk)

    cap1.release()

    # 调度 show_vid_combined
    root.after(10, show_vid_combined)

def show_vid2():
    print("show_vid2 called")
    if show_text[0] in emoji_dist:
        frame2 = cv2.imread(emoji_dist[show_text[0]])
        if frame2 is not None:
            print("Frame loaded successfully")
            pic2 = cv2.cvtColor(frame2, cv2.COLOR_BGR2RGB)
            img2 = Image.fromarray(pic2)
            imgtk2 = ImageTk.PhotoImage(image=img2)
            lmain2.imgtk2 = imgtk2
            lmain3.configure(text=emotion_dict[show_text[0]], font=('arial', 45, 'bold'))
            lmain2.configure(image=imgtk2)
        else:
            print('无法加载图像')
    else:
        print('表情文件不存在')

    root.after(10, show_vid2)


if __name__ == '__main__':
    root = tk.Tk()
    img = ImageTk.PhotoImage(Image.open("logo.png"))
    heading = Label(root, image=img, bg='black')

    heading.pack()
    heading2 = Label(root, text="Photo to Emoji", pady=20, font=('arial', 45, 'bold'), bg='black', fg='#CDCDCD')

    heading2.pack()
    lmain = tk.Label(master=root, padx=50, bd=10)
    lmain2 = tk.Label(master=root, bd=10)

    lmain3 = tk.Label(master=root, bd=10, fg="#CDCDCD", bg='black')
    lmain.pack(side=LEFT)
    lmain.place(x=50, y=250)
    lmain3.pack()
    lmain3.place(x=960, y=250)
    lmain2.pack(side=RIGHT)
    lmain2.place(x=900, y=350)

    root.title("Photo To Emoji")
    root.geometry("1400x800+100+10")
    root['bg'] = 'black'
    exitbutton = Button(root, text='Quit', fg="red", command=root.destroy, font=('arial', 25, 'bold')).pack(side=BOTTOM)

    # 调度 show_vid_combined
    root.after(10, show_vid_combined)
    root.after(10, show_vid2)
    root.mainloop()
