J3打卡——DenseNet模型实现鸟类分类
- 🍨 本文为🔗365天深度学习训练营中的学习记录博客
- 🍖 原作者:K同学啊
1.检查GPU
import tensorflow as tf
gpus=tf.config.list_physical_devices("GPU")
if gpus:
    tf.config.experimental.set_memory_growth(gpus[0],True)
    tf.config.set_visible_devices([gpus[0]],"GPU")
2.查看数据
import matplotlib.pyplot as plt
plt.rcParams['font.sans-serif'] = ['SimHei']
plt.rcParams['axes.unicode_minus'] = False
import os,PIL,pathlib
import numpy as np
from tensorflow import keras
from tensorflow.keras import layers,models

data_dir="D:\\jupyter lab\\训练营\\data\\第8天\\bird_photos"
data_dir=pathlib.Path(data_dir)

image_count = len(list(data_dir.glob('*/*')))
print("图片总数为:",image_count)
3.划分数据集
train_ds = tf.keras.preprocessing.image_dataset_from_directory(
    data_dir,
    validation_split=0.2,
    subset="training",
    seed=123,
    image_size=(img_height, img_width),
    batch_size=batch_size)

val_ds = tf.keras.preprocessing.image_dataset_from_directory(
    data_dir,
    validation_split=0.2,
    subset="validation",
    seed=123,
    image_size=(img_height, img_width),
    batch_size=batch_size)

class_names = train_ds.class_names
print(class_names)

plt.figure(figsize=(10, 5))  # 图形的宽为10高为5
plt.suptitle("photo")
for images, labels in train_ds.take(1):
    for i in range(8):
        ax = plt.subplot(2, 4, i + 1)
        plt.imshow(images[i].numpy().astype("uint8"))
        plt.title(class_names[labels[i]])
        plt.axis("off")

plt.imshow(images[1].numpy().astype("uint8"))

for image_batch, labels_batch in train_ds:
    print(image_batch.shape)
    print(labels_batch.shape)
    break

AUTOTUNE = tf.data.AUTOTUNE

train_ds = train_ds.cache().shuffle(1000).prefetch(buffer_size=AUTOTUNE)
val_ds = val_ds.cache().prefetch(buffer_size=AUTOTUNE)


4.创建模型
import tensorflow as tf
from tensorflow.keras import layers, Model

class DenseLayer(layers.Layer):
    """Basic unit of DenseBlock (using bottleneck layer)"""
    def __init__(self, num_input_features, growth_rate, bn_size, drop_rate):
        super(DenseLayer, self).__init__()
        self.bn1 = layers.BatchNormalization()
        self.relu1 = layers.ReLU()
        self.conv1 = layers.Conv2D(bn_size * growth_rate, kernel_size=1, strides=1, use_bias=False)
        self.bn2 = layers.BatchNormalization()
        self.relu2 = layers.ReLU()
        self.conv2 = layers.Conv2D(growth_rate, kernel_size=3, strides=1, padding='same', use_bias=False)
        self.drop_rate = drop_rate

    def call(self, x, training=False):
        new_features = self.bn1(x, training=training)
        new_features = self.relu1(new_features)
        new_features = self.conv1(new_features)
        new_features = self.bn2(new_features, training=training)
        new_features = self.relu2(new_features)
        new_features = self.conv2(new_features)
        if self.drop_rate > 0:
            new_features = tf.keras.layers.Dropout(self.drop_rate)(new_features, training=training)
        return tf.concat([x, new_features], axis=-1)

class DenseBlock(layers.Layer):
    """DenseBlock"""
    def __init__(self, num_layers, num_input_features, bn_size, growth_rate, drop_rate):
        super(DenseBlock, self).__init__()
        self.layers = []
        for i in range(num_layers):
            layer = DenseLayer(num_input_features + i * growth_rate, growth_rate, bn_size, drop_rate)
            self.layers.append(layer)

    def call(self, x, training=False):
        for layer in self.layers:
            x = layer(x, training=training)
        return x

class Transition(layers.Layer):
    """Transition layer between two adjacent DenseBlock"""
    def __init__(self, num_input_features, num_output_features):
        super(Transition, self).__init__()
        self.bn = layers.BatchNormalization()
        self.relu = layers.ReLU()
        self.conv = layers.Conv2D(num_output_features, kernel_size=1, strides=1, use_bias=False)
        self.pool = layers.AveragePooling2D(pool_size=2, strides=2)

    def call(self, x, training=False):
        x = self.bn(x, training=training)
        x = self.relu(x)
        x = self.conv(x)
        x = self.pool(x)
        return x

class DenseNet(Model):
    """DenseNet-BC model"""
    def __init__(self, growth_rate=32, block_config=(6, 12, 24, 16), num_init_features=64,
                 bn_size=4, compression_rate=0.5, drop_rate=0, num_classes=1000):
        super(DenseNet, self).__init__()
        self.features = tf.keras.Sequential([
            layers.Conv2D(num_init_features, kernel_size=7, strides=2, padding='same', use_bias=False),
            layers.BatchNormalization(),
            layers.ReLU(),
            layers.MaxPool2D(pool_size=3, strides=2, padding='same')
        ])

        num_features = num_init_features
        for i, num_layers in enumerate(block_config):
            block = DenseBlock(num_layers, num_features, bn_size, growth_rate, drop_rate)
            self.features.add(block)
            num_features += num_layers * growth_rate
            if i != len(block_config) - 1:
                transition = Transition(num_features, int(num_features * compression_rate))
                self.features.add(transition)
                num_features = int(num_features * compression_rate)

        self.features.add(layers.BatchNormalization())
        self.features.add(layers.ReLU())

        self.avgpool = layers.GlobalAveragePooling2D()
        self.classifier = layers.Dense(num_classes)

    def call(self, x, training=False):
        x = self.features(x, training=training)
        x = self.avgpool(x)
        x = self.classifier(x)
        return x

def densenet121(pretrained=False, **kwargs):
    """DenseNet121"""
    model = DenseNet(num_init_features=64, growth_rate=32, block_config=(6, 12, 24, 16), **kwargs)
    if pretrained:
        # Load pretrained weights if available
        # Note: TensorFlow does not have a direct equivalent to PyTorch's model_zoo.load_url
        # You would need to download and load the weights manually
        pass
    return model
model=densenet121()
5.编译及训练模型
model.compile(optimizer="adam",
loss='sparse_categorical_crossentropy',
metrics=['accuracy'])
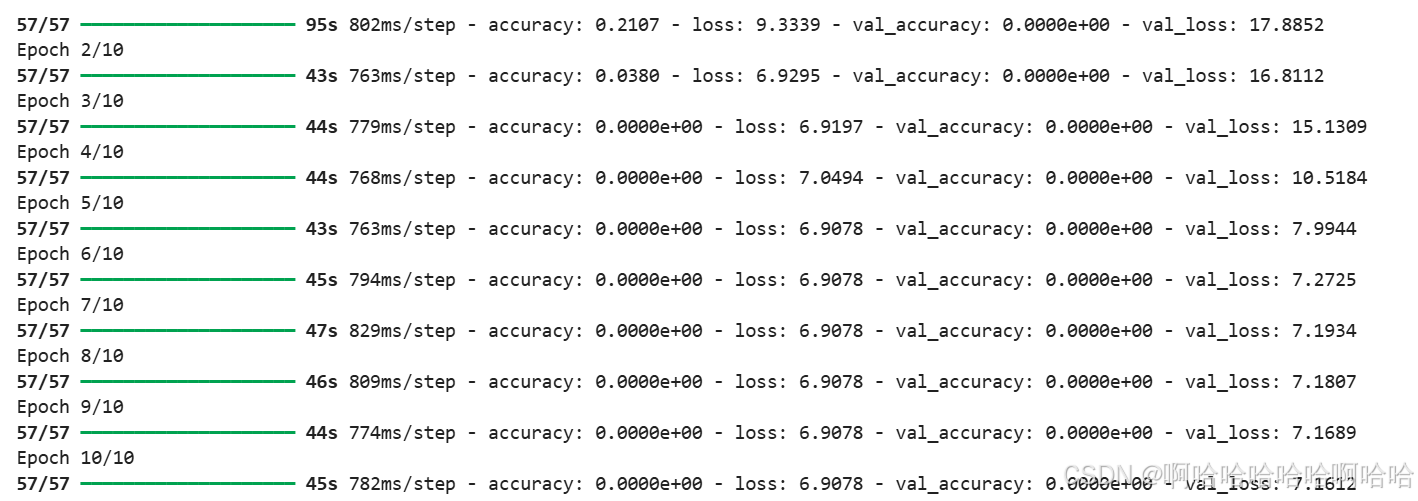
epochs = 10
history = model.fit(
train_ds,
validation_data=val_ds,
epochs=epochs
)
6.结果可视化
acc = history.history['accuracy']
val_acc = history.history['val_accuracy']

loss = history.history['loss']
val_loss = history.history['val_loss']

epochs_range = range(epochs)

plt.figure(figsize=(12, 4))
plt.subplot(1, 2, 1)
plt.suptitle("photo")

plt.plot(epochs_range, acc, label='Training Accuracy')
plt.plot(epochs_range, val_acc, label='Validation Accuracy')
plt.legend(loc='lower right')
plt.title('Training and Validation Accuracy')

plt.subplot(1, 2, 2)
plt.plot(epochs_range, loss, label='Training Loss')
plt.plot(epochs_range, val_loss, label='Validation Loss')
plt.legend(loc='upper right')
plt.title('Training and Validation Loss')
plt.show()
总结:
这些代码展示了如何使用TensorFlow和Keras构建、训练并评估一个基于DenseNet架构的图像分类模型。
3. 划分数据集
4. 创建模型
5. 编译及训练模型
6. 结果可视化
-
1. 检查GPU
-
使用TensorFlow检查是否有可用的GPU,并设置GPU的内存增长模式,以确保在训练过程中不会占用过多的显存。
-
2. 查看数据
-
使用
matplotlib进行数据可视化,设置中文字体支持。 -
加载图像数据集,统计数据集中的图片总数。
-
使用
pathlib库处理文件路径,方便后续操作。 -
使用
tf.keras.preprocessing.image_dataset_from_directory将数据集划分为训练集和验证集,划分比例为80%训练集和20%验证集。 -
设置图像大小和批次大小,并获取类别名称。
-
可视化部分训练集中的图片,确保数据加载正确。
-
使用
tf.data.AUTOTUNE优化数据加载和预处理过程,提升训练效率。 -
构建了一个DenseNet模型,具体为DenseNet121。
-
定义了
DenseLayer、DenseBlock和Transition等模块,用于构建DenseNet的核心结构。 -
DenseNet类实现了DenseNet的整体架构,包括初始卷积层、多个DenseBlock和Transition层,最后通过全局平均池化和全连接层输出分类结果。 -
densenet121函数用于创建DenseNet121模型,支持加载预训练权重(虽然代码中没有实现预训练权重的加载)。 -
使用
Adam优化器,损失函数为sparse_categorical_crossentropy,评估指标为accuracy。 -
训练模型10个epoch,并在训练过程中使用验证集进行验证。
-
绘制训练和验证的准确率曲线,展示模型在训练集和验证集上的表现。
-
绘制训练和验证的损失曲线,展示模型在训练过程中的损失变化。
-
通过可视化结果,可以直观地评估模型的训练效果,判断是否存在过拟合或欠拟合现象。